
Ankway solar camera APP
In-App Setup
App Installation
- Scan the following QR codes or search for “UBox” from the App Store(for iOS devices) or Google Play Store (for Android smart phones) to download and install the app.


App Registration
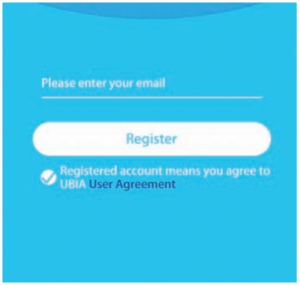
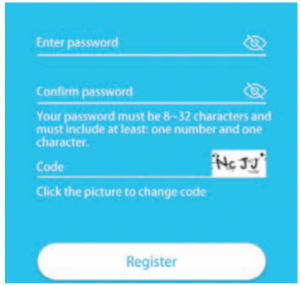
- Open the app then input your E-mail address then press “Register”. Check and select to agree the agreement then your E-mail box will get an verification mail. ( For better user’s experience, please allow to open all permissions to avoid missing any notifications from the app.)Set the login password and confirm the login password. Then press “Register” to next step. (For your password safety, the password requires more than 8 characters plus combination of letters).
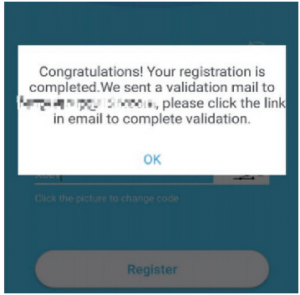
- We will send a verification email to you, please go to your email box and click the link to complete the verification. (Please check your email spam box if you cannot find the verification code email).
- We will send a verification email to you, please go to your email box and click the link to complete the verification. (Please check your email spam box if you cannot find the verification code email).
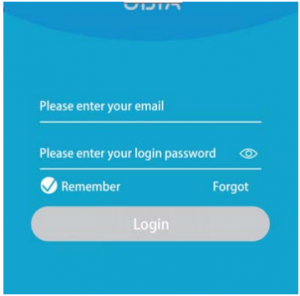
- Enter your E-mail address, and password, click login. (APP will auto fill the account information).
Set up the installed location
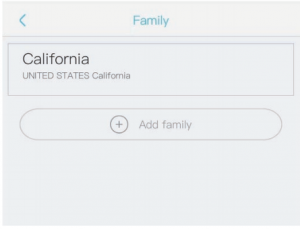
Click “Add family” and then input your desired family name, click “next step” and then input required information, and then click “finished” to save it. please pay attention to choose your right “Country/Region” so that you can connect the camera smoothly later and get proper notifications from your correct region server.
Pairing the camera using the UBox App
- Press “Add a device” to add a smart device
- Connect the device to power, and make sure your mobile phone is connected to an available Wi-Fi. Then press “Setup WiFi device”.
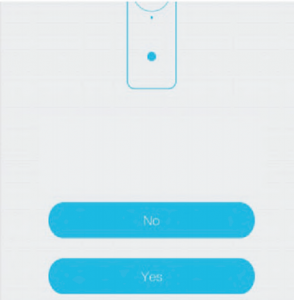
- After the power on the device, you will hear the voice prompt “The camera is now ready to begin pairing” and wait for the device’s blue LED to blinking which indicate your device is now in pairing mode.
- If the device blue LEDs are not blinking, please press the RESET button until the blue indicator to light up and then release. The device will reboot and enter the pairing state.
- Set the device name and select the device location before setup. (you have to choose one or you cannot connect the camera to the app).
- The app will input the Wi-Fi name automatically, and please input the correct Wi-Fi Password. Then you can choose between either the “QR code configuration’ or ‘Sound wave configuration”. (PS: An Incorrect wifi password will mean the camera cannot connect to your phone through the Server. Click the eye icon to double confirm the password you entered is correct. The device will be added to the device list automatically. Setup success! The device is ready to use.


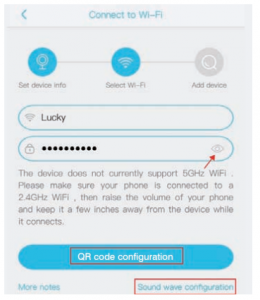
- QR code configuration: Click the “QR code configuration”, hold the QR code screenshot on the mobile phone in front of the camera lens, and then you will hear the message “Pairing Information Received”. (Note: The QR codes on the user manual or box is only for downloading the Ubox app.)
- Sound wave configuration: In the “search device” page, adjust your phone’s speaker volume to Maximum to optimal output, and once paired successfully you will hear the message: “Pairing Information Received”.


If you’re unable to pair the camera, please check the following suggestions below:
- Make sure your phone is connected to 2.4GHz Wi-Fi. When your 2.4g Wi Fi connected correctly to your phone, your Wi-Fi name will be recognized by the camera and pop-up on the Wi-Fi selection page automatically.
- Allow your phone to forget your current 5G Wi-Fi connection from your phone’s Wi-Fi menu to disable auto-connection.
- Adjust your phone to moderate brightness (not too light or too dark) so that the camera can read the QR code clearly without reflections.
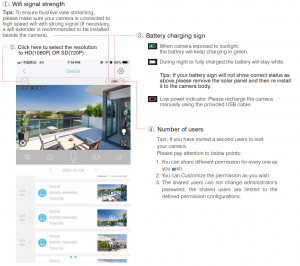
- Put your phone, camera and router within 1.5ft to get a strong Wi-Fi signal strength.
- If you choose to use the sound wave (audio pairing) method, please make sure your phone volume is adjusted to maximum output and your router ID + password is no more than 32 digits.
- Switch on your router’s DHCP option and set your router to dynamic IP addressing to avoid conflict with your other wireless devices for one static IP address.
- Reboot your router to reallocate your IP address and refresh your network.
- Please press and hold on the reset button for 4-5 seconds to reset the device. Once you hear “system reset” you can release the button and see the blue lights is coming on.

Detailed App Instructions
“Device” Page
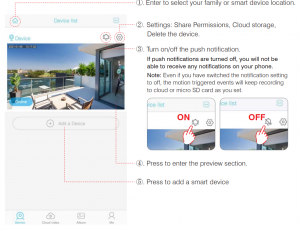
Settings
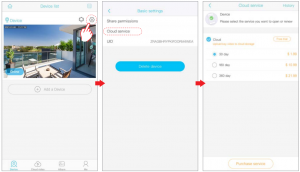
- Share Permissions:Once the camera is functioning properly, you can choose to share your camera with your friends or family members. To start sharing, select “share permissions” and input the account you want to share with. Choose a permissions from Administrator, family member, Visitor, Customize.You can Customize the permissions and turn on or off every permission as you wish by clicking the blue icon “permissions”.Note: Please let the invited user to register a UBOX account using their email first and then start to share according to the instructions above.
- Cloud storageThe motion detection video clips will be saved in the Cloud. The default video length is 10-30 seconds and will be stored free for 30 days from date of account activation. After 30 days trial period, your account will require subscription for continued cloud services.
- Delete the deviceFor your privacy, please do not forget to disconnect the security camera from your mobile App when you plan to return the camera.Click the Device, you could live viewing videos

 Click the Device, you could live viewing videos

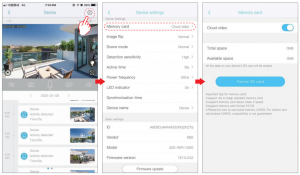
Click the Device Settings
- SD Card SettingPlease turn on the cloud storage so that you can sync the camera time with your phone.
- Image flipYou can choose Normal Rotate, Mirror or Mirror and rotate depends on.
- Scene modeYou can choose to set it as Normal, back light compensation, night IR, High light compensation or Dynamic according to your actual light environment of installation place.
- PIR Detection SensitivityYou can set the PIR sensitivity as Disabled, Low, Medium and High.● Disabled: disabled PIR detection.● Low: delay 7 seconds once PIR detects movement.● Medium: delay 5 seconds once PIR detects movement.● High: delay 1 second once PIR detects movement.Notes about PIR detection:1). When you set the PIR as Disabled, you will not record and receive any motion triggered events.2). To capture as much footage as possible once motion is detected, we recommend setting the PIR detection sensitivity to high.3). Try to capture more the beginning of the triggered event, please adjust your camera angle a bit closer to your aimed spot4). We recommend to set sensitivity at “Low” to reduce false alerts and save the battery power in noisy environments.
- Active time1). Select the clip duration recorded to micro SD card storage or cloud storage once motion is detected.2). Always: If this option is selected, the camera will not enter standby mode and will keep recording continuously until battery or storage space runs out ( 60 seconds per file)
Active Time
Cloud Video Length SD card video length
15s
10s 15s
30s
20s 30s
60s
30s 60s
P.S.: When you set the active time, the spotlight will turn up with the same time length when motion was triggered at night.
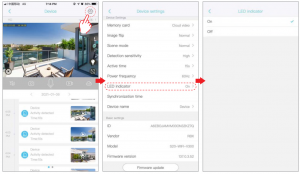
- LED indicatorWhen you choose Enable, the Blue LED will light up to indicate when you operate the camera as it should be. When you choose Disabled, the Blue LED will not light up to indicate the operations or trigger motions. It is recommended to set it as the default.
- Power frequencyPlease choose 60Hz or 5OHz according to your local frequency. It’s defaulted to 60Hz for united states users.
- Device NameYou can set a desired name for your camera.

 You can set the PIR sensitivity as Disabled, Low, Medium and High.● Disabled: disabled PIR detection.● Low: delay 7 seconds once PIR detects movement.● Medium: delay 5 seconds once PIR detects movement.● High: delay 1 second once PIR detects movement.
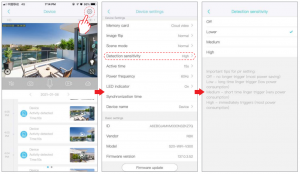 Notes about PIR detection:1). When you set the PIR as Disabled, you will not record and receive any motion triggered events.2). To capture as much footage as possible once motion is detected, we recommend setting the PIR detection sensitivity to high.3). Try to capture more the beginning of the triggered event, please adjust your camera angle a bit closer to your aimed spot4). We recommend to set sensitivity at “Low” to reduce false alerts and save the battery power in noisy environments.
“Cloud video” Page
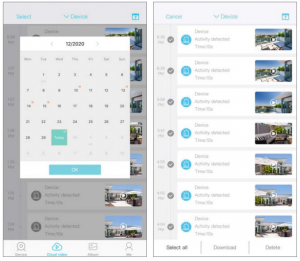 Click the “Calendar” icon on the right top corner , then choose the date to playback the videos from cloud storage Click the “Select” icon on the left top corner , then you can choose “Select all / Download / Delete” to the videos from cloud storage.
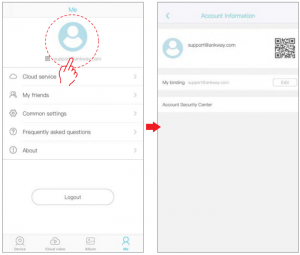
“Me”

- Check “my account” name and change password;
- Check and subscribe to Cloud storage; Each Device will be connected with one cloud Service and has one-month for free trial.(But not in account base).
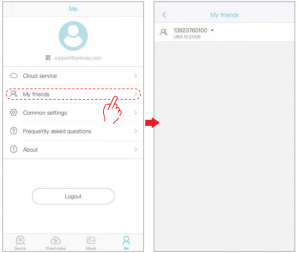
- Check and see my friends list and permission
- Common settings:1). Mute when viewing device: Switch to mute sound when live view camera as default.2). Mute when playback: Switch to mute sound when playback recorded videos as default.3). Default resolution: Click to change from SD to HD resolution as default.4). Alarm Vibrate: Switch to enable vibrate or not when notification comes in.5). Alarm Ring: Switch to enable Ring or not when notifications comes in.6). Talk voice change: Enable to change your voice to the camera end to scare off any intruders in case.Note: You can turn on or off the notification alarm vibrate, alarm ring and talk voice change for any Android devices, these functions are not compatible with iOS platform owing to the iOS system restriction.
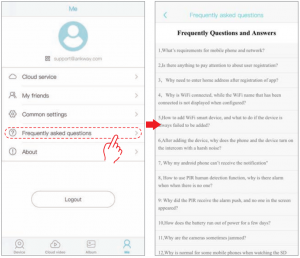
- Frequently asked questions: Check the App version


References
[xyz-ips snippet=”download-snippet”]