ANTHEM LCOS ProjectorInstructions Manual
LTX 500
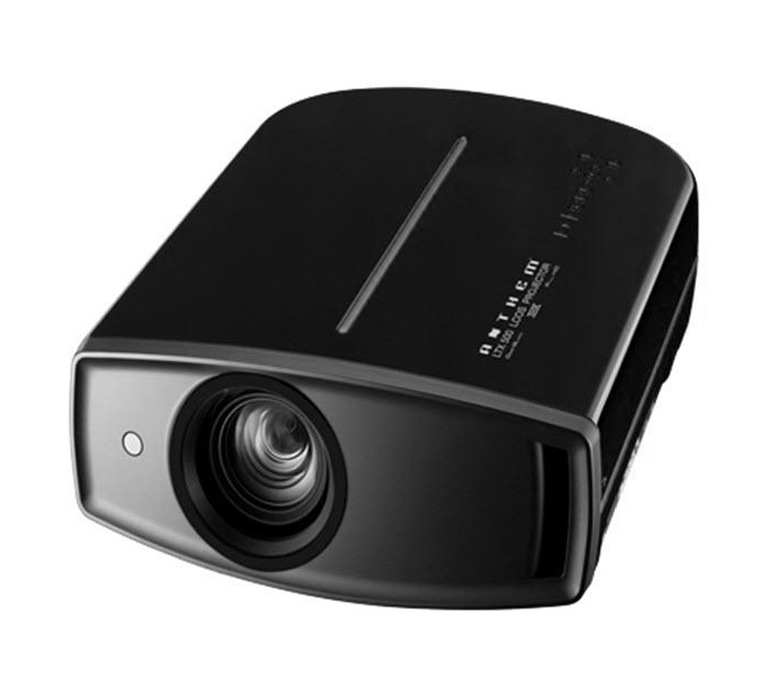
For Customer use :
Enter below the serial No. which is located on the side of the cabinet. Retain this information for future reference.
Model No. DLA-HD750
Serial No.______________
Contact: tel. (+1) 905-362-0958 M-F 9:00 am – 5:30 pm (ET)www.anthemAV.com
Safety Precautions
IMPORTANT INFORMATION
This product has a High Intensity Discharge (HID) lamp that contains mercury. Disposal of these materials may be regulated in your community due to environmental considerations. For disposal or recycling information, please contact your local authorities or for USA, the Electronic Industries Alliance: http://www.eiae.org.
WARNING: TO PREVENT FIRE OR SHOCK HAZARDS, DO NOT EXPOSE THIS APPLIANCE TO RAIN OR MOISTURE.
WARNING: THIS APPARATUS MUST BE EARTHED.
CAUTION: To reduce the risk of electric shock, do not remove cover. Refer servicing to qualified service personnel.
This projector is equipped with a 3-blade grounding type plug to satisfy FCC rule. If you are unable to insert the plug into the outlet, contact your electrician.
FCC INFORMATION (U.S.A. only)
CAUTION: Changes or modification not approved by Anthem Electronics could void the user’s authority to operate the equipment.
NOTE: This equipment has been tested and found to comply with the limits for Class B digital devices, pursuant to Part 15 of the FCC Rules.
These limits are designed to provide reasonable protection against harmful interference in a residential installation.
This equipment generates, uses and can radiate radio frequency energy and, if not installed and used in accordance with the instructions, may cause harmful interference to radio communications.
However, there is no guarantee that interference will not occur in a particular installation. If this equipment does cause harmful interference to radio or television reception, which can be determined by turning the equipment off and on, the user is encourage to try to correct the interference by one or more of the following measures:
- Reorient or relocate the receiving antenna.
- Increase the separation between the equipment and receiver.
- Connect the equipment into an outlet on a circuit different from that to which the receiver is connected.
- Consult the dealer or an experienced radio/TV technician for help.
MACHINE NOISE INFORMATION (Germany only)
Changes Machine Noise Information Ordinance 3. GSGV, January 18, 1991: The sound pressure level at the operator position is equal or less than 19 dB (A) according to ISO 7779.
About the installation place
Do not Install the projector In a place that cannot support Its weight securely. If the installation place is not sturdy enough, the projector could fall or overturn, possibly causing personal injury.
IMPORTANT SAFEGUARDS
Electrical energy can perform many useful functions. This unit has been engineered and manufactured to assure your personal safety. But IMPROPER USE CAN RESULT IN POTENTIAL ELECTRICAL SHOCK OR FIRE HAZARD. In order not to defeat the safeguards incorporated Into this product, observe the following basic rules for Its Installation. use and service Please read these Important Safeguards carefully before use.
- All the safely and operating instructions should be read before the product is operated.
- The safety and operating instructions should be retained for future reference.
- All warnings on the product and in the operating instructions should be adhered to.
- All operating instructions should be followed.
- Place the projector near a wall outlet where the plug can be easily unplugged. Unplug this product from the wall outlet before cleaning.
- Do not use liquid cleaners or aerosol cleaners. Use a damp cloth for cleaning.
- Do not use attachments not recommended by the product manufacturer as they may be hazardous.
- Do not use this product near water.
- Do not use immediately after moving from a low temperature to high temperature, as this causes condensation, which may result in fire, electric shock, or other hazards.
- Do not place this product on an unstable cart, stand, or table.
- The product may fall, causing serious injury to a child or adult, and serious damage to the product.
- The product should be mounted according to the manufacturer’s instructions, and should use a mount recommended by the manufacturer.
- When the product is used on a cart, care t” PE should be taken to avoid quick stops, excessive force, and uneven surfaces which may cause the product and cart to overturn, damaging equipment or causing possible injury to the operator.
- Slots and openings in the cabinet are provided for ventilation. These ensure reliable operation of the product and protect it from overheating. These openings must not be blocked or covered. (The openings should never be blocked by placing the product on bed, sofa, rug, or similar surface. It should not be placed in a built4n Installation such as a bookcase or rack unless proper ventilation is provided and the manufacturer’s Instructions have been adhered to.)
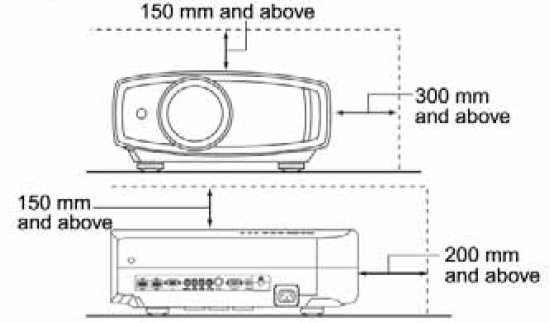
- To allow better heat dissipation, keep a clearance between this unit and its surrounding as shown below. When this unit is enclosed In a space of dimensions as shown below. use an air-conditioner so that the internal and external temperatures are the same. 150 mm and above
- Power source indicated on the label. If you are not sure of the type of power supply to your home. consult your product dealer or local power company.
- This product Is equipped with a three-wire plug. This plug will fit only into a grounded power outlet. If you are unable to insert the plug into the outlet, contact your electrician to install the proper outlet. Do not defeat the safety purpose of the grounded plug.
- Power-supply cords should be routed so that they are not likely to be walked on or pinched by items placed upon or against them. Pay particular attention to cords at doors, plugs, receptacles. and the point where they exit from the product.
- For added protection of this product during a lightning storm, or when it is left unattended and unused for long periods of time, unplug it from the wall outlet and disconnect the cable system. This will prevent damage to the product due to lightning and power line surges.
- Do not overload wall outlets, extension cords, or convenience receptacles on other equipment as this can result In a risk of fire or electric shock.
- Never push objects of any kind into this product through openings as they may touch dangerous voltage points or short out parts that could result in a fire or electric shock. Never spill liquid of any kind on the product.
- Do not attempt to service this product yourself as opening or removing covers may expose you to dangerous voltages and other hazards. Refer all service to qualified service personnel.
- Unplug this product from the wall outlet and refer service to qualified service personnel under the following conditions:
a) When the power supply cord or plug is damaged.
b) If liquid has been spilled, or objects have fallen on the product.
c) If the product has been exposed to rain or water.
d) If the product does not operate normally by following the operating instructions. Adjust only those controls that are covered by the Operation Manual, as an improper adjustment of controls may result In damage and will often require extensive work by a qualified technician to restore the product to normal operation.
e) If the product has been dropped or damaged In any way.
f) When the product exhibits a distinct change in performance -this Indicates a need for service
- When replacement parts are required, be sure the service technician has used replacement parts specified by the manufacturer or with same characteristics as the original part. Unauthorized substitutions may result in fire, electric shock, or other hazards.
- Upon completion of any service or repairs to this product, ask the service technician to perform safety checks to determine that the product is in proper operating condition.
- The product should be placed more than one foot away from heat sources such as radiators, heat registers, stoves, and other products (including amplifiers) that produce heat.
- When connecting other products such as VCR’s, and DVD players, you should turn off the power of this product for protection against electric shock.
- Do not place combustibles behind the cooling fan. For example, cloth, paper, matches, aerosol cans or gas lighters that present special hazards when over heated.
- Do not look into the projection lens while the Illumination lamp is turned on. Exposure of your eyes to the strong light can result in impaired eyesight,
- Do not look into the inside of this unit through vents (ventilation holes), etc.
- Do not look at the illumination lamp directly by opening the cabinet while the illumination lamp is turned on. The illumination lamp also contains ultraviolet rays and the light is so powerful that your eyesight can be impaired.
- Do not drop, hit, or damage the light-source lamp (lamp unit) in any way. It may cause the light-source lamp to break and lead to injuries.
- Do not use a damaged light source lamp. If the light-source lamp is broken, ask your dealer to repair it. Fragments from a broken light-source lamp may cause injuries.
- The light-source lamp used in this projector is a high pressure mercury lamp. Be careful when disposing of the light-source lamp. If anything is unclear, please consult your dealer.
- Do not ceiling-mount the projector to a place which tends to vibrate; otherwise, the attaching fixture of the projector could be broken by the vibration, possibly causing it to fall or overturn, which could lead to personal injury.
- Use only the accessory cord designed for this product to prevent shock.
*DO NOT allow any unqualified person to install the unit.
Be sure to ask your dealer to install the unit (e.g. attaching it to the ceiling) since special technical knowledge and skills are required for installation. If installation is performed by an unqualified person, it may cause personal injury or electrical shock.
POWER CONNECTION
The power supply voltage rating of this product Is AC110V — AC240V. Use only the power cord designated by our dealer to ensure Safety and EMC.
Ensure that the power cable used for the projector is the correct type for the AC outlet in your country. Consult your product dealer.
WARNING:
Do not cut off the main plug from this equipment.
If the plug fitted is not suitable for the power points in your home or the cable is too shod to reach a power point, then obtain an appropriate safety approved extension lead or adapter or consult your dealer. If nonetheless the mains plug is cut off, dispose of the plug immediately, to avoid a possible shock hazard by inadvertent connection to the main supply. If a new main plug has to be fitted, then follow the instruction given below.
WARNING: THIS APPARATUS MUST BE EARTHED.
IMPORTANT (Europe only):
The wires in the mains lead on this product are colored in accordance with the following cord:
Green-and-yellow : EarthBlue : NeutralBrown : Live
As these colors may not correspond with the colored making identifying the terminals in your plug, proceed as follows:
The wire which is colored green-and-yellow must be connected to the terminal which is marked M with the letter E or the safety earth or colored green or green-and-yellow.
The wire which Is colored blue must be connected to the terminal which is marked with the letter N or colored black
The wire which is colored brown must be connected to the terminal which is marked with the letter L or colored red.
Dear Customer,This apparatus is in conformance with the valid European directives and standards regarding electromagnetic compatibility and electrical safety.
North American representative:Anthem Electronics Inc.205 Annagem Blvd. Mississauga, ON L5T 2V1Canada
Information for Users on Disposal of Old Equipment and Batteries
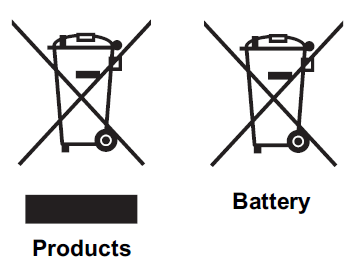
[European Union only]
These symbols indicate that equipment with these symbols should not be disposed ofas general household waste. If you want to dispose of the product or battery, pleaseconsider the collection systems or facilities for appropriate recycling.
Notice: The sign Pb below the symbol for batteries indicates that this battery contains lead.
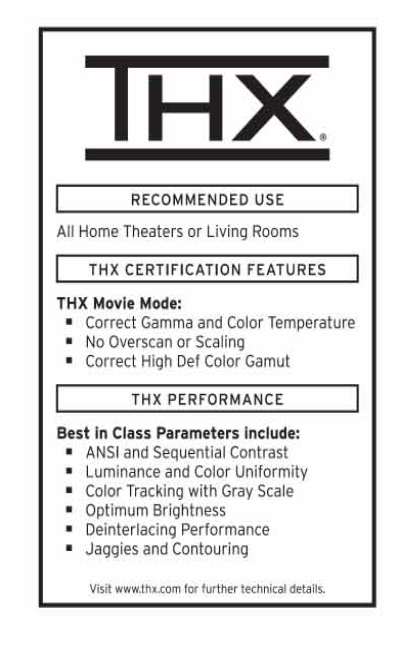
THX Certification
THX Certification THX Ltd. was founded by filmmaker George Lucas to improve the cinema and home entertainment experience through strict engineering standards and breakthrough technologies. THX has leveraged more than 25 years of filmmaking, cinema design and post-production expertise to partner with Anthem Electronics to engineer a best-in-class home theater projector.
With a strict focus on image quality and signal processing performance, THX certification promises that this Anthem Electronics projector is capable of presenting a wide range of video content at maximum resolutions with the correct color and luminance levels. In addition, THX has created a battery of signal processing tests that challenge the projector’s scaling, motion conversion and de-interlacing capabilities. This type of in-depth analysis predicts how the projector will present a variety of high definition and standard definition content.
The Anthem Electronics projector also features THX Movie Mode, a pre-calibrated video setting for watching movies on DVD, Blu-ray HD or broadcast television. This playback feature is designed to recreate the cinema experience at home by setting the display’s gamma, luminance, color temperature and other settings to mirror those used by filmmakers in post-production. THX Movie Mode also ensures projector brightness is optimal for large screen viewing.
Main Features
Supports Multiple Digital Devices
- Comes with 2 independent HDMI terminals that allows digital transmission of high definition signals. ( P18)
Beautiful Images on the Big Screen
- Enjoy smooth and high resolution video images with no visible grid, brought about by full high definition resolution of 1920 x 1080 pixels. ( P26)
Perfect for Any Location
- Comes with an 80% vertical and 34% horizontal lens shift function. ( P23)
How to Read this Manual/ Accessories/Optional Accessories
Check the Accessories

Instruction manual, warranty card and other printed material are also included.
Optional Accessories
Please check with your authorized dealer for details.
- Replacement Lamp: BHL5010-S (Lamp Unit)
- Replacement Filter (black in appearance): PB006560999 (Inner Filter)
Controls and features
Front Side/Left Side
Cautions:
- Do not place your fingers in the gap at the lens during lens shift adjustment. This may cause injuries if your fingers are caught in between the gap. ( P23)
- Do not let your fingers or other objects get caught in between the lens cover while closing the cover. This can cause injuries or malfunction.
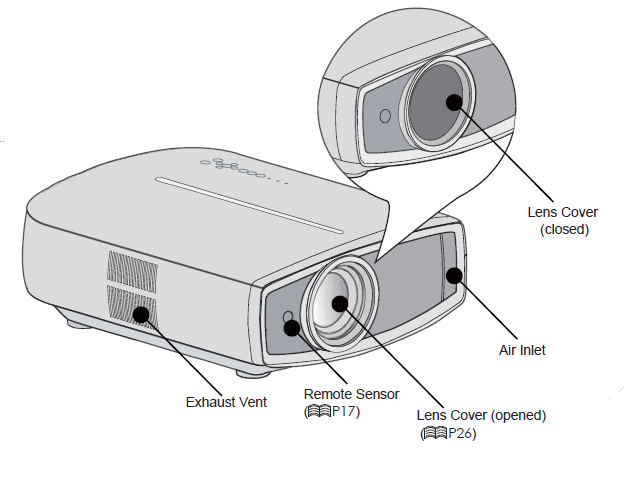
Rear Side/Top Side/Right Side

 Bottom Surface

Caution: Do not close lens cover when projecting. Otherwise it will cause malfunction heat and fire.
Remote Control
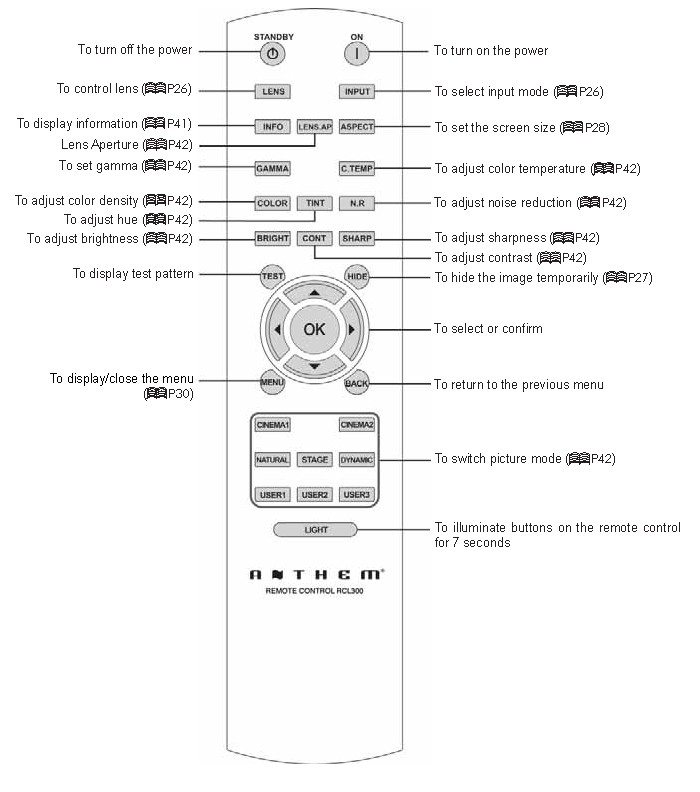
How to Use the Remote control
Loading Batteries

- If the remote control has to be brought closer to the projector to operate, it means that the batteries are wearing out.When this happens, replace the batteries. Insert the batteries according to the marks.
- Be sure to insert the end first.
- If an error occurs when using the remote control, remove the batteries and wait for 5 minutes. Load the batteries again and operate the remote control.
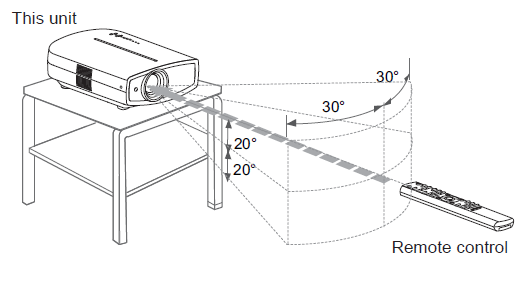
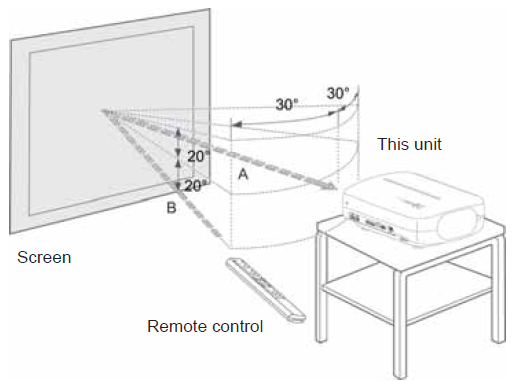
Effective Range of Remote Control Unit
When directing the remote control toward this unit
- When aiming the remote control towards the remote sensor on this unit, ensure that the distance to the sensor in front or at the rear of this unit is within 7 m.
- If the remote control fails to work properly, move closer to this unit.
When refl ecting off a screen
- Ensure that the total of distance A between this unit and screen and distance B between remote control and screen is within 7 m.
- As the efficiency of signals reflected from the remote control unit differ with the type of screen used, operable distance may decrease.
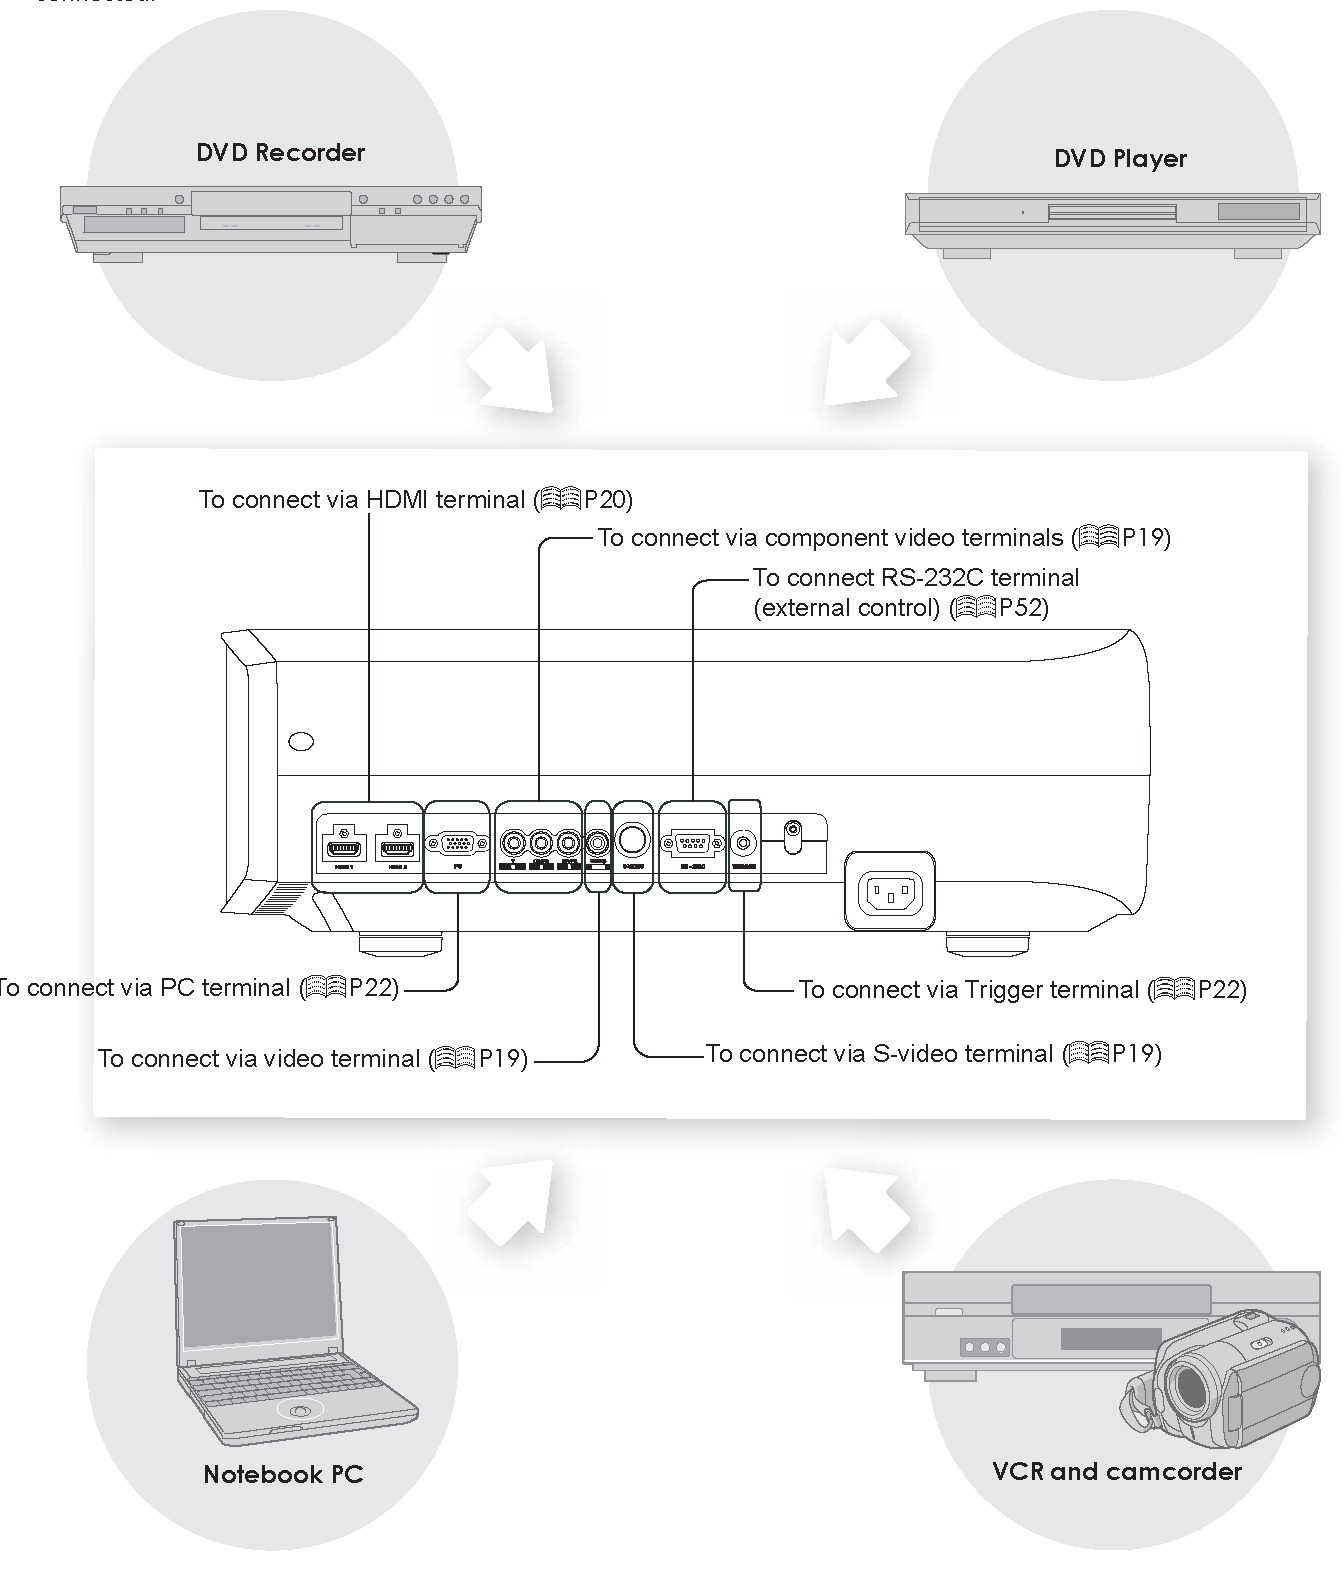
Selecting Connecting Devices
- Do not turn on the power until connection is complete.
- The connection procedures differ according to the device used. For details, refer to the instruction manual of the device to be connected.
- For audio output, connect the device to an amplifier.
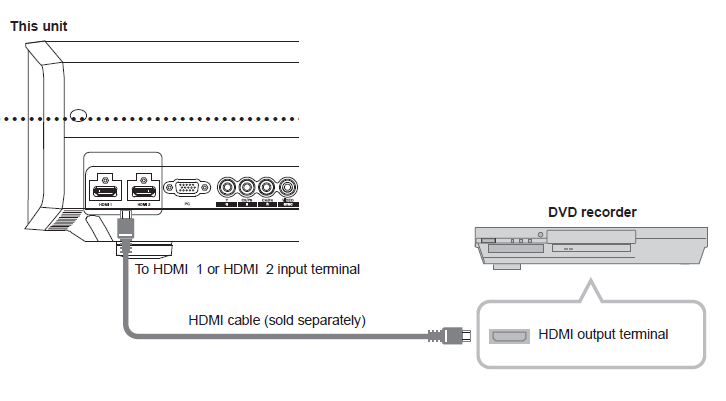
- The images may not be displayed depending on the devices and cables to be connected.Use an HDMI compliant cable (sold separately) with the HDMI logo.
- It may not be possible to connect to this unit depending on the dimension of the connector cover of the cables to be connected.
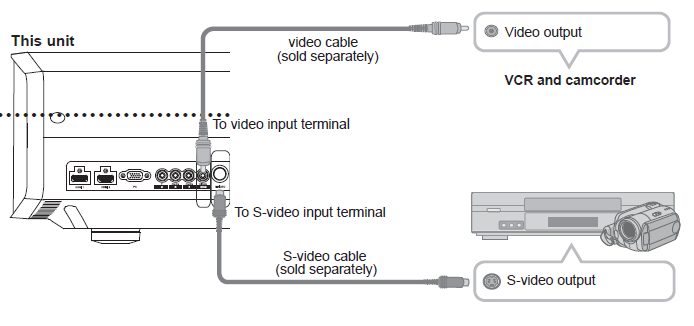
Connecting via Video Cable and S-Video Cable
Connecting via Component Video Cable

Connecting via HDMI Cable
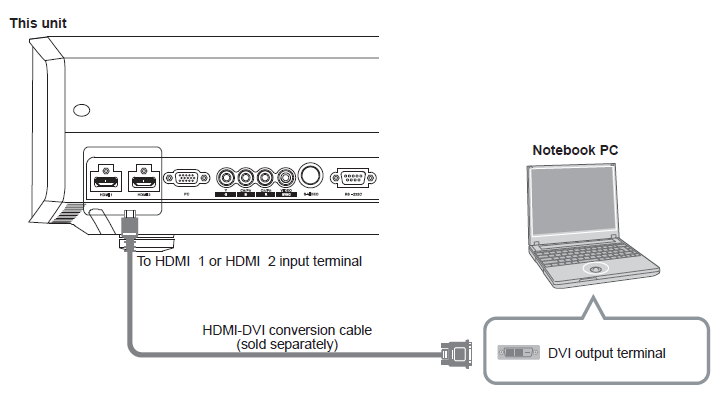
Connecting via HDMI-DVI Conversion Cable
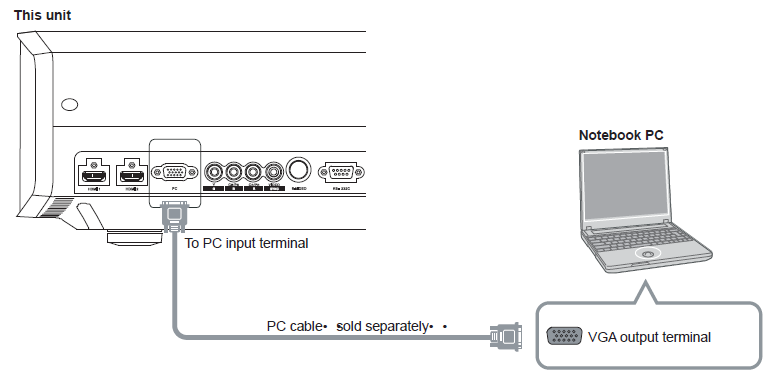
If noise is produced, take PCs (including notepads) away from this unit.
Connecting via SCART-RCA Cable

- Set .COMP. in the setting menu to SCART
- For information on compatible input signals, see Specifications.
Connecting via PC Cable
Connecting via Trigger Cable
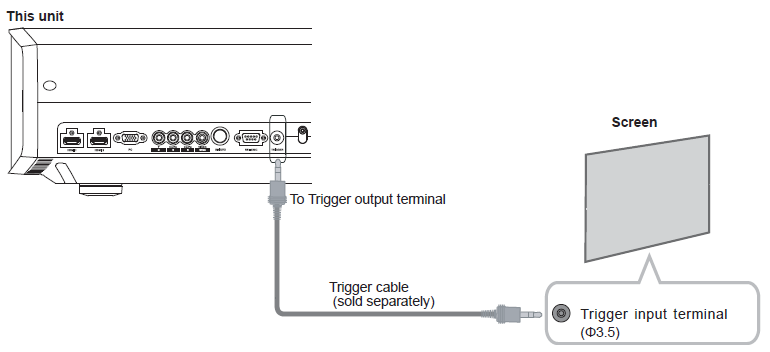
Caution:
- Do not supply the power to the other devices.
- Do not connect audio terminals of the other devices such as headphones etc. Otherwise, this may cause a malfunction of the other devices or injury.
- Using beyond the rated value will cause malfunction.
- Exercise adequate caution to prevent short circuit as the trigger terminal outputs a voltage of 12V.
Installing the Projector and Screen
While installing, please place this unit and the screen perpendicular to each other. Failing to do so may increase trapezoidal distortion. Please refer to Keystone.
Set Angle

Shift Adjustment
- Installing the projector and screenLeft/Right position0% up/down position (center)
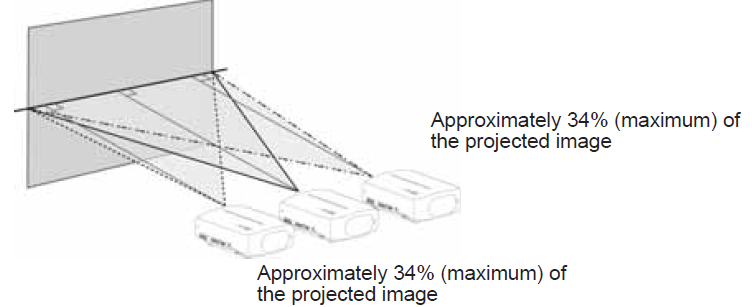
Up/Down position0% left/right position (center)
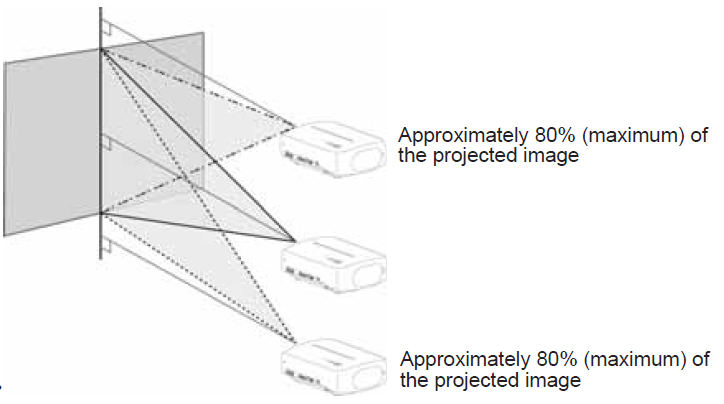
Shifting range of projected image
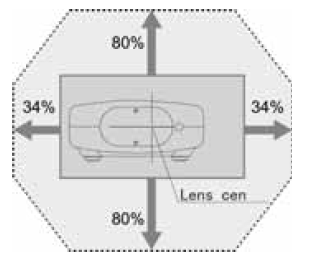
2. Adjust such that the projected image is in the center of the screen

It may be necessary to set Pixel Adjust in the setting menu after adjusting the image position.
Screen Size and Projection Distance
Determine the distance from the lens to the screen to achieve your desired screen size.This unit uses a 2.0x power zoom lens for projection.
Relationship Between Projection Screen Size and Projection Distance


- The projection distances in the table are provided only as a guide. Use them as a reference during installation.
- To adjust the installation, use a projected image of aspect ratio 16:9.
Projecting Image
This section describes the basic operations to project input images on the screen.
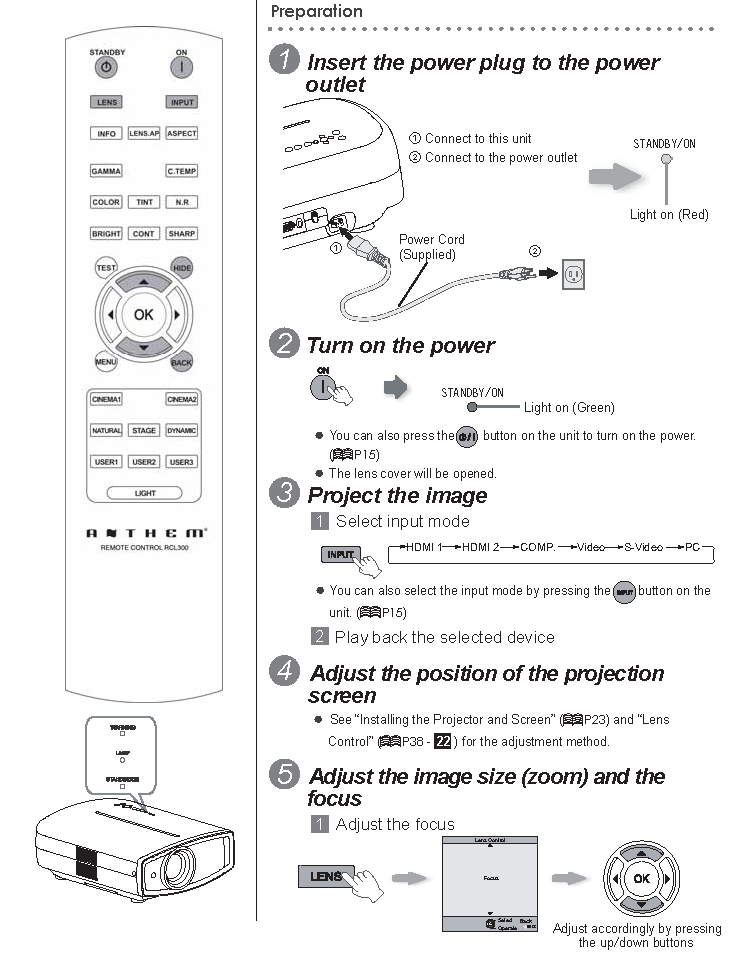
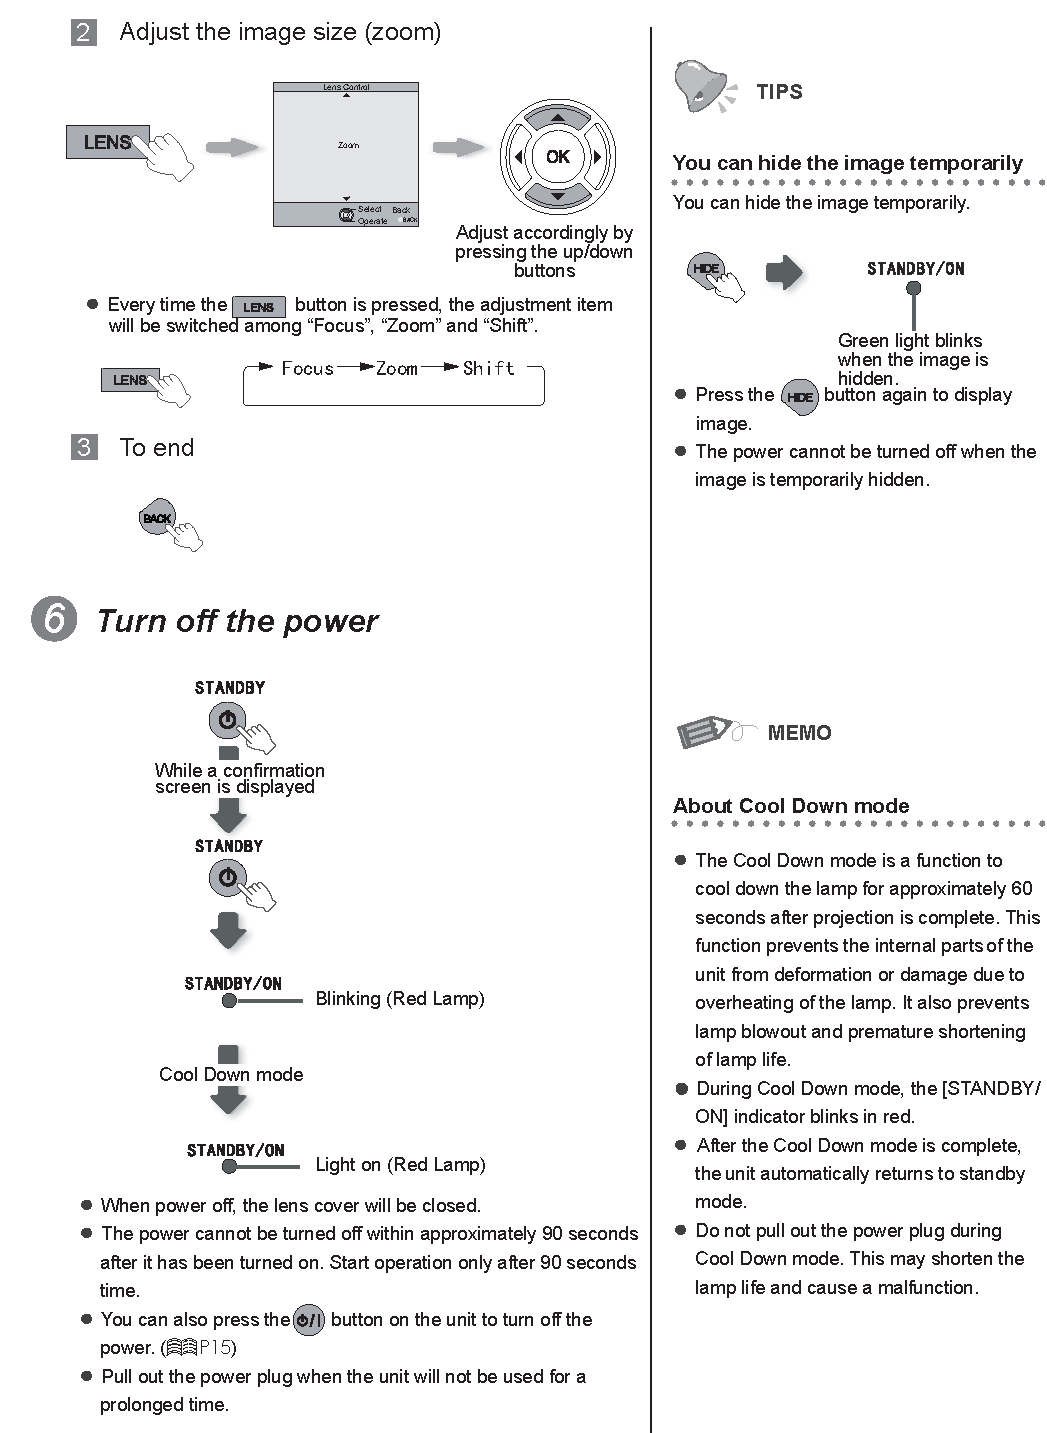
Convenient Features during Projection
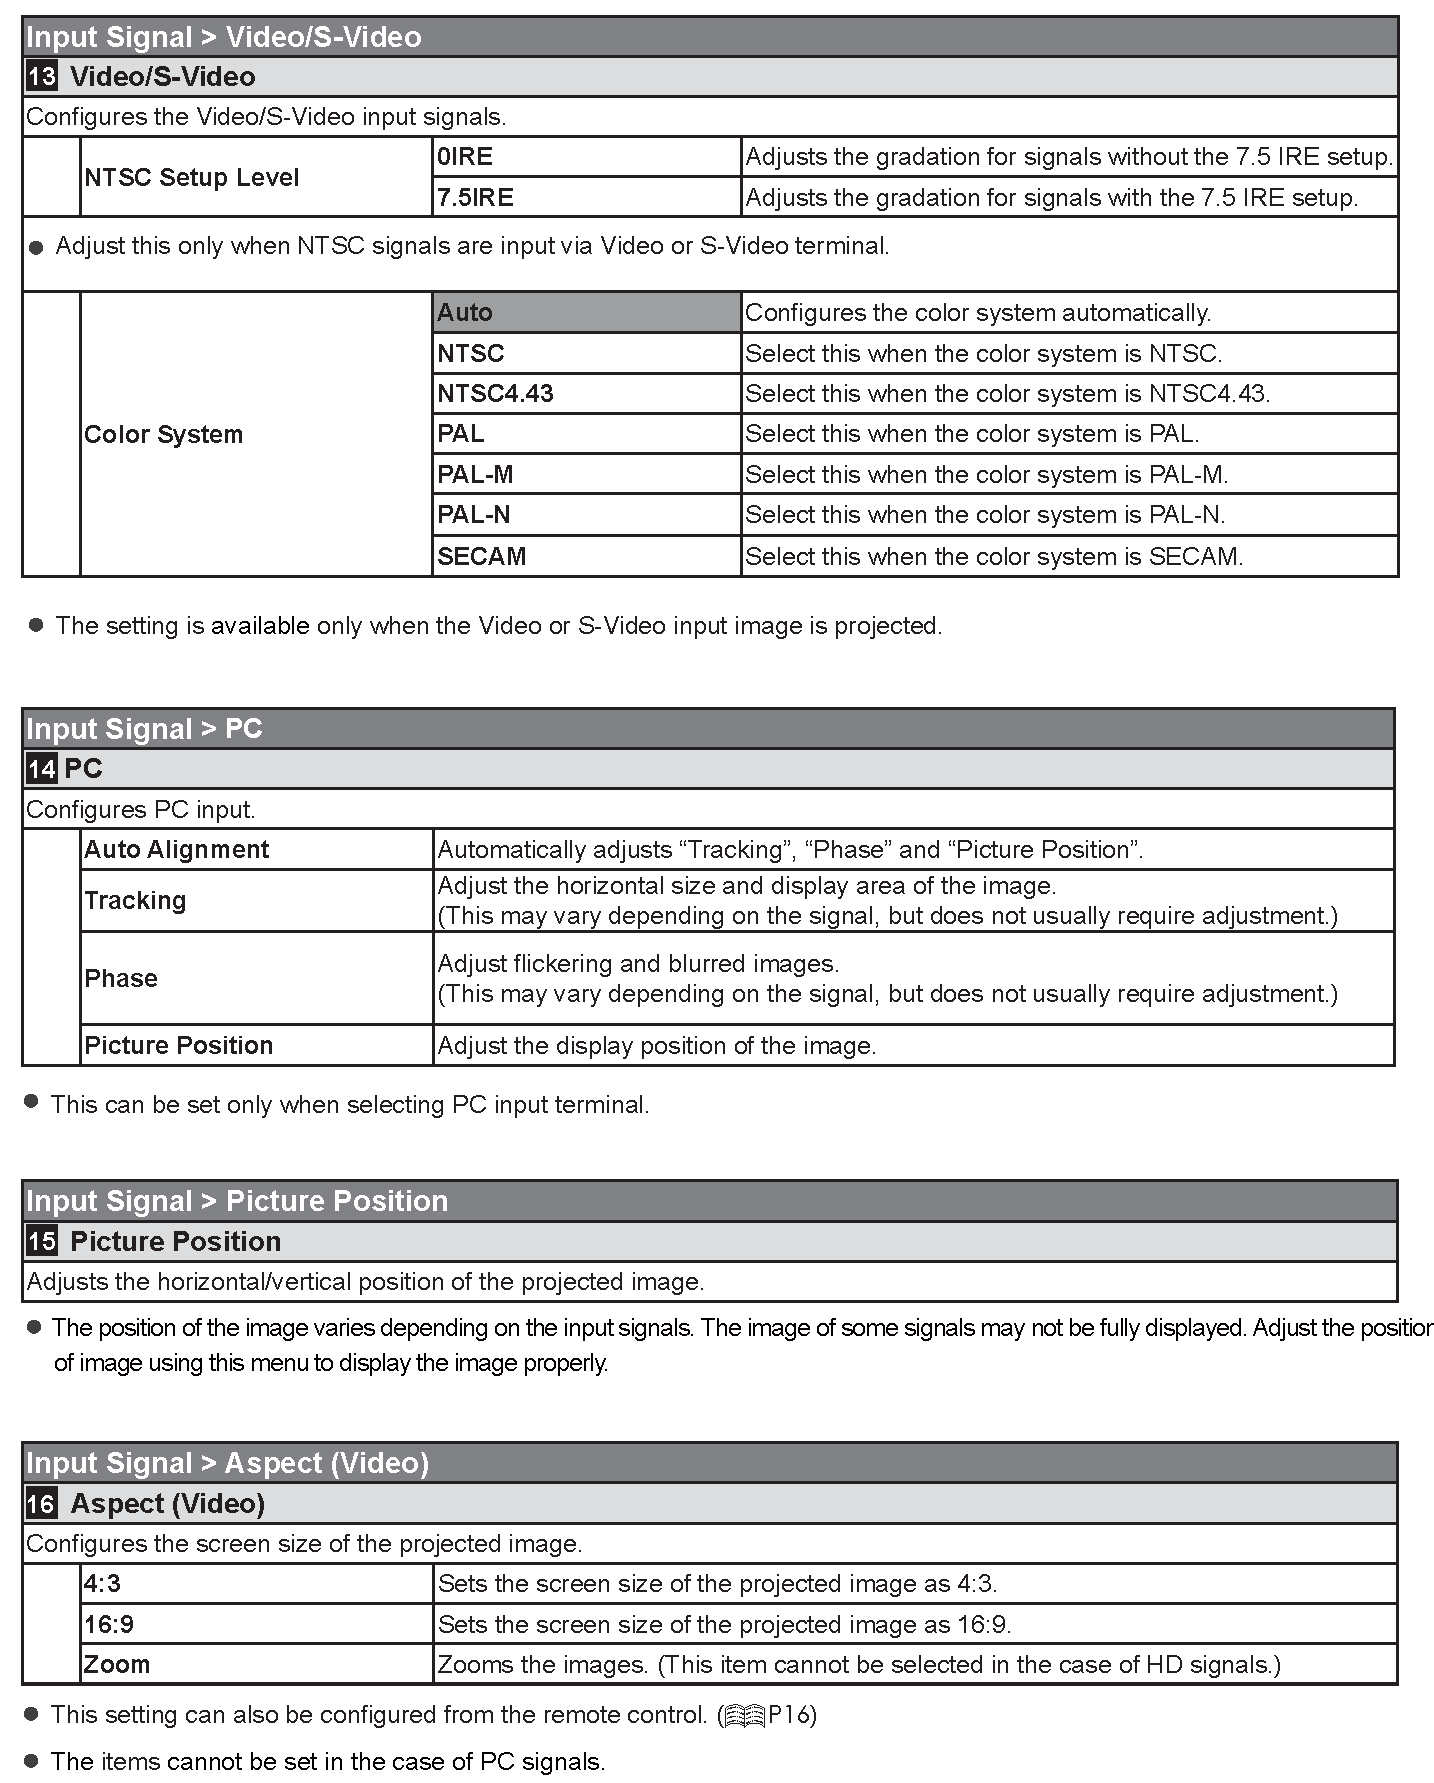
You can change the screen size of the projected image or hide the surrounding area of an image for which quality at the outer area has deteriorated.

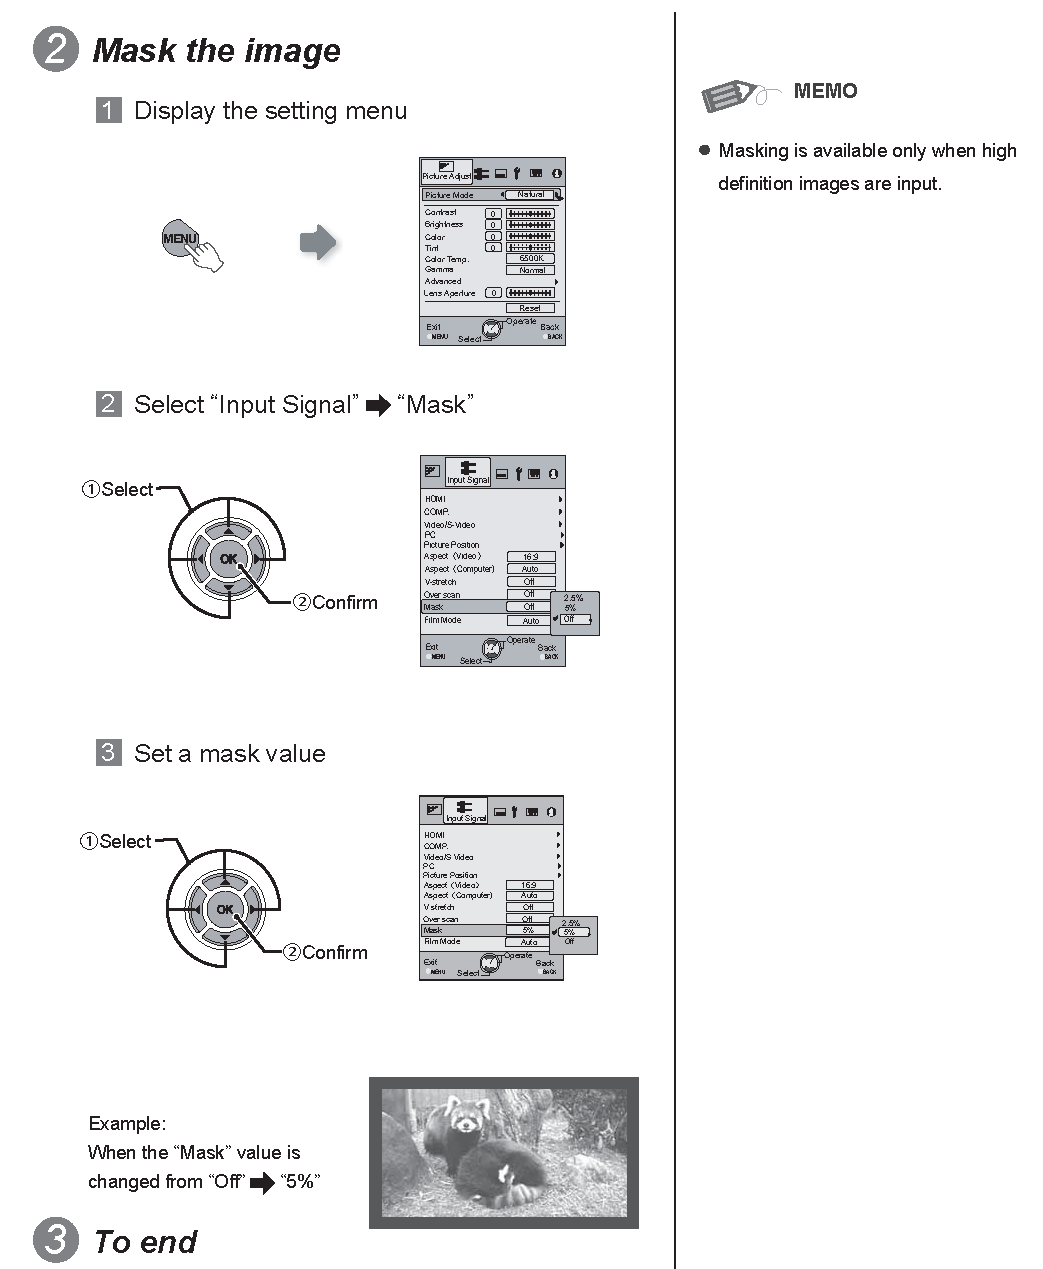
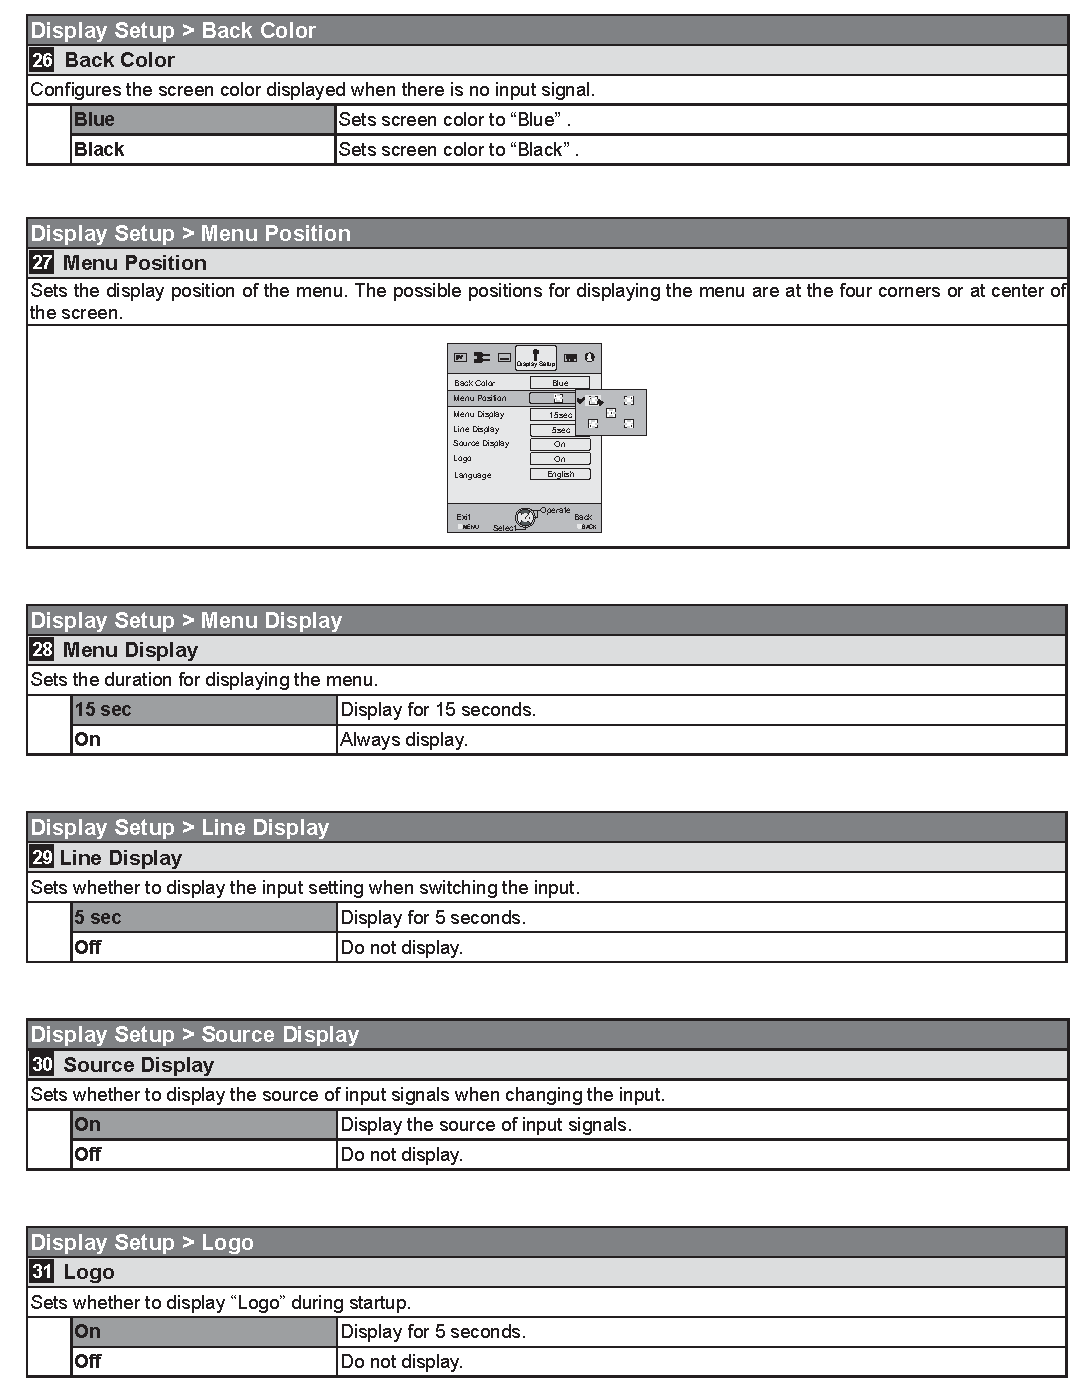
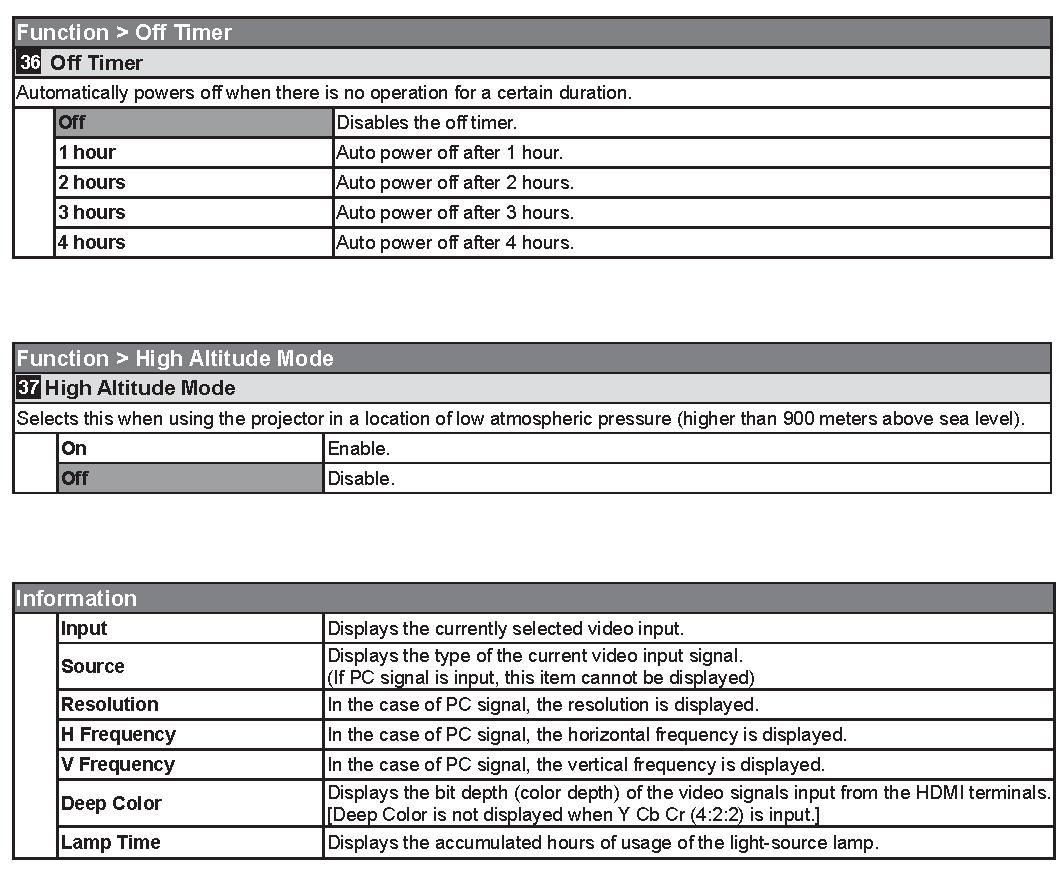
Projected images can be adjusted to a desired view by changing the initial settings.
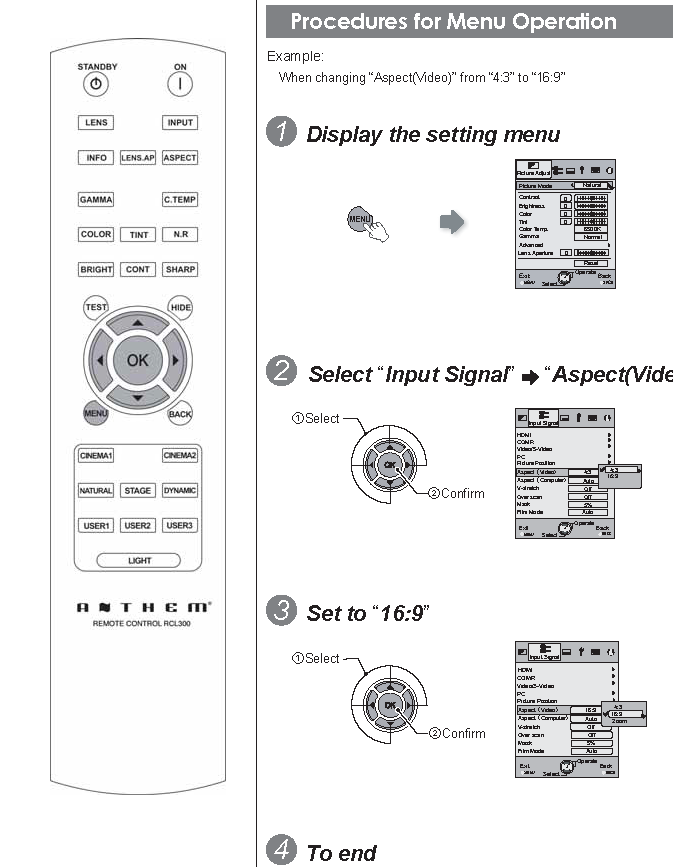
Item values shown in are factory settings.
- Items that can be configured differ according to the input signals.


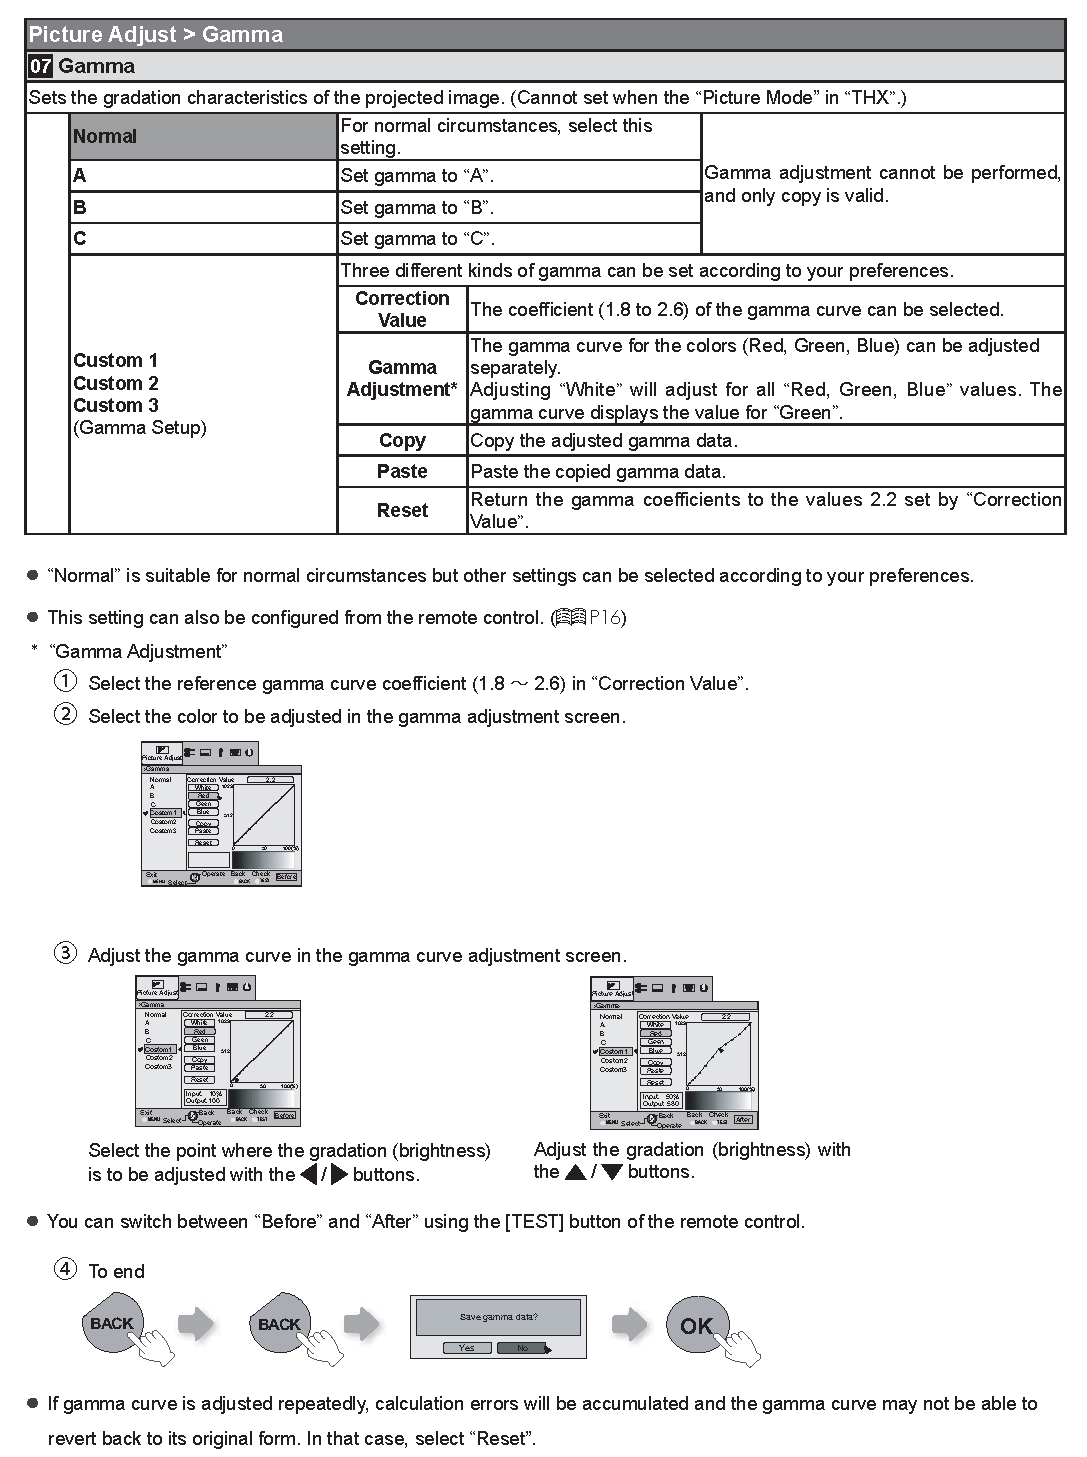
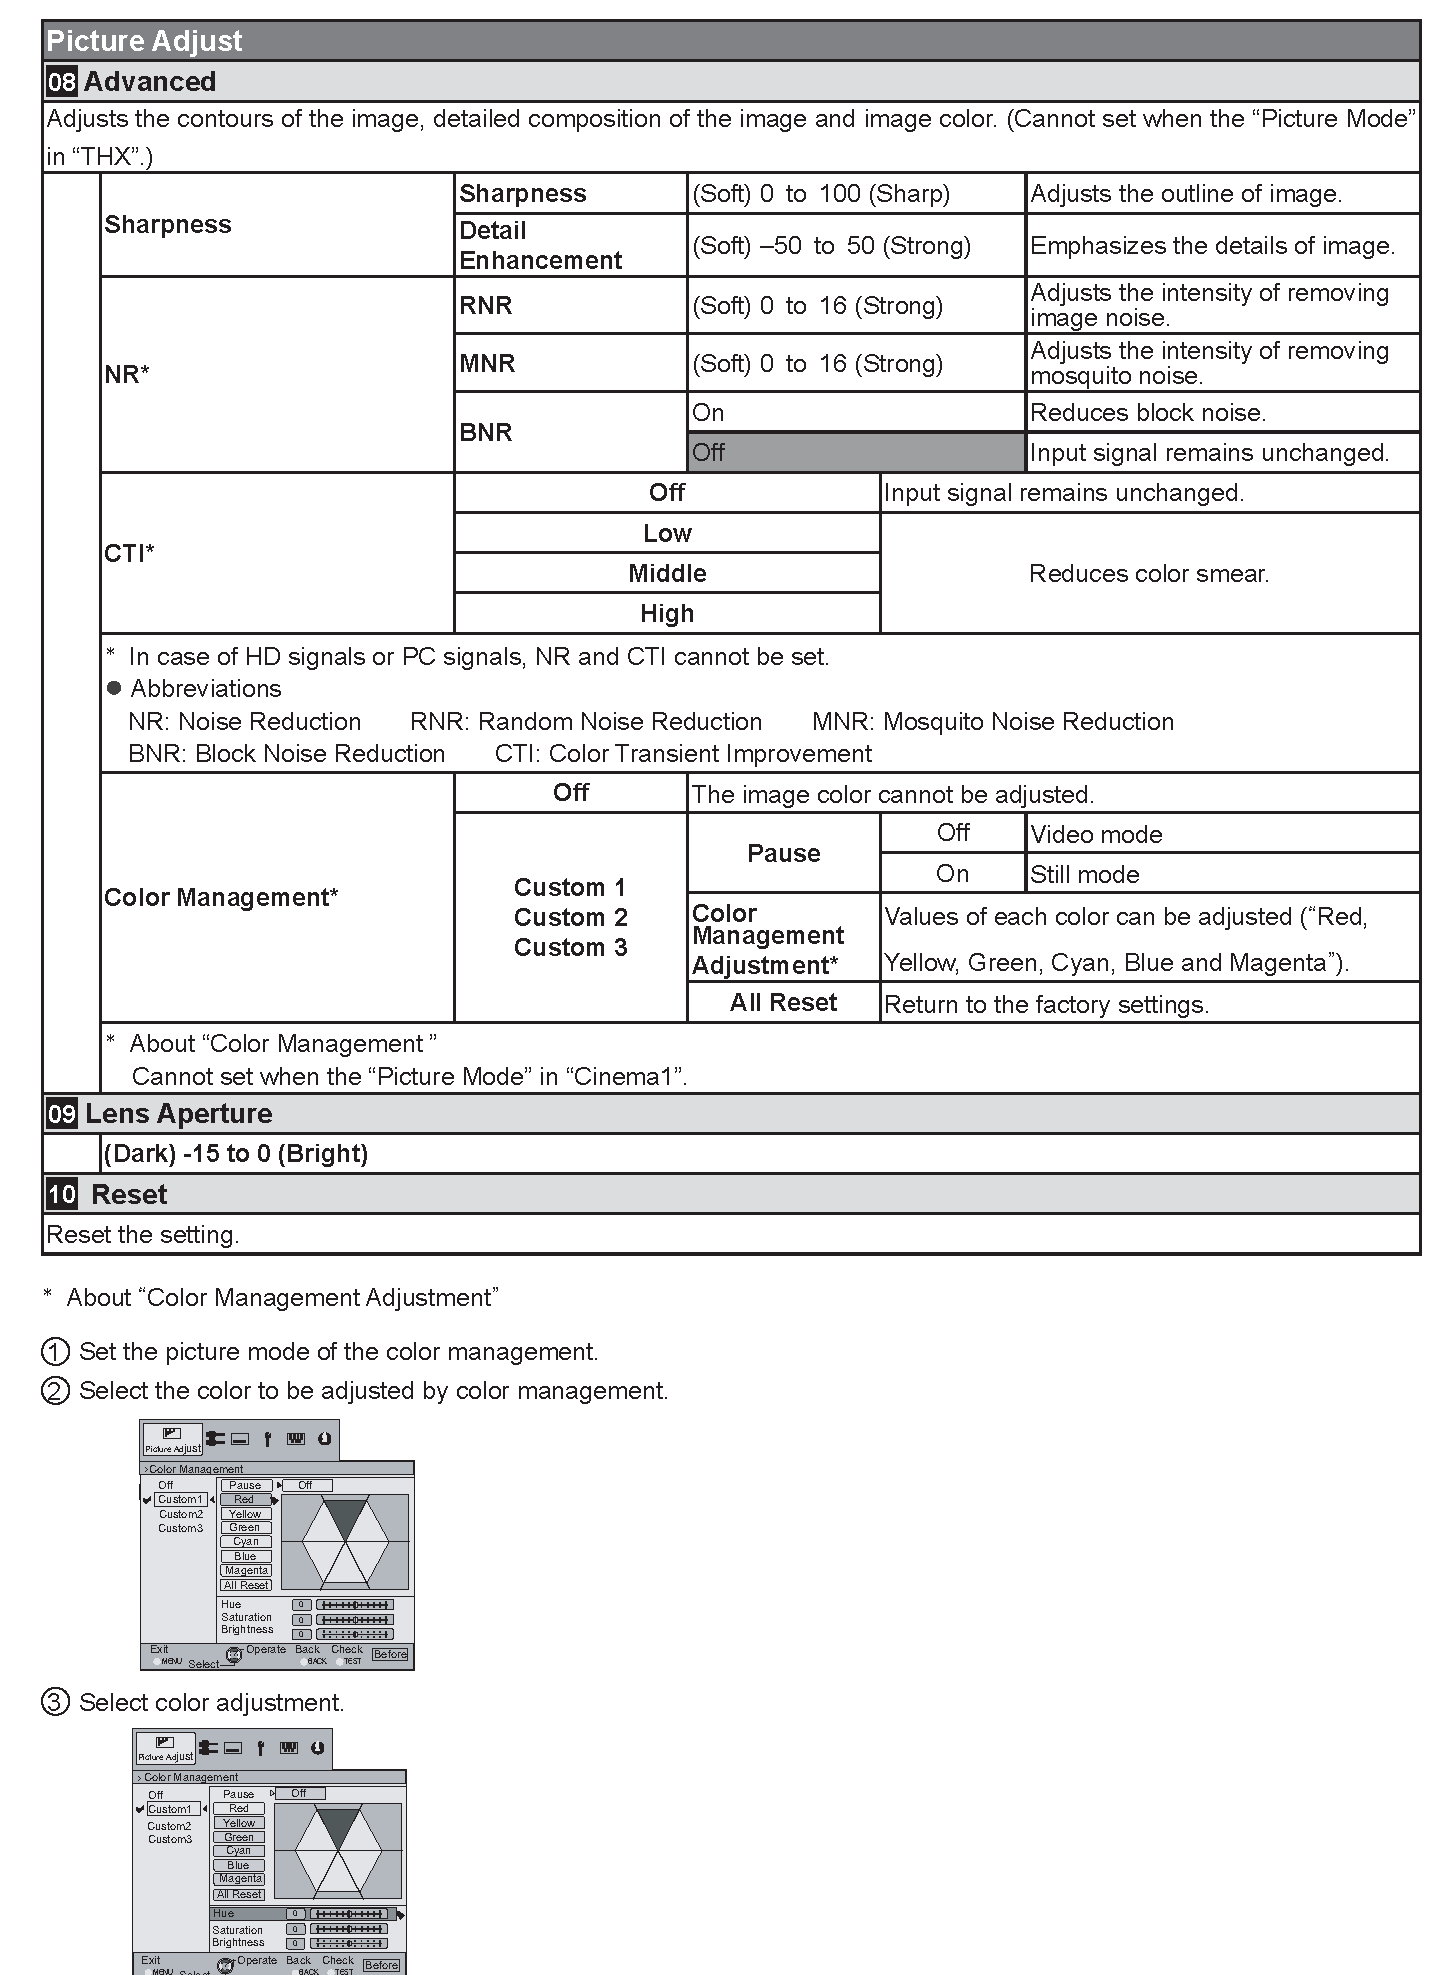
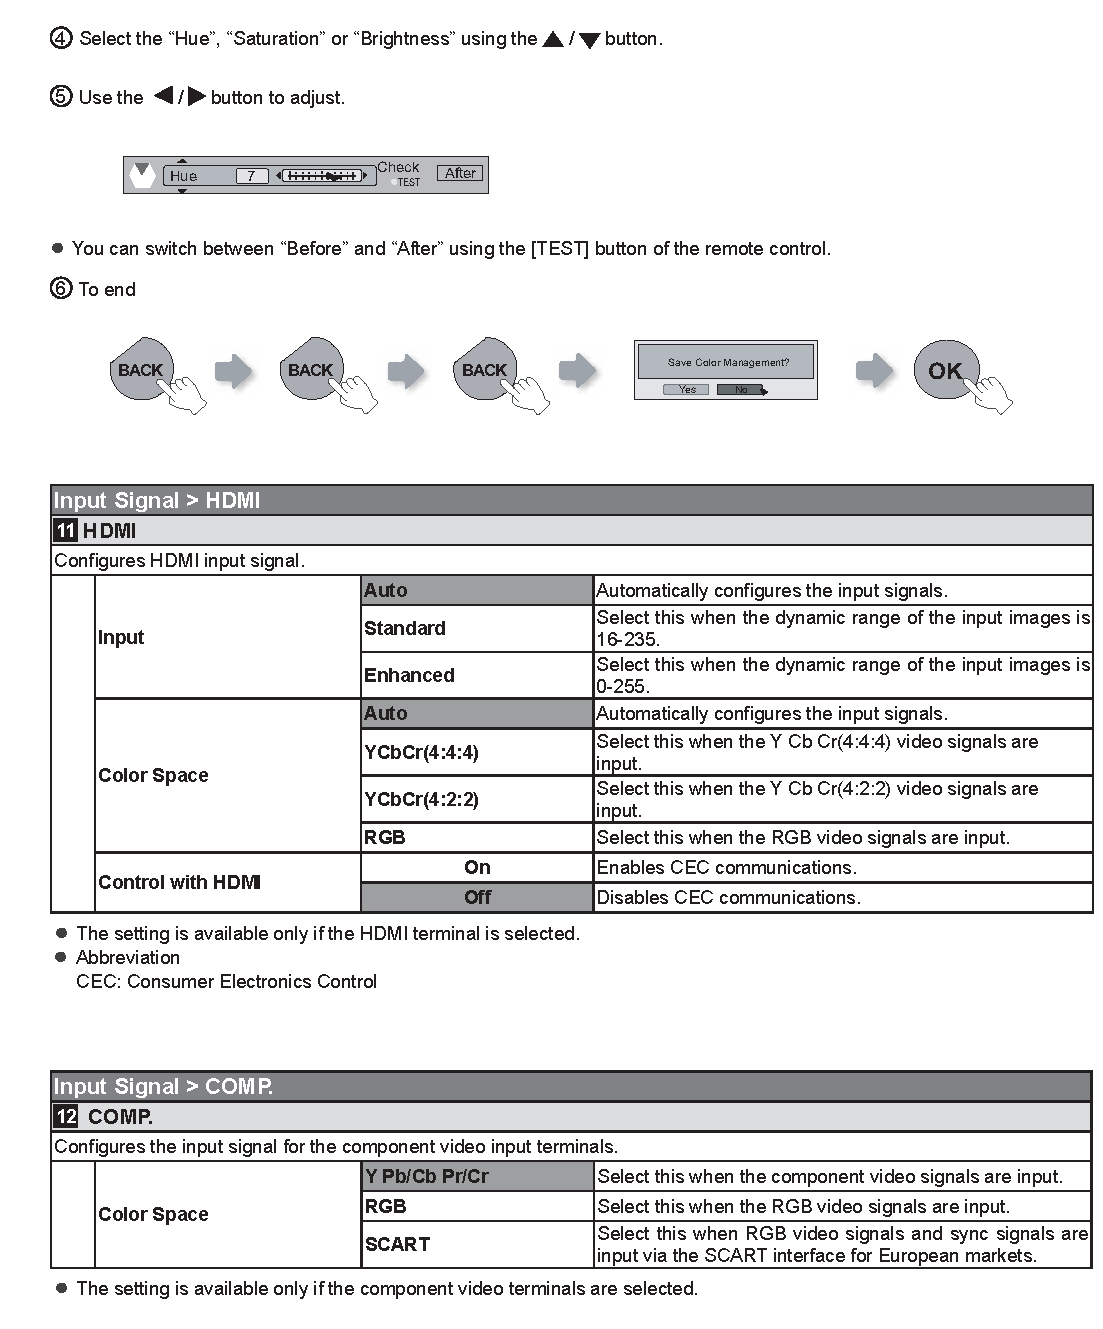



Customizing Projected Images
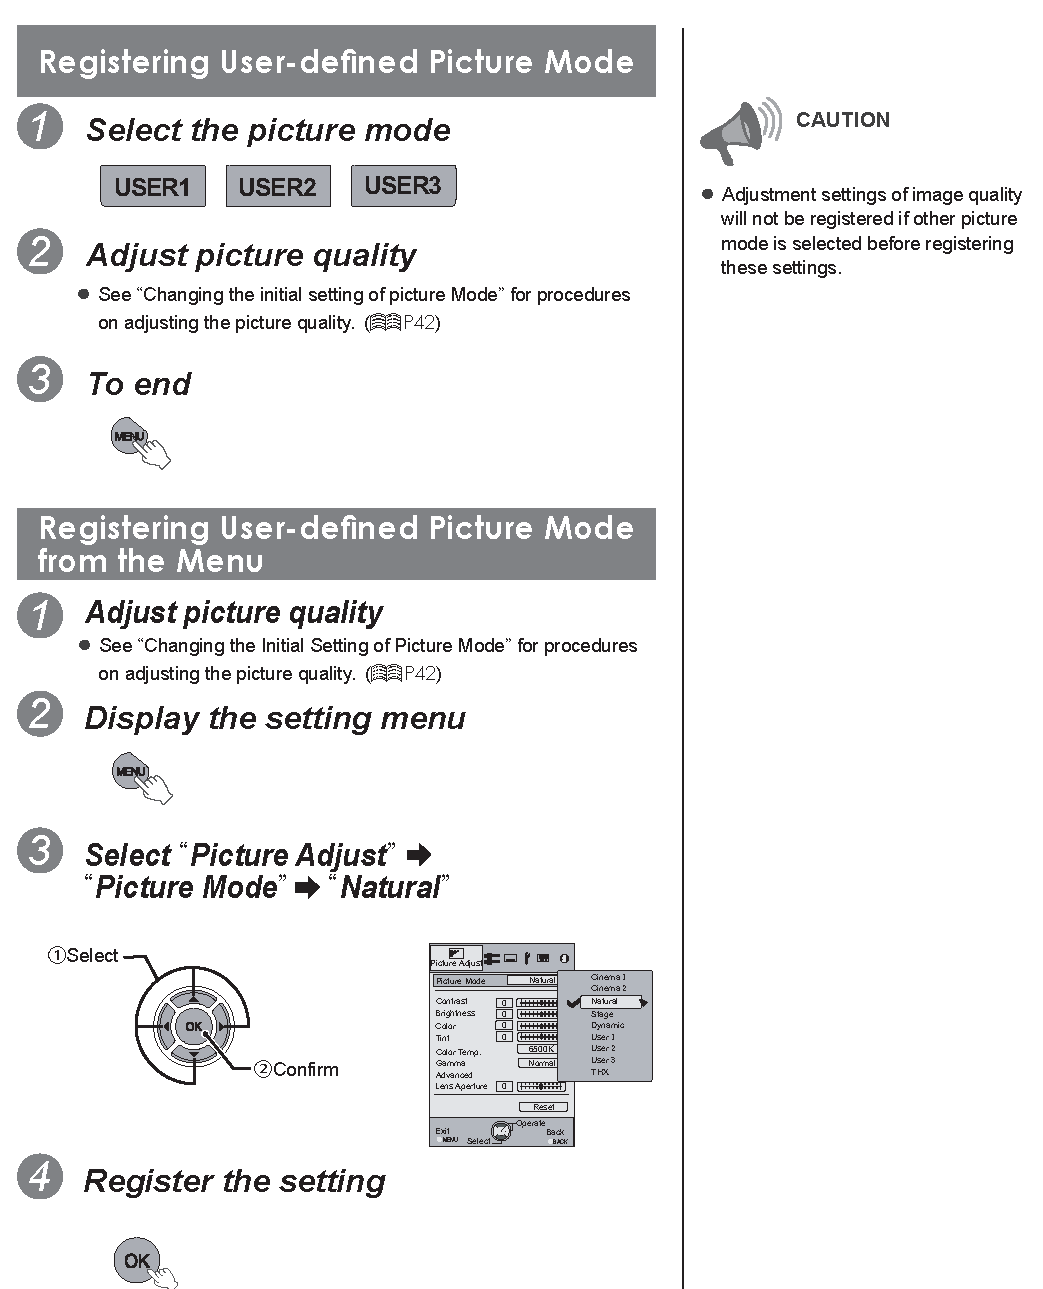
You can adjust the projected image to a desired image quality and register the adjusted value. (Picture Mode) Besides the fi ve default Cinema 1, Cinema 2, Natural, Stage, Dynamic and THX settings, there are 3 more types of user-defi ned settings for Picture Mode.

Troubleshooting
Before sending the unit to your authorized dealer for repair, please check the following points.
The following situations are not malfunctions
You do not need to worry about the following situations if there is no abnormality on the screen.
- Part of the top surface or front of the unit is hot.
- A creaking sound is heard from the unit.
- An operating sound is heard from the inside of the unit.
- Color smear occurs on some screens.
Perform the following operations when the unit is unable to operate normally due to external static or noise.
- When the unit is in standby mode, please pull out the power plug, then insert again.
- Press the power button on the unit to turn on the power again.
A sound may be heard when the lamp is off but there is no danger.LCOS device is manufactured using high-precision technology but there may be some missing pixels or pixels that remain permanently lit up.
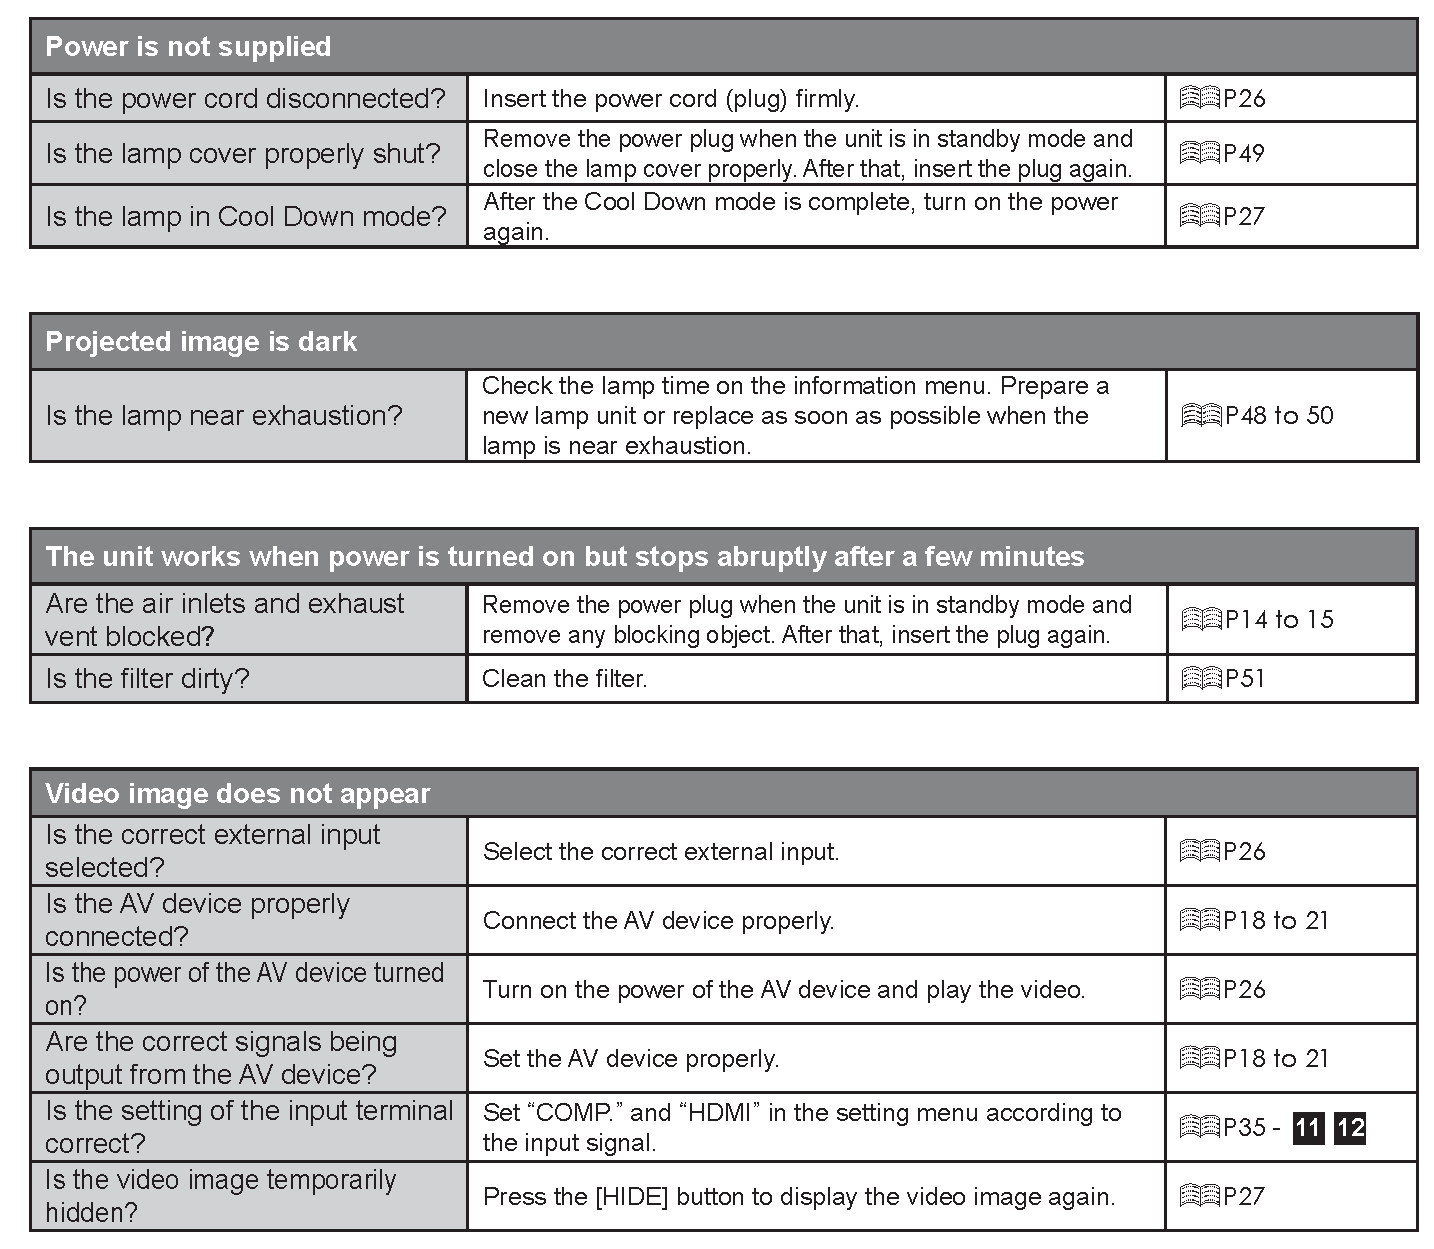
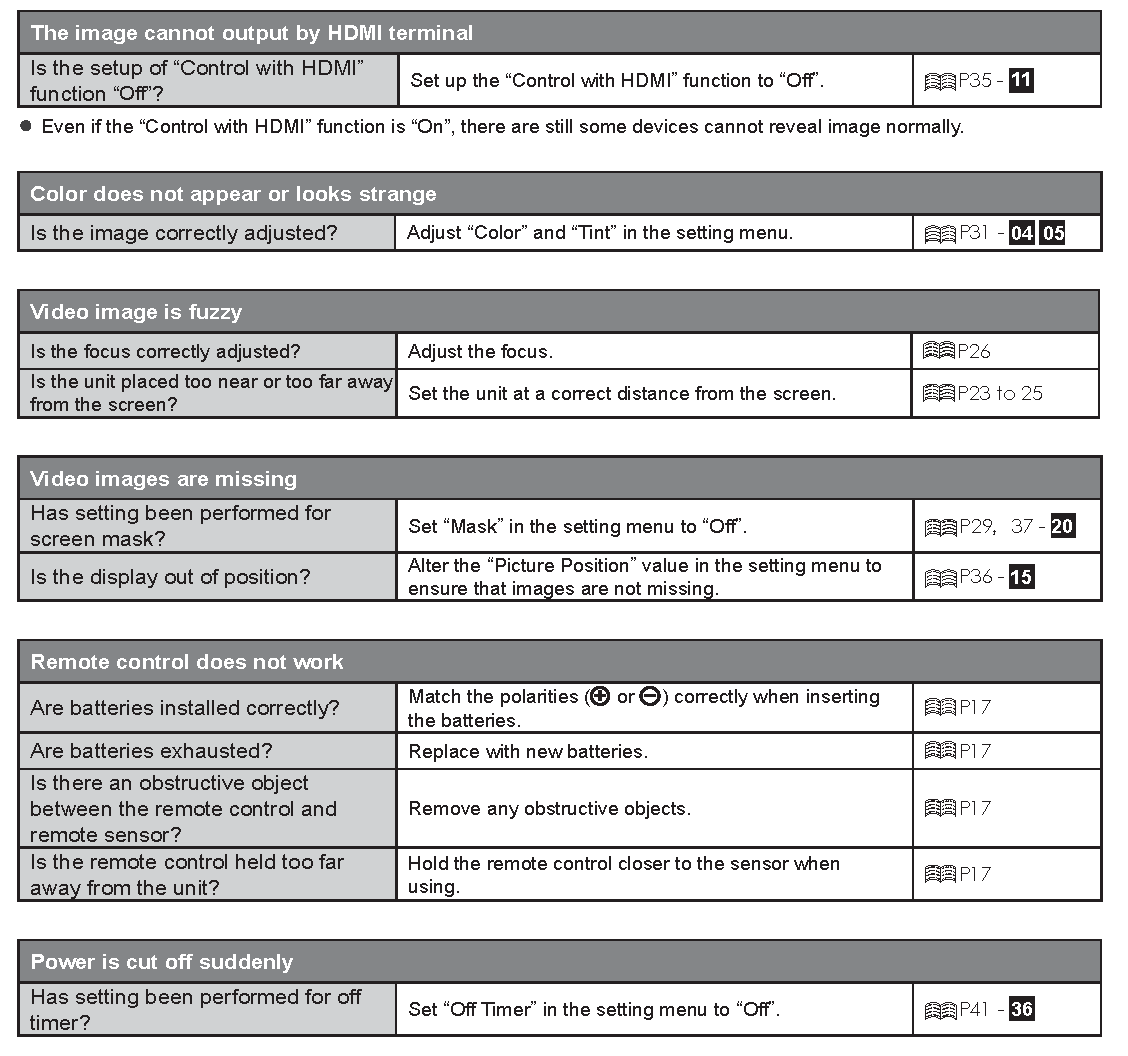
What to Do When these Messages Are Displayed

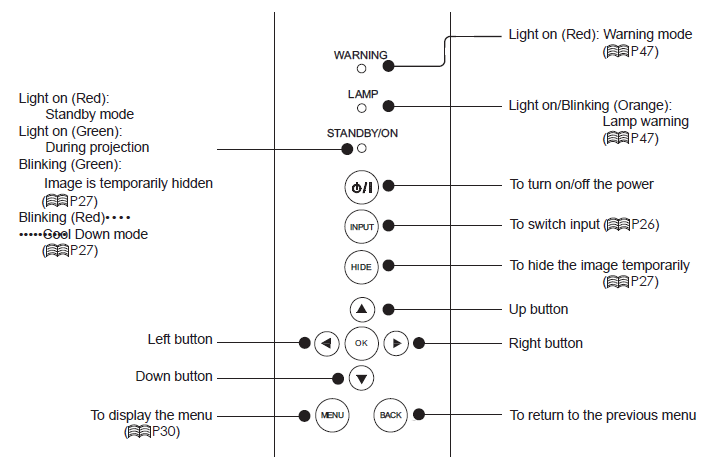
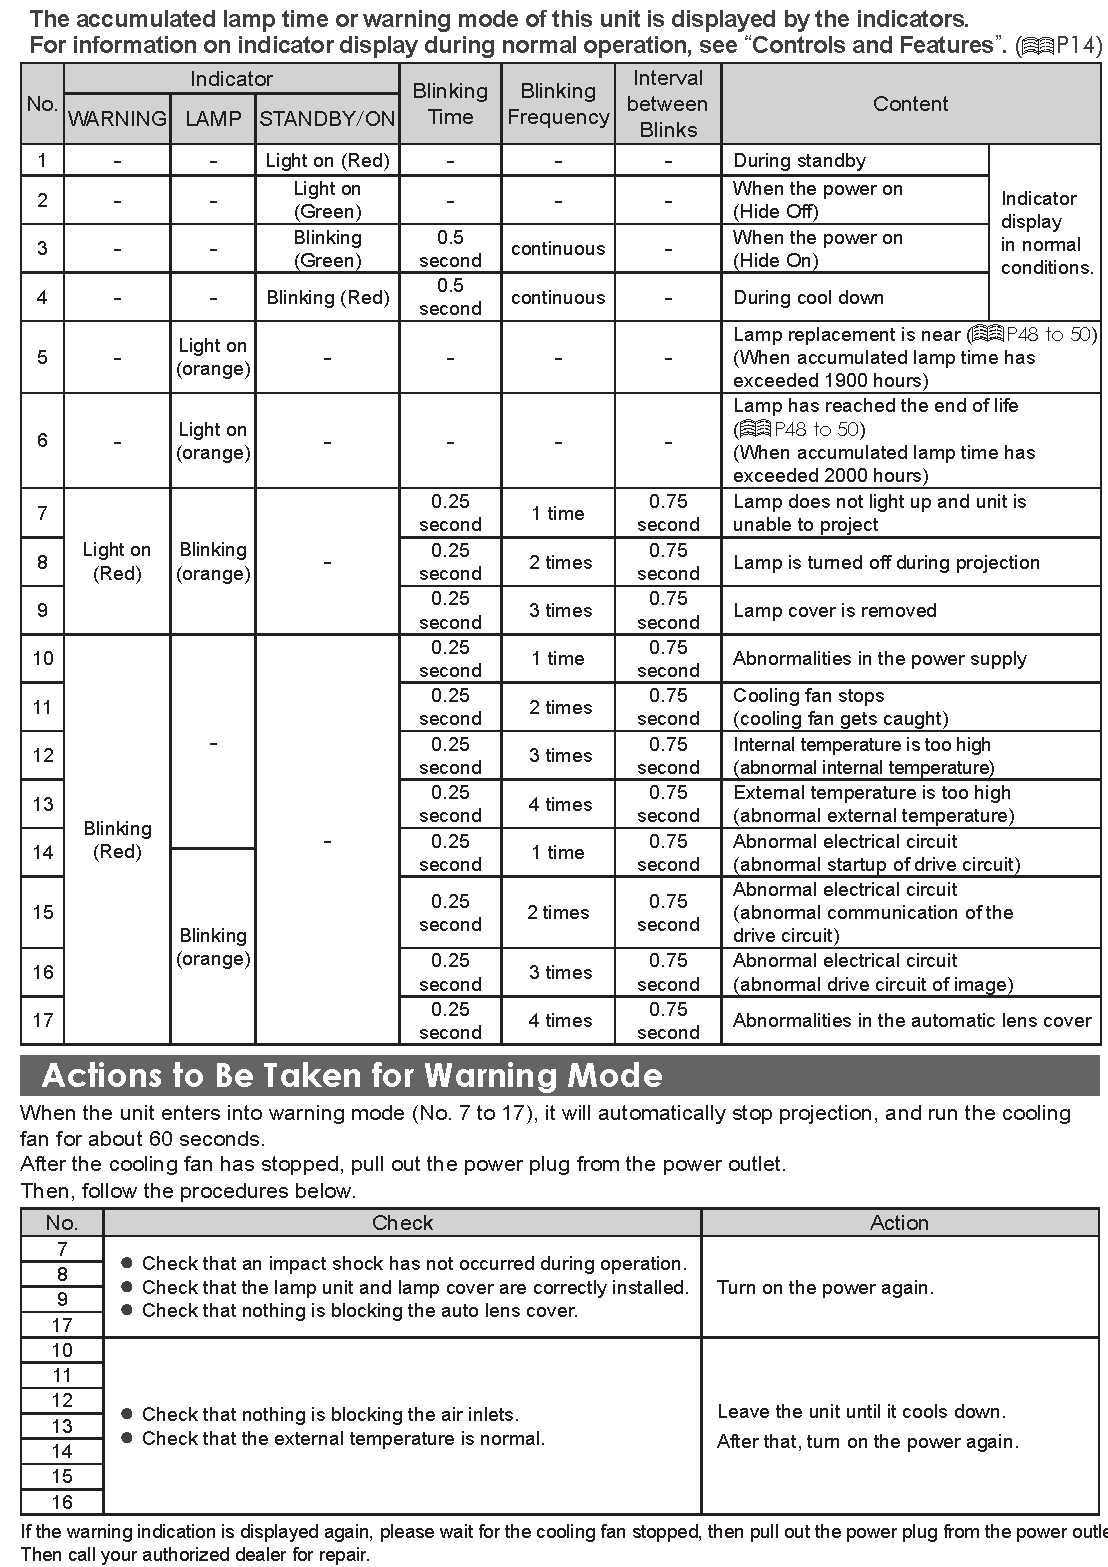
About Warning Indicators

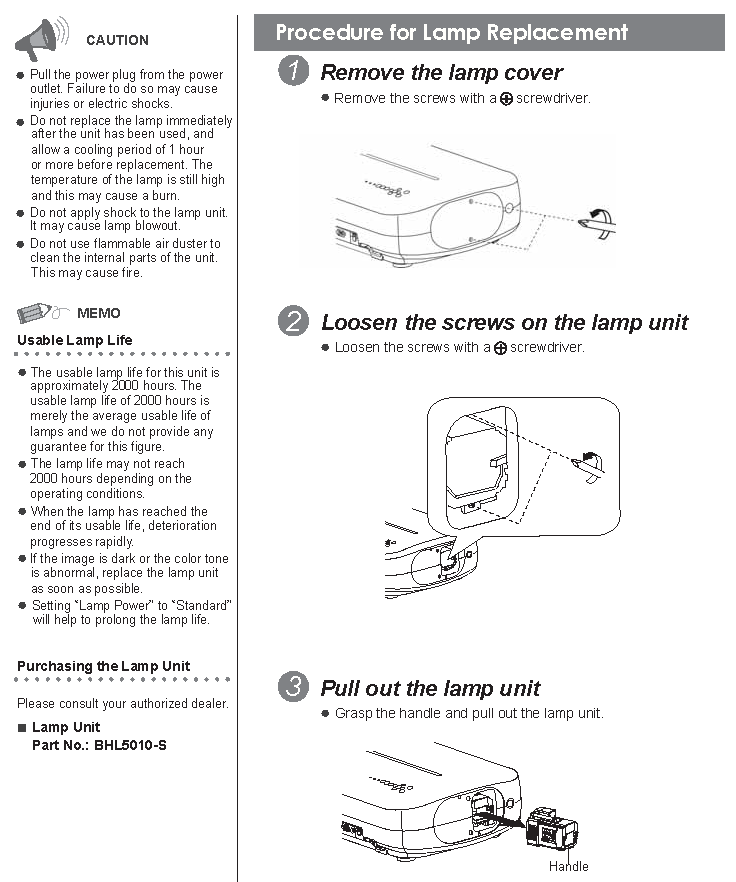
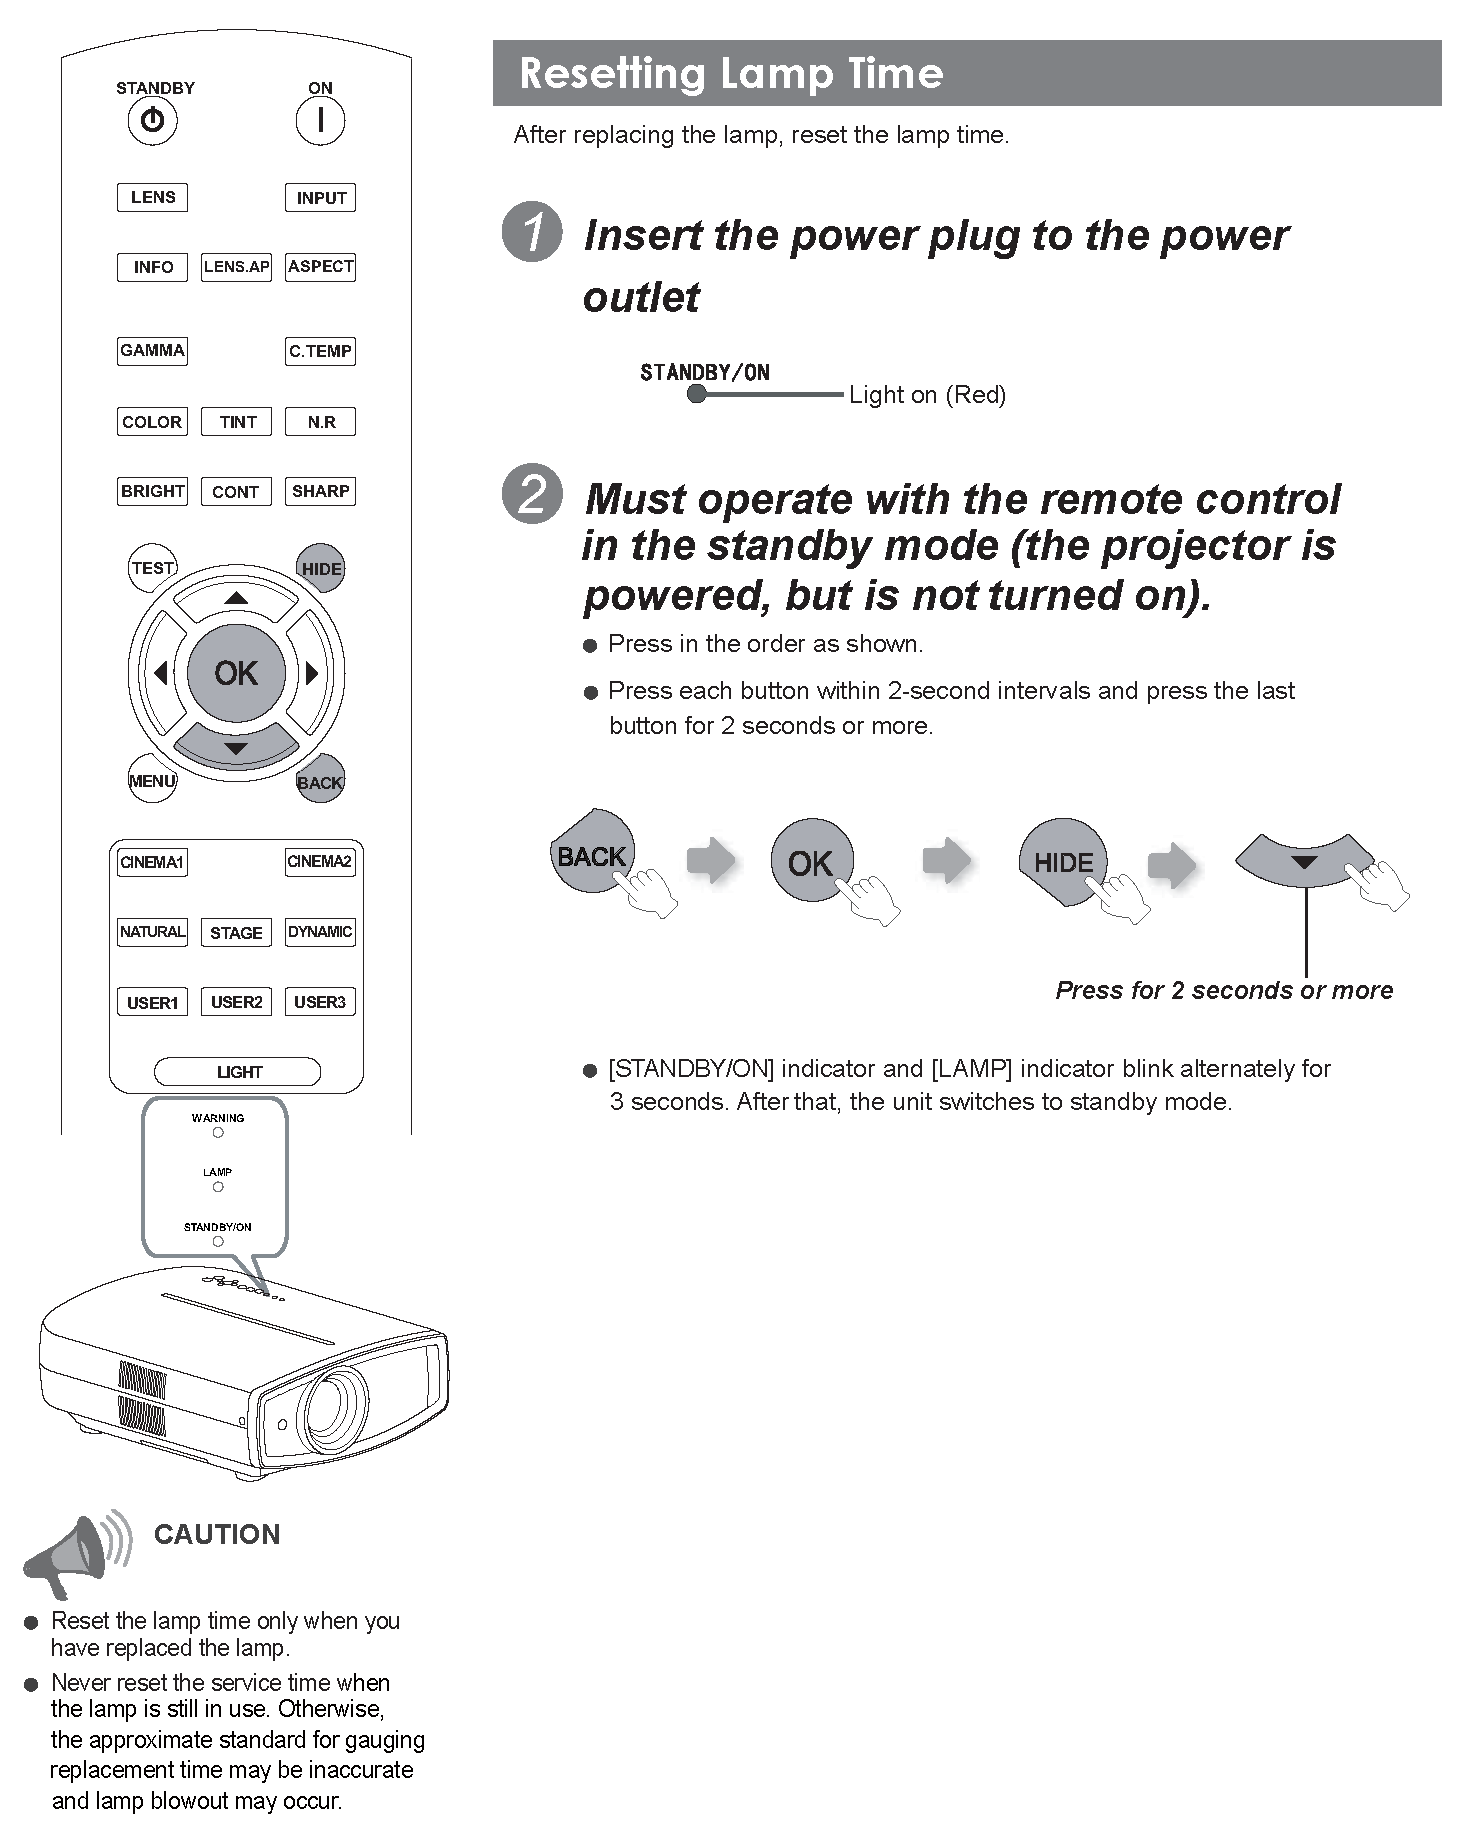
Replacing the Lamp
The lamp is a consumable item. If the image is dark or the lamp is turned off, replace the lamp unit.
- When the lamp replacement time approaches, a message is displayed on the screen and the condition is indicated by the indicator.

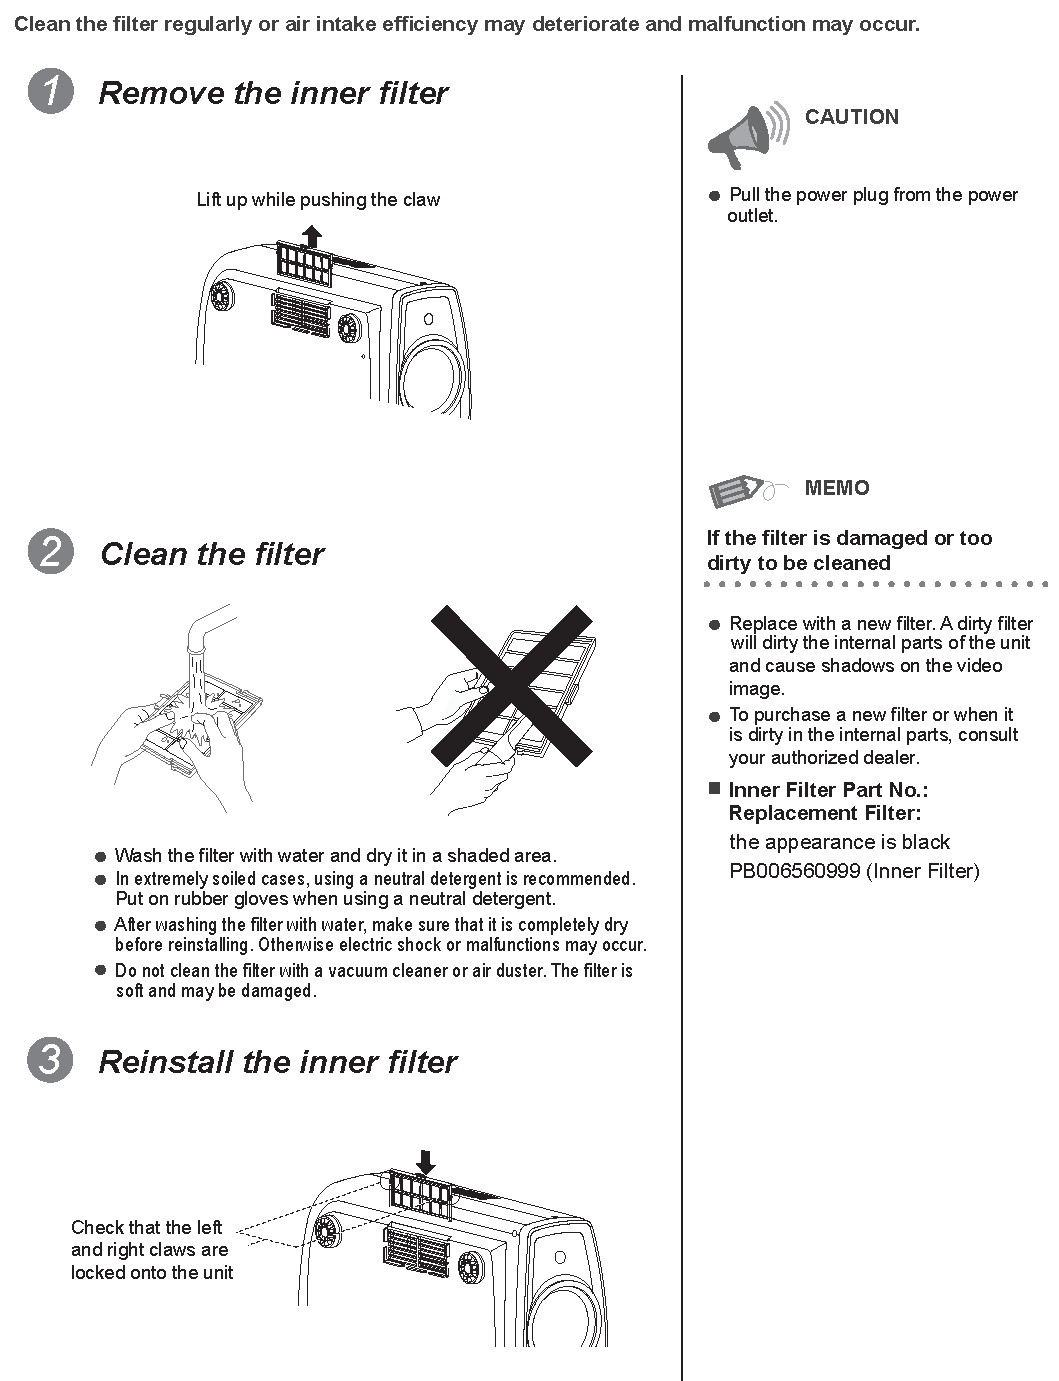
 Cleaning and Replacing the Filter
Clean the filter regularly or air intake efficiency may deteriorate and malfunction may occur.

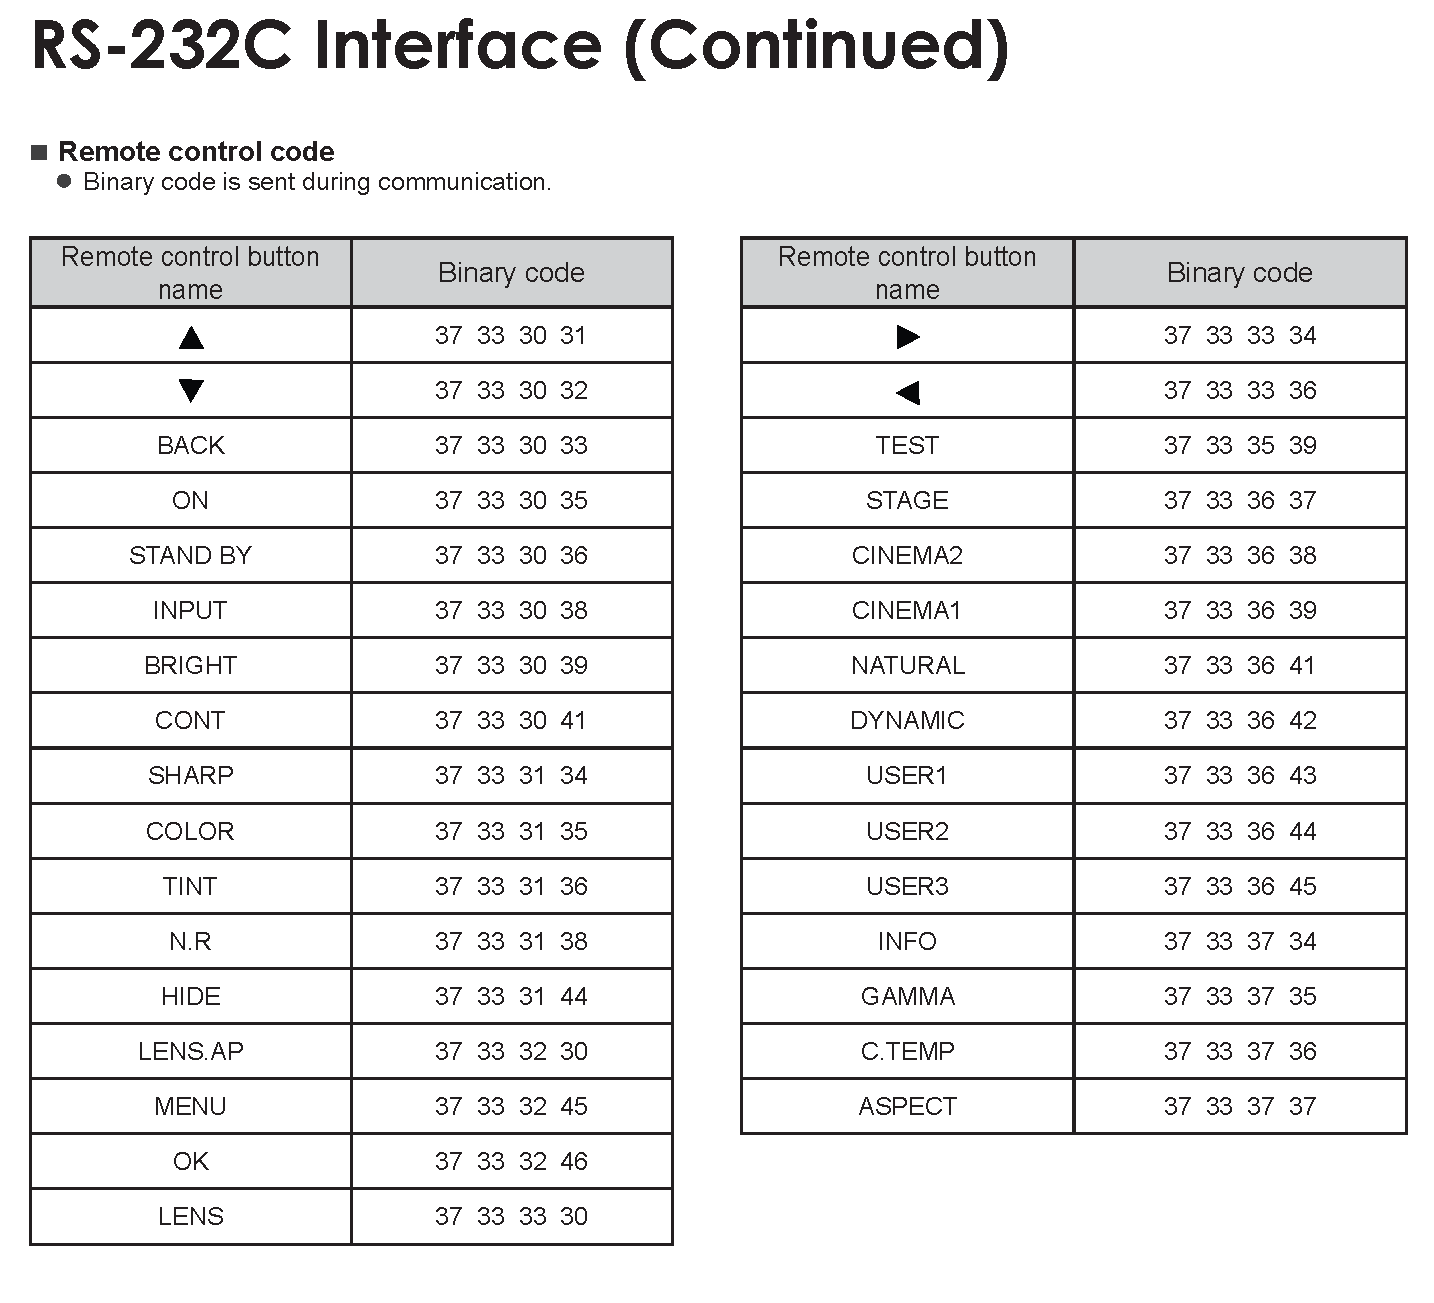

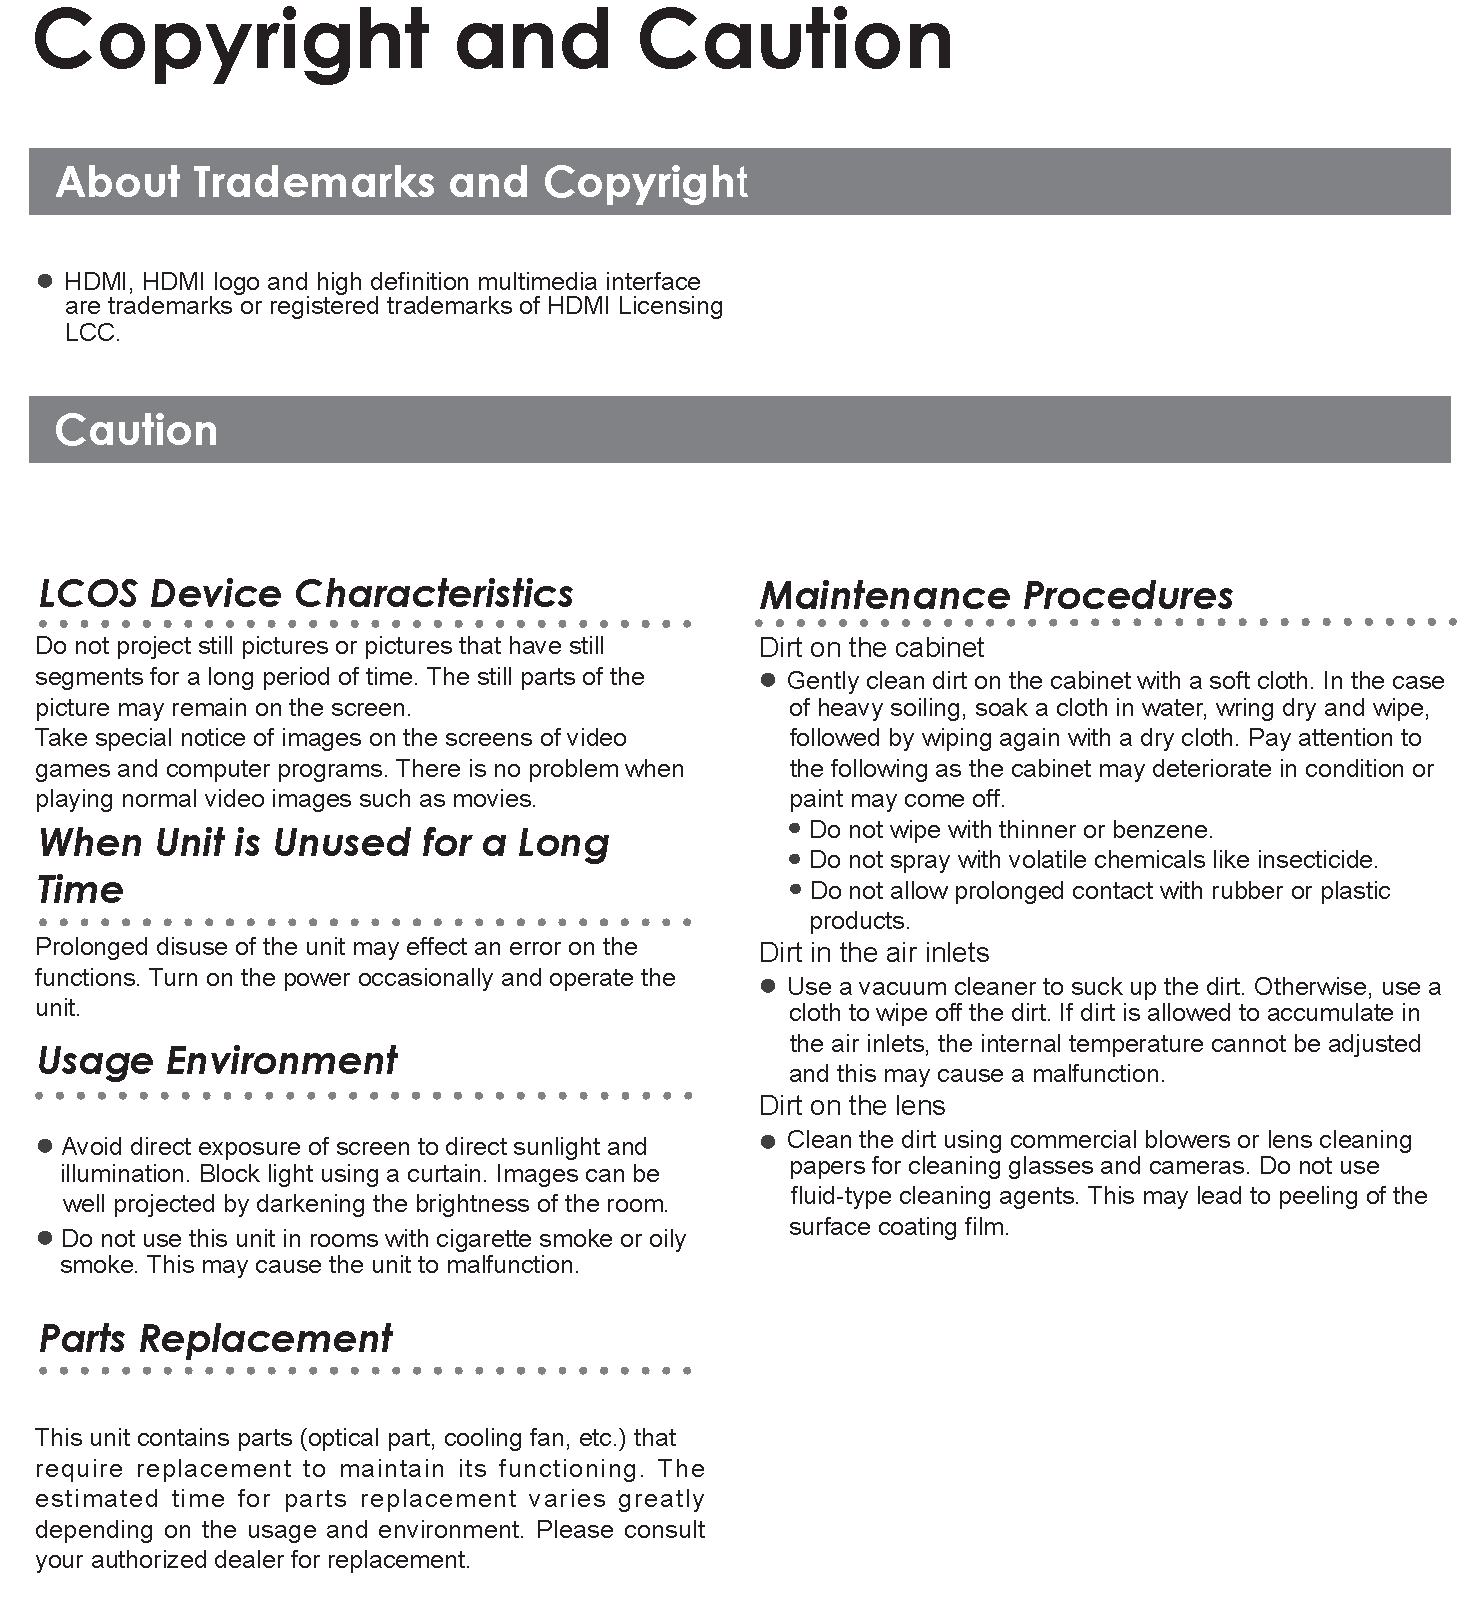


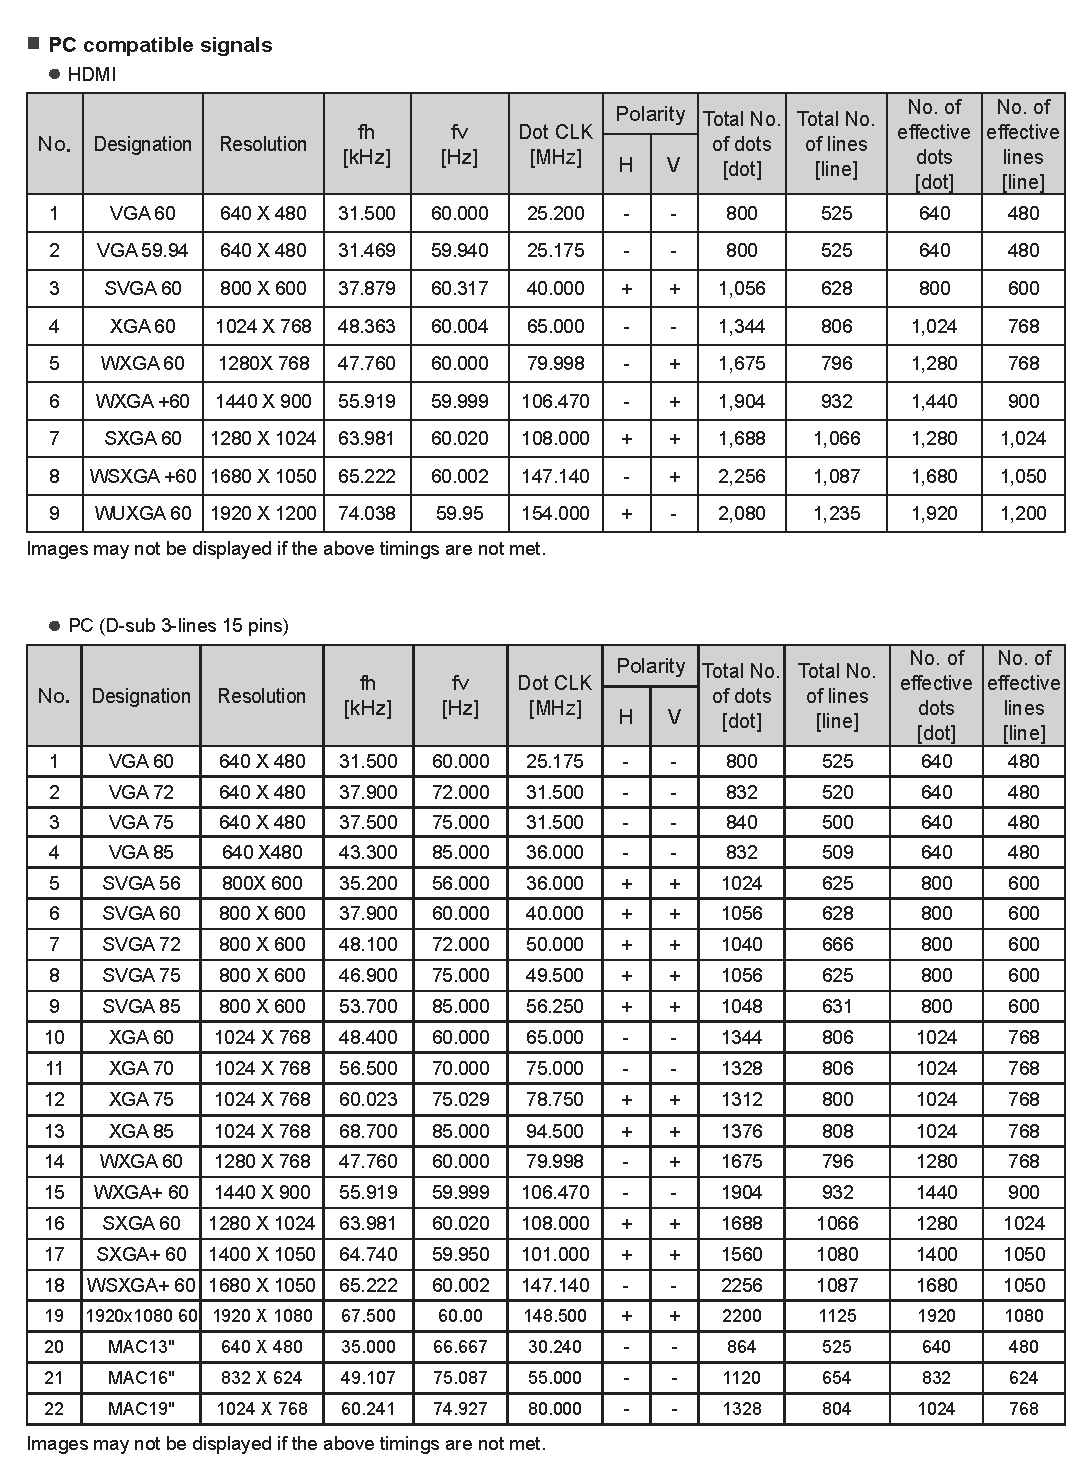

[xyz-ips snippet=”download-snippet”]

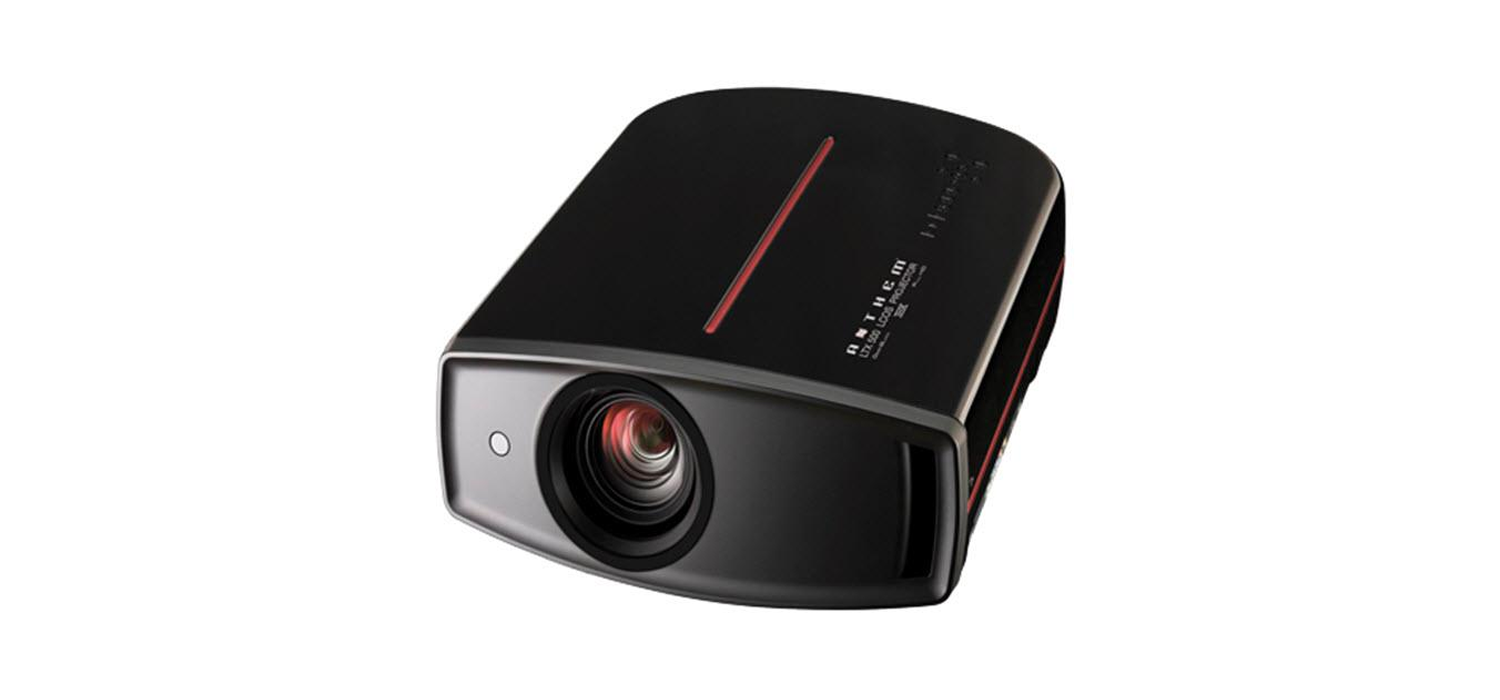

 Bottom Surface

 Cleaning and Replacing the Filter