![]() ITEM: SP-AZ078ANZZI AURA SHOWER PANELINSTALL & OPERATION MANUALV2.0
ITEM: SP-AZ078ANZZI AURA SHOWER PANELINSTALL & OPERATION MANUALV2.0

DON’T WAIT!REGISTER NOW!Register your product within 90 days to ensure your product is recognized as an official purchase and is for warranty coverage.
Mail-in the completed registry card (Pg. 2) or register online at www.swcorp.com/register.
PRODUCT REGISTRATION∗IMPORTANT: YOUR WARRANTY WILL NOT BE RECOGNIZED UNLESS THIS CARD IS FULLY COMPLETED AND RETURNED OR ONLINE REGISTRATION IS COMPLETED.To ensure that your warranty is registered and confirmed please do one of the following:
- Register online at www.swcorp.com/register. You will be asked to fill out the same information you would in the registration card. Registering online is fast, secure and ensures we receive your information.
- Complete, cut out, and mail the registration card below. By returning this registration card we confirm the date of purchase for your new product. This confirmation will allow us to process any warranty claims.
Mail the card to 5701 NW 35 Avenue, Miami, FL 33142
![]() CUT ALONG DOTTED LINE.
CUT ALONG DOTTED LINE.
| Product Registration Card
Name…………………………Address……………………………….City………………………………………..State ………………………Zip………………………..Phone…………………………………….Email ………………………………………Date of Purchase ………………………Installer’s Name…………………………….Phone ……………………………….. I have read the Owner’s Manual carefully and understand and agree that any installation, operation or maintenance of the product must be done strictly in accordance with instructions and guidelines contained in the owner’s manual and installation guide.Signature_______________________Date ______________________ |
Have questions? Call us at 305-614-4070 or visit us at www.ANZZI.com
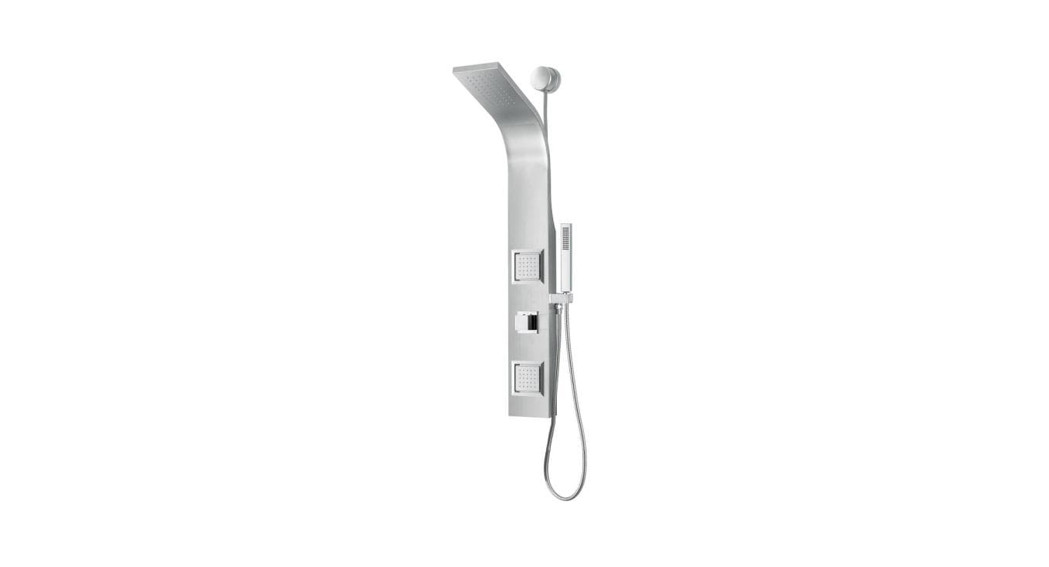
PARTS LIST
 A. Shower HeadB. DiverterC. Body JetsD. Hand Shower
| Component no. | Component | Material |
| 1 | body | s/s |
| 2 | head shower | ABS |
| 3 | pad | EPDM |
| 4 | screw 1 | s/s |
| 5 | clip | s/s |
| 6 | pvc hose | pvc |
| 7 | knob plate cover | s/s |
| 8 | knob | zinc |
| 9 | cap | ABS |
| 10 | braided hose | s/s |
| 11 | long- short connector | brass |
| 12 | base | ABS |
| 13 | body jets | ABS |
| 14 | flow restrictor | various |
| 15 | function cartridge | various |
| 16 | faucet | brass |
| 17 | one way joint | ABS |
| 18 | hand shower | ABS |
| 19 | hand shower holder | ABS |
| 20 | flexible hose | s/s |
BEFORE YOU START
Recommended Items

Read Before Using Your New Shower Panel
Congratulations on purchasing our Shower Panel. Your new shower panel will be a great addition to your bathroom for years to come. Our luxury Shower Panel brings a spa experience into your life in the comfort of your personal bathroom. Adding the shower panel as a modification to your present shower will allow you to enjoy the pleasures of massaging body spray jets. Furthermore. The shower panel will operate with your existing plumbing supply lines with standard line pressure and flow rates. Before using our Shower Panel, please read this document carefully and thoroughly.
The instructions and safety information in this document is essential to the safe operation of your new unit. Additionally, neglect or improper or incorrectly performed installation, maintenance, or repair, including failure to follow the applicable care and cleaning instructions may affect your new product’s warranty.
IMPORTANT.
- Prior to installation. please make sure your package is intact. Look over the product and contact you’re dealer or ANZZI if you find damaged sections.
- In order to install this shower panel, a simple understanding of plumbing techniques will be necessary. Please contact your dealer or a professional plumber if you are unfamiliar with plumbing techniques or have questions.
- This shower panel is designed for indoor use only. It is not intended for outdoor or other uses.
- The product is provided with flexible supply hoses. It would be better to put stop valves between the hoses and water supplies.
- The product could function between 20-125 supply pressure. Using a pressure-reducing valve while the pressure is too high.
Mounting the Brackets of the Shower Panel
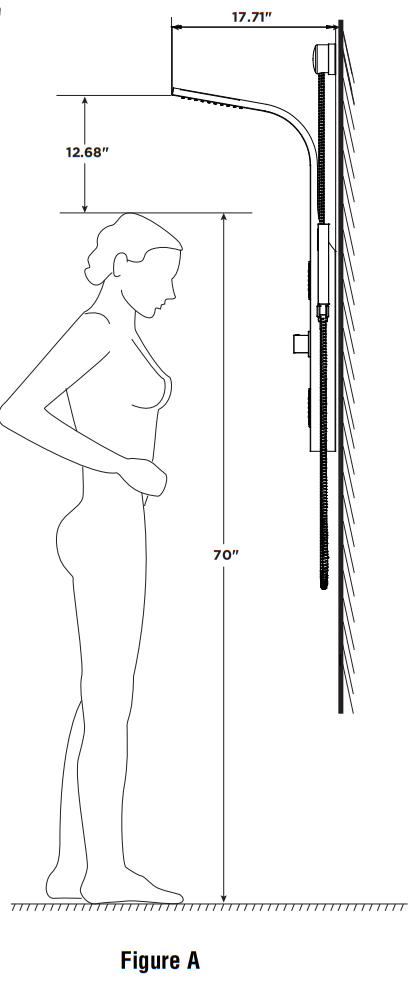
-It is recommended that the shower panel be mounted at a height that will make the unit accessible to people with varying heights. Establish the precise height and position of the unit on the wall. We recommend leaving a 12.68″(32cm) space between the showerhead and the average height of the people in the house as well as a minimum distance of 1″(2.5cm) from the ceiling. (Figure A)
-The height you choose shall allow the shower panel to completely cover up the connection points for the cold and hot water supplies. In order to determine the installation location of the shower panel, you should use a tape measure and a pencil.
(or some type of marking tool).
STEP 1
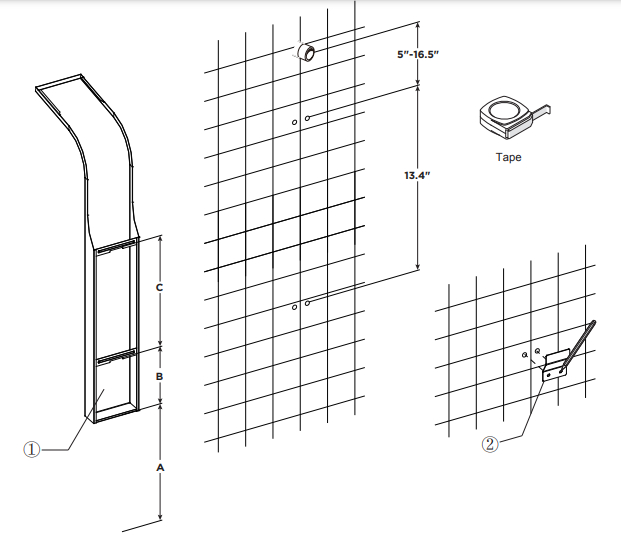
1-1 Measure the distance A between the floor and the bottom of the shower column.Measure the distance B between the bottom of the shower column and the back bracket.Measure the distance C between the brackets at the back of the shower column body (1)
1-2 Project this measurement onto the wall in order to install the mounting brackets (2)1-3 Mark the position of each screw hole of both mounting brackets(2) on the wall using a pencil.1-4 The recommended height of the water is 5-16.5 inches.
STEP 2
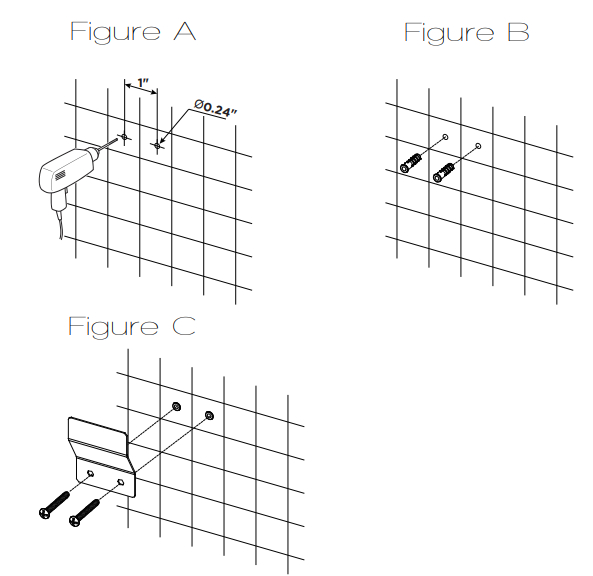
IMPORTANTBefore drilling any holes for the shower panel brackets, be sure there are no hidden cables or pipelines aligned with the desired drilling position.2-1 Drill the two holes for the top bracket 1” apart at the desired height.2-2 Drill the two holes for the bottom bracket 1” apart below the top bracket.2-3 Insert the wall anchors into the pre-drilled holes as shown in Figure B.2-4 Place the shower panel brackets aligned with the drilled holes and secure the brackets by tightening the screws.
STEP 3
INSTALLATION (hand shower)
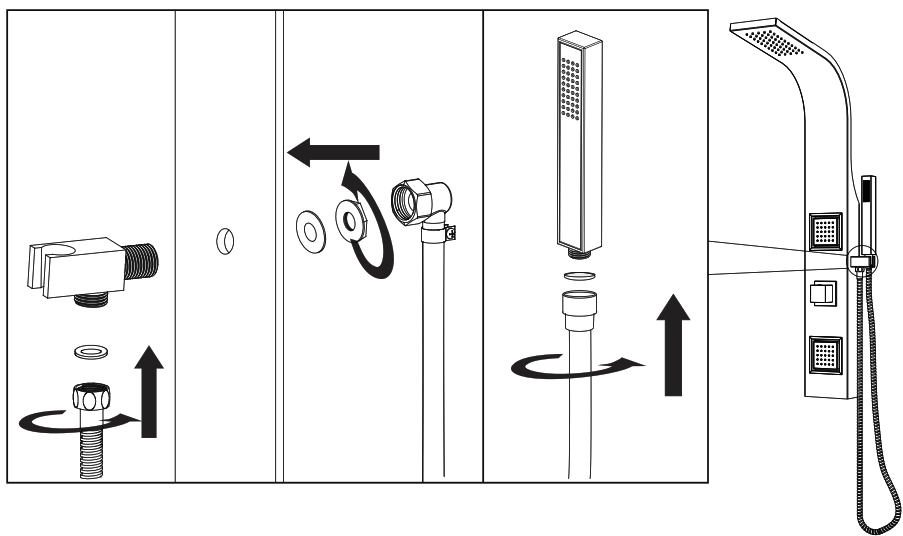
3-1 Insert the shower holder through the pre-drilled hole on the shower panel.3-2 Connect the water supply hose to the shower holder, as shown. Make sure all washers are inserted to prevent leakage.3-3 Once the shower panel is fully installed and hung on the bracket, you can install the hand shower hose to the holder connection.3-4 Connecting the hand shower to the hose, as shown.
STEP 5
INSTALLATION
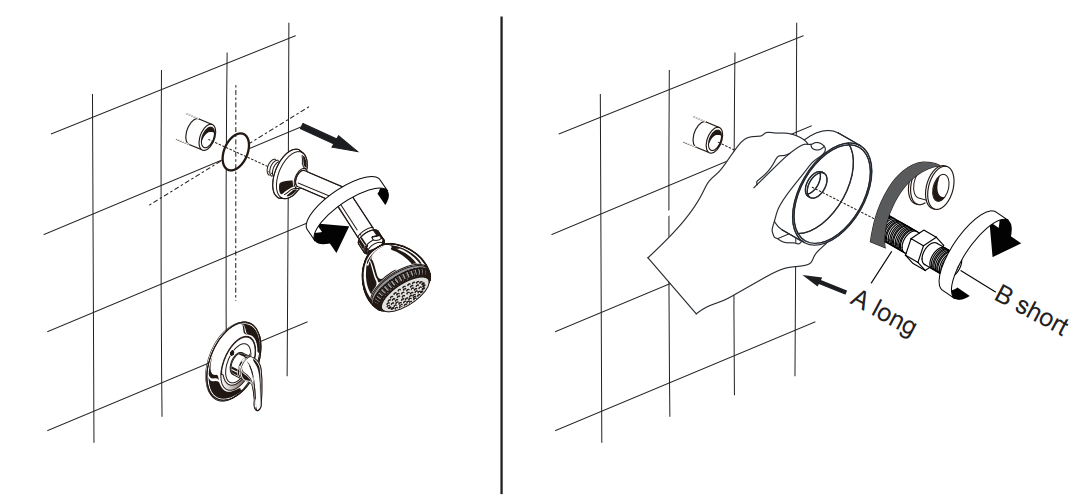
5-1 Remove the existing showerhead and shower arm assembly.5-2 Hold the plastic base against the wall. Wrap plumber tape around the “A” position of adapter threads. Connect the adapter to the existing outlet.
STEP 6
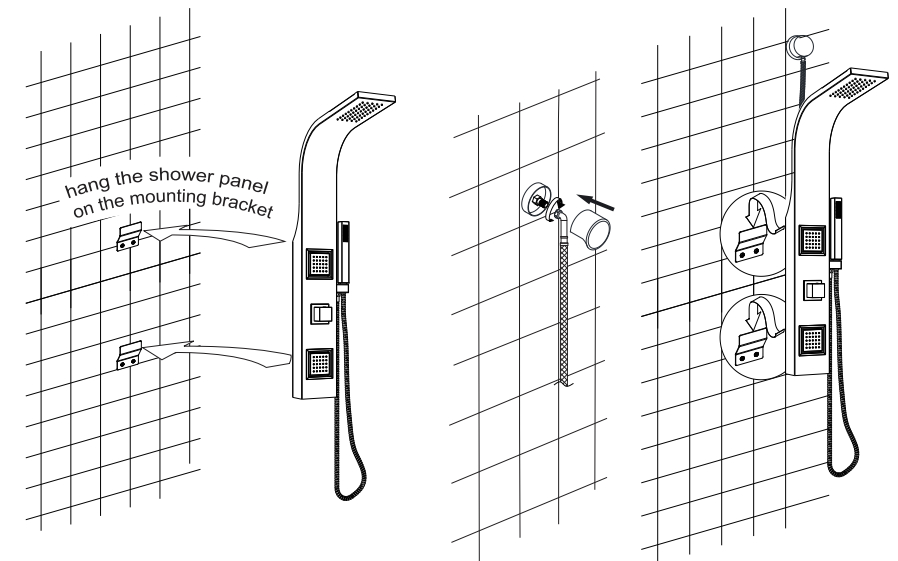
6-1 Make sure that the hoses are in the shower panel enclosure.6-2 Connect shower panel water supply hose to the existing plumbing and the mixing valve. The mixing valve will not function properly if the connections are incorrect. Before hanging the shower panel onto the wall, turn on shut-off valves and test all water functions of the shower panel and check all connections for leaks.6-3 Slide the shower panel down until it rests on the mounting brackets you installed. The shower panel must be seated onto the mounting brackets by pulling down the shower panel.
CARE AND MAINTENANCE ANZZIANZZI® products are crafted with superior quality standards and workmanship and engineered to stand the test of time. However, that does not mean the product can be neglected and will need some care and cleaning.
It is recommended to use regular soap and hot water along with a non-abrasive cloth or sponge to regularly clean the product. This avoids any nasty build-up or deposits which would be tougher to remove.
If you feel the use of stronger cleaning solutions or chemicals is necessary always test the cleaning solution or chemical on an inconspicuous area before applying it to the entire surface.Wipe all surfaces clean and rinse completely with water immediately after applying cleaner. Rinse and dry any overspray that lands on nearby surfaces.
DO NOT ALLOW THE CLEANER TO SOAK.Following these simple principles will ensure your ANZZI® product will remain as lustrous and stunning as the day it was first received. ENJOY!Sincerely, La Familia ANZZI®
![]() Have questions? Call us at 305-614-4070 or visit us at www.ANZZI.com
Have questions? Call us at 305-614-4070 or visit us at www.ANZZI.com
References
[xyz-ips snippet=”download-snippet”]