User Manual
![]()
AO Smith Storage Electrical Water Heater CEWHR-PE6
About A. O. Smith
In 1936, A. O. Smith developed and patented the process of glasslined water heaters, pioneering the modern standard in water heater design. Over the past years, A. O. Smith has gained respect and support of homeowners, contractors, architects, and specifying engineers in over 60 countries by providing innovative, energysaving products designed for years of troublefree service.
A. O. Smith Water Products Company, now the largest water heater manufacturer in the world, continues the tradition of innovation and becomes a global leader in water product industry.
User Guide
- Only professional installers acknowledged by A.O.SMITH are permitted to install the storage electrical water heater. If the water heater is installed with self-prepared installation materials or by un-authorized personnel, A.O.SMITH will not be responsible for all losses incurred thereby, including but not limited to pipeline leakage, fall or improper installation that may affect normal operation and performance of water heater.
- The storage electrical water heater is for residential application. Therefore, it may affect life expectation if it is used for commercial application.
- After installation and operation of the storage electrical water heater, users should inspect the system regularly and make necessary maintenance according to operation conditions. If any abnormality occurs, please stop operation immediately, and contact local authorized dealer for repair to ensure the normal, safe, and reliable operation of the water heater.
- The anode rod is a consumable part and it is generally suggested to check and replace the anode rod every 2 or 3 years. Users could contact the local authorized dealer for check and replacement to extend life expectation of water heater.
- Prior to any maintenance or repair of the storage electrical water heater, please cut off power supply. Unauthorized personnel are not permitted to adjust and repair the heater.
- In case the water heater is subject to dry heating, the generated steam or burning water might lead to serious scald. Therefore, it is necessary to fill the water heater with water. If dry heating occurs, cut off the power and water supply at once, stop the operation,contact local authorized dealer.and carry out inspection or repair by our company recommended professional installers.
- In case of any component soaked by water, the water heater is not permitted to use until checked by authorized service staff.
- Main components of the storage electrical heater are protected by insulation material to ensure safety use. Any damaged power cords should be replaced by authorized service staff.
- The pressure relief valve, equipped on the storage electrical water heater, is forbidden to change installation position or be blocked. Discharge pipe is required to connect the valve and down toward floor drain.
- In case of any fault of phase line and neutral line ,the power-off protection system will cut off the connection between water heater and electric supply circuit instantaneously. Please stop using, pull the plug, and contact local authorized dealer.
- This is only suitable for the model with the power-off protection system.
- Water, including hot water, out of the storage electrical water heater is not permitted for drinking.
- Electricity for the storage electrical water heater should be supplied by independent branch of circuit, of which electricity meter, breaker, maximum current need to be checked by professional electrician in advance.
- Power socket should be located at a dry place, and power cord should not be pushed or pulled with wet hand to avoid the danger of electric shock.
- Damaged electric wire, aged, loose and unfixed socket are not suggested to be used because of the danger of electric shock, short circuits, fires, etc. Please ensure power cord and socket could be connected well.
- A. O. SMITH Water Heater Company Ltd reserves the rights to explain all provisions mentioned above.
Caution: Failure to follow instructions in the user guide may cause fire disaster, which wouldbe a threat to life and property security.
Warning :Warning:the water heater is not permitted for use without reliable ground wire circuit for power socket. In case of the power indicator light off , please immediately stop using, pull plug and contact local authorized dealer. Well-drained floor drain is essential to prevent the damage to surroundings or downstairs in case of leakage of heater or joint.
Physical Characteristics
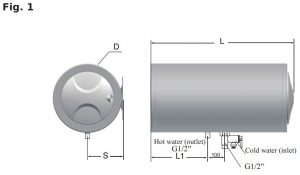
Dimensions
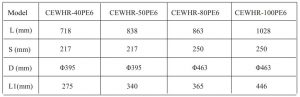
Specifications

Low Power: The rated power of the model is 1200W.Standard : The rated power of the model is 3000W.Note: Power of the model is on the plate of the body.
Safety Feature
High Temperature Limit Protection Switch
A high temperature limit protection thermal cutout is equipped on the storage electrical water heater. The switch cuts off the phase and neutral line instantaneously and simultaneously to guarantee safety in case water temp reach the high temp limited due to water heater fault. If this happens, please contact local authorized dealer.
Safety ValveA safety valve shown in fig.1 (Model G1/2-0.8, default 0.8MPa, not adjustable by user) is equipped on inlet tube of storage electrical water heater. The valve will relieve pressure automatically when piping system pressure exceeds the setting point. Discharge pipe is required to connect the valve in a frostless environment and down toward floor drain, and in any case the pipes should not be blocked.
The Power-off Protection System
In case of any fault of phase line and neutral line ,the power-off protection system will cut off the connection between water heater and electric supply circuit instantaneously. Please stop using, pull the plug, and contact local authorized dealer. This is only suitable for the model with the power-off protection system.
Product Features
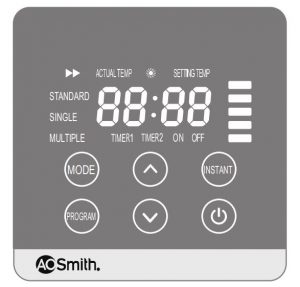
Fig. 2 Electronic Controller
Electronic Controller
MAXMAX function means more hot water output, therefore, better bath experience.
Hot Water Amount DisplayFive light blocks visibly indicate the hot water amount available in tank.
Program Program is to set clock, and timers for heating. Two timers are available.
Heating modeThis water heater has three types of heating modes.Selection can be made based on the season and purpose of hotwater, more convenient and energy-saving.
- “STANDARD”: Heat the full tank water at lower power mode.
- ” SINGLE”: Provide half tank ho t water rapidly to suffice single shower requirement.
- “MULTIPLE”: Provide full tank hot water rapidly to suffice multiple shower requirement.
Instant heating
When the water heater is in timer mode, press the ” instant ” key and the water heater enters the heating state immediately. The heating indicator glows, when the temperature preset by users is reached, the water heater returns to the state before setting. Also to exit from the instant heating mode, press the “instant” key again.
Power-off MemoryBy power-on more than 4 hours, the water heater could keep setting information for 72 hours when power supply is cut-off.
Intelligent DormancyIf no operation is performed within 3 minutes, the water heater enters into a dormant state.
Touch control panel Touch control panel is used for easy operation of this water heater. It displays electrical energyconsumption, set temperature, actual temperature, timer etc. The user can select the set temperature within the range of 35°C – 75°C.
Wired Remote control The heater may be hidden in the suspended ceiling to save space,and the wired remote control can be installed at a visible and convenient place.The wired remote control can be mounted on the wall or imbedded in the wall.
Glass – lined Protection Tank The Glass-lined protection tank is a patent by A.O.Smith, coating tank with Silicide smoothly and fusion at 870℃. The anti-rust and anti-scaling glass coating has pass 100,000 cycles fatigue life test in accordance with relevant UL Standards.
Anode Protection A powerful steel-core-anode rod is used to protect tank and greatly prolong service life of the water heater.
High Efficiency Energy-saving InsulationA polyurethane foam insulating layer without Freon reduces heat loss effectively.
Caution: Hot water over 50℃ has the risk of causing scald. Please do take care of yourfamily when settingtemp over 50℃.
Installation Instructions
Caution:Once the mounting, plumbing, power connection and water filling is done, then only the power supply should be given. The steps need to be followed as per the user guide.
- This water heater is heavy , hence will require at least 2 persons to carry and install, otherwise it may cause injury .
- Disassembly and assembly by users is prohibited.
MountingThis water heater should be installed at a location that is close to power socket, floor drain andwater utilisation point. As the outlet of the relief valve might discharge water during the operation of the water heater , therefore the floor drain should be provided near the waterheater . In the installation area, it should be ensured that the water leakage of the water heateror pipeline joints should not cause damage to the articles in adjacent region or lower layer ofthe building. While installing the water heater, please be sure for mounting the water inlet andoutlet pipes at the bottom of the water heater.
Vertical installation of the water heater is strictly prohibited.
Mounting procedures and precautions
The installing surface must be capable of supporting at least four times the weight of the waterheater when filled with water. If the water heater is not installed on the bearing wall or is mounted on hollow brick wall, corresponding protective measures must be provided, for example supporting rack, through-wall screw, mounting of back plate, etc.
Prior to confirming the positions of bolt holes, retain at least 300 mm space on the right side ofthe water heater , to open the side cover for repair .
- If the water heater is embedded into a gusset plate, the plate on the right side should bemoveable for convenience to dismantle the end cover for repair and maintenance.
- The water heater should not be located outdoors or in an area subjected to freezing.environment. If freezing occurs, the container and water pipe will break, causing scald orleakage.
Caution:
- This water heater should be installed with the fixing accessories provided.
- The water heater should be hung until the accessories are fixed firmly or else the heater mayfall off and serious injury accident might be caused.
- For the Unit with maximum rated power 1200W, hence a single dedicated power supply circuit is proposed, the core area of electric supply wire should not be less than 1.5 mm 2.
- For the Unit with maximum rated power 3000W, hence a single dedicated power supply circuit is proposed, the core area of electric supply wire should not be less than 2.5 mm 2.
Mounting Guidelines
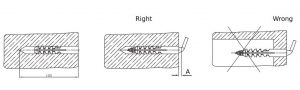
Use a drill bit with diameter of 12 mm to drill 2 holes at least 100 mm deep in the wall.The two holes should be aligned horizontally. The horizontal distance between the 2 holes is shown in the below table(Fig. 3).
The distance A is 5~10mm(Fig. 4).The nylon expansion tubes should be inserted into the drill holes. It is necessary to use a steel pipe to fastern the bolts into the nylon expansion tubes.The head of the screws should be vertical upward. Place the water heater on wall mounting screws. Downwards on the heater to ensure that the water heater is fixed steadily.
Fig. 3 Mounting distance of hangers

Caution: Original installation accessories should be used on solid wall. The heater may have has risk of fall in case of improper installation.
Fig. 4 Installation of mounting bracket
Plumbing Connection
Connect the valve provided with this unit to the inlet of the (inlet pipe has a blue cap). The arrow points to the direction of water flow (to the water heater). The relief valve must be connected to the discharge pipe. The hot water pipe is connected to the water outlet (outlet pipe has a red cap). If the water pressure of the inlet pipe approaches to or exceeds the relief limit (0.8 MPa) of the multi-functional relief valve, please install a reducing valve on the water inlet pipe away from the water heater. Refer to Fig. 5 for pipe connection. PPR pipes should be used for connection between the tapping pipe in users house and the water heater.
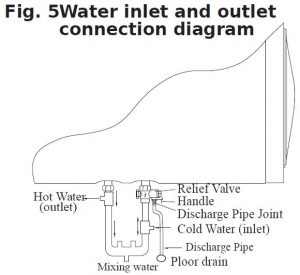
Caution: Apply proper sealing to the pipe joints to prevent leakage. At the same time, the relief valve may not be tightened excessively to avoid damage.
Power connection
The power cord and plug has been provided for the water heater. Users only needs to insert theplug into the corresponding electrical socket.Caution: Ensure that the socket is grounded reliably. Use an independent high-quality socket, its rated current should not be less than 5.5A(CEWHR-PE6-1200) /13.1A(CEWHR-PE6-3000) and ensure reliable contact with the plug.
Water filling
After all the pipes are connected, first open the discharge valve of the water heater, then the feed valve. Then fill the water heater with wate, rexhaust the air till water stream flows uniformly out of the hot water outlet. This indicates that the water heater has been filled up. Please close the hot water discharge valve and check all connections for any leakage. If leakage occurs, empty the inner tank, repair the leaked connection and then refill the water heater with water.For your convenience, please don’t close the feeding valve while filling the water.
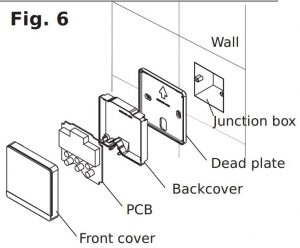
ControI Box Connection
While installing a control box on the Wall, if the grooves or clips are installed on the Wall, lay the control wire into the grooves or through the clips directly, and then fix the control box on a dead plate preinstalled on the wall. In case that the gland is embedded in the wall, firstly remove four screws of the control box, open the box, and take out the control wire from the Control box; plug off the wire from the PCB, and then pass the control wire through the gland(pay attention to not damage the ten-pin wire); plug the ten-pin plug on the PCB, then fix the PCB into the backcover, close the front cover, screw down the screws, and finally secure the whole control box on the dead plate preinstalled on the wall.
Operation Instructions
Caution: Before using the water heater , make sure that it should be filled with water andthe power plug has been connected properly.
Touch control panel functions Fig. 7

Operation instruction
- Initial powerFor the first-ever power connection, electronic controller will run self-inspection program. All screen indicators will glow (Fig. 7) and go out seconds later indicating the heater is standby. Notice: When water heater is disconnected with power supply by plug-out or power cut, heating mode、 temperature setting、timer-1 and standby will load status before the break.By power-on more than 4 hours, the heater could keep clock setting information for 72 hours when power supply is cut-off.
- Power ON/OFF( Fig.8)Press the ON/OFF key ” “, the water heater is on. Firstly, the electronic controller default state is at preset temperature mode and default display time. Display the current clock ” 12:00 “.The setting temperature is 70℃.
- Clock Setting (Fig.9 )In non-timing mode, press the “PROGRAM” key for 3 seconds approximately and the hour digit flashes. Press the “Increase button” or “Decrease button” key to set the hour; then, press “PROGRAM” key again, the minute digit starts flashing and then press the “Increase button” or “Decrease button” key to set the minute. In case of pressing continuously, the data changes ceaselessly; then press “PROGRAM” key again and exit the clock setting mode.

- Temperature Setting(Fig.10)With heater power on, user could press “Increase button” or “Decrease button” key to set temperature within the range form 35℃ to 75℃. In case of pressing continuously, the data changes ceaselessly;
- Timer(Fig.11, 12 , 13)With heater power on, user could press the “PROGRAM” key to change the status among“Timer-1”, “Timer-2”, “Timer-1 and Timer-2”. With Timer-1 indicator light up, user could press the “PROGRAM” key for 3 seconds to enter Timer-1 setting status.With“TIME ON” and flashing, user could press “Increase button” or “Decrease button” to increase or decrease “TIME ON” by 30 minutes.Press the “PROGRAM” key again,with “TIME OFF”and flashing, user could increase or decrease “TIME OFF” in the similar way. User could change the status among time-on, time off and exit by touching the “PROGRAM” key. Notice : Default timing interval for usage is 21:00 ~ 8:00. The timer scope of the timer1 is from 21:00~8:00.For timer2, the range is free.With Timer-2 indicator light up, user change time2 in the similar way.User could press the “program” key to enter Timer-1 + Timer-2 setting status.It means there are two timers in a day.The water heater will work during the period from “timer on” and “timer off”.
- Heating Mode(Fig.14)This water heater has three types of heating modes. User could press the “MODE” to change the status among“STANDARD”, “SINGLE”, “MULTIPLE”.Selection can be made based on the season and purpose of hot water, more convenient and energy-saving.1. “STANDARD” : Heat the full inner tank of water in 2000 W(Standard ) or 800W(Low Power ).2. “SINGLE” : Heat the upper half inner tank of water in 3000W(Standard ) or 1200W(Low Power ).3. “MULTIPLE” : Heat the full inner tank of water in 3000W/2000W (Standard )or1200W/800W(Low Power).
- MAX (Fig. 15)MAX function means more hot water output, therefore, better bath experience.Notice:The ”MAX” mode will be to start automatically when more hot water is required.This mode is only avaliable in “SINGLE” and “MULTIPLE”.
- Instant heatingWhen power on, users could touch “INSTANT” button to turn on “Instant heating ”with the indicator ” ” light up. Once reach setting temp, the heater will automatically change back to the mode before “Instant heating”.


Electric leakage detectionIn case of any fault of phase line and neutral line ,the power-off protection system will cut off the connection between water heater and electric supply circuit instantaneously.the indicate light will be off. Press the “reset” button again. In failing to return to normal. Please stop operation immediately, and contact local authorized dealer for repair to ensure the normal, safe, and reliable operation of the water heater.
Notice :
- This is only suitable for the model with the power-off protection system.
- Users should test the function of the power-off protection device regularly.Press “test” button and the indicator light will be off.Then press “reset” button and the indicator light will be on.Or else, please stop operation immediately, and contact local authorized dealer for repair to ensure the normal, safe, and reliable operation of the water heater.
Safety ValveSafety valve is a kind of protection device against overpressure, thus it is a normal phenomenon to see water discharged from safty valve when water pressure rises over 0.8MPa to heating or supply reason.
Notice :Users should check safety valve regularly as follow:Under the normal circumstance,open the relief valve regularly(turn the handle of the relief valve)to get rid of the calcium carbonate deposit,ect. If the wate flower out, the relief valve works normally without blockage; If no water flows, please stop operation immediately, and contact local authorized dealer .
Maintenance Instructions
Warning: Only A. O. Smith Authorized service personnel should maintain and repair thiswater heater. Unauthorized servicing could result in serious injury or property damage. While repairing the water heater , please disconnect the power plug from the socket.
Caution: Prior to the repair of the water heater , please refer the troubleshooting chart to rule out all the obvious causes.
Maintenance
- If the water heater needs to be drained, close the water inlet valve first, open the drain valve, then rotate the handle of the relief valve, release the nut connected to the water outlet joint of the inner tank and drain water from the discharge tube.
- It is recommended that the tank should be flushed to remove sediment which may buildup during operation.Specific operating procedures are as follows:
- Disconnect the power .
- Screw off the relief valve and remove the internal water inlet pipe of the water heater.
- Connect the water outlet pipe connection of the water heater to the tap water .pipeline and fill water from this end, the water inlet pipe connection is connected to floor drain by pipes and discharge water from this end.
- Open the water inlet valve to get a maximum tap water flow, flush the tank till the drained water from the tank becomes clean.
- Connect the water inlet and outlet pipes again according to Fig. 7, and put the water heater into use after a leakage test.
Caution: The drained water could have a high temperature, a scald might be caused, please be careful.
Warning
- Before installation, check and confirm if water heater power,match up with each other. electricity meter and wiring
- The water heater should be grounded reliably. It is prohibited to connect the earth wire to neutral wire or tap water pipe.
- If the safety valve has been installed by the manufacture, for sake of safe operation.users can not alter the installation location or block its outlet without permisstion.
- Water of 50℃ or above may have risk of scald. Please check water temp by hand and use water mixing valve to get water in appropriate temperature
- Be cautious about the hot water discharge through safety valve, as it may have risk to cause scald.
- For any damage of power cord, please contact local authorized dealer for replacement.
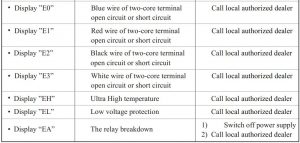
Troubleshooting

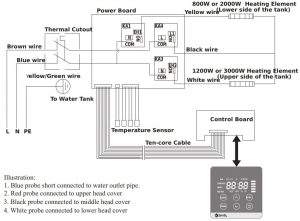
Wiring Diagram
Circuit Diagram
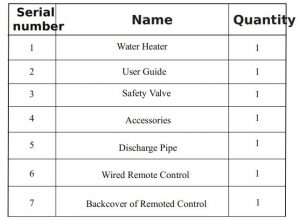
Part List
![]()
A.O. SMITH WATER HEATER CO., LTD
A.O.Smith reserves the right to make product changes or improvements at any time without notice.
AO Smith Storage Electrical Water Heater CEWHR-PE6 User Manual – AO Smith Storage Electrical Water Heater CEWHR-PE6 User Manual –
Questions about your Manual? Post in the comments!
[xyz-ips snippet=”download-snippet”]