
RO-QUICK90 System Filter Change Instruction
How To Replace Stages 1, 2 Pre-Filters:Turn OFF cold water supply to RO system. Turn OFF tank’s ball-valve. Turn ON the RO faucet briefly to relieve the built-up pressure inside the RO system. This will make opening the housings easier.
*Please remove red locking clips from Stage 1 & 2 tubing connection parts before replacing Stage 1 & 2 filters.
The Stage-1 Sediment filter is tucked between stage 2 & 4 CT-24CAB filters (see Fig. 1). For ease of access, please tilt the filters to a convenient position then do the following:
Step 1. Disconnect tubing from Point A & Point I, discard used filter.Step 2. Snap on the new filter onto the 2 holding clips. Make sure the Flow direction “arrow ![]() ” on the filter is pointing toward the output direction Point I. Re-connect tubing securely to both ends of the new filter.
” on the filter is pointing toward the output direction Point I. Re-connect tubing securely to both ends of the new filter.
The Stage-2 Pre-Carbon filter is located above the 3rd stage membrane filter (See Fig. 1). For ease of access, please tilt the filters to a convenient position then do the following:
Step 1. Disconnect tubing from Point B & Point K. Discard used Filter.Step 2. Snap on the new filter onto the 2 holding clips. Make sure the Flow direction “arrow ![]() ” on the filter is pointing towards the output direction Point B. Reconnect tubing to both ends of the new filter.
” on the filter is pointing towards the output direction Point B. Reconnect tubing to both ends of the new filter.
*Please re-install red locking clips from Stage 1 & 2 tubing connection parts after tubings are connected to the filters.

Fig. 1
1
 Turn counter-clockwise to open the membrane housing cap.Fig. 2
Add a little bit lubricant on double o-rings.
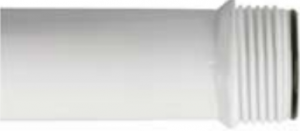
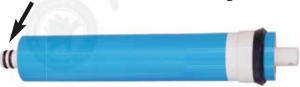
Fig. 3
How to Replace Stage-3 Membrane:
- Turn OFF the cold water supply to RO system. Turn OFF tank ball-valve. Lift up RO faucet lever briefly to relief the built-up pressure inside the RO system. This will make opening the housings easier.
- See Fig. 1. Locate the Membrane housing on the system (labeled “Membrane”). Remove the WHITE tubing from the housing’s cap at point D. To remove tubing, Push In and Hold Down on the collet ring square against the fitting. With the collet held in this position the tube can be removed. Open up the cap (turn counter-clockwise) See Fig. 2. Using a plier, remove the used membrane for disposal.
- Once the membrane is removed, please tilt the RO system at an angle to drain out residual water from inside the membrane housing and insert the new membrane using a plier. Push membrane into housing. Avoid touching the Membrane with your hands to prevent contamination!
- Important! Make sure the “double-ring” end of the membrane goes into the housing first as shown in Fig. 3. The membrane cannot filter water if it’s inserted in the WRONG direction!
How to Replace Stage-4 Carbon Filter:
The Stage-4 Pre-Carbon filter is located above the 1st stage sediment filter (See Fig. 1). For ease of access, please tilt the filters to a convenient position then do the following:
Step 1. Disconnect tubing from Point H & Point J, discard used Filter.Step 2. Snap on the new filter onto the 2 holding clips. Make sure the Flow direction “arrow ![]() ” the filter is pointing towards the output direction. Reconnect tubing to both ends of the new filter.
” the filter is pointing towards the output direction. Reconnect tubing to both ends of the new filter.
NOTE: The QC fittings come with an End Plug that needs to be removed before the tubing can be connected. See Fig. 4.
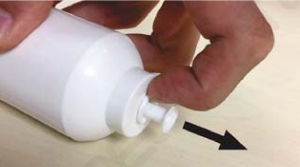
Fig. 4
©2019 APEC Water Systems. All rights reserved. v1.2019.Jan ,
References
[xyz-ips snippet=”download-snippet”]