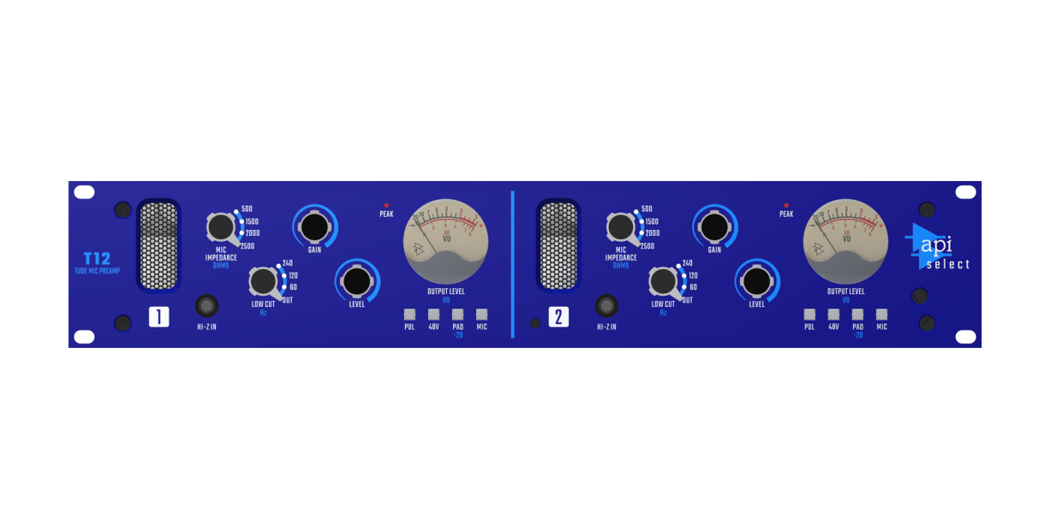
T12 Tube Mic Preamp

OPERATOR’S MANUALWritten for Automated Processes Incorporatedby Dan PfeiferRev. 21-04-26
About This Manual
This manual explains the operation and applications of the API Select T12 Tube Mic Preamp. This manual is organized in sections that correspond to the front panel controls and rear panel interface.Legend:
- UPPER-CASE BOLD = POTS, CONTROLS, SWITCHES, BUTTONS
- UPPER-CASE = REAR PANEL CONNECTIONS
Manual Revision History: YY-MM-DD format Original: 21-04-26 Revised:
Dan Pfeifer is a Professor of Recording Industry at Middle Tennessee State University
Important Safety Instructions
- Please read these instructions
- Keep this information in a safe place
- Do not use this device near water
- Clean only with a dry cloth
- This product uses high-voltage vacuum tube technology. To avoid a potentially-lethal shock, handle it with care. Never open the lid when the unit is on.
- Wait at least 5 minutes after the unit has been unplugged before opening the lid to replace tubes. Reinstall lid before powering.
- Do not block any ventilation openings
- Do not stick object(s) through the top, side, or front panel vents.
- Allow at least 1U of empty rack space above the unit for tube ventilation.
- The rear panel is a heatsink and will get warm. Leave at least a few inches of space around the rear panel area to allow for proper power supply cooling. Do not touch therear panel surface for an extended period of time when the unit is powered on.
- Do not install near any heat sources such as radiators, heat registers, stoves, or other devices that produce heat
- Do not defeat the safety purpose of the polarized or grounding-type AC plug
- Protect the AC power cord from being walked on or pinched
- Use only attachments/accessories specified by the manufacturer
- Unplug this device during lightning storms or when unused for long periods of time
- Refer all service to qualified personnel
ATTENTION: Exposure to extremely high noise levels may cause permanent hearing loss or damage. Individuals vary considerably in susceptibility to noise-induced hearing loss, but nearly everyone will lose some hearing if exposed to sufficiently intense noise (this may include music) for a period of time. Be safe.
WARNING – To reduce the risk of fire or electric shock, do not expose this apparatus to rain or moisture.
Introduction
Welcome to the API Select line of premium tube-based audio processors and thank you for choosing the T12 Tube Mic Preamp. The T12 is a classic 2-channel, all-tube, Class-A microphone preamplifier with a proprietary AP2516 input transformer in the input stage and a custom API output transformer. Built with 12AT7WC and 12BH7 dual-triode vacuum tubes, the T12 represents the next step in API’s preamplifier technology and new vistas of tonal shaping while retaining the unmistakable API sound quality. The result is one of the world’s best-sounding mic preamps that’s capable of handling an infinite number of production applications, including stereo operation. Carefully designed to deliver a wide range of preamp options, the T12 delivers warmth, clarity, and punch.

1.1 Features
- All-tube, Class-A microphone preamplifier
- Proprietary AP2516 input transformer
- Audio circuit uses 12AT7WC preamp and 12BH7 output dual-triode vacuum tubes, with custom transformer output
- Variable microphone input impedance
- Switchable 48-volt phantom power
- High-impedance, unbalanced ¼” instrument input
- MIC/HI-Z input switch
- 20dB input pad
- 11-step detented preamp gain control
- Low-cut filter with 3 fixed frequencies
- 11-step detented output trim with 0.5dB steps for precise control
- Detented controls for accurate recall and channel matching
- LED peak indicator
- Vintage look, backlit VU meters indicate output levels
- XLR and ¼” TRS output connections
Quick Start
One tip to get started: We try to design all of our processing modules with the understanding that there is never enough time to read a manual and learn all of the features in the 10 seconds that is allowed during a setup. If you simply set all of the parameters as follows the T12 will have a useful, but the conservative effect on the signal.After the unit has been powered on and warmed up*:
- Connect a microphone to the INPUT XLR on the rear panel
- Set MIC IMPEDANCE to 1500 OHMS
- Set LOW CUT to OUT
- Set GAIN to the fully counter-clockwise position
- Set LEVEL to the fully clockwise position
- Disengage the POL (polarity inverter) switch
- Engage the 48V switch if a phantom-powered microphone is connected**
- Engage the MIC switch to select the XLR microphone INPUT on the rear panel
- Adjust the GAIN control to set the desired level
These settings will provide a good starting place for additional tweaking to achieve the desired sound.*NOTE: The T12 is a tube-based processor that requires 15 minutes for the tubes to warm up to a stable temperature before tonal qualities become consistent.**NOTE: CAUTION! Only engage the 48V switch when microphones that require 48-volt phantom power are connected. Phantom power will damage many ribbon mics,especially vintage ribbon mics, so use great care when engaging 48V phantom power.**NOTE: CAUTION! Never connect or disconnect microphones when 48-volt phantom power (48V) is engaged. Wait 5-10 seconds after the 48V switch is disengaged for the circuit to discharge before disconnecting microphones.
Overview
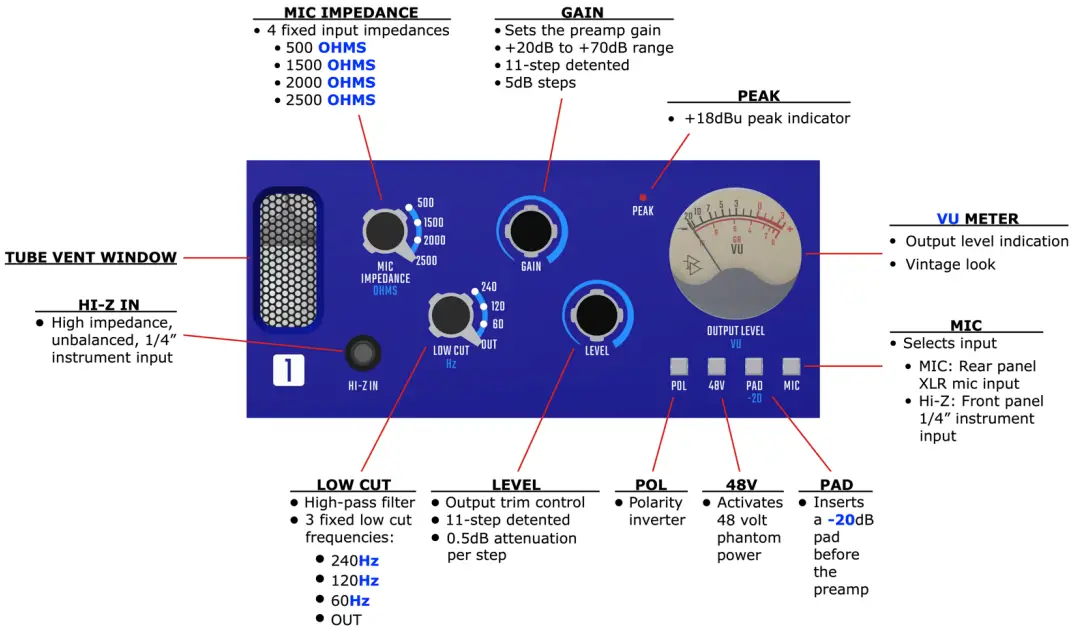
The T12 Mic Preamp provides a comprehensive suite of controls:
- HI-Z IN: High-impedance, 500kW, unbalanced ¼” instrument input
- MIC IMPEDANCE: Sets the impedance of the microphone input
- Four fixed impedance choices: 500, 1500, 2000, and 2500 OHMS
- LOW CUT: Sets the cut-off frequency of the high-pass filter
- Four filter choices: OUT, 60, 120, and 240 HZ (Hertz)
- GAIN: Sets the amount of gain applied to the input signal
- LEVEL: Trims the level of the output stage
- POL (Polarity): Toggles to activate the input polarity inverter
- 48V: Toggles to apply 48-volt phantom power to the microphone INPUT
- PAD: -20dB input pad (applies to both MIC and HI-Z inputs)
- MIC: Toggles between the MIC and HI-Z inputs
- PEAK: +18dBu LED peak indicator
- OUTPUT LEVEL VU: Back-lit, vintage look output VU meter
Preamp Controls
Each channel of the T12 Mic Preamp is equipped with a comprehensive set of parameters and features.
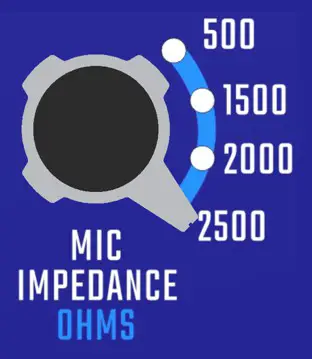 |
4.1 Microphone Input ImpedanceMIC IMPEDANCE OHMS: Selects the impedance of the microphone INPUT
|
 |
4.2 Low Cut FilterLOW CUT: Selects the function of the high-pass filter
|
 |
4.3 Preamp GainGAIN: Sets the amount of gain the preamp applies to the input signal
|
 |
4.4 Output Trim
LEVEL: Trims (attenuates) the level of the output stage
|
Function and Routing Controls
The T12 Mic Preamp is equipped with a flexible set of preamp functions and routing controls. Functions include a polarity inverter, 48-volt phantom power, -20dB pad, and input selector. These features provide increased control of the input signal arriving at the preamp.
 |
5.1 Polarity Inverter (POL)The T12 Mic Preamp is equipped with an input polarity inverter (POL), sometimes referred to as a “phase reverse” or “Ø” switch. The POL switch flips the polarity of the input signal before the preamp stage.POL: Engage to activate the polarity inverter
|
 |
5.2 48-Volt Phantom PowerThe T12 Mic Preamp can supply 48-volt phantom power to the microphone INPUT.48V: Engage to apply 48-volt phantom power to the microphone INPUT
|
|
NOTE: CAUTION! Only engage the 48V switch when microphones that require 48-volt phantom power are connected. Phantom power will damage many ribbon mics, especially vintage ribbon mics, so use great care when engaging 48V phantom power.NOTE: CAUTION! Never connect or disconnect microphones when 48-volt phantom power (48V) is engaged. Wait 5-10 seconds after the 48V switch is disengaged for the circuit to discharge before disconnecting microphones. |
|
 |
5.3 -20dB Input PadThe T12 Mic Preamp is equipped with a -20dB input pad (PAD -20) before the preamp.PAD -20: Toggle to apply 20dB of attenuation to the input signal
|
 |
5.4 Input SelectionThe T12 Mic Preamp is equipped with an input switch (MIC) that toggles between the XLR microphone input on the rear panel and the HI-Z instrument input on the front panel.MIC (Microphone): Toggle to select the MIC or HI-Z input
|
High Impedance Instrument Input
In addition to the XLR microphone INPUT on the rear panel, the T12 Mic Preamp is equipped with a ¼” high-impedance, unbalanced instrument input.
 |
HI-Z IN: High-impedance, 500kW, unbalanced instrument input
|
Level Indication
Each channel of the T12 Mic Preamp is equipped with a LED peak indicator and VU output level meter for level indication.
 |
7.1 Peak IndicatorPEAK: Indicates when output level reaches or exceeds +18dBu
|
 |
7.2 VU MeterOUTPUT LEVEL VU: Indicates the signal level at the OUTPUT connector
|
Tube Vent Window
 |
The T12 Mic Preamp is equipped with a metal-grate vent window that provides ventilation for cooling and allows the tubes to be seen. This vent window should never be blocked when the unit is powered on. |
Power Switch & Rear Panel Connections
 |
9.1 Power SwitchThe power switch for the T12 Mic Preamp is located on the right side of the front panel.Power: Toggle to power the T12 ON and offNOTE: The T12 is a tube-based processor that requires 15 minutes for the tubes to warm up to a stable temperature before tonal qualities become consistent. |
9.2 Rear PanelThe rear panel of the T12 Mic Preamp provides audio inputs and outputs for both channels connections,as well as AC power connection, voltage selection, and fuse. |
|
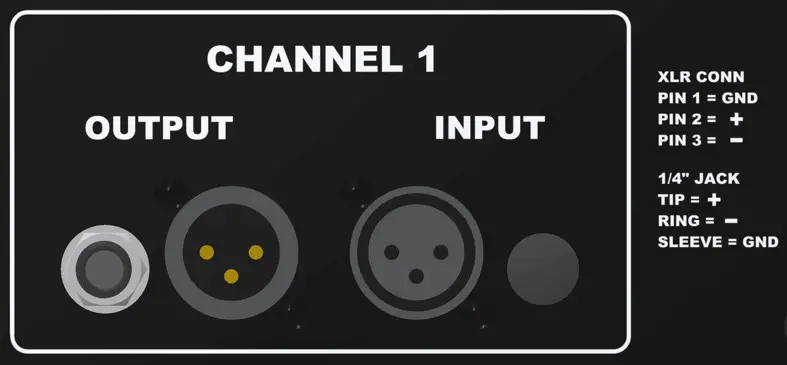 |
9.2.1 Audio ConnectionsEach audio channel, Left and Right, have INPUT and OUTPUT rear panel connections.IMPORTANT NOTE: Care should be taken not to short the outputs, as damage will occur to the output stage. |
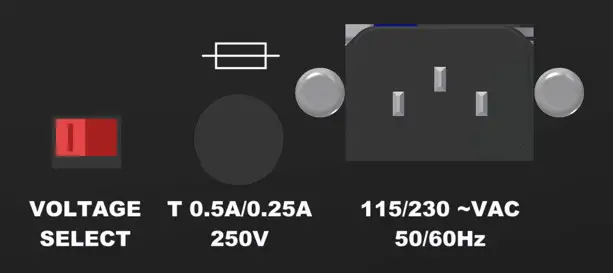 |
9.2.2 AC PowerThe AC power connection, fuse, and voltage selection switch is located on the rear panel of the T12.115/230V~: Voltage selection switchFuse: 0.5A/0.25A 250V
|
APPENDIXA1 SpecificationsA2 Block DiagramA3 Recall ChartA4 User Accessible MaintenanceA5 API Limited Warranty and Service
A1 Technical Specifications
| • Input Impedance: |
|
| • Output impedance: | 75 ohms, can drive 600 ohm loads |
| • Maximum input level: | +24dBu with -20dB PAD engaged and gain set to 20dB |
| • Gain Range: | 0db to +70dB |
| • Maximum output level: | +24dBu |
| • SNR: | 98dB |
| • Frequency Response: | 20Hz – 30kHz (+0dB / -1dB) |
| • Power Consumption: | 40W |
| • Size: | 19” x 3.5” x 12” Deep |
| • Size (Boxed for Shipping): | 21” x 9” x 15” |
| • Actual Weight: | 14 lbs. |
| • Shipping Weight: | 17 lbs. |
A2 Block Diagram

A3 Recall Chart
T12 RECALL CHART
| ARTIST: ENGINEER:DATE: | NOTES: DRAWN BY:STUDIO: |
 |
| NOTES |
 |
| NOTES |
A4 User Accessible Maintenance
A4.1 Tube Replacement
The T12 Mic Preamp features 12AT7WC and 12BH7 dual-triode vacuum tubes in each channel. The factory-installed tubes are selected at API for optimal performance.All tubes are socketed and can be replaced if required.
- Make sure the power switch is off
- Make sure the unit has been unplugged for at least 5 minutes before opening the chassis
- Four screws on the sides remove the lid and allow access to the printed circuit board
- No user tube bias adjustments
A4.2 VU Meter Level Jumper
A marked internal jumper selects between 0VU = +4dBu and 0VU = +14dBu for the OUTPUT LEVEL VU meter (one per channel).
- Make sure power switch is off
- Make sure the unit has been unplugged for at least 5 minutes before opening the chassis
- Four screws on sides remove the lid and allow access to the printed circuit board
- No user calibration adjustments
A5 API Limited Warranty and Service Information
a) Warranty Information: API products carry a one-year factory service and five-year parts warranty from the date of purchase. API (Automated Processes, Incorporated) does not cover claims for damage due to alteration and/or abuse. This warranty is limited to failures during normal use, which is due to defects in material or workmanship. If any defects are found in the materials or workmanship, or if the product fails to function properly during the applicable warranty period, API, at its option, will repair or replace the product. NOTE: Vacuum Tube part warranty is limited to 90 days from the date of purchase.b) PLEASE NOTE: The design or quality of any non-authorized third-party service or vendor is beyond the control of API. Therefore, the use of NON-API VPR Alliance modules in any API product – including consoles may VOID this warranty. Also, service or modification of any API unit except by an authorized API representative may VOID this warranty.c) API reserves the right to inspect any products that may be the subject of any warranty claims before repair or replacement is carried out. The final determination of warranty coverage lies solely with API.d) This warranty is extended to the original purchaser and to anyone who may subsequently purchase this product within the applicable warranty period. Proof of purchase may be required.e) For questions regarding the operation, interfacing, or service of your API product, please contact your API dealer from whom you purchased the unit. Many times, your authorized API dealer is the fastest and most cost-effective way to maintain and service your product.f) The below steps are the best way to initiate the repair process or to submit a parts order request:Repair procedure:
- Fill out a Return Authorization (RA) form at service.apiaudio.com.
- Wait to receive an e-mail from API Audio with an RA#.
- Use the API original box to package the unit. Write the RA# large and legibly on the box (if the RA# is not clearly visible on the box, the unit may be rejected by ourreceiving department)
- Include a copy of the RA form with the unit.
- Ship the product freight prepaid to API SERVICE DEPARTMENT 8301 Patuxent Range Road – Ste A1 Jessup, MD 20794
Parts Order procedure:
- Fill out the online PO form (for parts and parts numbers not listed online please fill out the PO form with your name, e-mail, contact phone, and shipping address and describe the part you need).
- Submit online PO form.
- API will e-mail you back with part numbers and procedures on how to order/pay.
g) This is your sole warranty. API does not authorize any third party, including any dealer or sales representative, to assume liability on behalf of API or to make any warranty for API.h) THE WARRANTY GIVEN ON THIS PAGE IS THE SOLE WARRANTY GIVEN BY API AND IS IN LIEU OF ALL OTHER WARRANTIES, EXPRESS AND IMPLIED, INCLUDING THE WARRANTIES OF MERCHANTABILITY AND FITNESS FOR A PARTICULAR PURPOSE. THE WARRANTY GIVEN ON THIS PAGE SHALL BE STRICTLY LIMITED IN DURATION TO FIVE (5) YEARS FROM THE DATE OF THE ORIGINAL PURCHASE FROM API OR AN AUTHORIZED API DEALER. UPON EXPIRATION OF THE APPLICABLE WARRANTY PERIOD API SHALL HAVE NO FURTHER WARRANTY OBLIGATION OF ANY KIND. API SHALL NOT BE LIABLE FOR ANY INCIDENTAL, SPECIAL, OR CONSEQUENTIAL DAMAGES THAT MAY RESULT FROM ANY DEFECT IN THE API PRODUCT OR ANY WARRANTY CLAIM.i) This warranty provides specific legal rights and you may have other rights, which vary from state to state.

Automated Processes8301 Patuxent Range RoadJessup, MD 20794 USA301-776-7879http://www.apiaudio.com
References
[xyz-ips snippet=”download-snippet”]

