
Aprilaire E080 Dehumidifier
WHOLE HOME DEHUMIDIFICATION
The Aprilaire® Dehumidifier controls the humidity level in your entire home A powerful blower inside the dehumidifier draws air into the cabinet, filters the air and removes moisture, then discharges the dry air into the HVAC system or dedicated area of the home Inside the cabinet, a sealed refrigeration system removes moisture by moving the air through a series of tubes and fins that are kept colder than the dew point of the incoming air The dew point is the temperature at which moisture in the air will condense, much like what occurs on the outside of a cold glass on a hot summer day The condensed moisture drips into the dehumidifier drain pan to a drain tube routed to the nearest floor drain or condensate pump After the moisture is removed, the air moves through a second coil where it is reheated before being sent back into the home The air leaving the dehumidifier will be warmer and drier than the air entering the dehumidifier.
You can reduce the amount of humidity that enters the home by closing windows, doors, and fireplace flues when outdoor humidity is high, and by drying clothes outside Direct exhaust from kitchen vents and bath fans is the best means of controlling humidity due to cooking and showers/baths The dehumidifier is not designed to prevent window condensation in winter Use ventilation to lower indoor humidity levels in the winter
SETTING THE DESIRED HUMIDITY LEVEL
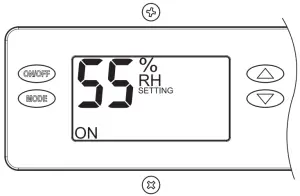 The dehumidifier on-board control will display the humidity setting when not running, and displays the measured humidity when running The
 ![]() and
and ![]() buttons allow the humidity level to be set from 40% to 80% relative humidity Use the ON/OFF button to turn the dehumidifier ON or OFF Set the control at 55%RH when first installed Allow the dehumidifier to run until it reaches the setting before deciding if you want to change the setting 90-1853
buttons allow the humidity level to be set from 40% to 80% relative humidity Use the ON/OFF button to turn the dehumidifier ON or OFF Set the control at 55%RH when first installed Allow the dehumidifier to run until it reaches the setting before deciding if you want to change the setting 90-1853
- If you prefer the air to be more dry, decrease the humidity setting
- If you prefer the air to be less dry, increase the humidity setting
Your comfort is the best measure of how to adjust your setting When first installed, your dehumidifier has to remove all the moisture that is initially in your home The home acts like a sponge so the moisture in the materials of your home is at the same level as the air After drying the air, the materials of the home will release moisture back into the air until they are again at the same level As a result, it is not uncommon for the dehumidifier to operate for an extended period when first installed
ENERGY SAVINGS TIPS
ENERGY SAVINGS TIP #1: Adjust the humidity setting to be as high as is comfortable to reduce dehumidifier run time. If it feels clammy or “smells musty”, lower the humidity setting. To save energy, turn the dehumidifier to OFF when you open your windows, just as you would with air conditioning.
ENERGY SAVINGS TIP#2: If vacating your home for an extended period in the summer, set the RH at 55% and set your thermostat as high as you are comfortable setting it to in the cooling mode. Consult with appropriate professionals regarding the highest temperature that is safe for your pets or possessions. This will keep the humidity at a controlled level while minimizing the amount of cooling energy used.
HOW DOES THE DEHUMIDIFIER WORK?
Once per hour the dehumidifier will measure the humidity level of the air and compare it to the humidity setting If the humidity in your home is higher than the setting, the dehumidifier will dehumidify the air until the humidity level drops below the setting Note: The dehumidifier will continue to dehumidify until the humidity level is 3%RH below the setting
When the dehumidifier turns on, the blower circulates the air for 3 minutes before measuring the humidity level of the air The on-board control will display AIR SAMPLING, along with the measured humidity on the control screen If the humidity of the air is higher than the setting, the compressor turns on and the control will display DEHUMIDIFYING, along with the measured humidity on the control screenYour dehumidifier is equipped with two features that protect against unwanted energy consumption Defrost is a normal operating mode that helps to prevent significant ice formation on the refrigeration system coil The dehumidifier display will show “DEFROSTING” when operating in this mode This mode can occur when there is not enough air moving through the dehumidifier or if the temperature and/or humidity of the incoming air is too low The second protection feature is the E8 code E8 on the dehumidifier display indicates that the air entering the dehumidifier is below 50°F or above 104°F, or the dew point of the incoming air is below 40°F There would be a significant reduction in dehumidifier efficiency if the dehumidifier operated outside of these conditions Low dew point conditions can be seen in some basements or crawl spaces and usually occur in the Winter and Spring months The dehumidifier continues to monitor the incoming air and when the conditions are within the operating range, E8 will be removed from the display and dehumidification will begin as needed
OPTIONAL HEATING AND COOLING SYSTEM BLOWER OPERATIONYour installing contractor may have configured the dehumidifier to turn on the heating and cooling system blower when the dehumidifier turns on to allow for improved circulation of the dry air
EXTERNAL CONTROL OPTIONS
Your April Aire dehumidifier can be controlled with an optional external control that is conveniently located in the living space The April Aire Model 76, 8620, and 8910 are recommended controls The Model 76 is a dedicated dehumidifier control and the 8620 and 8910 integrate dehumidification control as part of the thermostat minimizing the number of controls on the wall.
The Model 76 can also act as a remote control if the dehumidifier is located in a crawl space Install the Model 76 in your living space and make changes to the dehumidifier setting or find out what the humidity level is in the crawl space from the comfort and convenience of the living space
If one of these controls or any other external control is installed, please refer to their owner’s manuals for operating instructions April Aire owner’s manuals are available at www.aprilaire.com
If you are interested in having an external control installed, please consult your installing contractor
MODEL 76 CONTROL
MODEL 8620 THERMOSTAT OR MODEL 8910* HOME COMFORT CONTROLTM 8620 MAIN DISPLAY SCREEN
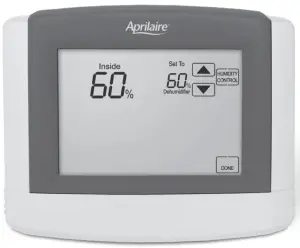 8620 HUMIDITY CONTROL SCREEN
*Model 8910 consists of a thermostat and equipment control module to accommodate the installation of various IAQ accessories.
HOW DOES THE OPTIONAL VENTILATION WORK?
If you had your contractor install the optional ventilation feature, they calculated how much fresh air was needed based on various factors (i.e. home size, number of occupants, local building codes, etc.) Knowing how much is needed and the rate at which fresh air will be brought into your home, the contractor set up the dehumidifier control to operate ventilation a certain amount of time per hour to provide the needed fresh air When ventilation operates, a damper in a duct that brings air in from the outside opens, and your heating and cooling system blower will run to distribute the fresh air
If you need to change the amount of time to operate ventilation, press the MODE button twice to display the ventilation time setting Use the ![]() or
or ![]() button to adjust the number of minutes per hour (060, set to zero to turn it off) that ventilation is to run The control will return to the dehumidifier setting display automaticallyFor additional information, go to www.aprilaire.com to find out more about the benefits of home ventilation.
button to adjust the number of minutes per hour (060, set to zero to turn it off) that ventilation is to run The control will return to the dehumidifier setting display automaticallyFor additional information, go to www.aprilaire.com to find out more about the benefits of home ventilation.
MAINTENANCE
CLEAN OR REPLACE THE AIR FILTER
After initial installation the air filter should be checked and cleaned every 6 months The CLEAN FILTER service reminder will display on the on-board control screen every 6 months To clear the service message, press the ![]() and
and ![]() buttons simultaneously for 3 seconds
buttons simultaneously for 3 seconds
 FILTER CLEANING PROCEDURE
- At the UI control, select the ON/OFF button and switch to OFF mode
- Remove the filter access door from either side of the dehumidifier
- Slide the filter out of the dehumidifier
- Flush the filter with warm water and a mild detergent solution
- Shake off the excess water from the filter
- When inserting the filter, making sure the filter is secured in the top and bottom filter rails Safety clips are located along the filter frame and will compress within the filter frame as the filter is installed If filter doesn’t insert completely check for presence and proper placement of drain insert (see page 6)
- Replace the filter access door
- At the UI control, select the ON/OFF button and switch to ON mode
- Press the and buttons simultaneously for 3 seconds to clear the service message
DRAIN AND DRAIN INSERT INSPECTION
The drain and drain insert should be checked annually to ensure there are no blockages or air lock in the drain system
IMPORTANT
The drain insert is a critical feature of the dehumidifier drain management system. This component is required for the dehumidifier to run properly. If the drain insert is not installed, you will not be able to reinstall the air filter. The air filter is equipped with a safety mechanism that prevents you from fully inserting the filter without the drain insert installed.
WARNING
Running the dehumidifier without the drain insert can lead to condensate leaks.
REMOVING THE DRAIN INSERT
- Turn the ON/OFF switch OFF
- Remove the filter access door from the drain side of the dehumidifier
- Remove the filter from the dehumidifier to access the drain insert
- Locate the drain insert which is located over the drain opening
- Remove the drain insert by hooking your finger into the finger loop and gently lifting the cover up and out of the drain pan
- Clean the drain insert with warm water and mild detergent solution
REINSTALLING THE DRAIN INSERT
- Reinstall the drain insert by inserting your forefinger into the finger loop and grasping the outer edge of the finger loop with your thumb
- Gently insert the drain insert tip into the drain opening and tilt the cover downwards into place
- Insure the drain insert is seated properly by checking the top surface of the drain cover is the same surface height as the filter guide channel
- Turn the ON/OFF switch ON
- At the UI control, select the ON/OFF button and switch to ON mode
![]() CAUTION
CAUTION
Do not use spray solvents or cleaners on or near the inlet side of the dehumidifier. If desired, apply cleaner to a cloth and use to clean the cabinet.
TROUBLESHOOTING
DIAGNOSTIC CODES
The on-board control will display a diagnostic code if an error should occur and service is required Contact your installing contractor if E1E7 or E9 is displayed on the on-board control screen E8 will be displayed if the incoming air temperature is below 50°F, above 104°F, or when the dew point is below 40°F When the incoming air is within the acceptable range, the dehumidifier will resume operation If the error persists, contact your installing contractor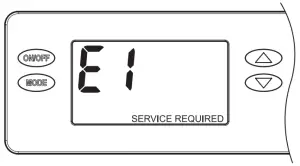
LIMITED WARRANTY
Your Research Products Corporation April Aire® Dehumidifier is expressly warranted for five (5) years from date of installation to be free from defects in materials or workmanship Research Products Corporation’s exclusive obligation under this warranty shall be to supply, without charge, a replacement for any component which is found to be defective within such five (5) year period and which is returned not later than thirty (30) days after said five (5) year period by you to either your original supplier or to Research Products Corporation, Madison, Wisconsin 53701, together with the model number and installation date of the dehumidifier
THIS WARRANTY SHALL NOT OBLIGATE RESEARCH PRODUCTS CORPORATION FOR ANY LABOR COSTS AND SHALL NOT APPLY TO DEFECTS IN WORKMANSHIP OR MATERIALS FURNISHED BY YOUR INSTALLER AS CONTRASTED TO DEFECTS IN THE DEHUMIDIFIER ITSELF.
IMPLIED WARRANTIES OF MERCHANTABILITY OR FITNESS FOR A PARTICULAR PURPOSE SHALL BE LIMITED IN DURATION TO THE AFORESAID FIVE YEAR PERIOD RESEARCH PRODUCTS CORPORATION’S LIABILITY FOR INCIDENTAL OR CONSEQUENTIAL DAMAGES, OTHER THAN DAMAGES FOR PERSONAL INJURIES, RESULTING FROM ANY BREACH OF THE AFORESAID IMPLIED WARRANTIES OR THE ABOVE LIMITED WARRANTY IS EXPRESSLY EXCLUDED THIS LIMITED WARRANTY IS VOID IF DEFECT(S) RESULT FROM FAILURE TO HAVE THIS UNIT INSTALLED BY A QUALIFIED HEATING AND AIR CONDITIONING CONTRACTOR IF THE LIMITED WARRANTY IS VOID DUE TO FAILURE TO USE A QUALIFIED CONTRACTOR, ALL DISCLAIMERS OF IMPLIED WARRANTIES SHALL BE EFFECTIVE UPON INSTALLATION
Some states do not allow limitations on how long an implied warranty lasts or the exclusion or limitation of incidental or consequential damages so the above exclusion or limitations may not apply to you This warranty gives you specific legal rights and you may also have other rights which vary from state to state
WARRANTY REGISTRATION
report this adVisit us online at www.aprilaire.com to register your Aprilaire product If you do not have online access, please mail a postcard with your name, address, phone number, email address, product purchased, model number, date of purchase, and dealer name and address to: Research Products Corporation, PO Box 1467, Madison, WI 53701 Your warranty registration information will not be sold or shared outside of this company.
www.Aprilaire.comP.O. Box 1467 Madison, WI 53701-1467 800.334.6011 F: 608.257.4357Printed in USA©2021 Aprilaire Division of Research Products Corporation
References
[xyz-ips snippet=”download-snippet”]