![]()
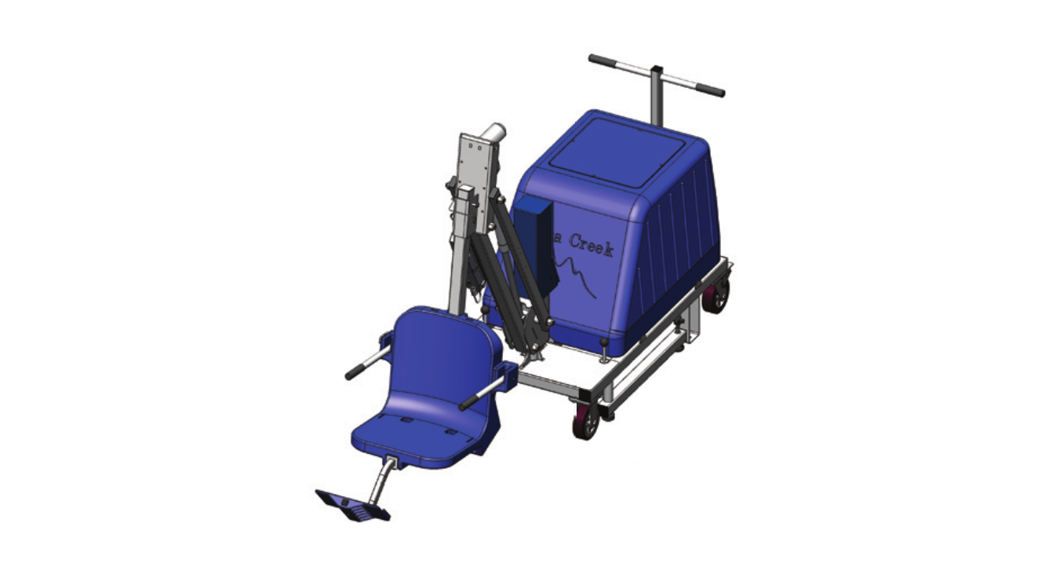
 Mighty Voyager Portable LiftPART #: F-VGRPLUS PATENT NUMBER: [10,792,203]US PATENT NUMBER: [D507,769 S]325 LB. [147 kg] MAXIMUM WEIGHT CAPACITYMANDATORYLEAVE THIS MANUAL WITH LIFT OWNER
Read and follow all instructions. Lift safety can only be ensured if the lift is installed and operated according to these instructions.
- NEVER permit children to play on or around the lift
- Do not allow children to use the lift without adult supervision
- NEVER apply direct water pressure to the electronics
- Do not use the Mighty Voyager for deck-to-waterline measurements over 12″
- NEVER operate lift without 900lbs of sand in ballast
- NEVER use the lift with a dry pool
- For safety reasons, NEVER swim alone
![]()
READ CAREFULLYCheck the entire box and inside all packing materials for parts. Before beginning assembly, read the instructions and identify parts using the figures and parts listed in this document.
t is critical all parts be carefully inspected by the installer prior to installation to ensure no damage occurred in transit and a damaged part is not used. If any damage occurred in transit, Aqua Creek Products, LLC must be notified within three days of receipt of the unit.
Proper installation cannot be overstressed, as an improper installation voids Aqua Creek’s warranty and may affect the safety of the user.
Mighty Voyager Portable Lift
IMPORTANT SAFETY INSTRUCTIONS
 When installing and using this electrical appliance, basic precautions should always be followed, including the following:READ ALL INSTRUCTIONS BEFORE USINGWARNING – To reduce the risk of injury, do not permit children to use this product unless they are closely supervised at all times.
This appliance is not intended for use by persons (including children) with reduced physical, sensory or mental capabilities, or lack of experience and knowledge unless they have been given supervision or instruction concerning the use of the appliance by a person responsible for their safety.
Never operate the lift without the 900 pounds of counterweight in the ballast tank. Only sand should be used in the ballast tank. No other materials (i.e. rocks, dirt, etc.) shall be used.
Do NOT operate lift unless both outriggers are deployed.Check the unit periodically for signs of deterioration: Keep all nuts, bolts, and screws tight to be sure the lift is in safe working condition.
SAVE THESE INSTRUCTIONSAffix supplied ADA POOL/SPA LIFT sign in a location visible from the lift at all times.
Rechargeable batteries are to be removed from the appliance before being charged. Batteries are to be inserted with the correct polarity. If the appliance is to be stored unused for a long period of time, the batteries should be removed. The supply terminals are not to be short-circuited.REDUCE THE RISK OF DROWNING!Supervise children at all times.No jumping or diving from the lift.The seat may be hot, use caution when entering.Keep covered when not in use. Inspect and clean before use.
INDOOR BATTERY CHARGER:AMPERAGE = 0.65FREQUENCY = 60
24 VOLT BATTERYAMPERAGE = 8IP RATING = IPX5
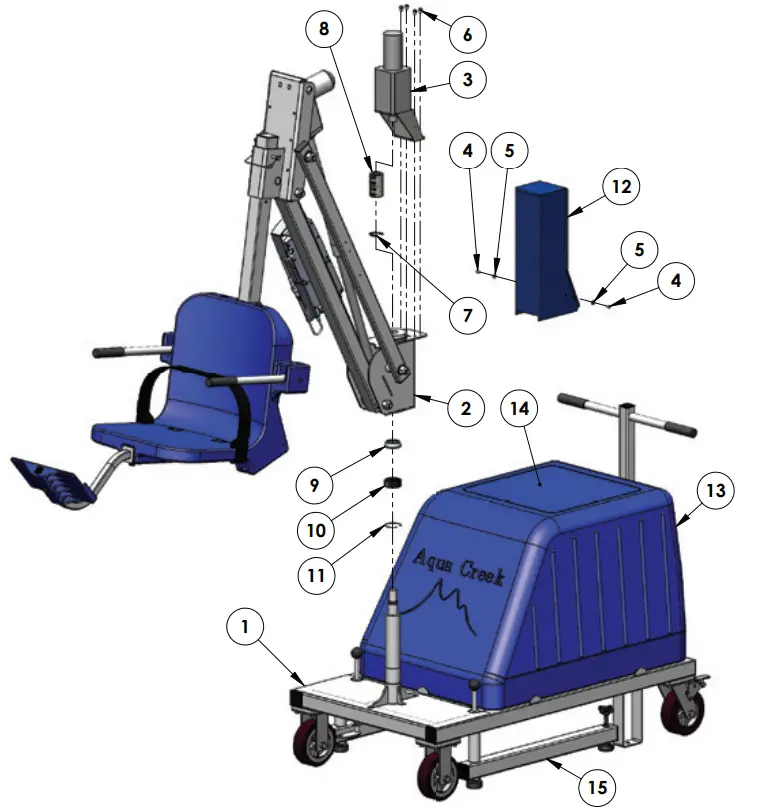
Mighty Voyager Components
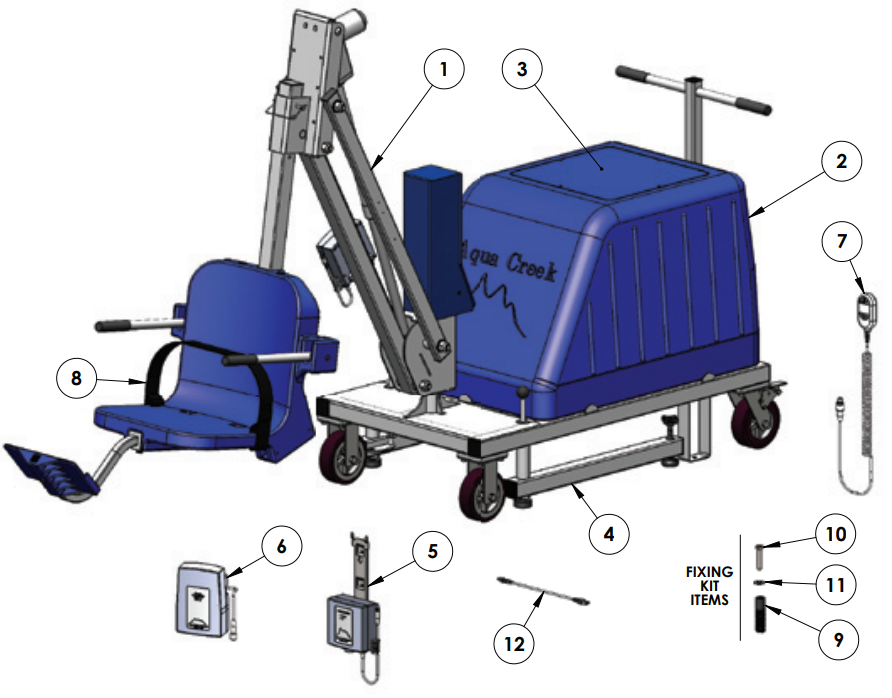
| 1. MIGHTY VOYAGER LIFT | 9. 4” PVC INSERT |
|
2. BALLAST TANK |
10. 2 1/2” HEX BOLT |
| 3. BALLAST TANK LID | 11. 1/2” FLAT WASHER |
| 4. OUTRIGGER | 12. VITO BATTERY TEST CABLE |
| 5. VITO BATTERY CHARGER | 13. *ADA LIFT SIGN |
| 6. VITO 24V BATTERY | 14. *LUBRICANT PACKET |
| 7. VITO HANDSET REMOTE |
15. *900LBS OF SAND (NOT INCLUDED) |
| 8. SEAT BELT |
*ITEMS NOT SHOWN
Installation: ADA Guidelines
ADA REQUIREMENTS:The Mighty Voyager Lift is completely ADA compliant when installed correctly.The installation must meet the following requirements:
- Clear deck space dimensions (see FIGURE 1)
- The centerline of seat 16 inches minimum from the pool edge
- Deck slope no greater than 1:48
- The seat must go at least 18 inches into the water. The lift should be installed at a location with 44 inches to 48 inches of depth (deck to pool floor)
*Setback distance will vary on curved walls, contact Aqua CreekNOTE: The FIXING BOLT is used to fix the portable lift in place and to ensure that it remains in an ADA-approved location. This makes the lift fully ADA compliant.

Mighty Voyager Assembly Instructions
NOTE: Assembly will require eighteen (18) 50lb bags (900lbs) of sand, not supplied with the lift.DO NOT USE LIFT WITHOUT SAND AS A COUNTERWEIGHT! DO NOT USE ANY MATERIAL OTHER THAN SAND AS A COUNTERWEIGHT!
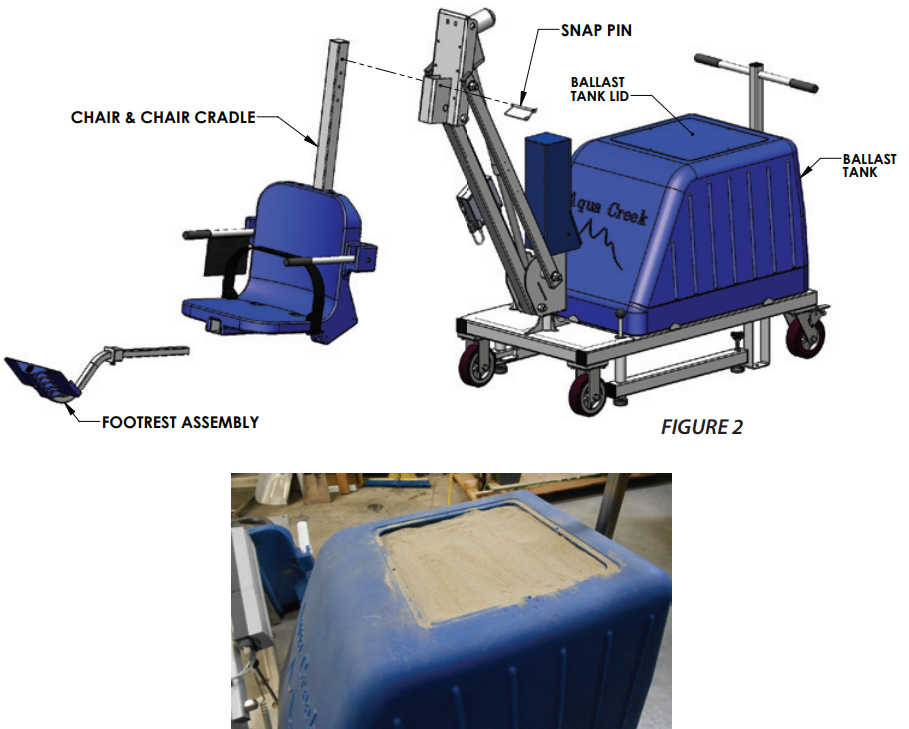
- Remove the lift from the packaging. Slide the chair and chair cradle through the bottom of the head casing and attach using the supplied snap pin. Slide the footrest assembly into the chair tube and attach using the supplied knob screw (be sure the plastic insert is fully installed in the chair tube and that the hole in the insert and in the bottom of the chair tube are aligned). See FIGURE 2 below.
- Remove the ballast lid and fill the ballast tank with 900 pounds of all-purpose sand (the sand should come to the bottom of the lip where the ballast tank lid sits, see picture below). Once all the sand has been poured in, screw the lid back in place on top of the tank.

- Attach the seat belt through the loops in the seat base and pinch the hook & loop material together. See diagram to right.
- Place the battery on the charger and bring it to a full charge.
- Remove the fully charged battery from the charger and install it on top of the control box. The battery will line up with the control box, and will ‘click’ when it properly locks in place. Apply dielectric grease to the plug terminals, including the o-ring seal, and then connect the battery cable to the control box cable. NOTE: To extend battery life, always store the battery on the charger when the lift is not in service.
- Roll the lift to the area near the pool where it is to be used and then lock the rear casters.
- Deploy both outriggers and twist the pressure foot on either side until they come into contact with the ground. DO NOT OPERATE LIFT UNLESS OUTRIGGERS ARE DEPLOYED! See FIGURE 3 below.
- Operate the lift without a load to verify that the lift will operate properly in the selected location. Check that there is enough clearance between the lift seat and the pool wall as the chair extends into the water.
- When the lift is confirmed to be in a proper location, a facility may choose to install a fixing kit. A fixing kit will affi x the lift to the deck and is required formost commercial applications to be ADA compliant. See the following page for detailed instructions.


Mighty Voyager Fixing Kit Installation Instructions
TOOLS REQUIRED:
- Core-drilling rig
- 1-1/4” diameter core-drill
- 3/4” wrench or socket
- 2-part construction epoxy or equivalent
- Tape measure
- Marking pen
NOTE: Fixing Kit installation is only required for ADA applications.
- Determine the location of the anchor insert, allowing for the ADA-compliant clear deck space. (see FIGURE 1, page 4)
- Mark the location for the 1-1/4 inch x 4-inch deep anchor hole. Using a core drill, drill a 1-1/4 inch diameter, 4-inch deep hole at the marked location.
- Dry-fi t the anchor inserts to make sure it fits flush with the deck surface.
- Fill the hole 1/2 full with epoxy (or equivalent). Install the anchor insert flush with the deck surface and clean off any excess. Allow 24 hours for the epoxy to cure.
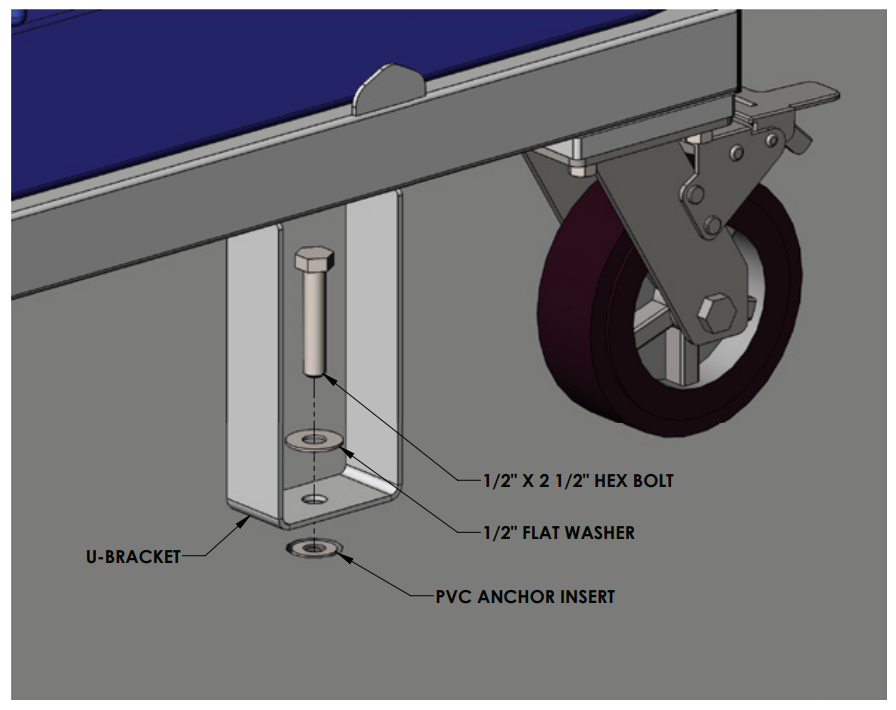
- Roll the portable cart over the installed anchor. Align the anchor with the U-bracket.
- Drop the fixing bolt into the U-bracket and, by hand, start to thread into the anchor insert. If needed, adjust the alignment of the lift.
- When properly aligned, complete threading with a 3/4 inch wrench or socket. Tighten until the bolt just touches the flat washer. DO NOT OVERTIGHTEN.
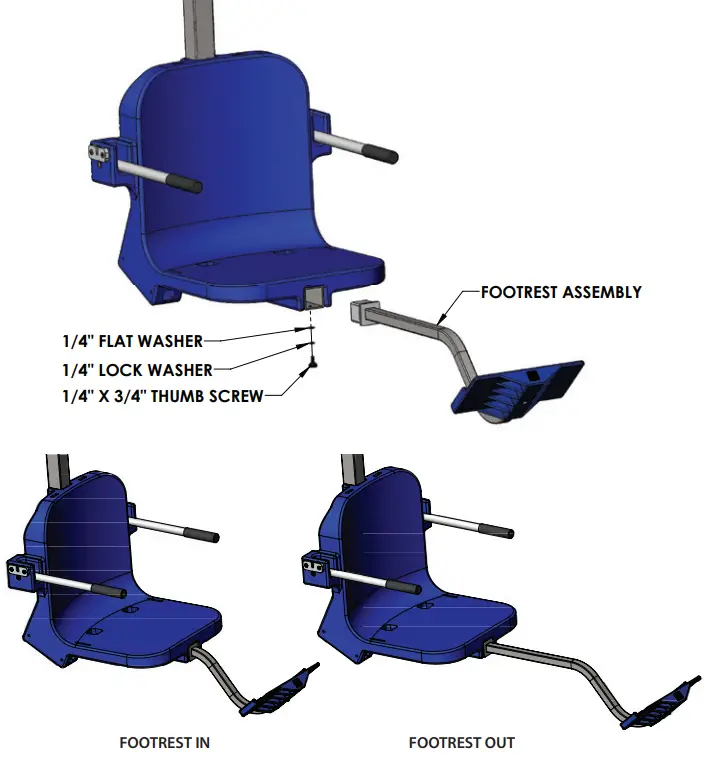
Footrest Installation Instructions
The Aqua Creek footrest assembly is designed to fi t under the chair and is installed inside the 2” square tubing that supports the chair from underneath. To install the footrest:
- Insert the footrest assembly into the 2 x 2 square tube that supports the chair until the plasticinsert of the footrest assembly sits flush against the end of the 2 x 2 tube.
- Using the supplied 1/4” hardware, fasten the leg rest assembly to the 2 x 2 tube.
Basic Troubleshooting
Problem: The lift won’t move.Solution:
- Make sure the cords are properly plugged in:Check the ends of the cords for corrosion or damage. The cord plugs should be recessed into the outlet. You should feel them pop into place when they are correctly inserted.
- Check the contact points:Make sure the contact point of the control box and the battery is not damaged or corroded. If there is corrosion clean with Scotch-Brite™ pad. Put some dielectric grease on the contact points before reattaching the battery.
- Make sure the battery is fully charged:
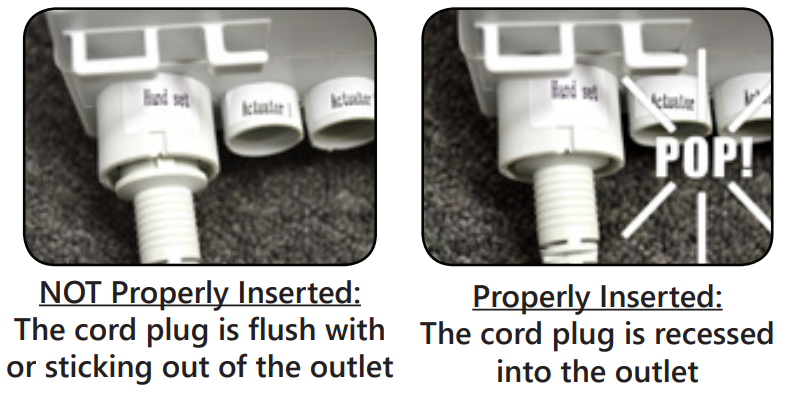 Check the ends of the cords for corrosion or damage. The cord plugs should be recessed into the outlet. You should feel them pop into place when they are correctly inserted.
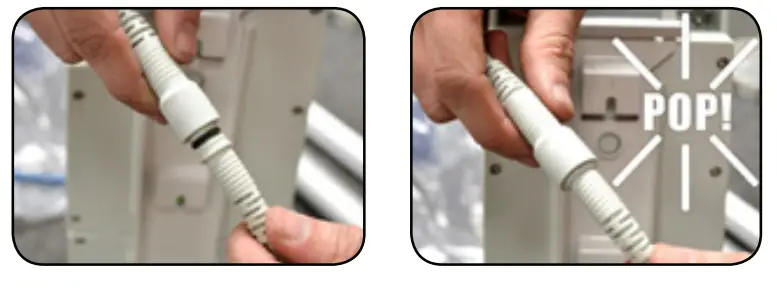 Make sure the contact point of the control box and the battery is not damaged or corroded. If there is corrosion clean with Scotch-Brite™ pad. Put some dielectric grease on the contact points before reattaching the battery.
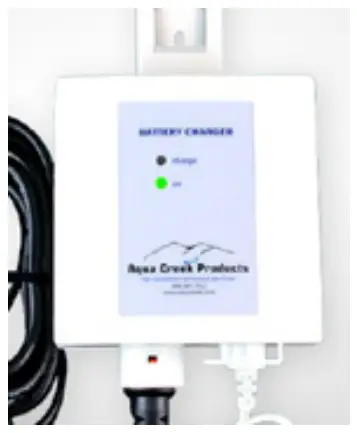
The Charger is ON when the green light is glowingThe Battery is CHARGING when the orange light is glowingWhen the battery is fully charged the orange light will stop glowing
Problem: The lift stopped moving and is stuckSolution:
- Press the Emergency button Press the emergency to retract button on the front of the control box to retract the lift.Note: the lift will not retract if the battery is not fully charged or if the control box is not working. The emergency button only overrides the remote handset.

For troubleshooting, videos Visit: www.aquacreek.com or scan the QR code below using your smartphone.
 http://aquacreekproducts.com/help-center/trouble-shooting/
Note: If you feel your lift is malfunctioning due to a faulty battery or connections, contact Aqua Creek Products for a testing kit.
Battery Test Cable Instructions
WARNING! DO NOT ATTEMPT TO DIRECTLY PROBE THE BATTERY CONNECTOR TO TEST VOLTAGE. THIS MAY CAUSE PERMANENT DAMAGE TO THE BATTERY! USE THE SUPPLIED BATTERY TEST CABLE ONLY FOR CHECKING THE BATTERY VOLTAGE!
The Aqua Creek 24V battery has a cable and connector for connecting to the control box or to the battery charger. The battery connector is not suitable to check the battery voltage, as it is very hard to probe the connector without shorting out the battery, which will cause damage. For this reason, a separate battery test cable is provided. To safely check the battery voltage, use a voltmeter or multimeter with standard test probes, and insert the probes into the test cable as shownbelow.
Pinch Point Locations

Proper Care of Pool & Spa Lifts
| PROCEDURE | BEFORE EACH USE | DAILY | WEEKLY | MONTHLY |
| Check battery level indicator on the control box | ✓ | |||
| Run the lift through a complete test cycle (fully extend actuator) to verify it is functioning properly | ✓ | |||
| Wash lift with fresh water and dry with a clean, soft, non-abrasive cloth | ✓ | |||
| Recharge battery | ✓ | |||
| Visually inspect lift for damage, corrosion, and loose or missing hardware | ✓ | |||
| Check all contact points for damage and/or corrosion | ✓ | |||
| Repair, clean, and apply dielectric grease to all contact points | ✓ | |||
| Thoroughly clean the lift frame and apply a liberal coat of car wax to maintain the lift’s finish | ✓ | |||
| Check all warning and cautionary labels to make sure they are not faded or worn and replace as needed | ✓ |
PROPER CARE NOTES
- Use only freshwater to wash your lift. Do not wash with pool water.
- Use only clean, soft, non-abrasive cloths on your lift.
- Do not store lift in the pump room or near chemicals.
- Do not allow children to play on or around this lift.
- When cleaning the lift do not spray water directly on the control box or battery.
- The lift may need to be bonded according to local code requirements.
STAIN REMOVAL TIPS:To remove stubborn stains from the finish, spray the affected area with mild dish soap, rubbriskly with a 3M Scotch Brite™ pad. Use white epoxy paint to touch up the finish. Applywax to protect when dry.
For service and/or replacement parts, contact Aqua Creek ProductsToll-free: (888) 687-3552
Mighty Voyager Parts List
| Item # | QTY | PART # | DESCRIPTION |
| 1 | 1 | VGR-CRT-00 | VOYAGER CART ASSEMBLY |
| 2 | 1 | VGR-LFT-00 | VOYAGER LIFT ASSEMBLY |
| 3 | 1 | MTY-900-00 | MOTOR ASSEMBLY |
| 4 | 2 | BSH 10 X 3/8 | #10-24 X 3/8 SOCKET HEAD CS |
| 5 | 2 | WF1 0 | #10 FLAT WASHER |
| 6 | 4 | BHW 1/4 X 3/8 | 1/4-20 X 3/8 HEX WASHER HEAD |
| 7 | 1 | 94751A785 | EXTERNAL RETAINING RING |
| 8 | 1 | INV01703 | 1″ CLAMP-ON SHAFT COLLAR |
| 9 | 1 | BEARING, ROLLER LM67048 | ROLLER BEARING & RACE |
| 10 | 1 | K50X55X2OH | NEEDLE BEARING |
| 11 | 1 | 93576A250 | SPIRAL EXTERNAL RETAINING RING |
| 12 | 1 | F-MTMC | MOTOR COVER |
| 13 | 1 | P-BBT-00 | BALLAST TANK |
| 14 | 1 | P-BBTC-00 | BALLAST TANK LID |
| 15 | 2 | VGR-300-00 | OUTRIGGER ASSEMBLY |
Revised_9.21.2020AQUA CREEK PRODUCTS, LLC LIMITED FIVE (5) YEAR WARRANTY:MIGHTY VOYAGER POOL LIFT(ITEM #’s F-VGRPL, F-VGRPL-T, F-VGRPL-G, F-VGRPL-C)
Aqua Creek Products, LLC (a.k.a. Aqua Creek) warrants to the original end-user purchaser that products manufactured by Aqua Creek, when properly installed in accordance with assembly and installation instructions, and properly used and maintained, shall be free from defects in material and workmanship for a period of five (5) years from the date of original purchase, provided that Aqua Creek receives prompt notice in writing of any defect or failure and satisfactory proof thereof, with the following exception(s):
Exceptions:
- All electrical components, including the linear actuator, shall have the following warranty period:o Year 1-2: 100% Coverageo Year 3: 60% Coverage (Customer is responsible for 40% of replacement cost)o Year 4: 50% Coverage (Customer is responsible for 50% of replacement cost)o Year 5: 40% Coverage (Customer is responsible for 60% of replacement cost)
- Hydraulic actuators and mesh slings shall have a warranty period of one (1) year from the date of original purchase.
- Powder coat finish scratches, scrapes, corrosion, or dents from customers normal use, negligence, or abuse
This warranty specifically excludes reimbursement for labor to remove, repair, or install the product and any shipping charges.These warranties do not cover any damages due to accident, force majeure, the act of nature, misuse, abuse, negligence or failure to properly maintain any products, or normal wear and tear from day-to-day operations. In the event that any products are altered, repaired, or improperly installed or improperly used by anyone without the prior written approval by Aqua Creek, all warranties are void.IMPORTANT: THE AMOUNT OF WEIGHT PLACED ON THE LIFT SHALL NOT EXCEED THE RATED LIFTING CAPACITY FOR THE LIFT. NEVER OPERATE THE LIFT UNDER LOAD IN A DRY POOL (WITH NO WATER IN THE POOL). It is the responsibility of the lift owner to verify the weight of the patron for warranty claim purposes and to ensure that the lift is not overloaded. Non-payment for product to Aqua Creek may void the warranty.
To initiate a warranty claim, the owner of an Aqua Creek product must provide the place of purchase, in writing, with a full description of the product, its serial number, the dates of purchase and installation, and the exact nature of the defect. Within thirty (30) days after receipt of a written warranty claim by Aqua Creek, and barring any unforeseen delays, the place of purchase will be notified of Aqua Creek’s decision regarding the claim.
If requested by Aqua Creek, any defective product must be returned, freight prepaid by customer, to Aqua Creek’s designated factory location or duly appointed distributor for inspection and/or repair. Aqua Creek will, at its option, repair or replace the failed or defective item, and deliver the repaired product or replacement to the customer. All freight charges are the responsibility of the customer. Products returned to Aqua Creek for which Aqua Creek provides replacement under this limited warranty shall become the property of Aqua Creek. A new warranty period shall NOT be established for the repaired or replaced products. Such products shall remain under warranty only for the remainder of the original warranty period on the original products purchased.
This written limited warranty constitutes the final, complete and exclusive statement of warranty terms. No person or organization is authorized to make any other specific or implied warranties or representations on behalf of Aqua Creek.
THE WARRANTIES SET FORTH HEREIN ARE IN LIEU OF ALL OTHER WARRANTIES, EXPRESSED OR IMPLIED, WHICH ARE HEREBY DISCLAIMED AND EXCLUDED, INCLUDING WITHOUT LIMITATION ANY WARRANTY OF MERCHANTABILITY OR FITNESS FOR A PARTICULAR PURPOSE OR USE.
THE SOLE AND EXCLUSIVE REMEDIES FOR BREACH OF ANY AND ALL WARRANTIES WITH RESPECT TO THE PRODUCTS SHALL BE LIMITED TO REPAIR OR REPLACEMENT AT AQUA CREEK’S DESIGNATED FACTORY LOCATION, OR DULY APPOINTED DISTRIBUTOR, OR IN PLACE AT AQUA CREEK’S OPTION. IN NO EVENT SHALL AQUA CREEK’S LIABILITY EXCEED THE ENTIRE AMOUNT PAID TO AQUA CREEK BY THE ORIGINAL PURCHASER FOR THE FAILED OR DEFECTIVE PRODUCT.
IN NO EVENT SHALL AQUA CREEK PRODUCTS, LLC BE LIABLE FOR ANY INCIDENTAL, CONSEQUENTIAL, SPECIAL, INDIRECT, PUNITIVE, OR EXEMPLARY DAMAGES OR LOST PROFITS FROM ANY BREACH OF THIS LIMITED WARRANTY OR OTHERWISE.
THIS WARRANTY GIVES YOU SPECIFIC LEGAL RIGHTS AND YOU MAY ALSO HAVE OTHER RIGHTS, WHICH MAY VARY FROM STATE TO STATE. SOME STATES DO NOT ALLOW THE EXCLUSION OR LIMITATION OF INCIDENTAL, SPECIAL, OR CONSEQUENTIAL DAMAGES, SO SOME OF THE ABOVE LIMITATIONS OR EXCLUSIONS MAY NOT APPLY TO YOU.
Copyright © 2020 Aqua Creek Products All Rights Reserved
Revised 10/21/20
References
[xyz-ips snippet=”download-snippet”]