


![]()
![]()
Operating Manual for Navigation Lights Series AQUA SIGNAL 34
Navigation Lights with LED technology
Supply: 12V / 24V DC ±20%.Consumption:starboard, stern: approx 1,0W each.port: approx 1,3W.Bicolour: approx 2,2W.Masthead: approx 2,1W.Tricolor: approx 1,9W.Signalling white / green: approx 1,0W.Signalling red: approx 1,3W.
These lights are in compliance with following standards:The International Regulations for Preventing Collisions at Sea, 1972 (COLREG / IMO):– Regulation COLREG 72, Annex I/14– IMO Resolution A.694(17)– IMO Resolution MSC.253(83)DIN EN 14744, Inland navigation vessels and sea-going vessels Navigation light:– EN 14744, 2005 as amended by Corr. 2006– IEC 60945 Ed. 4.0, 2002 inc. Corr. 1, 2008
ABYC A-16 & USCG/IMO Colregs (USA) for vessels < 20m USCG / IMO COLREGS for vessels > 12 and < 20m
Certificat :Type examination certificate Navigation lights operated electrically on vehicles of less than 50 m length
Certificate no.: BSH/46162/0141863/10Issue by: BSH Bernhard-Nocht-Str. 78, 20359 Hamburg, GermanyFor vessels < 50m, for 12V and 24VMasthead, Bicolor, and Tricolor < 20m, for 12V and 24V
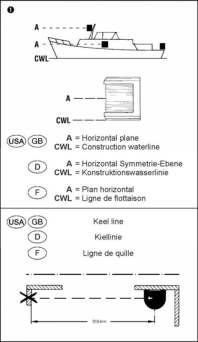
RegulationsFor all ships the rules set forth in Annex 1 to the COLREG’s – Positioning and Technical Details of Lights and Signalling Shapes – must be adhered to. The technical data regarding horizontal and vertical positioning and spacing of the navigation and signalling lights laid down in these mounting instructions do apply to all ships irrespective of their flag.
Mounting InstructionsThe function of the navigation lights can only be assured and be in accordance with the regulations if the following points are adhered to: For correct positioning of the navigation lights on board the COLREG’s have to be followed.The navigation lights must be positioned on and above the keel line e.g. parallel to it. Their horizontal symmetrical level (A) must be parallel to the construction water line (CWL). The navigation lights have a directional arrow that runs parallel to the keel line in the direction of travel. The light cannot be obstructed by parts of the boat or passengers. Their position may not be changed while in use. Mounting up side down is not allowed.
Important note for port and starboard lights (1)In case screens are used for the sidelights the front screen has to be removed since it is not necessary and is obstructing the light output in right ahead direction.
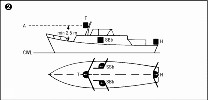
DESCRIPTIONSSIDELIGHTS SSb + SBb 34 (2) (6)Angle: 112,5° green / red visibility 2 nm
STERN LIGHT H 34 (2) (3) (6)Angle: 135° white visibility 2 nm
BICOLOR SIDELIGHTS TD 34 (3) (7)Angle: 112,5° red and 112,5° green visibility 2 nm
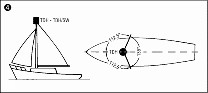
TRICOLOR LIGHTS FOR SAILING BOATS TDH 34 “quicfits” (4)Angle: angle 112,5° red, 112,5° green, 135° white visibility 2 nm min. for all sectors
COMB. TRICOLOR/ANCHOR LIGHT TDH / SW 34 “quicfits” ForSAILING BOATS (4)Angle: tricolor 112,5° red, 112,5° green, 135° white, anchor 360° white visibility 2 nm min. for all sectors
REGULATIONS FOR NAVIGATION LIGHTS TYPES TDH AND TDH/SW 34 WITH AND WITHOUT “quicfits” The regulations are permitting to use these lights only on sailing boats <20m. While under engine these lights are not permitted.MASTHEAD LIGHT T 34 “quicfits” (2) + (3)Angle: 225° white, visibility 3 nm
COMB. MASTHEAD / ANCHOR LIGHT T/SW 34Angle: masthead 225° white, visibility 3 nm, signalling 360° white, visibility 2 nm
STERN LIGHT H 34 (2) + (3)Angle: 135° white, visibility 2 nm
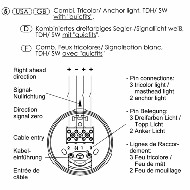
SIGNALING LIGHTS SW, SR, SG 34Angle: 360°, white / red / green visibility min. 2 nm
MOUNTINGSidelights starboard (SSb), port (SBb) and stern (H) → (6)The housing cap must be removed for assembly. Fasten the previously cabled assembly mounting rear panel on the side of the ship with two screws.a) Horizontal spacing of assembly holes 50 mm.b) The connection cable can be laid behind the rear panel.c) Place the housing cap, lettering upwards, corresponding to the“signal zero direction” (see marking), on the mounting rear panel. Check that the cap is on firmly.
DEMOUNTINGSidelights starboard (SSb), port (SBb) and stern (H) → (7)For demounting the housing cap must be removed carefully with an angled screwdriver first on the aft side and afterwards on the zeroahead side.
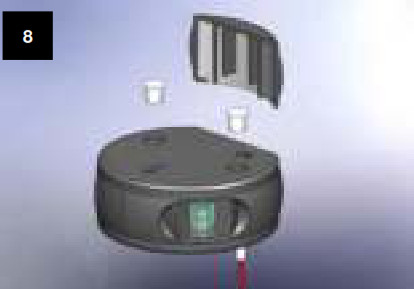
MOUNTINGBicolor (TD) → (8)Mounting can be carried out both as covering mounting, as well as under-installation e.g. on the pulpit.a) First remove the cable covering capb) Provide two fastening holes at a horizontal spacing of 49 mm. Ob- serve the “signal zero direction” (see marking).c) For correct alignment of the light, port (red) and starboard (green), the printing must always point upwards.d) Place rubber seal between mounting area and light.e) Tighten fastening screws.Tricolor “quicfits”, comb. Tricolor / Anchor “quicfits”, Masthead “quicfits”, comb. Masthead / Anchor “quicfits”Remove light from “quicfits” base after loosening the lower locking ring. Arrange electrical connection as described in the chapter ,ELECTRICAL INSTALLATION`. To simplify mounting use base to mark positions of drilling holes. Pay attention to right ahead direction when mounting. Fix the “quicfits” base with 3 screws dia. 5mm. The “quicfits” system allows quick removal of the light i.e. to prevent theft or damage when mast is down. The base remaining on the mast can be covered with the supplied cap.
Signalling lights, tricolor lights for sailing boats, comb. tricolor / anchor lights, masthead, comb. masthead / anchor lightsTurn the lights upper anticlockwise. To simplify mounting use base to mark positions of holes (mounting holes and cable entry). Pay attention to right ahead direction when mounting.
ELECTRICAL INSTALLATION SIDELIGHTS, BICOLOR, SIGNALLING LIGHTAll navigation lights are fitted with cables and ready for use. Only the housing cover (side lights), respectively the cable cover (bicolor side lights), has to be removed for mounting.
TRICOLOR “QUICFITS”, COMB. TRICOLOR / ANCHOR “QUICFITS”, MASTHEAD “QUICFITS”, COMB. MASTHEAD / ANCHOR “QUICFITS”The electrical connection of these lights is only made in the “quicfits” base. Use round cable of about 810mm dia. with adequate cross-section. Loosen the cable clamp. Dismantle about 35mm of the cable according to ill. (9) Feed cable through cable entry and cable clamp parts. Arrange electrical connection according to ill. (5) and fasten cable clamp with two screws.The installation should be done according to this instruction in order to ensure a watertight closure of the cable gland. Electrical connection of light and “quicfits” base is obtained by pushing the light onto the base.
The navigation lights have been tested in accordance with IEC 60945 and are below the approved threshold values. However, it cannot be excluded that in exceptional cases it may come to an interaction between the navigation lights and the radio equipment.Please ascertain a sufficient distance between the navigation lights, the radio antennas and the radio equipment.
MAINTENANCE:Special care is not necessary. Occasional cleaning of the housing and glass with a soft brush and fresh water will be sufficent. We recommend to clean the transparent cover in regular periods with clear water. Aggressive cleaners containing solvents should not be used. The LED-Electronic is fitted within a cast to protect it from dirt and weather. The housing is fitted with air slits for better acclimatisation that cannot be closed.
ATTENTION:Solvents can destroy the optic of a navigation light. We recommend to remove the light prior to executing paint jobs. The housing of the light should never be painted for photometric reasons. The lenses in particular but also other plastic components may not be touched with paint.
SPARE PARTS / *EXTRASCovers for the sidelights starboard, port.Cable cap for bicolour.
Part-no:starboard, black E-8385000800starboard, white E-8385000700starboard, high polished 8385000900port, black E-8385100700port, white E-8385100600port, high polished 8385100800stern, black E-8385200700stern, white E-8385200600stern, high polished 8385200800bicolour, black 8386300100bicolour, white 8386300200bicolour, high polished 8386700100

– Bracket for mounting signalling lights and mast head.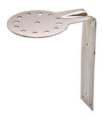 3945001000
![]() Safety instructions:Beware of optical radiation!Risk of eye injury.Do not look directly into LED-lighting.
Safety instructions:Beware of optical radiation!Risk of eye injury.Do not look directly into LED-lighting.
Product life according to EN 14744The service life of the navigation light depends on the ambient temperature. If the navigation light operates at +25 °C, for example, a service life of max. 30,000 hours is to be expected. Operating times at higher ambient temperatures reduce the expected service life correspondingly. The remaining service life is indicated by flashing signals after a corresponding time. The following applies after switching on the light:– 1 x flashing = 75% remaining service life– 2 x flashing = 50% remaining service life– 3 x flashing = 25% remaining service life; recommendation: provide replacement!– 4 x flashing = End of the life expectancy; the light switches off immediately.
GLAMOX RETAINS THE RIGHT TO MAKE TECHNICAL AND DESIGN CHANGES TO THE PRODUCTS.
Please read the Operating Manual for your navigation lights carefully!
9420110500.docRev.: 04Print date: 2016-04-13

Glamox Production GmbH & Co. KGGlasower Weg 5D-17166 Teterow, Germany
e-mail: [email protected]Internet: http://www.glamox.com/gmo Operating Manual for Navigation Lights Series AQUA SIGNAL 34
References
[xyz-ips snippet=”download-snippet”]