Aquascape 83001 DIY Backyard Waterfall Kit Instructions
Thank you for choosing the Aquascape DIY Backyard Waterfall Kit.
Our goal at Aquascape is to provide our customers with the best valued products in water gardening. We hope you enjoyyour purchase and thank you for choosing Aquascape. Your Paradise. Our Passion.®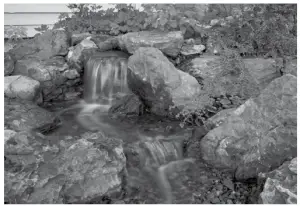
DIY Backyard Waterfall Kit
The Aquascape DIY Backyard Waterfall Kit comes complete with everything you need to incorporate the sights and sounds of cascading water into your yard or landscape, providing up to a 3-foot Pondless®/ disappearing waterfall. All necessary components are provided in a convenient, all-in-one kit that takes the guesswork out of purchasing individual components. This instruction manual will guide you through proper installation of this kit. We want to make this experience as easy as possible, allowing you to concentrate on the creativity needed to design your waterfall.Skipping steps or changing the order will create extra work in the long run.
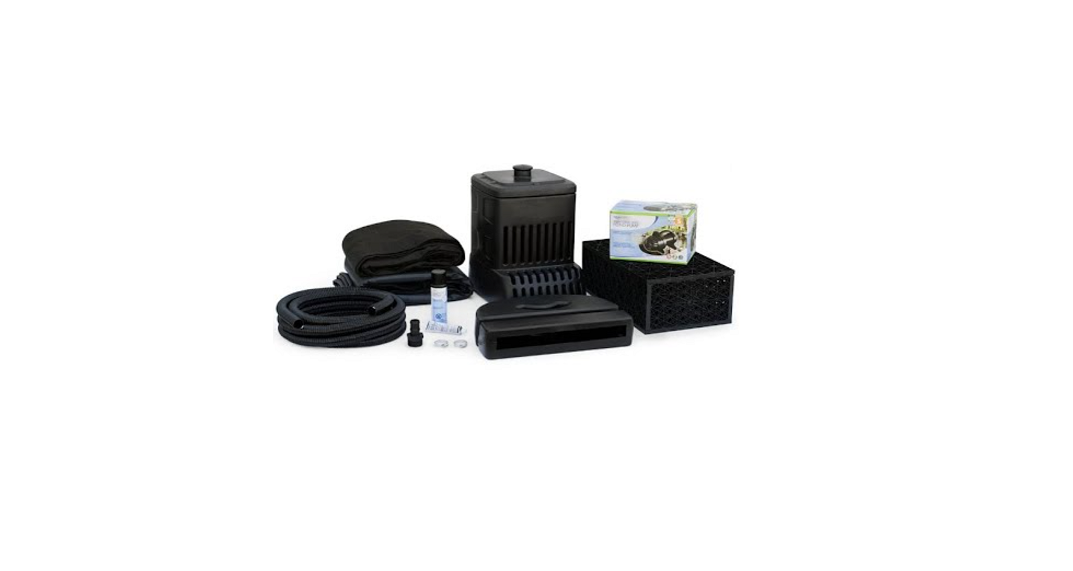
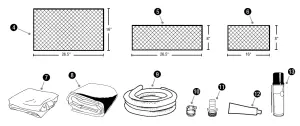
Contents
| No. | Description |
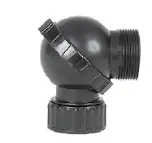
| 1. | Pondless® Pump Vault |
| 2. | Waterfall Spillway |
| 3. | AquaSurge® 2000 Pond Pump |
| 4. | (4) AquaBlox® Panel A |
| 5. | (4) AquaBlox® Panel C |
| 6. | (8) AquaBlox® Panel D |
| 7. | 10′ x 12′ Liner |
| 8. | Underlayment |
| 9. | Kink Free Pipe 1.5″ x 25′ |
| 10. | (2) Hose Clamps |
| 11. | Barbed Hose Adapter |
| 12. | Silicone Sealant |
| 13. | Pond Waterfall Foam Sealant |
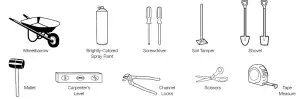
Recommended Tools
US (866) 877-6637 | ☎ CAN (866) 766-3426 | aquascapeinc.com
Installation
STEP 1
SELECT YOUR LOCATION
- When choosing the location for your new waterfall, we recommend putting it near a deck or patio so you can sit and relax close to your water feature. Also keep in mind viewpoints from inside the house. Make your new waterfall visible from a kitchen window or patio door, giving you year round enjoyment. Make sure your waterfall and stream face the viewing area.
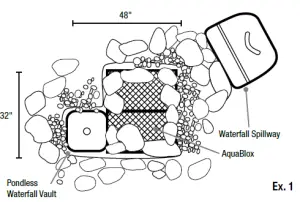
- For this waterfall kit you will need roughly a 32″W x 48″L area for the basin of the falls and a maximum 3′ stream and waterfall (Ex. 1).
STEP 2
CAREFULLY REMOVE CONTENTS FROM BOX
- Verify all parts are present. Read instructions carefully.
STEP 3
ASSEMBLE AQUABLOX
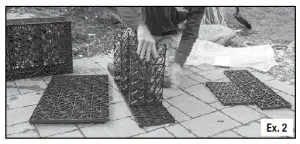
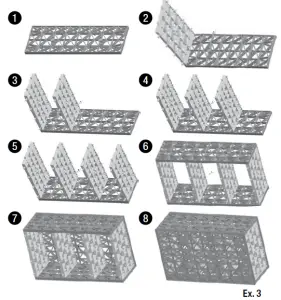
- Line up the pegs with the corresponding holes on the panels and follow the pattern in (Ex. 3) to assemble the AquaBlox (Ex. 2 and Ex. 3). A rubber mallet can be used to tap the pegs into place.
STEP 4
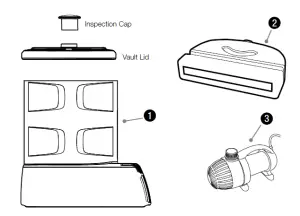
PLACE PONDLESS VAULT AND AQUABLOX
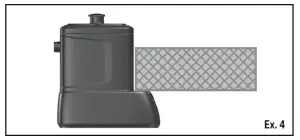
- Lay out the AquaBlox and the Pondless Waterfall Vault in desired location. The AquaBlox should be placed side by side with the wider panel face down. Place the AquaBloxover the front edge of the Pondless Waterfall Vault (Ex. 4).
- Use a can of brightly colored, highly visible spray paint to outline the shape around the Pondless Waterfall Vault and AquaBlox. This will help mark out the area to be excavated (Ex. 5).

STEP 5EXCAVATE YOUR WATERFALL BASIN
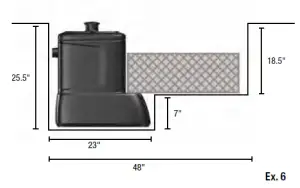
- Remove vault and AquaBlox and begin to excavate approximately 18.5″depth. Once 18.5″ depth has been reached, excavate area for vault an extra 7″ down.NOTE: an additional 6″ of excavation is recommended per side of the basin to allow for AquaBlox dimensions, sufficient backfill material, and compaction required during backfilling (Ex. 6).
- Excess soil can be used to create elevation for the waterfall and stream or as soil for the berm around the waterfall.
STEP 6LEVEL BASIN AND TAMP SOIL

- One of the most important parts of the excavation is getting the basin level. Use a tamper to compact soil (Ex. 7). Put a level on the bottom of the basin to make sure the basin is level from side to side and front to back. The base of the excavation should be smooth soil, flat, and free of lumps and debris. Add compactable material such as sand if existing soil conditions do not meet requirements listed above. If compactable material was used, double check to make sure your basin is still level before proceeding. Use a tamper for the area where the Pondless Waterfall Vault sits as this area should be as close to level as possible (Ex. 8).
- Check the size and depth of the excavation by placing the Pondless Waterfall Vault and AquaBlox into the excavated area.
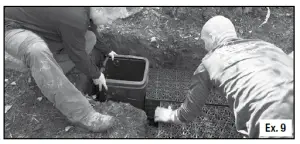
- The AquaBlox should sit level on the front ledge of the Pondless Waterfall Vault, as well as line up level to the side of the vault. There should be approximately 6″ between the AquaBlox and the sides of your basin. This is to allow for sufficient backfill material and compaction required during backfilling (Ex. 9).
STEP 7PLACE UNDERLAYMENT AND LINER
- Remove any sharp objects from the excavated basin that may damage the liner.
- Remove the AquaBlox and Pondless Waterfall Vault from the basin in order to install the underlayment and liner.
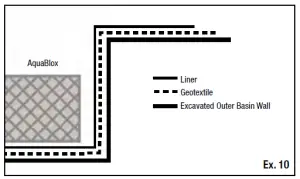
- Unfold the underlayment fabric and place into the excavated basin. Starting from the bottom, remove the slack from the underlayment, making sure it conforms into all of the sides. Make sure you leave enough underlayment to cover your stream and waterfall location (Ex. 10).
- Place the EPDM liner on top of the underlayment.The installation process is the same as the underlayment, starting at the bottom and contouring the liner up and out of the basin.
- Try to get large folds out, the main goal is to have the liner lying flat and going into all corners. Don’t try to get it perfect, you will hide the liner with rocks and gravel later.
- Make sure the liner is high enough around the edges of the basin. Problems can be fixed by readjusting the liner into the excavation, backfilling (making the basin smaller) in areas where there is not enough liner (Ex. 1

STEP 9BACKFILL SIDES
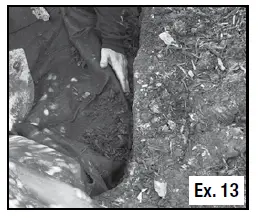
- The excess excavation along the outside perimeter of the basin can be backfilled once all of the AquaBlox are installed. Use sand or compactable freedraining material to back fill evenly on all sides to secure the AquaBlox into position (Ex. 13).
STEP 10LAY PLUMBING AND DIG TRENCH
- Lay your pipe around the perimeter of the basin. The pipe will go from the Pondless Waterfall Vault to the eventual location of the Waterfall Spillway (Ex. 14).
- Dig a trench for your pipe or cover it with soil, rocks or mulch.]HOOKING UP THE PUMP AND PLUMBING
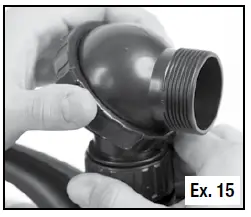
- The AquaSurge pump includes a wide assortment of fittings from which to choose. For this application you will be using the rotational ball fitting. The extremely versatile fitting provides you the ability to adjust the pump discharge to the position that your waterfall set-up requires. Loosening the threaded collar allows you to rotate the upper half of the ball (Ex. 15).
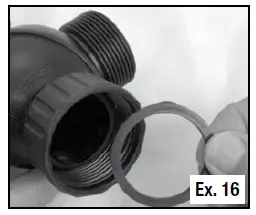
- A flat rubber washer seal is included to ensure a hand tight and leak-free connection. Make sure the flat rubber washer is in place before installing the fittings (Ex. 16).NOTE: Do not use tools to install the fittings into the pump discharge. Fittings need to be only hand tight.
- The kink-free pipe coming from the Waterfall Spillway can be trimmed to proper length and inserted through the slot on the side of the Pondless Waterfall Vault (Ex. 17).
- Lower the pump into the Pondless Waterfall Vault and rotate the rotational ball fitting to line up with the tubing. Attach tubing to the fitting and use a hose clamp to secure tubing onto the fitting (Ex. 17).
- The cord from the pump can be buried just beneath the stone and gravel and run to the electrical supply.
 HOOKING UP THE PUMP AND PLUMBING
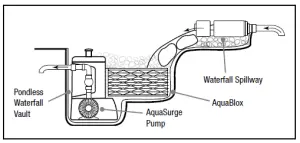
 TIP: In some instances the tubing/hose may be tight and difficult to use with hose fitting. If this is the case heat the hose with the use of a hair dryer or simply dip the hose for a few secondsin very hot water. Lubrication can also be used, such as silicone grease, or vegetable oil.
STEP 12
ADD ROCK AND GRAVEL
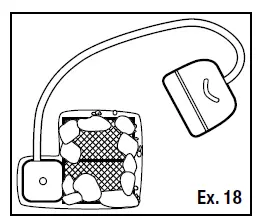
- Set larger boulders 6″–18″ around the perimeter of the basin on top of the AquaBlox to support the edges of the basin (Ex. 18).
- Add 1.5″ to 2″ size gravel to cover the AquaBlox in the basin.
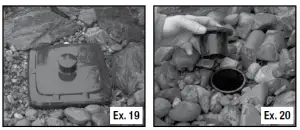
- A finishing layer of decorative gravel can be added to the top if desired (Ex. 19).
- The built-in water level inspection port allows the lid of the Pondless Waterfall Vault to be buried just below the surface of the rock (Ex. 20).
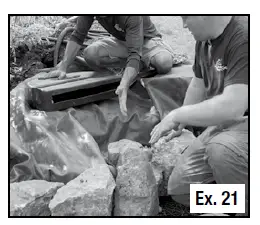
STEP 13BUILD THE WATERFALL
- Position your waterfall so it is facing the main viewing areas.
- Build waterfall and stream approximately 3′ from the AquaBlox, providing enough liner at the top of the waterfall to wrap over the top of the Waterfall Spillway.
- Tamp the ground under the desired location for Waterfall Spillway to provide a flat, level surface. Set the Waterfall Spillway into place (Ex. 21)
- Pull your underlayment and liner into place.
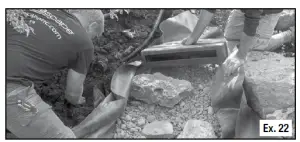
- You can adjust the height of the Waterfall Spillway by adding gravel underneath the Spillway (on top of the liner) until you have reached your desired height (Ex. 22).
- The gravel will also provide a suitable base for leveling the Waterfall Spillway.
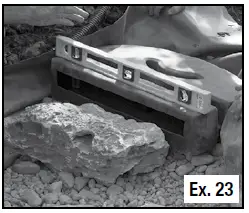
- The Waterfall Spillway should be level from side to side and tilt forward a 1/4 bubble on a 2′ level (Ex. 23).
- Place two larger boulders on either side of the waterfalls you are creating in order to frame the waterfall.The water will be running between the two larger boulders you’ve set in place.
- You can now begin to stack the rocks between the two larger boulders. These are the rocks that the water will be running over, so take your time and be creative. Start with the larger rocks on the bottom and work your way up to the smaller ones on top.
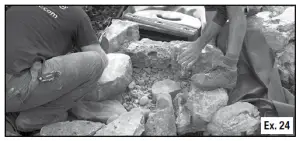
- Small stones and gravel can be used to fill in the gaps between the larger waterfall stones (Ex. 24).
STEP 14
HOOK UP AND LEVEL THE WATERFALL SPILLWAY
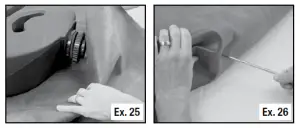
- Fold liner over top of Waterfall Spillway. It is recommended to provide some slack in the liner in case the position of the Waterfall Spillway needs minor adjustment during installation (Ex. 25).
- Use a screw driver or awl, puncture a small hole in the liner through the center of the Waterfall Spillway bulkhead.This will be your reference point for the location of the liner connection (Ex. 26).
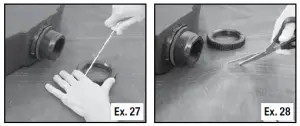
- Unfold the liner back off the Waterfall Spillway and remove the retaining nut from the Waterfall Spillway bulkhead. Center the retaining nut over the puncture hole in the liner. Use a pen, marker, or sharp tool, to trace a line around the inside of the nut (Ex. 27).
- Remove the retaining nut and trim a hole in the liner approximately 1/8 inch inside of the score mark (Ex. 28).
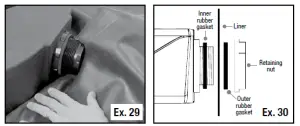
- Remove the outer rubber gasket from the Waterfall Spillway fitting. Insert the hole in the liner over the Waterfall Spillway bulkhead. The liner should fit snug around base of the Waterfall Spillway fitting (Ex. 29).
- Place the second rubber gasket onto the fitting.NOTE: The liner should be located between both rubber gaskets (Ex. 30).
- Place retaining nut on Waterfall Spillway and hand tighten. The fitting is reverse threaded, refer to the arrow locatedn on the retaining nut for proper direction. Use channel locks to tighten down the retaining nut an additional 1/4 to 1/2 turn past hand tight being careful to not over tighten retaining nut, which could possibly crack the plastic fittings(Ex. 31).
- Install the MPT barb fitting into the back of the Waterfall Spillway. To provide a water tight seal, use the included silicone sealant on the threads of the fitting. Be careful not to over tighten pipe fitting, which could possibly crack the plastic fittings (Ex. 32).
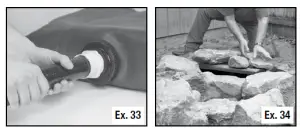
- The Waterfall Spillway is now ready for the pipe to be installed and secured in place with a hose clamp (Ex. 33).
- Disguise the Waterfall Spillway using boulders, logs, gravel, soil, or other creative landscape material (Ex. 34).
 NOTE: The liner should be located between both rubber gaskets (Ex. 30).
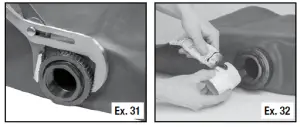
STEP 15ADD WATERFALL FOAM
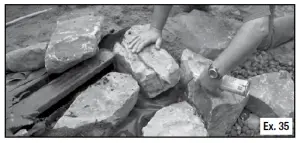
- The Pond and Waterfall Foam Sealant provided is used to fill in gaps between the rocks of your waterfall. The foam keeps water flowing over the top of the rocks. Without the foam you will lose the impact of your waterfall, as water travels beneath the rocks (Ex. 35).
- Gravel can be used to disguise the foam.
- Allow foam to dry for at least 1 hour before introducing water.
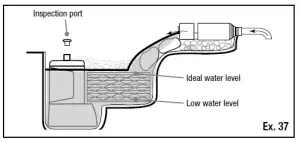
STEP 16ADD WATER
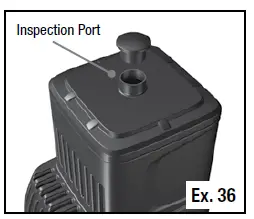
- Use the built-in water level inspection port on the lid of the Pondless Waterfall Vault to monitor your water level (Ex. 36 and 37).
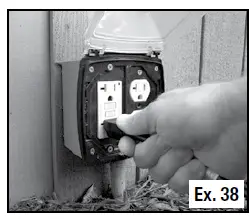
STEP 17PLUG IN THE PUMP AND TWEAK THE WATERFALL
- When the basin is filled and all of the black waterfall foam is dry, plug the pump in and test the waterfall (Ex. 38).
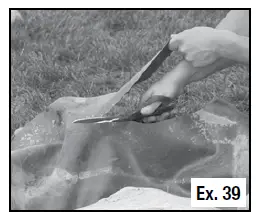
STEP 18TRIM THE LINER
- With the waterfall running, go around and trim off any excess liner, leaving several inches above the water level/water splash asa precaution (Ex. 39). The remaining liner edges can be covered with gravel or other suitable landscape material.
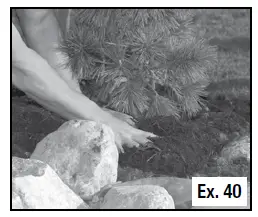
STEP 19MULCH THE BERM AND NATURALIZE EDGES
- The entire area surrounding the basin can now be mulched and any surrounding plants added (Ex. 40).
Winter Application
- In areas that experience freezing temperatures, waterfall owners have the option of shutting down their feature or running it through the winter. When intending to run the waterfall through the winter, be sure to keep the pump running. The strong current will prevent freezing from occurring. If the waterfall contains a shallow area or stream, we recommend checking throughout the season to eliminate ice damming if necessary.
- When shutting down the waterfall for winter, we recommend removing the pump and plumbing assembly to store in a frostfree location.
General Maintenance
In order to maintain your beautiful new waterfall, we recommend a few simple steps.
- Add Water – The water stored in your waterfall will reduce over time due to evaporation and water splash off. Top off the water level in your basin throughout the year to ensure your pump has enough water to function properly.
- Add Water Treatments – To keep your waterfall clean and healthy we recommend adding Aquascape Fountain Maintenance (included) on a regular basis. For information on other water treatment products designed to maintain your water feature, visit aquascapeinc.com.
- Remove Debris – Throughout the year, leaves and other debris may end up in your waterfall. Periodically using your hands or a small net to remove any debris from the feature will help keep your waterfall looking beautiful all year long.
Replacement Parts
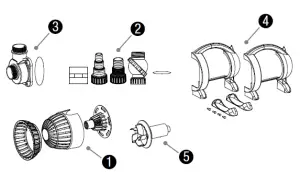
AquaSurge 2000 Replacement Parts
| No. | Item number/description |
| 1. | 91063 – Intake Screen Kit |
| 2. | 91065 – Discharge Fitting Kit |
| 3. | 91066 – Water Chamber Cover and O-Ring Kit |
| 4. | 91068 – Pump Handle and Feet Kit |
| 5. | 91070 – Replacement Impeller Kit |
Warranty Information
 report this ad
The parts above are guaranteed for years listed from date of purchase. Proof of purchase required. Warranty does not cover damage resulting from negligent handling, misuse or lack of reasonable maintenance or care. Warranty is valid against defects due to material and the company’s workmanship only. The sole obligation shall be to replace the defective unit with a suitable replacement unit. Units should be checked for proper operation prior to returning as defective. Aquascape Inc. or its affiliates are not liable for loss or damage of any nature or kind, whether arising out of or from the use of the product, defective or not defective.
Read More About This Manual & Download PDF:
References
[xyz-ips snippet=”download-snippet”]