
ARDWOLF Bluetooth Door Lock User Manual
A70
Introduction
Thank you for choosing Ardwolf products! In order to enable you to quickly understand and install this smart lock, please be sure to read this manual carefully. If you have any questions, please visit wwwardwolf.com for more help.
Warm Tips:
- Before using this lock, please pair it to the mobile phone App .
- This lock is equipped with mechanical keys for manual unlocking. Remove mechanical keys from the package and keep them in a safe place and always have access to them.
- To power on the lock, four alkaline AA batteries(not included) are required. Non-alka-line and rechargeable batteries ARE NOT RECOMMENDED.
- This lock is not designed to be exposed to direct sunlight or rain. It is not waterproof IP rated.
- The operation of setting lock has a stand-by time limit of 20 seconds; Without any activity, lock will shut after 20 seconds.
- Keep your fingers clean when using this lock.Please read this manual before operating your Smart Lock, and keep it for further reference.
Features
- Accessing the Lock – Five ways to access the lock: Bluetooth, Fingerprint, Mifare card, Pin code & Mechanical key.
- Safety – There are multiple safety mechanisms within the lock.
- a) Auto Lock: After an unlocking, it can lock automatically after a period of time (can be 5s, 10s, 30s, 60s or custom seconds, the time can be set via the smart phone App)
- b) Keypad Locked: After 6 failed pin code attempts, the keypad will shut down for 3 minutes before being able to attempt the pin again. Mechanical key and Bluetooth Unlock can be used to unlock in this state.
- c) Privacy Lock out Mode: There is also a button under the knob of back panel, which is a privacy lock out mode, which essentially is a ‘do not disturb’ mode, this will make the lock no longer accept fingerprint, card, pin codes or Bluetooth ekeys except for mechanical key.
- If you press the security lock button for over 2 seconds and activate the privacy lock out mode(keypad can’t input pin code any more), people won’t be able to get in from outside except by using mechanical key.
- If you want to deactivate it, just turn the knob once or press the security lock button for over 2 seconds, people from outside will be able to get in with Fingerprint, mifare card, pin code or Bluetooth again.
- Anti-peed Password – Before you enter your password, you can push some random numbers to preventthe password from being inferred based on the fingerprints on the frequently pushed numbers and frombeing seen by anyone nearby.
- Emergency Power Supply – If you fail to replace the batteries before they are fully discharged, you can still open the door with a mobile battery connected to the USB charging terminal.
- Real Time Record – You can manage your passcodes and check unlock records in real time on your App.
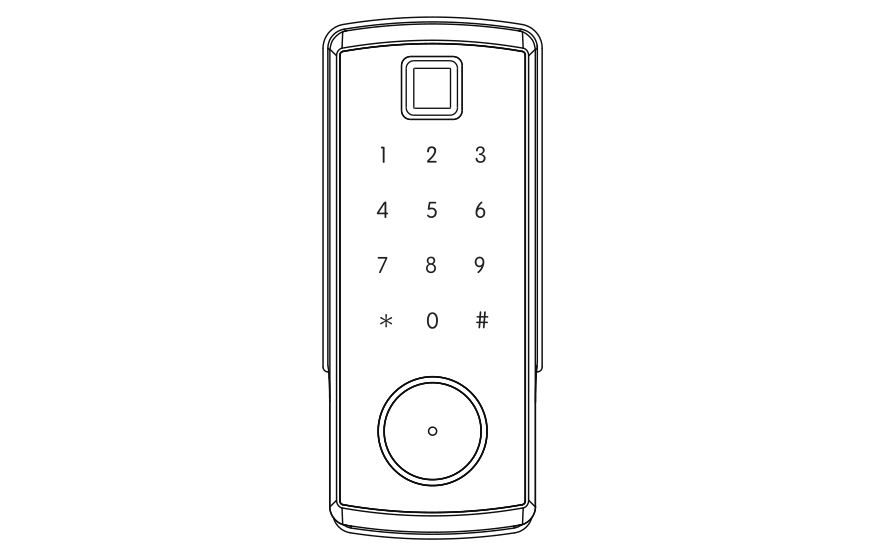
Product Profile
Specifications

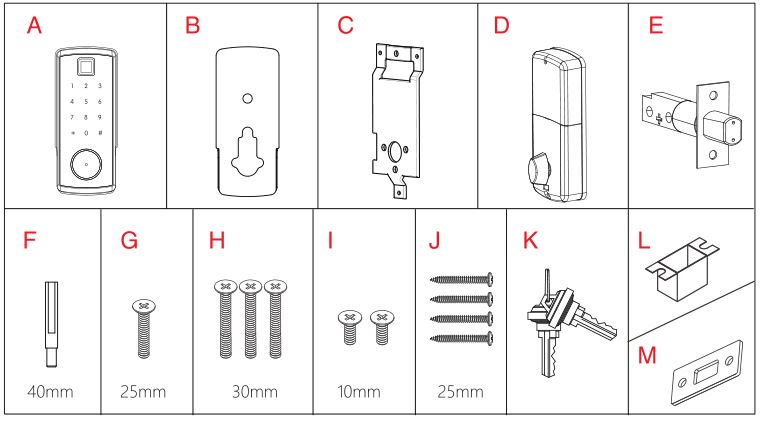
Packing List
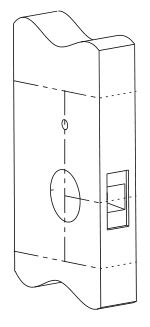
Door Preparation
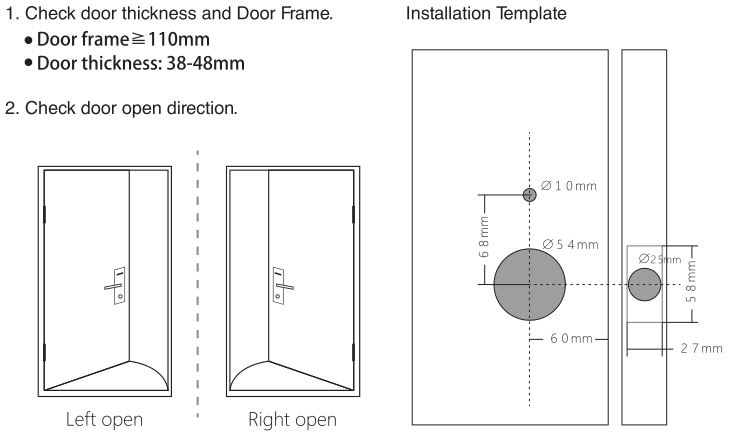
Installation Diagram
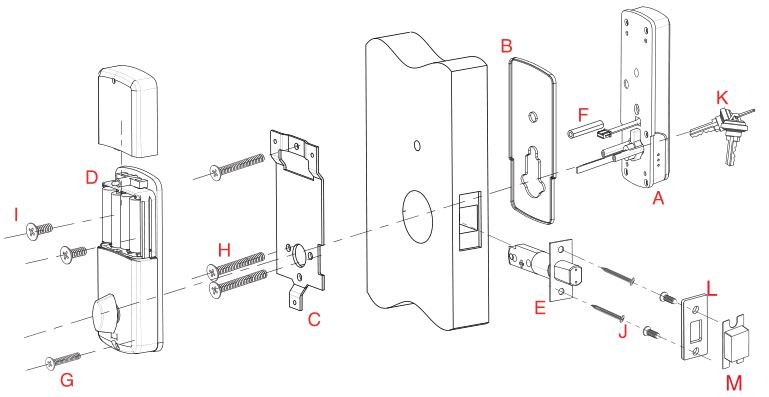
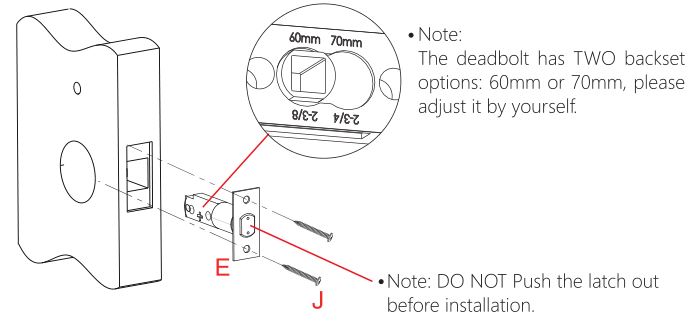
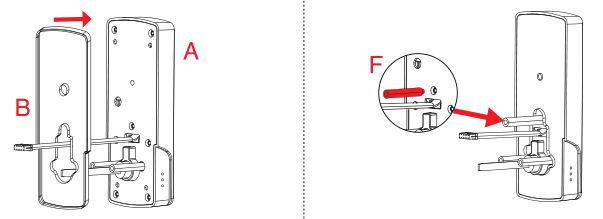
A) Outdoor lock body * 1B) Silicon gasket * 1C) Mounting plate * 1D) Indoor lock body* 1E) Deadbolt * 1F) Cylindrical sleeve bolt* 1G) M4 x 25mm cross flat head bolt *1H) M4 x 30mm cross flat head bolt * 3I) M4 x 10mm cross flat head bolt * 2J) M4 x 25mm cross flat head self-tapping screw * 2K) Mechanical key * 2L) Strike plate * 1M) Latch holding plastic box * 1
Installation Instructions
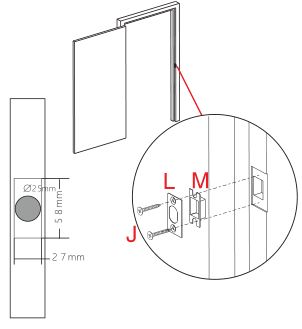
(1)
- Check the required backset (60mm or 70mm).
- Align the template along the vertical center line of the deadbolt(E) at the desired height, and tape it to the door.
- Mark the holes first, then start drilling.
(2) Install the deadbolt (E) with screws (J) on the door.
(3) Install outdoor unit(A) with gasket(B) and cylindrical sleeve bolt( F) on outdoor unit(A).
(4) Install mounting plate (C) with M4 cross flat head bolt (H) on the door.
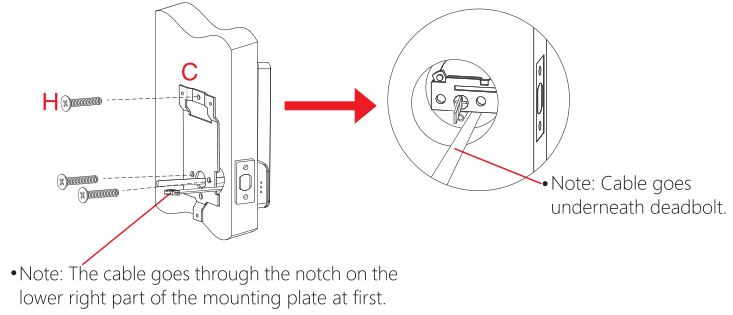
(5) Install indoor unit(D) with M4 cross flat head bolts(I, G) on the door.
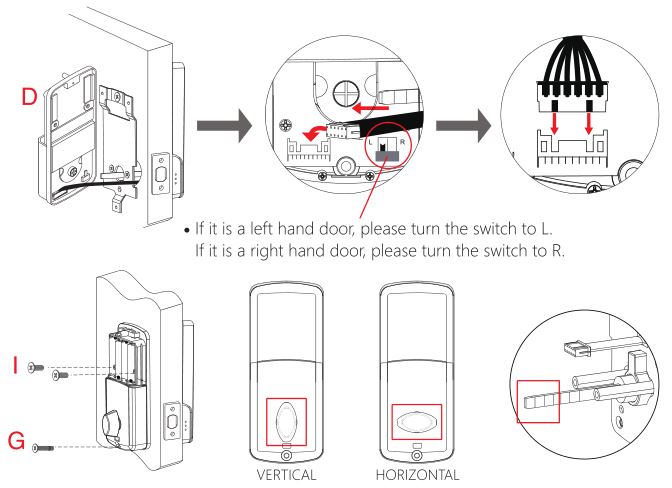
• Note: (1) If it’s a RIGHT opening door lock, pis put the lock spindle VERTICALIY into the hole connected to the knob at the indoor unit of the lock, and the rotating part of the knob should also be turned to VERTICAL position. (2) If it’s a LEFT opening door lock, pis put the lock spindle VERTICALIY into the hole connected to the knob at the indoor unit of the lock, but the rotating part of the knob should be turned to HORIZONTAL position.
(6) Install 4 pieces AA Alkaline batteries.
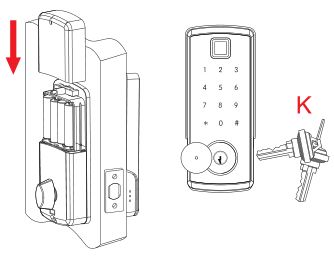
• Testing the lock by rotating the knob on unit D and using mechanical key(K).
(7) Mark and drill holes for strike.
App Operation Guide
Installation and Registration
The lock must be added on the APP before it can be used. Once the lock is added successful, you can manage the lock with the APP including sending an eKey, sending a password, adding fingerprints and so on.
- Download the APP ”TT Lock”Download the TTlock APP by scanning the QR code below or search “TTlock” from Google play store (Android) or Apple store (iOS).
 Note:– The APP only supports Android 4.3 / iOS7.0 version and above.– The user that is paired to the lock is the only administrator. Other users can be authorized to unlock by APP but cannot pair with the lock.
 - Registration and LoginOpen the TTlock APP, register a new account (phone number or email) and then log in.

 Note:– The APP only supports Android 4.3 / iOS7.0 version and above.– The user that is paired to the lock is the only administrator. Other users can be authorized to unlock by APP but cannot pair with the lock.
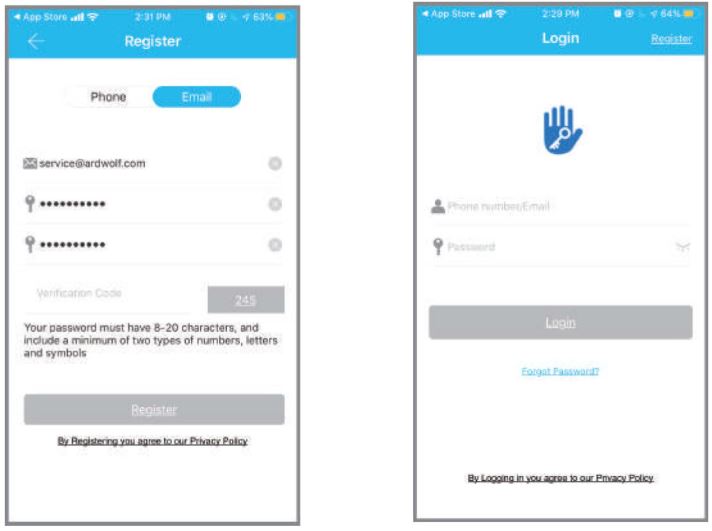
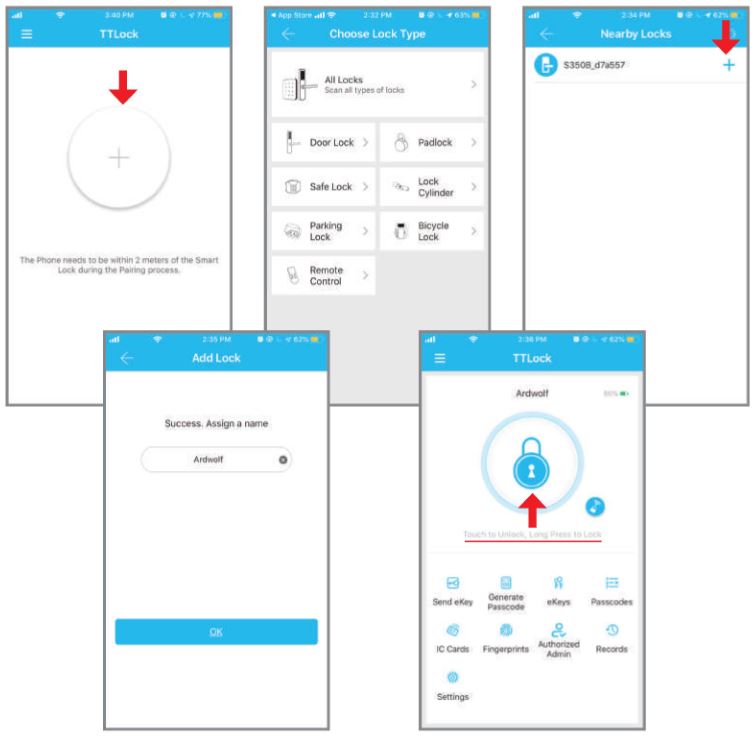
Match the Lock with APP
- Turn on the Bluetooth and WiFi of your phone. Then open the APP. Click ”.Add Lock” – “Door Lock’:
- Touch any key of the lock to activate the keypad. And then click “Next” on the APP.
- Find the smart lock name which starts with “xx_xxx” and click”+’:(Note: If you do not see the “+” sign, it means the lock has already been paired with another phone/account. In this case, you will need the current administrator to remove the lock from the APP or transfer administrator to your account. You can also reset the lock back to factory setting to directly delete the current administrator)
- Rename the smart lock and click “OK’: Return to the front page and touch the unlock icon to see if the connection is successful.
- Now you have become the administrator of the lock and can start settings. Please make sure the Bluetooth is on and the phone should be within 10 meters from the lock during the operation process.
APP Function Introduction
*These operations need administrator rights and require Bluetooth to be turned on.
1. Lock Setting

1.1 BasicsBattery Percentage: display the battery level, need to connect with bluetooth or gateway to update the status.Lock Name: the administrator can rename the lock.Lock Group: the administrator can add multiple locks for grouping, which is suitable for rental housing.Admin Passcode: the default passcode of the administrator, which can be manually changed to a custom passcode.
1.2 Unlock RemotelyNeed to buy a gateway, you can remotely control your lock after pairing.
1.3. Auto LockOff-by-default. Turn on and set time to 5s 10s, 15s, 30s, 60s or custom (5s-120s).
1.4 Passage ModeOff-by-default. If turn on, the lock will remain unlock until it is manually locked. Can be set into custom period.
1.5 Lock SoundOn-by-default. Can be manually turn off.
1.6 Lock ClockCalibrate time of the lock.
1.7 DiagnosisHelp analyse the system problems. It needs to be done via Bluetooth beside the lock.
1.8 Read Operation RecordsThis operation will read all records stored in the lock.
1.9 Firmware UpgradeCheck whether there is any update version available.
1.10 AttendanceCan be used for company attendance management. It contains functions of employee management, attendance statistics and so on. It supports staff attendance check in three ways, including APP, passcode, and IC card. (Detailed instructions please contact Ardwolf support)
1.11 Unlocking NotificationOn-by-default. If this function is on, the administrator’s phone will receive the unlock information when someone who assigned with a key unlocks the door with the APP.
2. APP Setting
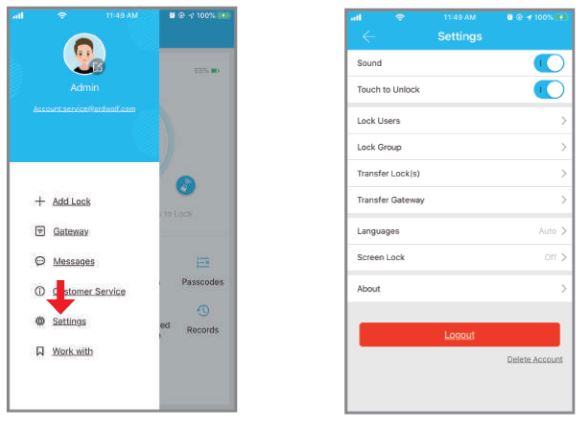
Sound: On-by-default. The APP system unlock operation sound, can be manually turn off.
Touch to Unlock: Off-by-default, this function is invalid when the “TTlock” APP is turned off or running on the background of your phone. When the APP is open and connect within 10 meters from the lock, any family members can unlock the door by pressing any one touch screen button for at least 2 seconds. It is recommended to close the option if you do not need it.
Lock Group: the administrator can add multiple locks for grouping, which is suitable for rental housing. It is more convenient for achieving group management of personnel. It can be modified or deleted if not needed.
Transfer locks: This function is used to transfer the administrator rights. Once transferred, you are no longer the administrator.
Transfer gateway: This function is used to transfer the gateway. Once transferred, you will lose the right for managing the gateway.
Screen Lock: If turned on, you need to use your fingerprint or account password to get access to the APP.
3. Main Functions
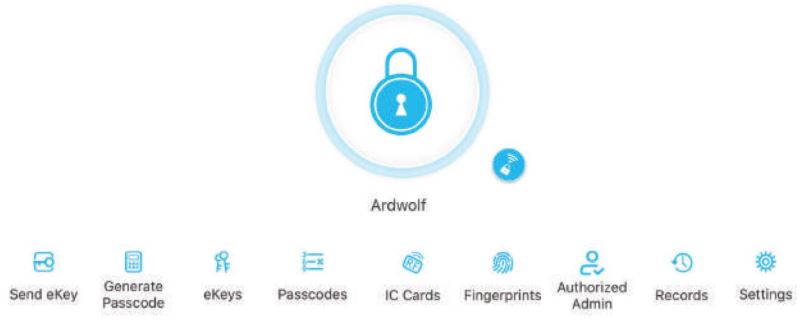
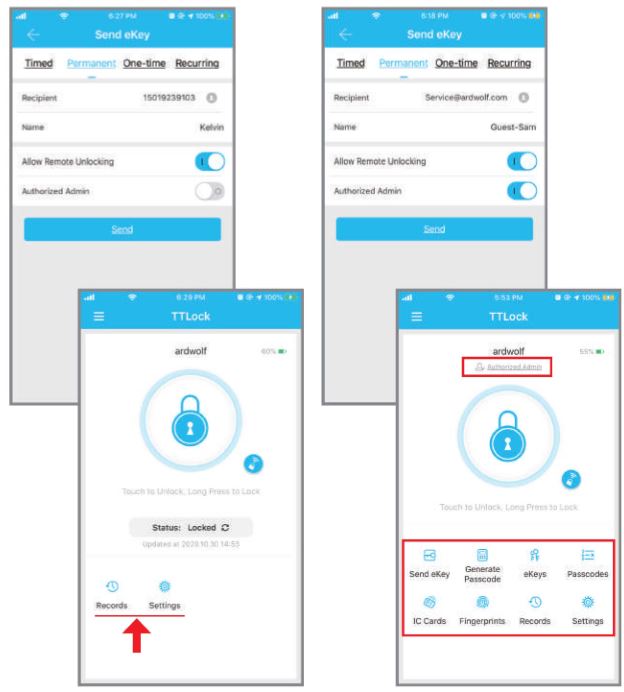
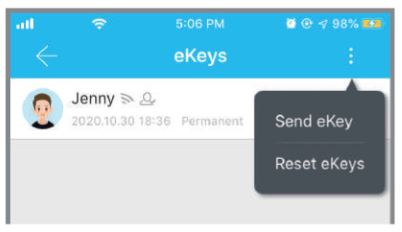
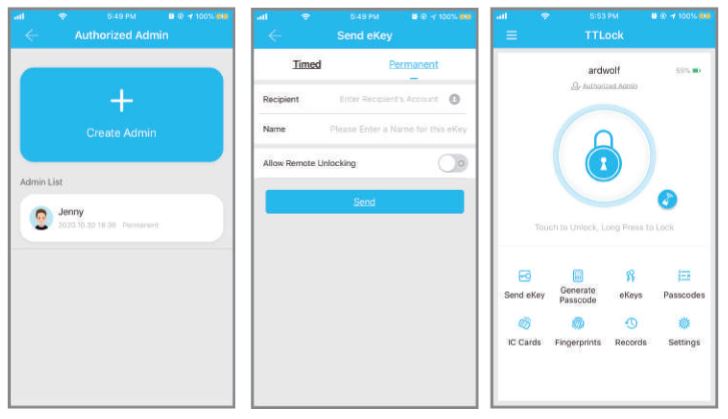
3.1 Send eKey
A function for the administrator to authorize the Recipient, such as your family members to unlock/lock via the APP. The recipient needs to download the TTlock APP but do not need to pair their apps with the lock.
- This operation needs to be connected to Bluetooth and network, the shared eKey will be stored in “eKeys”.
- Click the type to select and set up the time-limited ekey, one-time ekey , permanent ekey or recurring eKey as you need.
- When sending eKeys, be aware of the difference between an Admin user and other users. If turn on the “authorized Admin” button, the recipient will become the authorized-admin user and owns the right to mange the lock settings.
3.2 eKeysGenerated eKeys can be viewed and managed here.
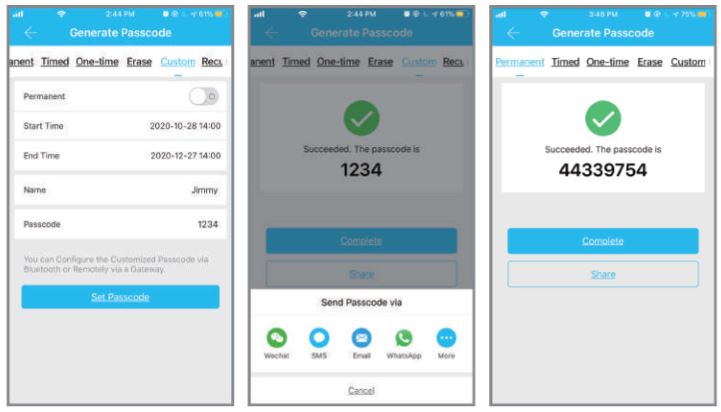
3.3 Generate Passcode
The passcode can be set as different type: Permanent/ Timed/ One-time(6 hours) /Erase(24 hours)/ Customized I Recurring. The passcodes will be stored in “Passcodes” .
- Only the custom passcode can be directly set into 4-9 digits on APP. Thus we recommend to use custom passcode to set the codes and validity period you like.
- The other passcodes generated automatically are in 8 or 9 digits. You can change these passcodes via the “Passcodes” center.
- All passcodes generated can be shared directly by Facebook, Messenger, Whatsapp and other social media apps.
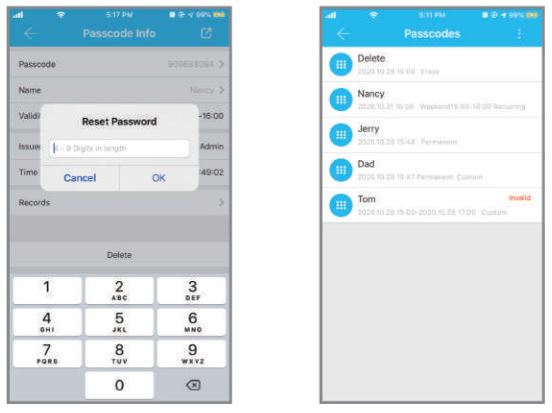
3.4. PasscodesAll generated passcodes can be viewed and managed here. This includes the authority to change, delete, reset the passcode and change its validity period.
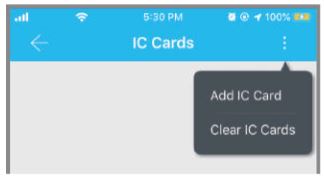
3.5. IC CardThe administrator can add and manage the IC cards here.
- Click ”.Add IC Card” to add new cards. Enter a name to identify the card and select the type of access (time-limited or permanent). When you press OK, it will instruct you to bring the IC card closer to the lock to complete the process.
- Select “Clear IC Cards’; all IC cards of this lock will be deleted.
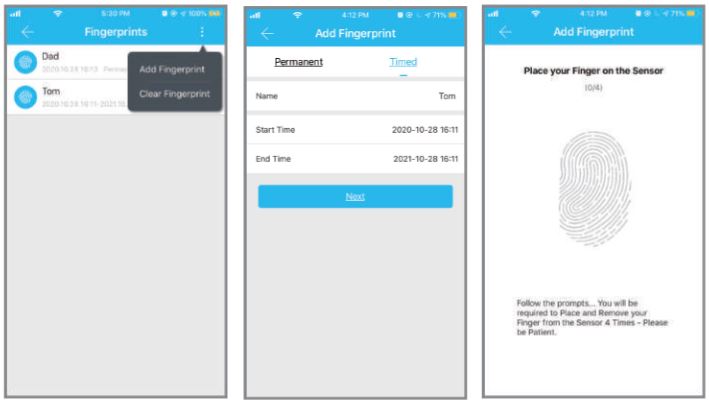
3.6. FingerprintsThe administrator can add and manage the fingerprints here.
- The validity period of the fingerprint can be set, either permanent or time-limited.
- Click ”.Add Fingerprint” to start to add a new fingerprint, it will instruct you to complete the process.
- You will be required to register your finger 4 times, apply your finger from 4 slightly different aspects will help improve the accuracy of the recognition.
3.7. Authorized AdminOnly the administrator can authorize the admin. The authorized admin can manage the main functions of the lock as the highest administrator. However, the authorized admin can not authorize others.
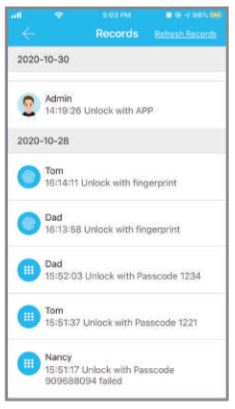
3.8. RecordsView lock and unlock history to check when and who used it.
Gateway
Gateway Connection (Gateway Sold Separately)The A?O lock is directly connected via Bluetooth, that is why it is not attacked by the network. The gateway is a bridge between smart locks and home WIFI networks. Through the gateway, the user can remotely unlock, read the unlock record, delete and modify the password. It can also work with Alexa to voice control the lock.
- Turn on the bluetooth of your phone, and then connect your phone to the WIFI network which the gateway is connected to.
- Click Gateway – click the “+” button in the upper right corner.
- Choose G2
- Reconnect the power of the gateway, when the light flashes red and blue, click “Next”
- Choose the G2 gateway
- Input your home WiFi passcode and name the gateway. Then click “OK”. Wait for pairing with your lock.
- After connection complete, turn back to the lock setting, turn on the “Remote Unlock” button. Now you can click the small remote button in the front page to unlock remotely.
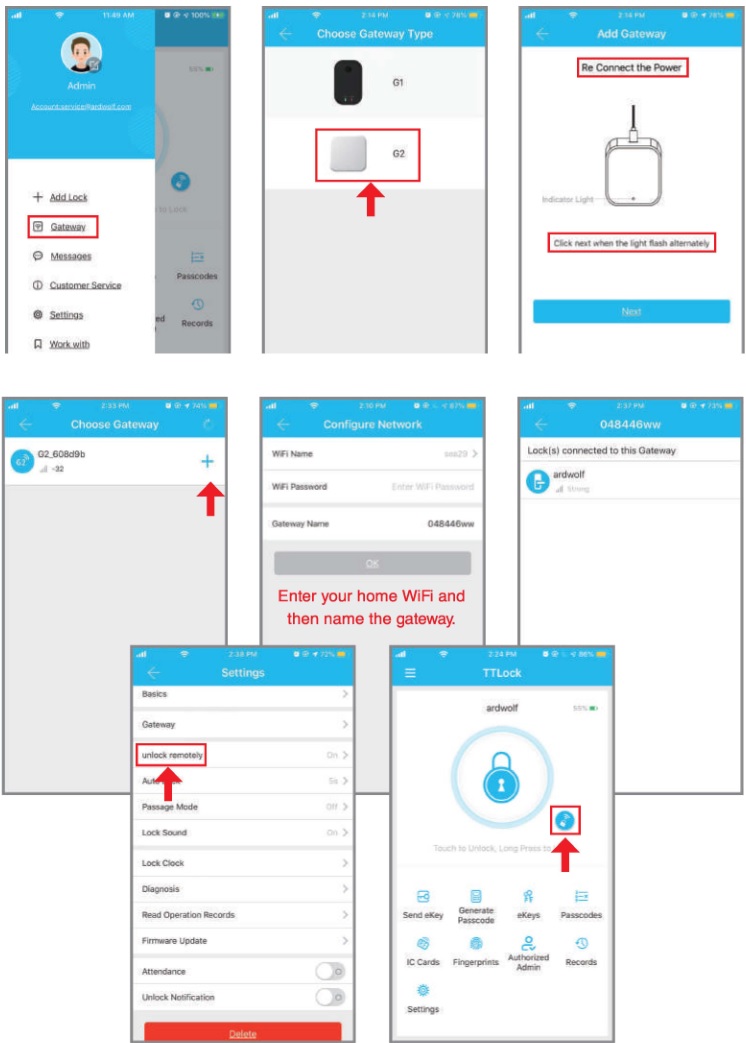
Note:
- Make sure your phone and the gateway are connected to the same WiFi network during connection.
- Need to keep the gateway 6-8 meters within the smart lock.
- Gateway samples are available, please contact Ardwolf support for details or video instruction.
Transfer GatewayThe transfer gateway function is similar with the transfer smart lock operation. The gateway can be transferred to individual users and TT Renting users.
FAQ
Q1: How to reset the lock back to factory setting?A: Remove off one battery and then put it back, once the keypad lights up, press and hold the black button under the knob at the back panel of the lock for about 10s, till the lock indicates “Please input initialization passcode’: then enter “0000#” on the keypad, the lock will then indicate “deleting administrator successfully’: which means the lock has been restored to factory defaults.
Q2: The door won’t lock automatically when I close it.A:
- Check if Auto Lock is set. If not, press and hold the# key on the panel keypad for 3 to 5 seconds to lock the door.
- If the door doesn’t lock automatically when Auto Lock is set, then the lock has been installed incorrectly.
- The Auto Lock function is not activated when the batteries are completely discharged. Check if the batteries are discharged.
Q3: How to unlock/lock via keypad?A: Enter the passcode and then press”#” to unlock. Long press”#” and hold 2s to lock back if Auto Lock is not set.
Q4: How to change the passcodes?A:
- Via APP: The administrator can change the passcodes. Click “Passcodes” on the app – select the user name – click the passcode, now you can custom the code into 4-9 digits.
- Via Keypad: Enter the original passcode to unlock, then enter *10# original passcode # new passcode (between 4-6 digits)# new passcode #.
Q5: What is the differences among the lock administrator, authorized-admin and the general users?A: All users can unlcok/lock via the TTlock app (need to download it to the phone) but there are some differences:
- The user that is paired to the lock is the only (highest) administrator. The other users can only be authorized by the admin to unlock/lock via APP but cannot pair to the lock.
- The (highest) administrator has all the rights to manage the settings. The (highest) administrator can authorized other admins. The authorized-admin has most of the same rights as the administrator except the right to authorize other admin. The general users cannot manage the settings.
Q6: How to switch the highest administrator of the lock?
A:
- Delete the current administrator:Open the APP- locate the lock – click “Setting” – click “Delete” – enter your “account password” – click “OK’:Then the previous administrator has been deleted and now you can pair the lock with a another APP account/phone.
- Reset the lock back to factory setting: once the lock be restored to factory defaults, the administrator will be deleted as well.
- Switch through the “Transfer locks” function:Open the APP – click APP “Settings” – click “Transfer Lock(s)” – Select the Lock – click “Next”- enter the recipient’s APP account and the verification code – click “Next” – Finish
Q7: Why the smart lock always beeping? How to resolve it?A:
- The battery is low. Solution: replace the battery or temporarily use the 9V backup battery.
- The Anti-theft Alarm Prompt button is not tightly pressed. Solution: Always press and hold the alarm button on the front panel during installation, otherwise it will always beeping when put in the battery.
Q8: I’m unable to open the door from a distance of 10 meters / yardsA:
- The app works via a Bluetooth connection, which can be impacted by the environment.
- For both security and functionality reasons, try moving as close as possible to the lock.
- The battery is low, use the emergency power supply for the door.
Q9: How can I reset my TTlock app account if I forgot my password?A:
- Open the TTlock lock App, click Forgot password, enter the email address you registered for your TTlock account.
- Enter a new password, check Get code. A verification code will be sent to your email box. Enter the code to reset your password. Use the new password to sign in the account.
Q10: can I still use the smart lock when my phone is lost or tum off?A:
- Yes. You can still use the traditional physical key or password to lock/ unlock the door.
- Use a new phone to download the App, Sign in your App account with the email or phone number and password. Enter the verification code, then you can use the new phone to unlock the door. Don’t forget to reset the door after you unlock it.
Q11: Lock configuration failed.A:
- Remove the mechanical key from the cylinder.
- Check that the door was closed properly or if lock operation was interfered.
Q12: The App is disconnected from the door unit and / or I can’t find my lock on the App.A:
- Close the App, turn off your phone’s Bluetooth. Then turn Bluetooth back on, and open the App.
- Refresh the App.
- The lock can only be connected to one user’s App. It’s possible that another user’s phone App is already connected to the lock. If don’t know which user is connected to it, you have to reset the lock.
Q13: How to have the remote control function?A: You need to purchase an additional “G2” Wi-Fi gateway separately. Please contact Ardwolf customer support to get the gateway or the connection guide.
Q14: Does it support Alexa and Google Home?A: Yes, it supports Alexa and Google Home, but requires to pair with a Gateway first.
Warranty
Global warranty policyWarranty period for this product is one year and we provide lifetime after sales services.
Warranty AgreementWithin one year of the purchase date, if the product has any quality or technical problems, we will repair or replace the product for the buyer for free. The warranty period starts from the original order date.
WARNING
Failure to follow these safeguards could result in your lock opening inadvertently.
- Avoid keeping and storing phones and fobs unnecessarily close to the lock when inside the home.
- Restrict access to your lock’s back panel and routinely check your settings to ensure they have not been altered without your knowledge.
- When sending an eKey, always double-check that you are sending it to the correct recipient.
- Protect and restrict access to your smartphone so that your app settings cannot be altered without your knowledge.
- If your smart phone is lost or stolen, reset your lock. Resetting your smart lock system will restore your lock to factory settings and delete all smart phones and fobs.
Contact
Please contact us for the installation video, setup video, connection guide or any problem you have of this lock.
Service Email: [email protected]
F @Ardwolf Home SecurityMore information you will find at www.ardwolf.comAll rights reserved
[xyz-ips snippet=”download-snippet”]