![]()
Ceramic Air Fryer
 RAF-595, RAG-596, PAR-597 + RAW-598User Guide
HEALTHY STARTS HERE
Your new Aria Air Fryer is a practical, multi-function appliance that uses powerful AriaFlow technology to deliver super-hot air to your food from all angles, without using extra oil or grease. This leads to satisfying, deliciously crispy food in a snap with less fat, calories, grease, and harmful chemicals. Perfect for frozen snacks, meats, and reheating leftovers, almost anything that can be made in a conventional, microwave, or convection oven can be fried, grilled, toasted, and roasted in your new Air Fryer! Enjoy healthier meals faster than ever from your favorite, quick appetizers to mouth-watering dinners.
We worked hard to ensure this Air Fryer is made of Teflon-Free, dishwasher-safe Ceramic parts with a Lifetime Warranty, so you can spend more time on the things that matter most – like, spending time with loved ones.
 |
 |
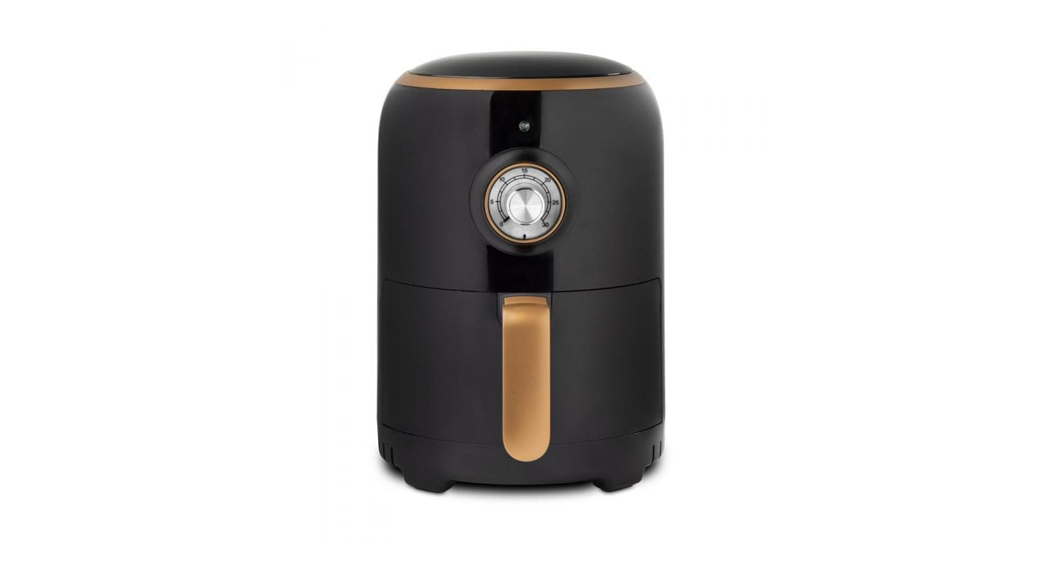
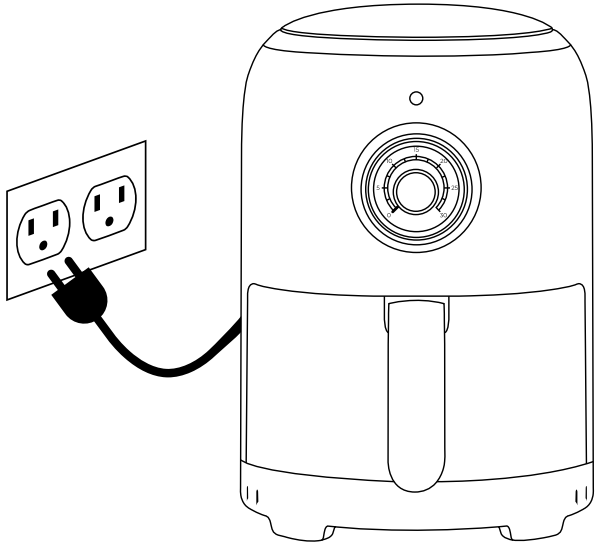
| Powering Air FryerPlace the Air Fryer on an even surface and plug it into a grounded wall socket | Time Control |
Loading Air Fryer
Note: Do not fill the Frying Basket beyond the Max Line
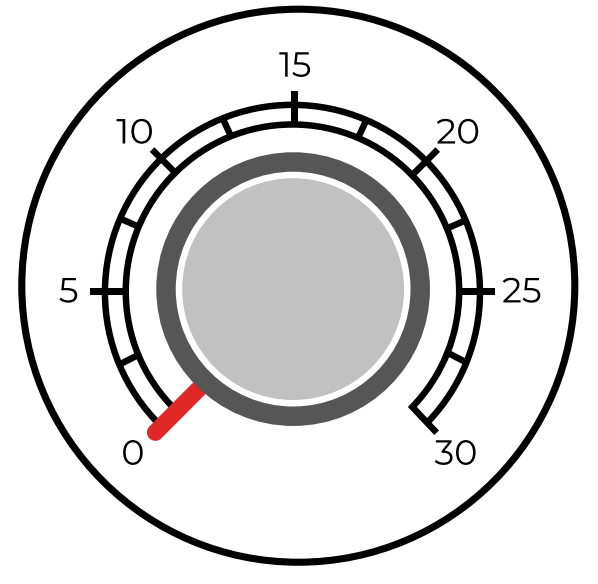
Note: As soon as the Dial is set to anything above 0 and the Basket is securely inside the unit, the Air Fryer will begin cooking immediately.
The blue Heating Indicator light will turn on when the Air Fryer is heating up and turn off when the air inside has reached 400°. The light may turn on and off throughout the cooking cycle as needed.
CAUTION: If the Time Dial is set to anything above 0 and the Frying Basket is set inside the unit, the Air Fryer is cooking – Please exercise extreme caution as the unit, inside, and area around it will be very hot and can cause bodily injury.
CAUTION: When the Air Fryer is cooking, please exercise caution as the unit, inside, and area around it will be hot – regardless of if the blue Heating Indicator light is on or off.
CAUTION: If needed, always safely pull the Basket out and be very cautious of any steam or hot air that may be released.
Before First Use
- Remove all packaging materials, plastic, tape, and labels.
- Clean the Frying Basket and Crisping Rack with warm water, soap, and a non-abrasive sponge. As the Frying Basket and Crisping Rack have a non-stick, food-safe coating, be sure not to use an abrasive sponge or metal scouring pad as this will damage the coating.
(Tip: The Basket and the Rack CAN also be cleaned in the dishwasher)
- Wipe the inside and outside of the Air Fryer with a dry cloth. Note: The Air Fryer may make some smoke or slight odor the first time you use This is normal.
- Ensure the heating element and fan inside the Air Fryer are both clean and clear from any obstructions.
Note: This Air Fryer must only be used with the Frying Basket securely inside the appliance.Do not attempt to use the Air Fryer without the Frying Basket securely inside the unit.
 CAUTION!
- Some parts of the Air Fryer are extremely hot during operation such as the exterior, interior, basket, and Do not touch hot surfaces, parts, accessories, interior or exterior while cooking. Use a heat-resistant oven glove instead of touching the Air Fryer or its accessories directly to avoid bodily injury.
- The Air Fryer contains both electronic and heating elements. To avoid electrical shock, do not immerse the power cord, plug, or housing in water or put them under the tap during cleaning.
- Prevent any water or other liquids from entering the Air Fryer.
- Do not cover the air ventilation inlet and air outlet of the Air Fryer while it’s in use.
- During cooking, hot steam is released from the air outlet openings. Be sure to keep your hands, face, and all other body parts away to avoid injury. Also, be careful of hot steam and air as you open the Air Fryer or remove the Frying Basket.
- Do not fill the Frying Basket or internal chamber of the Air Fryer with oil or fat as this may cause a fire hazard. The appliance uses hot air to cook.
- Always allow the Air Fryer and all parts and accessories to cool down completely before handling or cleaning.
- Do not clean with metal scouring pads or abrasive sponges and
- To prevent a fire, be sure to keep the Air Fryer away from all flammable materials, such as curtains, drapes, tablecloths, cloth, wallpapers, and walls.
- Do not place anything on the top of the Air Fryer or directly behind it.
- The Air Fryer is intended for household use only. Do not use the Air Fryer for anything other than its intended use or beyond the specifications of this manual.
- In case of a fire, don’t attempt to extinguish the flames with water. Unplug the appliance. If safe, smother flames with a damp cloth.
Cooking Instructions
- Place the Air Fryer on an even surface and plug it into a grounded wall socket. Be sure that the Air Fryer is a safe distance (at least 8 inches) from the wall or any other appliances or furniture to avoid damage to the surrounding environment and allow for proper air circulation.
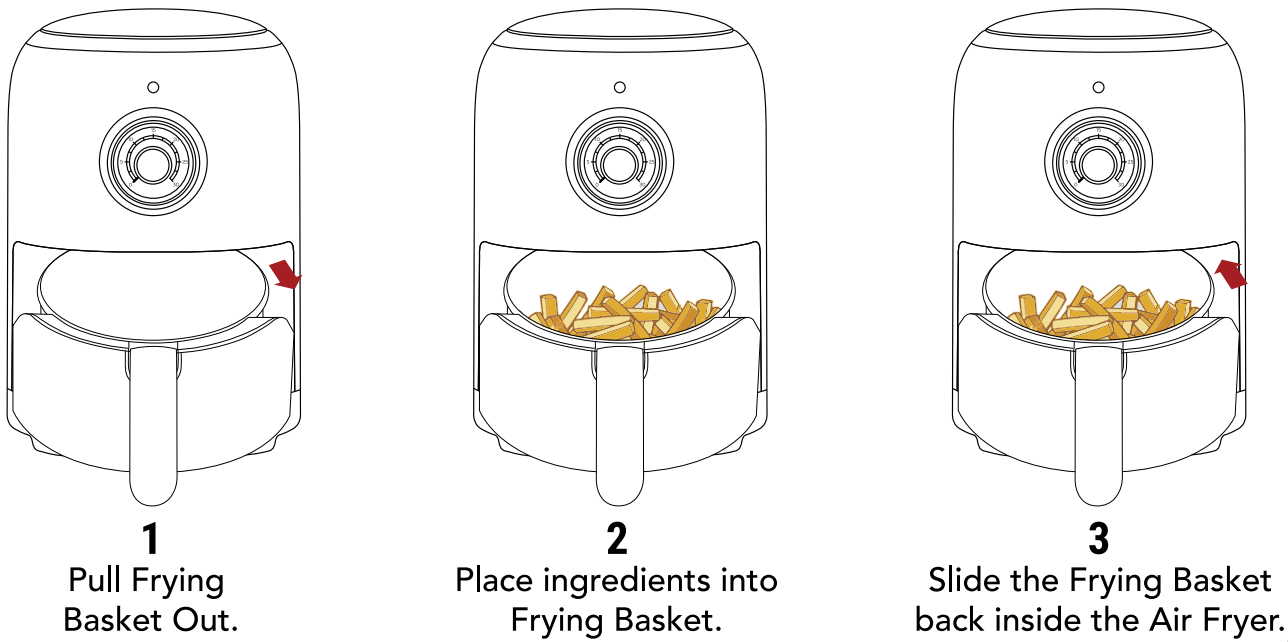
- Pull the Frying Basket out of the Air Fryer and place the ingredients inside of the Frying Basket. Note: Do not fill the Frying Basket beyond the Max Line as this could have a negative effect on the cooking of the ingredients. Note: As this fryer works using hot air circulation, do not fill the Frying Basket with oil or frying fat.
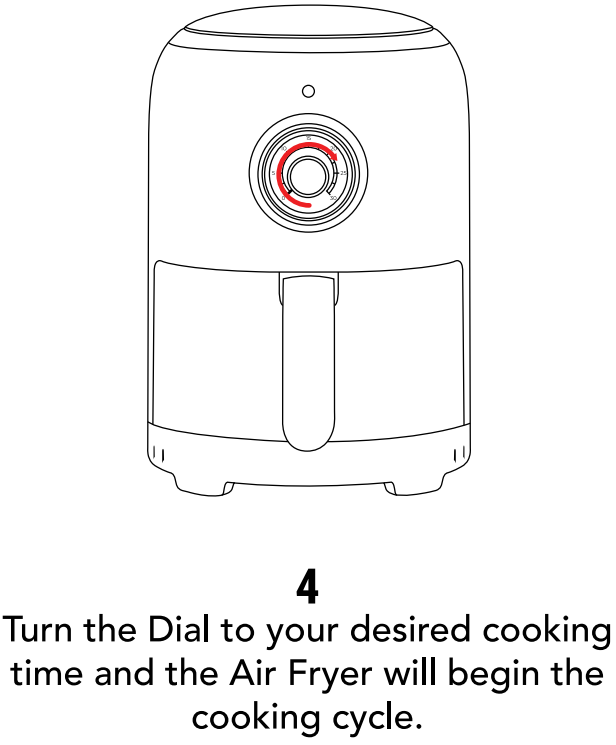
- Slide the Frying Basket back into the Air Fryer and turn the Dial to the desired cooking time.
- Turning the Dial to anything above 0 will begin the cooking cycle if the Basket is securely inside the unit.
- If the Air Fryer was cool, you’ll notice the blue Heating Indicator light turn on as the air inside reheats. When the Air Fryer has reached the desired temperature, the blue light will turn off. Note: When the blue Heating Indicator light is on, or when the Timer is set to anything above 0 with the Basket inside the unit, the Air Fryer is cooking and hot air is circulating at high speeds inside. Keep all body parts away from the Air Fryer and its Outlet vents during this time. Be careful of steam and hot air when removing the Air Fryer Basket.
- If desired, adjust the cooking time by using the Dial during the cooking cycle Note: For the best cooking results with smaller ingredients such as fries, pull out the Basket by the handle and gently shake the ingredients halfway through the cooking time. Note: As a safety feature, this Aria Air Fryer automatically shuts off when the Basket is removed from the unit. The timer will continue even with the Basket out, however, the unit is safely off. Warning: If needed during cooking, always safely pull the Basket out and be very cautious of any steam or hot air that may be released.
- When the set cooking time elapses, the Air Fryer will Ding once.Cooking Instructions (continued)
- Slide the Frying Basket out carefully and place it on a heat-resistant surface. Note: Any excess oil will have been collected at the bottom of the Basket, so do not turn the Basket upside down as this hot oil will spill.
- If the ingredients are ready to serve, simply retrieve your food with tongs or another heat-safe tool.
| Food Frozen Fries | Time14-22 min. | Temp (°F)400 | Shake/Flip Halfway | Notes |
| Shake | ||||
| Handmade | 16-26 min. | 400 | Shake | Soak for 30 mins, dry, then add a half a teaspoon of oil before cooking for crispiness |
| Beef / Steak | 10-20 min. | 400 | Flip Over | |
| Pork Chops | 15-24 min. | 400 | Flip Over | |
| Hamburger | 8-12 min. | 400 | Flip Over | |
| Sausage Rolls | 6-12 min. | 400 | Shake | |
| Chicken Breast | 15-25 min. | 400 | Flip Over | |
| Frozen Snacks | 8-15 min. | 400 | Shake | |
| Vegetable | 8-15 min. | 400 | Shake |
Note: Please keep in mind that these are general guidelines. Your ingredients may differ in size or thickness so we can’t guaranty the best settings for your specific ingredients. Please keep an eye on your food while cooking to ensure the best results for you.
Troubleshooting
| Problem | Solution |
| Air Fryer Not Working | Make sure the Air Fryer is plugged into a power outlet. If necessary try another outlet.Frying Basket isn’t completely secured inside |
| The Air Fryer is especially noisy | The motor or internals aren’t working correctly. Shut the Air Fryer off immediately and safely. Contact Aria Customer Care for warranty instructions. |
| Food not fully prepared when taken out | The Frying Basket is overfilled with ingredients.Temperature is set too lowCooking time is set too short |
| Fried ingredients aren’t crispy enough | Use oven snacks or brush a thin layer of oil on the surface of the ingredients before cooking for crispier results |
| Home-made French fries are not crispy enough | Soak the cut potatoes in water for at least 30 minutes to remove the starch, but be sure to dry them properly before cooking. Add a brush of oil or cut the potatoes into thinner fries for crispier results. |
| Ingredients aren’t cooked evenly | In the middle of the cooking process, carefully lift the Frying Basket out and shake it to separate the overlapped ingredients, then place the Basket back inside to continue. |
| The Air Fryer has shut down | The Air Fryer has an auto-off safety feature that protects it from overheating.Unplug the unit safely and allow it to cool down completely. Then plug it back in and restart cooking following instructions |
| Smoke is coming out of the Air Fryer | The Frying Basket, Rack, or inside of the Air Fryer still contains grease or oil from a previous cooking cycleWhite smoke is caused by grease or oil. To prevent this, clean the Frying Basket and the inside of the Air Fryer completely. |
| Note: A few ingredients with a high-fat content such as bacon or some meats can release excess fat, grease, and oil which can begin to smoke. Please be mindful of this and remove all excess fat and oil inside the Air Fryer as necessary. |
Important Safety Tips
As your Air Fryer is a powerful electrical appliance with heating elements and fans, be sure to follow all safety precautions and read all instructions fully and carefully before using
WarningMake sure that your outlet’s voltage corresponds to the voltage stated on the label of the appliance, and only use it with a properly grounded outlet.As the plug is polarized (one prong is larger than the other), be sure to insert it into a polarized outlet the correct way. If the plug does not fit, reverse the plugand try again, or contact a certified electrician.Do not modify the appliance in any way.Before using, check the power cord of the appliance and the accessories. Do not use if any part shows any damage. Contact Customer Care if this is the case for warranty assistance.Before each use, ensure the heating element on top of the Air Fryer and the fan are both clean and clear from any ingredients or food from the previous cooking cycle.
Warning
Keep out of reach of children – they should be supervised to ensure that they do not play with the Air Fryer.Do not use Air Fryer unattended while in use.Never use the Air Fryer without the Frying Basket in place.Immediately unplug the Air Fryer if you see dark smoke coming out of it. Wait for the smoke to stop being released before pulling out the Basket and other accessories.Children over 10 years, anyone with a physical or mental disability, and anyone with a lack of experience and knowledge on how to use the Air Fryer should read the User Guide completely and be guided by someone who has prior experience with using the appliance.Do not let the power cord contact hot surfaces or hang over the edge of the table or counter.Do not plug in the Air Fryer or operate the appliance or display with wet hands. Do not use this appliance with an extension cord as this can cause a fire hazard. As the Air Fryer gets extremely hot
Warningduring use, prevent fire hazards and do not put plastic or metal dishes, bowls, tools, or protective film into the appliance.Do not place paper, cardboard, or any similar materials into the Air Fryer.If using parchment or baking paper, be sure to place your food securely on top of the paper before putting it in the Air Fryer. The extremely light paper could be lifted by the fan and touch the heating elements, causing a fire hazard.The Air Fryer should be placed on a horizontal and stable surface, away from water and all liquids when being used.Do not place it on plastic, any boards, or any other surface that can get too hot or damaged.Do not place the Air Fryer against a wall or other appliances. There should be a space of 8 inches all around the Air Fryer while it’s in use or directly after its use (since it will be hot.)Do not leave the Air Fryer unattended.Once cooking is completed and you are taking out the Basket or food, the heating element at the top of the unit will have a very high temperature. Do not touch it.
WarningIf the preset time is too long the food will be burnt and dark smoke will be released from the air outlet. Unplug the Air Fryer immediately and allow it to cool completely. After it cools, clean the food and oil in the Frying Basket in addition to any accessories.After the Air Fryer has turned off, then safely pull the plug from the socket. Avoid pulling the power cord too harshly to prevent damage and electric shock.Unplug the Air Fryer from the outlet when it is not in use or before cleaning it. Always allow the appliance to cool down completely first before cleaning. Do not use any 3rd party accessories.This appliance is intended to be used in a household. Do not use outdoors.If the appliance is used improperly, or for professional or semi-professional purposes, or if it is not used according to the instructions in the User Guide, the warranty becomes invalid and Skyline Brands Inc refuses any liability for damage caused.Always unplug the Air Fryer when it’s not being used.
Care, Cleaning & Maintenance
For optimal efficiency and long-term care, clean the Air Fryer after each use.
- Since the Air Fryer and internal parts get very hot during use, unplug the power cable and let the Air Fryer cool for at least 30 minutes before handling or cleaning any parts. Note: Remove the Frying Basket and any accessories carefully to let the Air Fryer cool more quickly before cleaning.
- Clean the Frying Basket and Rack with hot water, a minimal amount of soap, and a non-abrasive sponge. To avoid damage to the parts, do not use a hard-wire cleaning tool.
- The Frying Basket and the Rack are dishwasher-safe for easier cleaning.
- Clean the inside of the Air Fryer with hot water and a non-abrasive sponge.
- Wipe the surface of the Air Fryer with a moist cloth. Do not use corrosive liquids for cleaning.
- Always keep the power cord of the Air Fryer dry and away from water to prevent electric shock and damage to the appliance.
- For long-term storage, unplug the Air Fryer, allow it to cool down, properly clean and dry all the parts, put the components into the box, and store it in a cool, dry place.
WarningIf the appliance is used improperly, or for professional or semi-professional purposes, or if it is not used according to the instructions in the User Guide, the warranty becomes invalid and Skyline Brands refuses any liability for damage caused.Warranty TermsThis warranty applies to products purchased and used only in the U.S and Canada and does not cover wear and tear from improper use or not following instructions as specified in the print manuals. Furthermore, we exclude all claims resulting from misuse, special, incidental, and consequential damages. All liability is limited to the amount of the purchase price. After a period of 90 days, we will still repair or replace the product at no cost, however, may ask you to help pay for the shipping cost associated with the product.

To make a warranty claim, do not return the appliance to the store.Please call 1.847.357.9077Between 10:00am – 5:00pm (CST) Monday through Fridayemail [email protected]
![]()

Follow us on SocialsFor video tutorials, recipes, and more!
![]()

2QT/800 Watts
[xyz-ips snippet=”download-snippet”]