User Manual
Arlo Pro 3 Floodlight Camera
1. Get to Know Your Pro 3 Floodlight Camera
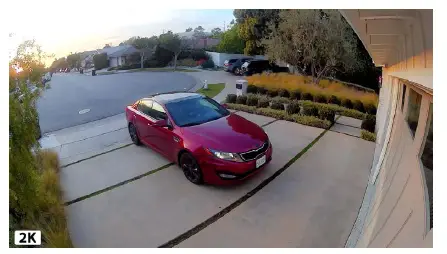
Illuminate and view 2K video with your Arlo Pro 3 Floodlight Camera. Your floodlight cuts through darkness with brilliant LEDs, and the integrated 2K camera allows you to view live video or recorded clips from your phone. When your floodlight detects motion or audio, it uses a WiFi link to your internet connection to stream video to your Arlo account in the cloud. Instantly illuminate a wide perimeter to deter unwanted visitors. Receive notifications when visitors arrive or packages are delivered1, adjust brightness, and view live video or recorded clips directly from your phone. Hear and speak to visitors clearly with two-way audio. See in full color at night so you can identify unique details, and track and zoom on moving objects with clarity. The wire-free and sleek design seamlessly integrates into any home or business. Hear something outside? Manually trigger your light, siren, or view live video from your phone. Call a neighbor or e9112 directly from notifications or the Arlo app in case of emergency.
Get the Arlo app
Download the Arlo app. The Arlo app lets you create an Arlo account in the cloud and set up and manage all your Arlo devices.
Note: If you already use the Arlo app, make sure that you’re using the latest version. To find out if an update is available, go to the app store and search for Arlo.
- Requires Arlo Smart subscription.
- e911 feature available for U.S. subscribers only. Requires Arlo Smart subscription.
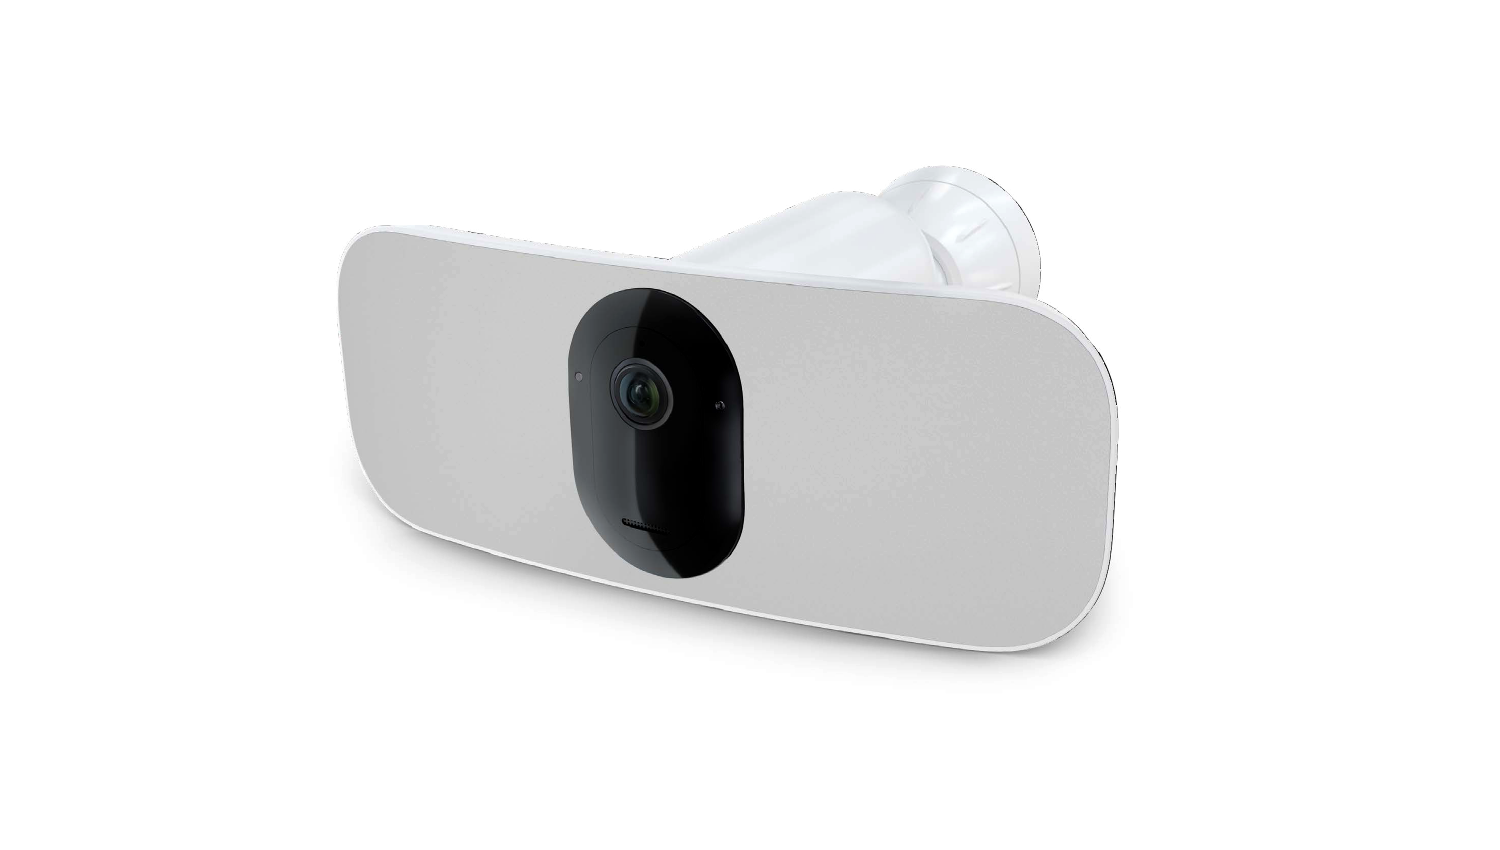
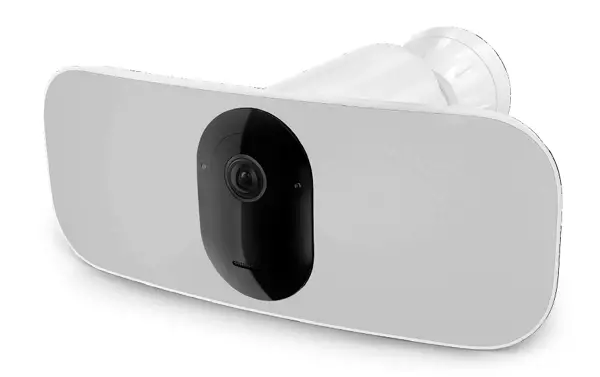
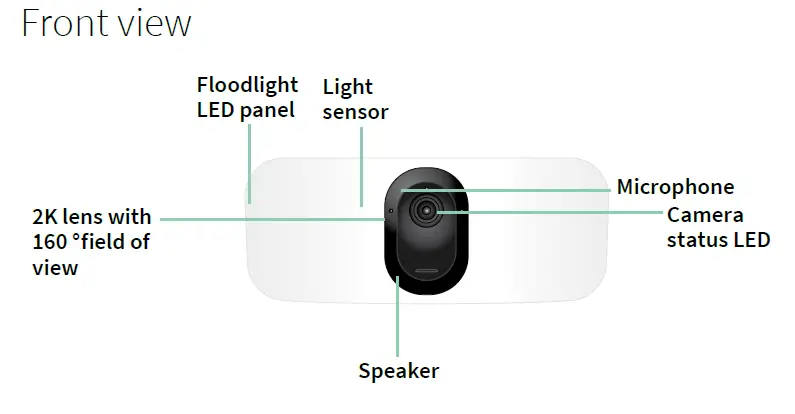
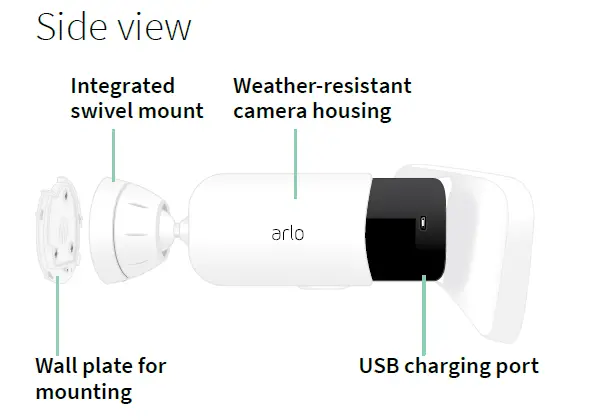
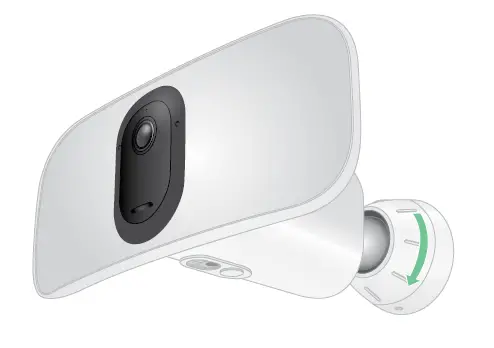
Meet your Pro 3 Floodlight Camera
Your Pro 3 Floodlight Camera consists of two parts, the housing and the floodlight camera with a battery compartment.
Features
- Superior brightness. Brightly illuminate your property with 2000-3000 lumens.3
- Color night vision. See what’s lurking with color night vision or black & white.
- Built-in smart siren. Trigger your siren remotely or automatically during an event.
- Custom control. Enhance protection with custom floodlight and camera settings.
- Multiple power options. Power with included rechargeable battery, or optional solar panel and outdoor magnetic charging cable.
- 2K video with HDR. Zoom in on objects and see clearer details and colors in 2K HDR.
- 160° diagonal view. Keep an eye on more of what matters with a wider field of view.
- 2-Way Audio. Hear and speak to visitors clearly with superior audio quality.
- Rechargeable battery. Convenient and long-lasting, it takes the expense out of security.
- Weather-resistant. Built to withstand the heat, cold, rain, or sun.
Do more with Arlo
You can add these options, which are sold separately:
- Add more Arlo cameras and devices. Cover more areas in and around your home by adding cameras, video doorbells, and more.
- Arlo ceiling adapter. See Install the ceiling adapter (sold separately) on page 14.
- Arlo outdoor magnetic charging cable. Using this cable this increases the light brightnessfrom 2000 to 3000 lumens. It also supports CVR (when your floodlight is paired with anArlo SmartHub or base station). See Outdoor magnetic charging on page 75.
- Arlo Solar Panel. Connect an Arlo Solar Panel to your camera and harvest power from thesun to keep your camera battery charged. See Solar panel charging on page 76.
- Upgrade your Arlo subscription. For more information, visit What are the available Arlo subscription plans and how much cloud recording is available?.
2. Get Started
This chapter presents the tasks involved in installing your Arlo Pro 3 Floodlight Camera. The free Arlo app guides you through this process with step-by-step instructions. The tasks in this process fall into these main categories:
- Setup
- Prep
- Mounting
- Checking the camera’s view
Setup: Use the Arlo app
The free Arlo app helps you complete setup and guides you through the installation process.
- Open the Arlo app and connect to your WiFi network. If you don’t have the app, you can download it and create your Arlo account. Once you set up your Arlo account, you can access it from the Arlo app on a smartphone or tablet, or from a computer using a web browser. If you’re using a computer, enter https://my.arlo.com/#/login in the address bar of the browser.
- Select Add Device and add your Pro 3 Floodlight Camera.
Prep: Insert the battery
The Arlo Pro 3 Floodlight Camera consists of two parts. The floodlight and camera part is where you insert the battery. The camera housing is the second part, which protects the camera.
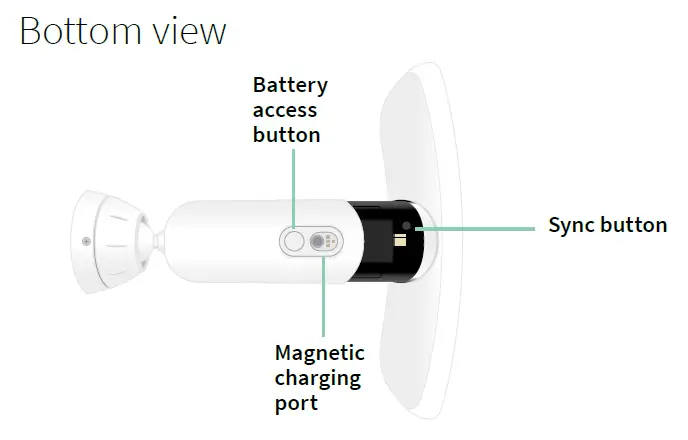
- Press the battery access button on the bottom of the Floodlight Camera and separate thecamera from the camera housing.

- Insert the battery into the camera with the Arlo logo on your floodlight and the Arlo logoon the battery facing up.The LED on the front of your Pro 3 Floodlight Camera blinks blue after the battery isinserted.
- If you want to charge the battery, bring the camera indoors and use the USB chargingcable and the power adapter.
- Keep your Floodlight Camera separate from the camera housing while you follow theinstructions in the Arlo app to pair your Floodlight Camera to your Wifi network.The Arlo app guides you through setup first before you mount the camera housing.
 The LED on the front of your Pro 3 Floodlight Camera blinks blue after the battery isinserted.
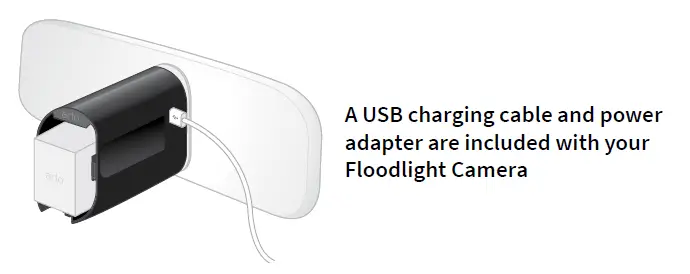
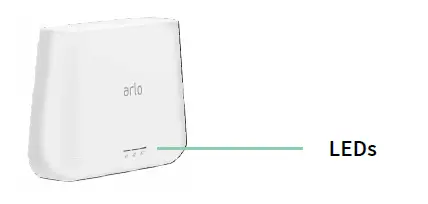
Prep: Check the LED
The LED lights when your floodlight is powered on. The LED changes color and blinks depending on the battery charge and to indicate the status of activities such as pairing the camera and updating the camera firmware.
- Slow blinking blue. The floodlight is in the process of pairing.
- Fast blinking blue. The floodlight successfully paired.
- Blinking amber. The floodlight is out of range, an error occurred during pairing, or the battery charge is low (15% or less).
- Alternating blue and amber. The floodlight failed to pair, or a firmware update is in process, or a reset is in process.
Prep: Find a good location for your floodlightSelect a location for your floodlight with a clear vantage point to fully optimize the wide field of view.
For the best experience, choose a location with a strong WiFi signal. You can check the WiFi signal strength in the Arlo app. For information about WiFi connections, see WiFi connection options for your floodlight on page 18.
We recommend mounting your floodlight 8-10 feet (2.5-3 meters) off the ground, angled toward the ground. Each home system setup is unique, so use these guidelines as general best practices.
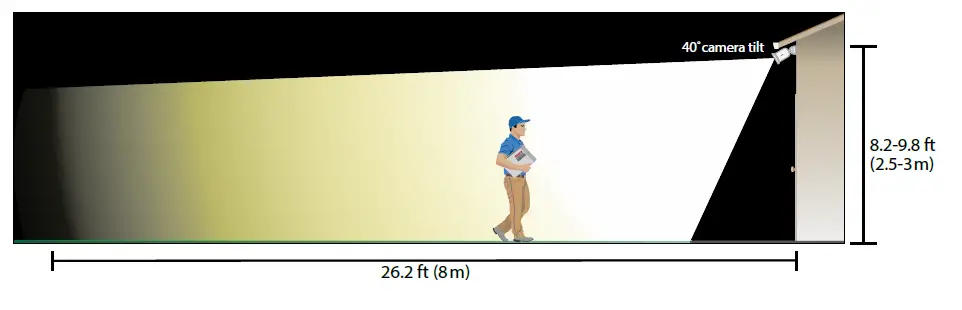
This illustration shows the floodlight’s beam spread within the camera’s field of view. The area lit by the floodlight extends beyond what is shown here.
When mounting your floodlight:
- Place your floodlight about 8-10 feet (2.5-3 meters) off the ground.
- Tilt your floodlight about 40° toward the ground, and further adjust the angle based on the height and location.
- Make sure that the floodlight camera’s field of view is clear of nearby walls and other obstructions. A nearby wall can cause a bright reflection from the floodlight.
Prep: What you need for wall mounting
Your floodlight comes with a wall plate, screws, and wall anchors that are designed for wall mounting. If you want to mount your floodlight on a ceiling, we recommend using the ceiling adapter, sold separately. See Install the ceiling adapter (sold separately) on page 14.
What you need for wall-mounting.
- A power drill with a 15/64 in. (6 mm) drill bit
- A Phillips screwdriver
- A pencil
- The wall plate, screws, and wall anchors that came in the package with your Pro 3 Floodlight Camera.
WARNING: Mount your camera onto a flat, supportive surface.
When mounting your camera, select a mounting surface that can support the weight of your camera with the battery installed. Mounting your camera in an unstable location might create a hazardous situation or damage your product, which might not be covered by Arlo’s warranty.
Wall-mount your floodlight
The Arlo app guides you through the installation process for your floodlight. For the best experience, we recommend that you wait until the Arlo app tells you to mount your floodlight before you begin the mounting process.
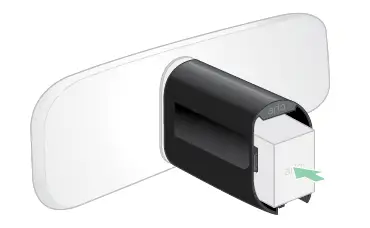
1. Press the battery access button on the bottom of the floodlight and separate the camera from the camera housing.This makes mounting easier, and it allows you to charge the camera while you’re mounting the camera housing.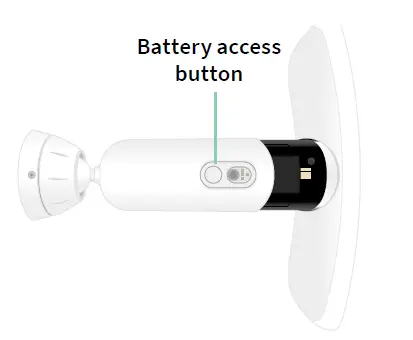 2. Place the wall plate on the wall as a guide with the arrow pointing up. Use a pencil to mark the position of the holes in the wall plate. Then remove the wall plate.3. Use a 15/64 in. (6 mm) drill bit to drill three holes into the wall.We recommend using wall anchors when mounting on drywall, brick, or tile.
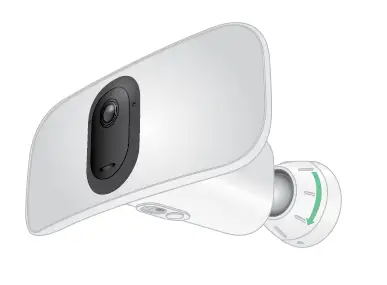
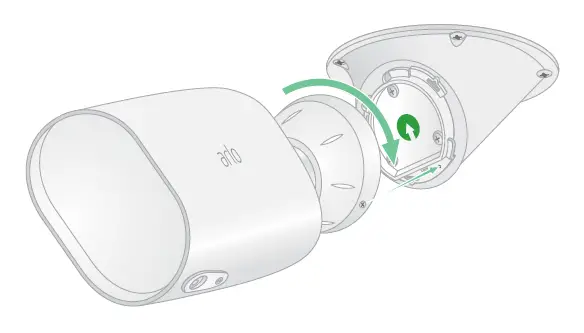
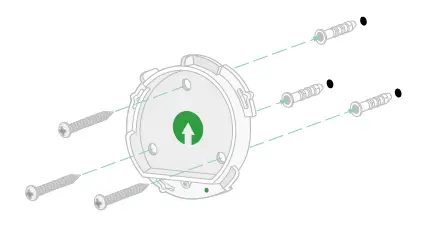 4. Place the wall plate with the arrow pointing up and fasten a screw into each hole.5. Align the camera housing so that the lock screw on the bottom of the mount lines up with the green dot on the wall plate.6. Twist the camera housing clockwise until you hear a click and the housing locks in place.7. Tighten the lock screw.8. While you hold the top and bottom of the floodlight, insert the floodlight camera into the camera housing until it clicks into place. (Don’t press on the camera lens or the light.)
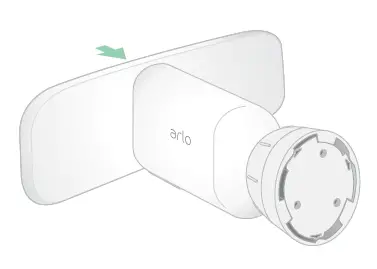 9. Tilt and swivel to adjust the angle of the camera.
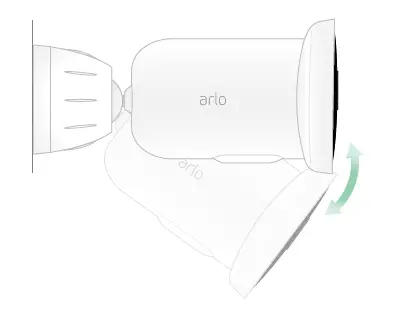 10. Secure the floodlight by turning the camera housing grip clockwise.
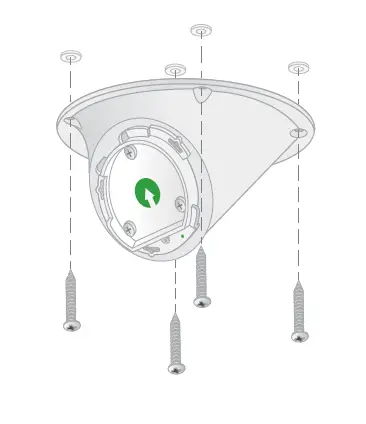
Prep: Install the ceiling adapter (sold separately)
If you want to mount your floodlight on a ceiling, we recommend using the Arlo ceiling adapter (sold separately) for optimal floodlight positioning.
WARNING: Mount your camera onto a flat, supportive surface.
When mounting your camera, select a mounting surface that can support the weight of your camera with the battery installed. Mounting your camera in an unstable location might create a hazardous situation or damage your product, which might not be covered by Arlo’s warranty.
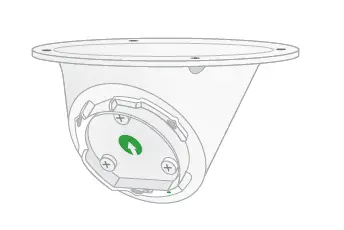
- Mount the adapter to the ceiling using the provided screws.
- Attach the camera housing to the ceiling adapter.Align the locking screw on the camera housing to the bottom right dot and then rotate the housing clockwise to lock in place.
- Tighten the locking screw.
Check your floodlight’s field of view
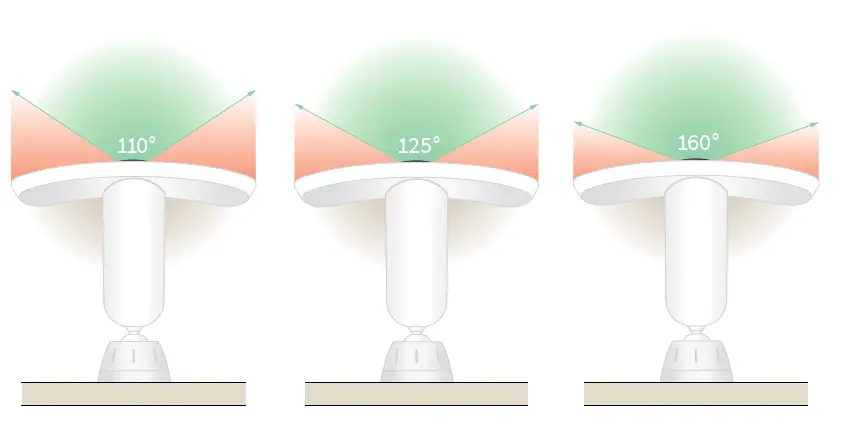
The field of view is the area that the camera sees. You can set the video mode for your floodlight to Full (110 degrees), Wide (125 degrees), or Super Wide (160 degrees). Arlo automatically corrects the image to reduce the fisheye effect for each field of view setting.
Change the video mode to select the field of view
- Open the Arlo app.
- Tap Settings > My Devices.
- Select the floodlight.
- Tap Video Settings > Video Mode.
- Tap a field of view to apply it to your floodlight.
Test motion detection
You can use the motion detection test to find the right motion sensitivity setting for each camera.
- Open the Arlo app.
- Tap Settings > My Devices.
- Select your floodlight.
- Tap Device Utilities > Motion Detection Test.
- Move in front of the floodlight camera. During this test, the LED blinks amber when motion is detected.
- Move the slider to adjust the motion sensitivity level as needed. This motion sensitivity setting is used during the motion detection test. It is not automatically applied to the camera rules used by modes to arm your floodlight. When you are satisfied with a particular motion sensitivity level in the test, note the setting so that you can add it to your rules.
- Edit the rule for your camera to enter the motion sensitivity level that you want to use. See Change motion sensitivity on page 36.
Arm your Floodlight Camera
Selecting a mode lets you control when your camera detects motion and audio and the rules it uses to record and alert you. You can also use modes to control when the floodlight lights and when its siren turns on. The Arlo app comes with four modes: Armed, Disarmed, Schedule, and Geofencing. You can customize each mode and you can also create custom modes. For information, see Chapter 6, Modes, Rules, and Alerts on page 34.
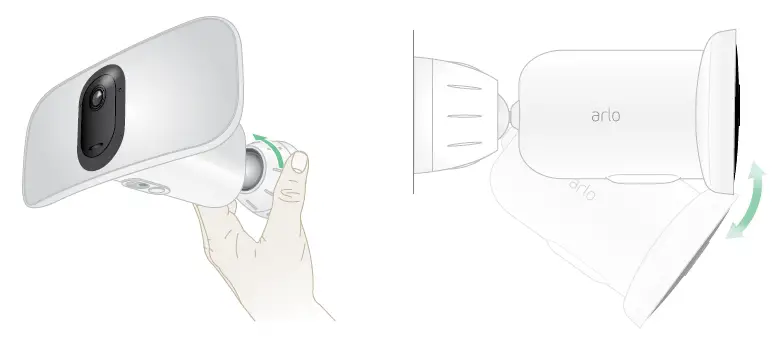
Reposition your floodlight after mounting
Note: For your safety, consider asking a friend or family member to use the Arlo app while you are handling your floodlight.
- Use your fingers to turn the grip on the mount counterclockwise to loosen it.
- Tilt and swivel to adjust the angle of your floodlight.
- Tap Settings > My Devices.
- Select the camera.
- Tap Device Utilities > Camera Positioning.Your floodlight camera starts streaming video. The signal strength bar indicates the WiFisignal that your camera is receiving at its current location.
- Confirm the placement of your camera by using the live stream in the Arlo app.
- Finger-tighten the grip on the mount by turning it clockwise.
HEVC 2K playback-supported devices
High Efficiency Video Coding (HEVC) is a video compression standard that enables you to download and stream 2K videos with ease. To use HEVC on the Arlo app, you must use a supported device and meet the minimum requirements. Your device must:
- Run iOS 9.0 or higher (Apple devices)
- Run Android 5.0 or higher (Android devices)
- Have the latest version of the Arlo app (for mobile)
- Use a web browser that supports HEVC
Note: To check if your web browser supports HEVC, visit https://caniuse.com/#feat=hevc.
HEVC is supported on:
- iPhone 7/7 Plus or newer
- iPad Pro or newer
- Samsung Galaxy S7/S7 Plus or newer
- Galaxy Note 8 or newer
- Google Pixel/Pixel XL or newer
- Huawei P9 or newer
- Xiaomi Mi 5 or newer
- LG G5 or newer
- HTC U10 or newer
- Sony Xperia X or newer
- Moto Z or newer
- OnePlus 3 or newer.
3. WiFi Setup and Connections
When you install and set up your floodlight, the Arlo app guides you through the process of connecting the floodlight to your router’s 2.4 GHz WiFi network or to an optional Arlo SmartHub or base station.WiFi connection options for your floodlightWhen you install your floodlight you can connect it directly to your router’s 2.4 GHz WiFi band, or you can connect the floodlight with WiFi to an Arlo SmartHub VMB5000 or VMB4540, or an Arlo base station VMB4500 or VMB4000.
An Arlo SmartHub or base station isn’t included in the package with your floodlight. They are sold separately. Using your floodlight with a SmartHub or base station gives you access to these additional features:
- 2K local streaming and 2K local recording
- Auto Zoom and Tracking
- CVR (with a subscription)
- Use local storage on an SD card in a VMB5000 SmartHub or on a USB storage device connected to the SmartHub VMB4540 or base station VMB4500 or VMB4000.
- Use remote access for SmartHubs VMB5000 and VMB4540.
After you install and set up your floodlight, you can move its WiFi connection from your router to a SmartHub or base station. You can also move your floodlight’s WiFi connection from a SmartHub or base station and connect it directly to your router’s 2.4 GHz WiFi band. To do this, you must remove the device from your account and reinstall through the Arlo app, selecting the appropriate option to move back and forth.
Tips for optimal WiFi performance
The distance between WiFi devices can affect the WiFi signal:
- Maximum recommended distance. We recommend that you place your floodlgiht within 300 feet (90 meters) of your WiFi router. The maximum line-of-sight range of 300 feet is reduced by each wall, ceiling, or other major obstruction between the floodlight and the router.
- Minimum recommended distance. To reduce WiFi interference, allow at least 6½ feet (2 meters) between your floodlight and any Arlo cameras that you install. These materials can reduce WiFi signal strength if they are located between WiFi devices:
- Unusually thick walls and ceilings
- Brick
- Concrete
- Stone
- Ceramic
- Glass, especially mirrors
- Metal
- Large quantities of water, such as the water in a fish tank or water heater.
Connect your mobile device to a 2.4 GHz WiFi network during setup
If you’re connecting your floodlight directly to your router’s WiFi network, it’s important to understand that your mobile device must connect to the same WiFi network as the floodlight during setup.
Your floodlight can only connect to a 2.4 GHz WiFi network. Many routers broadcast WiFi networks in both 2.4 GHz and 5 GHz bands, so your phone might connect to the 5 GHz WiFi band. During setup, connect your phone to your 2.4 GHz WiFi network, then connect your Pro 3 Floodlight Camera to that same 2.4 GHz WiFi network.
Find your 2.4 GHz WiFi network name and password Your phone might connect to your 5 GHz WiFi network most of the time. If you’re not sure about how to find the 2.4 GHz WiFi network:
Look on your WiFi router label.Many routers have a label that shows the WiFi network name, which is also called an SSID. Your 2.4 GHz network name might have a 2, 2.4, or 2G at the end. Your 5 GHz network name might have a 5 or 5G at the end. If you changed your WiFi settings, then check the place where you saved your custom settings.
- If your WiFi network name or SSID doesn’t indicate whether it’s 2.4 GHz or 5 GHz, ask your internet service provider (ISP) or the person who set up your WiFi router.
- If you have a mesh WiFi network, it uses only one WiFi network name for both WiFi bands. The floodlight finds and connects to the 2.4 GHz WiFi band. As long as you connect your phone to the same mesh network, Arlo can discover the floodlight.
Connect your iOS (Apple) device to a 2.4 GHz network
1. Unlock your device and tap Settings.2. Tap Wi-Fi, near the top of the list of Settings options.3. Turn on WiFi by tapping the switch next to Wi-Fi at the top.Note: WiFi is activated when the switch is green.4. Select a 2.4 GHz WiFi network.This is commonly indicated by a 2, 2.4, or 2G at the end of the network name.5. If prompted, enter the password for the network.When you’re connected to the WiFi network, a blue check mark appears to the left of the network name.
Connect your Android device to a 2.4 GHz network
1. Unlock your device and tap Settings.2. Tap Network & internet > Wi-Fi.3. Turn on WiFi by tapping Use WiFi at the top.4. Select a 2.4 GHz WiFi network.This is commonly indicated by a 2, 2.4, or 2G at the end of the network name.5. If prompted, enter the password for the network.When you’re connected to the WiFi network, the word Connected appears under the network name.
Connect an optional Arlo SmartHub
Your Pro 3 Floodlight Camera can connect to a SmartHub or Base Station with Siren. TheSmartHub or base station uses an Ethernet cable to connect to your router. Connect a SmartHub The Arlo app guides you through the steps to install and set up your Arlo SmartHub.
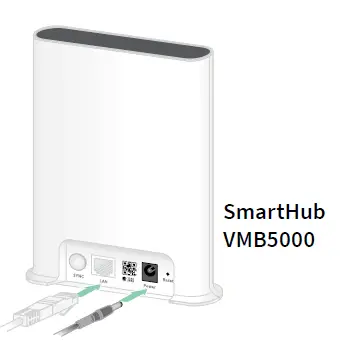
1. Connect the SmartHub to your router with an Ethernet cable.2. Connect the AC adapter to the SmartHub and plug it in. The LED on the front of the SmartHub lights.
The SmartHub LED
The SmartHub LED located on the front panel indicates the status of the SmartHub.
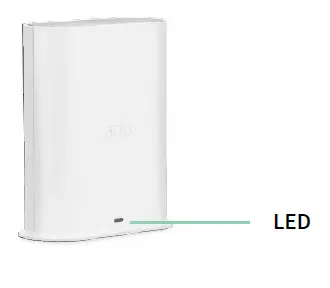 The LED blinks once when the SmartHub is first powered on. Then the LED lights as follows:
• Solid blue. The SmartHub is connected to the internet.• Slow blinking blue. The SmartHub is ready to sync and pair with a camera or is connecting with a camera.• Fast blinking blue. The SmartHub paired with a camera.• Solid amber. An error occurred or something is wrong with the connection.• Slow blinking amber. The SmartHub can’t connect to the camera. The camera can’t be found, is out of range, or another connection error occurred.• Alternating blue and amber. A firmware update or a reset is in progress.
Connect an optional Arlo Base Station with Siren
You can connect your floodlight directly to your home router’s 2.4 GHz WiFi network, or youcan connect your floodlight to an Arlo SmartHub or Base Station with siren. Your floodlightis compatible with Base Station with Siren models VMB4500 and VMB4000. The base stationuses an Ethernet cable to connect to your router.The Arlo app guides you through the steps to install and set up your base station.
1. Connect the base station to your router with an Ethernet cable.2. Connect the AC adapter to the base station and plug it in.
The LED on the front of the base station lights.
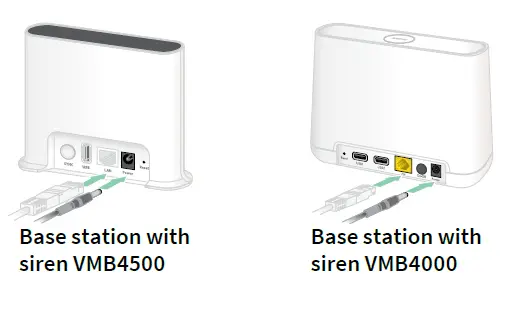
Base Station LED (VMB4500)
The LED located on the front indicates the status of the base station.

The LED lights as follows:
• Solid blue. The base station is connected to the internet and to an Arlo device.• Slow blinking blue. The base station is ready to sync with an Arlo device.• Fast blinking blue. The base station is synching with an Arlo device.• Solid amber. The base station is booting.• Slow blinking amber. The base station can’t connect to the Arlo device. The device can’t be found, is out of range, or another connection error occurred.• Alternating blue and amber. A firmware update or a reset is in progress.
Base Station LEDs (VMB4000)
This base station has three LEDs located on the front.
The LEDs light as described in this table.
Move your floodlight’s WiFi connection to a SmartHub or base station
You can change your floodlight’s WiFi connection from your router to an Arlo SmartHub VMB5000 or VMB4540, or an Arlo base station VMB4500 or VMB4000.To add a SmartHub or base station and connect your floodlight:
1. Open the Arlo app.2. Add the SmartHub or base station to the same Arlo account that your floodlight wasoriginally connected to.If you’re using an Arlo Smart trial associated with this account, doing this keeps the ArloSmart trial active so you don’t lose it.3. Follow the Arlo app instructions to set up your SmartHub or base station and connect it to the internet.4. Tap Settings > My Devices.5. Select your floodlight.6. Scroll down and tap Remove Device. Your device is reset and removed from your account.7. From My Devices, tap Add New Device > Cameras > Pro> Pro 3 Floodlight Camera.8. Follow the Arlo app instructions to add the floodlight.9. When the Arlo app detects your SmartHub or base station, follow the instructions to connect your floodlight to your SmartHub or base station.
Move your floodlight’s WiFi connection to a direct router connection
You can change your floodlight’s WiFi connection from a VMB5000, VMB4540, VMB4500, or VMB4000 SmartHub or base station, and connect the floodlight directly to your router’s 2.4 GHz WiFi network.
When you connect your floodlight directly to your router, you can still cross-trigger an Arlo Chime or other Arlo cameras that are paired with an Arlo SmartHub or base station. However, you can’t store Arlo recordings from your floodlight on a local storage device in the SmartHub or base station.
To move your floodlight’s WiFi connection directly to your router:
- . Open the Arlo app and log into the same Arlo account that your floodlight is connected to.If you’re using an Arlo Smart trial associated with this account, doing this keeps the trial active so you don’t lose it.
- Make sure that your mobile device is connected to your router’s 2.4 GHz WiFi network.For more information, see Connect your mobile device to a 2.4 GHz WiFi network duringsetup on page 73.
- Tap Settings > My Devices.
- Select your floodlight.
- Scroll down and tap Remove Device.Your device is reset and removed from your account.
- From My Devices, tap Add New Device > Cameras > Pro> Pro 3 Floodlight Camera.
- If Arlo detects a SmartHub or base station, tap Connect without SmartHub or Connectwithout a Base Station.
- Follow the Arlo app instructions to connect your floodlight directly to a 2.4 GHz WiFinetwork.
4. Use Your Floodlight Camera
When you open the Arlo app, the Devices page displays your camera feeds.
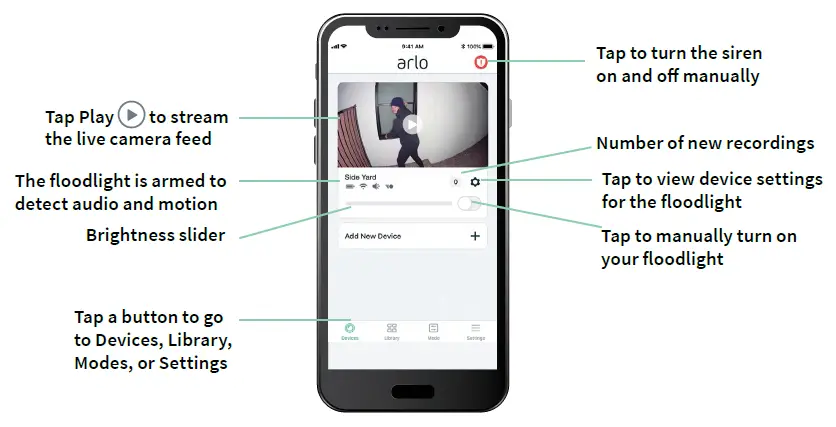
Manually turn your floodlight on and off
You can turn your floodlight on and off using the Arlo app and you can set it to trigger automatically when motion is detected, audio is detected, or when a device cross-triggers the floodlight. (See Use a rule to turn on the floodlight on page 42.)
To manually turn on your floodlight:
1. Open the Arlo app.2. Tap the On/Off button below the camera feed for your floodlight.
The light turns on.
The light stays on the length of time that is specified for duration in light settings and thenturns itself off (unless you manually turn it off sooner). A countdown timer displays thenumber of minutes the light stays on. To change the amount of time that the floodlight stays on, see Change the light settings on page 52.3. To increase or decrease the brightness, drag the slider to the right or left. Note: Increasing the brightness uses a greater amount of battery life.4. To manually turn off the floodlight, tap the On/Off button again.
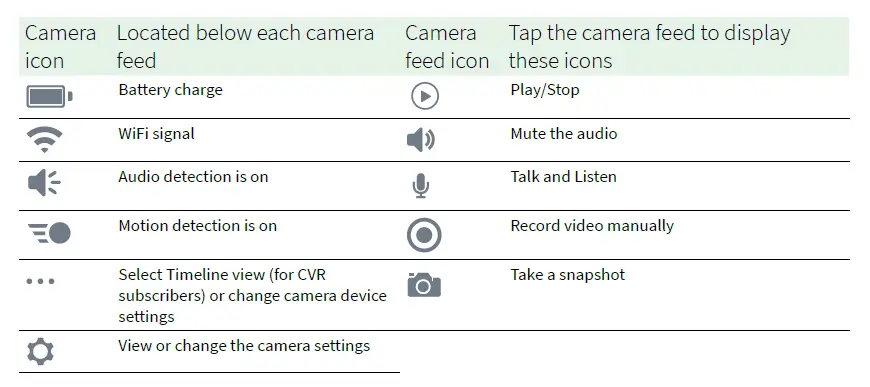
View your camera feeds
1. Open the Arlo app.2. Tap Play on the camera feed.The camera feed updates and camera feed icons display.3. To stop viewing and listening to the live feed, tap Stop .
Pan and zoom your video feed
1. Open the Arlo app.2. Tap Play on the camera feed.On a mobile device, use the pinch gesture to zoom, and touch-and-drag to move around the zoomed-in frame.
On a computer, double-click to zoom. Left-click and hold and drag to move around the zoomed-in frame.After zooming in, the image stops and buffers for about five seconds to improve the qualityof video. When the buffering stops, your zoomed-in video renders in high quality.Local 2K Live Streaming from an optional SmartHub or base stationThis feature is available if you pair your floodlight to an optional Arlo SmartHub or basestation (sold separately). You can live stream in 2K resolution from your floodlight in the Arloapp on a mobile device that’s on the same local network as the SmartHub or base station. Ifyou enabled local 2K live streaming in your video settings, tap Play on the camera stream in the Arlo app.To enable Local 2K Live Streaming:
1. Open the Arlo app.2. Tap Settings > My Devices.3. Select the camera.4. Tap Video Settings.5. Tap Local 2K Live Streaming to toggle live streaming on and off.
Note: If you turn on Local 2K Live Streaming, the Arlo app automaticlly turns off Auto Zoom and Tracking. The reverse is also true. If you turn on Auto Zoom and Tracking, the Arlo app automatically turns off Local 2K Live Streaming.
Read More About This Manual & Download PDF:
Arlo-Pro-3-Floodlight-Camera-Manual-Original –
Arlo-Pro-3-Floodlight-Camera-Manual-Original –
 report this ad
Questions about your Manual? Post in the comments!
[xyz-ips snippet=”download-snippet”]