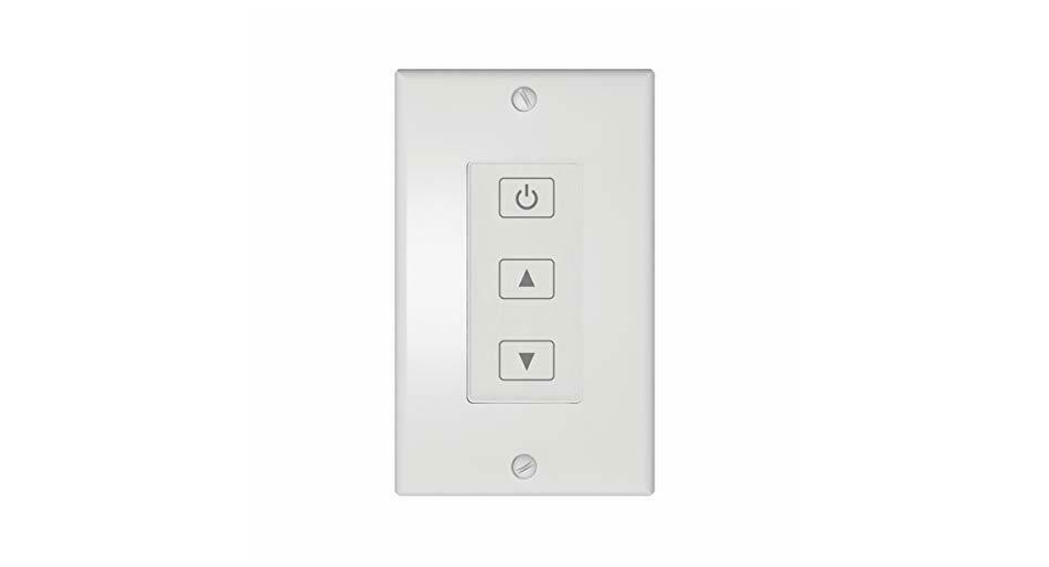
Wireless Touchpad for 2-in-1 LED DimmerItem 523120
This Wireless Touchpad is for use only with Armacost Lighting’s wireless-ready 2-in-1 LED Dimmer (Item 511120). It provides remote switching and dimming of low voltage LED lighting and works through walls and doors up to 100 ft. away. Using radio frequency (RF) technology, it eliminates the need to run wires from the LED lighting to the remote switch location, and is useful in projects where installing new cabling can be diffi cult.
Features RF pairing technology for expandability and multi-zone lighting control. This remote wireless touchpad can be paired to control and synchronize multiple dimmer receivers in the same area, or multiple touchpad/receiver sets can control different zones of lighting in the same area without cross-interference. Includes designer-style wireless touchpad, mounting screws, drywall anchors, and battery.
The wireless touchpad is only compatible with Armacost Lighting’s wireless-ready dimmer (Item 511120).
Patent No. 9,167,660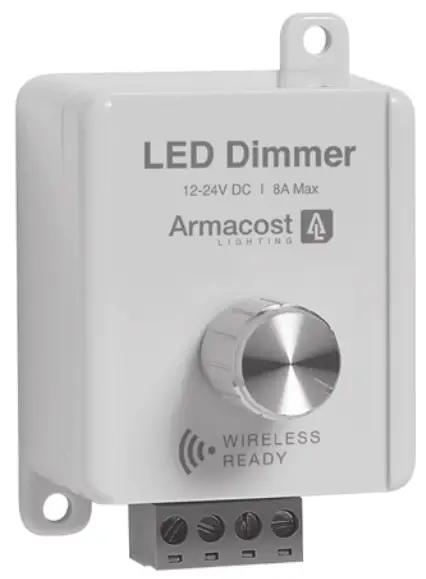
For dry location only. If used outdoors, keep in a dry location.Wireless function may cease to operate properly in freezing or close to freezing environments. Be sure the dimmer has the “wireless ready” markings below the dimmer knob.
WIRELESS TOUCHPAD TRANSMITTER INSTALLATION
Note: Compatible with most, but not all, switch plates made by other manufacturers.
OPERATION AND PAIRING
The Armacost Lighting wireless-ready dimmer (Item 511120) will need to be programmed or paired to recognize the radio frequency signal of the wireless touchpad.
- Following the instructions that were supplied with your wireless-ready dimmer, connect the dimmer to the power supply and your LED lighting. Ensure the dimmer and LED lights operate properly. Have the wireless touchpad in close range to the receiver, 10 feet or closer for pairing.
- Disconnect power to the dimmer by unplugging or switching off the power supply. Leave off for at least 5 seconds. You can also disconnect the power by pulling out the reen block connector on the dimmer.
- To pair, press and hold the brightness up and brightness down keys simultaneously. While continuing to hold the buttons, restore power to the power supply and dimmer.
To test, press the on/off key of the wireless touchpad to confirm that it can control the receiver. If not, repeat the process.
Depending on the lighting layout, and to reduce the need for extra wiring, it can be advantageous to have one touchpad control or be “paired” to multiple rotary knob dimmer receivers (wireless-ready models only).
To add or pair more receivers, repeat the same process with additional receivers. The wireless touchpad will pass its unique code to multiple receivers.To synchronize multiple receivers, so that all lights turn on/off and dim in unison to one touchpad, simply manually turn off all receivers with each rotary knob. Then press the power on key of the wireless touchpad. All lights should turn on at the same time.
Note: You can also “un-pair” the dimmers by following the process above, but press the power on and brightness up keys instead.
IMPORTANT: Do not press any key on the wireless touchpad repeatedly or too quickly or the receivers can lose synchronization or fail to operate in unison. Firm, deliberate button presses are required to keep multiple dimmers in synch. For effective synchronization, all receivers must be within range of the single wireless touchpad.
In the event of a power outage, once power is restored to the LED lighting, the brightness will be at the level where the rotary knob on the receiver unit was last set, not the last setting on the wireless touchpad. This is also true if the lights are switched off by turning off the power supply. The Wireless Touchpad will operate properly while the rotaryknob of the 2-in-1 Dimmer is in any position, but it is recommended that it be set to fully off. This will prevent your lighting from turning on without input following a power outage.
TROUBLESHOOTING
The wireless touchpad does not work.Be sure the wireless touchpad is in range of the receiver. Try moving the touchpad closer to the receiver. The dimmer is a radio frequency (RF) device and, as such, the range of the wireless remote control is dependent on many factors. Actual operational distance will vary based on walls and line of sight obstructions, and other nearby electronic devices. Be sure your battery is good. Replace the battery if in doubt. A battery will last from 6 months up to 2 years, depending on usage.
The receiver may need to be paired again with your transmitter.If the dimmer receiver is functioning properly, and the touchpad battery is fresh, yet the touchpad will not control the lighting, repeat the pairing instructions.
If you would like to purchase additional dimmer transmitters or receivers, visit the retailer where you made your purchase or visit armacostlighting.com.
SPECIFICATIONS
Wireless working frequency ………………………………. 433.92MhzTransmitter battery ………………………………………CR2032 3-voltFCC ID …………………………………………………… NWKHF10008Country of origin …………………………………………………….China
Limited 1-year warranty. This product is for dry location use only. Improper installation, improper powering, abuse, or failure to use this device for its intended purpose will void warranty. Proof of purchase is required for all returns. Questions? Email: [email protected].

This item is a Radio Frequency Device (RF), and as such the range of the remote control is dependent on many factors. Actual operational distance will vary based on walls and line of sight obstructions, and other nearby electronic devices. This device complies with Part 15 of the FCC Rules. Operation is subject to the following two conditions: (1) this device may not cause harmful interference, and (2) this device must accept any interference received, including interference that may cause undesired operation. Changes or modifi cations to this unit not expressly approved by the party responsible for compliance could void the user authority to operate the equipment.
© 2012-21 Armacost Lighting. All rights reserved.210106
References
[xyz-ips snippet=”download-snippet”]