
![]()
ARMORALL 20V Cordless Wet/Dry Vacuum Instruction Manual
2.5G 20V CordlessModel No. DVTB202 0901
![]()
Distributed ByCleva North America, Inc.601 Regent Park CourtGreenville, SC 29607
The Armor All word mark and logo are trademarks of The Armor All/ STP Products Company and are used under license.
Thank you for purchasing this Armor All® wet/dry vacuum cleaner. Feel confident that withArmor All® you are obtaining a high quality product engineered for optimal performance.This vacuum is capable of picking up liquids and dry materials.
FOR YOUR SAFETY: CAREFULLY READ AND UNDERSTAND ALL INSTRUCTIONS
WARRANTY
We take pride in producing a high quality, durable product. This vac carries a limited two (2) yearwarranty against defects in workmanship and materials from date of purchase under normalhousehold use. Please keep your receipt as proof of purchase. This warranty gives you specificlegal rights, and you may have other rights, which vary from state to state. For product servicecall Customer Service at 1-866-384-8432.
Not Covered by Warranty:
- Any part that has become inoperative due to misuse, negligence, direct/indirect abuse,accidents, improper maintenance, repairs or alterations;
- Consumables such as filters and accessories;
- Normal wear and tear of parts and attachments, such as hose, nozzles, or casters;
- Normal deterioration of the exterior finish due to use or exposure;
- Any product where serial number/data label is tampered with or removed;
- Any product purchased from an unauthorized retailer.
IMPORTANT SAFETY INSTRUCTIONS
READ AND UNDERSTAND ALL INSTRUCTIONS BEFORE USING THIS VACUUM.Read and understand this owner’s manual and all labels on the Wet/Dry Vacuum cleaner before operating. Safety is a combination of common sense, staying alert and knowing how your vacuum works. Use this Wet/Dry Vacuum only as described in this manual. To reduce the risk of personal injury or damage to your Wet/Dry Vacuum, use only manufacturer recommended accessories.
SAVE THIS MANUAL FOR FUTURE REFERENCE.
When using an vacuum, basic precautions should always be followed, including the following:
Failure to follow the warnings and instructions may result in explosion, fire and/or serious injury.
![]() WARNING! To reduce the risk of fire, explosion, or injury:
WARNING! To reduce the risk of fire, explosion, or injury:
- Do not run vacuum unattended.
- Do not use without filters in place.
- Do not use to pick up flammable or combustible liquids, such as gasoline, or use in areas where they may be present.
- Do not pick up anything that is burning or smoking, such as cigarettes, matches, or hot ashes. To reduce the risk of health hazards from vapors or dusts, do not vacuum toxic materials.
- Do not use or store near hazardous materials.
- If vacuum is not working as it should, has been dropped, damaged, left outdoors, or dropped into water, return it to a service center.
- Do not allow to be used as a toy. Close attention is necessary when used by or near children.
- Do not put any object into openings. Do not use with any opening blocked; keep free of dust, lint, hair, and anything that may reduce air flow.
- Keep hair, loose clothing, fingers, and all parts of body away from openings and moving parts.
- Use extra care when cleaning on stairs.
- Do not handle vacuum, charger, charger plug, or charger terminals with wet hands.
- Turn off all controls before removing the battery pack.
- Turn off the vacuum and remove the battery pack before connecting the hose or otheraccessories.
- Prevent unintentional starting. Ensure the switch is in the off-position before connecting to battery pack, picking up or carrying the vacuum. Carrying the vacuum with your finger on the switch or energizing vacuum that have the switch on invites accidents.
- Disconnect the battery pack from the vacuum before making any adjustments, changing accessories, or storing vacuum. Such preventive safety measures reduce the risk of starting the vacuum accidentally.
- Recharge only with the charger specified by the manufacturer. A charger that is suitable for one type of battery pack may create a risk of fire when used with another battery pack.
- Use vacuum only with specifically designated battery packs. Use of any other battery packs may create a risk of injury and fire.
- When battery pack is not in use, keep it away from other metal objects, like paper clips, coins, keys, nails, screws or other small metal objects that can make a connection from one terminal to another. Shorting the battery terminals together may cause burns or a fire.
- Under abusive conditions, liquid may be ejected from the battery; avoid contact. If contact accidentally occurs, flush with water. If liquid contacts eyes, additionally seek medical help. Liquid ejected from the battery may cause irritation or burns.
- Do not use a battery pack or vacuum that is damaged or modified. Damaged or modifiedbatteries may exhibit unpredictable behavior resulting in fire, explosion or risk of injury.
- Do not expose a battery pack or vacuum to fire or excessive temperature. Exposure to fire or temperature above 130°C (265°F) may cause explosion.
- Follow all charging instructions and do not charge the battery pack or vacuum outside of the temperature range specified in the instructions. Charging improperly or at temperatures outside of the specified range may damage the battery and increase the risk of fire.
- Have servicing performed by a qualified repair person using only identical replacement parts. This will ensure that the safety of the product is maintained.
- Do not modify or attempt to repair the vacuum or the battery pack except as indicated in the instructions for use and care.
- Use only as described in this manual. Use only manufacturer’s recommended attachments.
- CAUTION! To reduce the risk of injury from moving parts. Disconnect battery pack beforecleaning or servicing.
- WARNING! To reduce the risk of fire or explosion. Do not expose to rain. Store indoors.
- WARNING! To reduce the risk of fire or explosion. Disconnect battery pack before cleaning or servicing.
- Use the vacuum at a temperature between -5°C (23°F) and 40°C (104°F).
- Store the vacuum, the charger and the battery at a temperature between -20°C (-4°F) and 50°C (122°F).
- BATTERY PACK For Use Only With 20LSC21 Charger or 20LFC19 Charger. BATTERYCHARGER For Use Only With Battery 20LB2026 or Battery 20LB4027.
When using as blower:
- Direct air discharge only at work area.
- Do not use Wet/Dry Vacuum as a sprayer.
- Do not direct air at bystanders.
- Keep children away when blowing.
- Use safety goggles.
SAVE THIS INSTRUCTIONHousehold Type
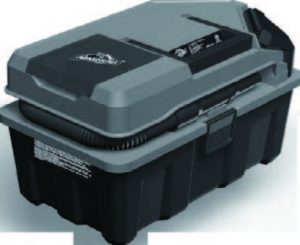
KNOW YOUR PRODUCT – CORDLESSTOOLBOX WET/DRY VACUUM
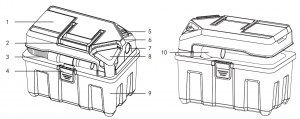

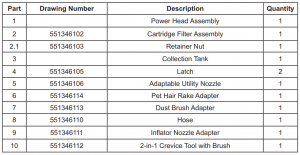
Components
- Battery Bay
- Handle
- Hose
- Cover Latches (Front and Back)
- On/Off Switch
- Toolbox Cover
- Blower Port
- Adaptable Utility Nozzle with Pet Hair Rake Adapter
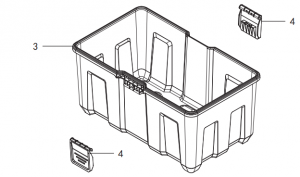
- Collection Tank
- Vacuum Port
- 2-in-1 Crevice Tool With Brush
- Cartridge Filter
- Inflator Nozzle Adapter
- Dust Brush Adapter
UNPACKING YOUR WET/DRY VACUUM& GENERAL ASSEMBLY
- Verify that the battery pack is not installed.
- Undo the latches.
- Remove the contents from inside the collection tank; make sure you have all contents as listed on page 5.
INSTALLING & REMOVING THE HOSE
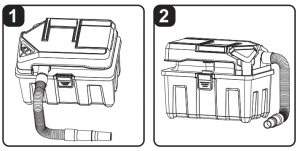
- Pull the work end of the hose out of the hose storage. (Fig. 1)
- The other end of the hose is already connected to the vacuum port; make sure it is secure.
- This wet/dry vacuum has blowing capabilities. To use as a blower, connect the larger end of the hose to the blower port. (Fig. 2)
INSTALLING & REMOVING ACCESSORIES

Choose the desired accessories and push onto the smaller end of the hose. (Fig. 3.1)Note: This wet/dry vac comes with an adaptable utility nozzle. This accessory can be used as awet nozzle, a brush, or a pet hair rake. To use the slide-on adapters follow these instructions:
- Choose the brush or the pet hair rake adapter.
- With the nozzle facing up, slide the adapter onto the utility/car nozzle until it clicks into place. (Fig. 3.2)
- To remove, press the tab on the right side of the adapter and slide it off the utility/car nozzle. (Fig. 3.3)
GENERAL OPERATION
INSTALLING & REMOVING BATTERY PACK
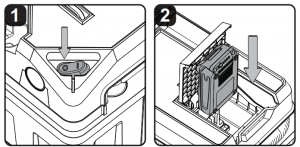
- Flip the ON/OFF switch to the ‘O’ OFF position. (Fig. 1)
- To insert the battery pack, slide it into the battery bay until it snaps into place. (Fig. 2)
- To remove the battery pack, press the latch and pull it out of the battery bay.
STARTING/STOPPING THE WET/DRY VACUUM
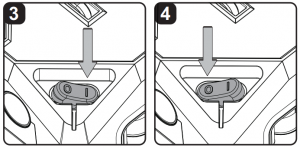
To turn on the wet/dry vacuum, flip the switch to the ‘I’ ON position. (Fig. 3) To turn off the wet/dry vacuum, flip the switch to the ‘O’ OFF position. (Fig. 4)O = OFF I = ON
DRY VACUUM OPERATION
![]() WARNING: BE SURE TO READ, UNDERSTAND, AND APPLY, INFORMATIONENTITLED ‘SAFETY INSTRUCTIONS & WARNINGS’. DO NOT VACUUM IN AREAS WITH FLAMMABLE GASES, VAPORS, OR EXPLOSIVE DUSTS IN THE AIR. FLAMMABLE GASES OR VAPORS INCLUDE BUT ARE NOT LIMITED TO: LIGHTER FLUID, SOLVENT TYPE CLEANERS, OIL-BASED PAINTS, GASOLINE, ALCOHOL, OR AEROSOL SPRAYS. EXPLOSIVE DUSTS INCLUDE BUT ARE NOT LIMITED TO: COAL, MAGNESIUM, GRAIN, OR GUN POWDER. TO REDUCE THE RISK OF HEALTH HAZARDS FROM VAPORS OR DUST, DO NOT VACUUM TOXIC MATERIALS.
WARNING: BE SURE TO READ, UNDERSTAND, AND APPLY, INFORMATIONENTITLED ‘SAFETY INSTRUCTIONS & WARNINGS’. DO NOT VACUUM IN AREAS WITH FLAMMABLE GASES, VAPORS, OR EXPLOSIVE DUSTS IN THE AIR. FLAMMABLE GASES OR VAPORS INCLUDE BUT ARE NOT LIMITED TO: LIGHTER FLUID, SOLVENT TYPE CLEANERS, OIL-BASED PAINTS, GASOLINE, ALCOHOL, OR AEROSOL SPRAYS. EXPLOSIVE DUSTS INCLUDE BUT ARE NOT LIMITED TO: COAL, MAGNESIUM, GRAIN, OR GUN POWDER. TO REDUCE THE RISK OF HEALTH HAZARDS FROM VAPORS OR DUST, DO NOT VACUUM TOXIC MATERIALS.
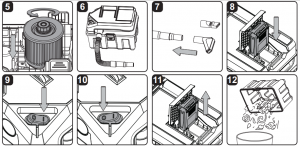
- Verify that the cartridge filter is securely mounted. (Fig. 5) For installation instructions see page 12.
- Insert the hose into the vacuum port. (Fig. 6)
- Push required accessories onto the free end of the hose. (Fig. 7)
- Make sure the battery pack is correctly installed. (Fig. 8) For installation instructions see page 7.
- Turn the motor on by flipping the switch to the ‘I’ ON position. (Fig. 9)Once you have completed vacuuming, or when the collection tank is full, turn the motor off by flipping the switch to the ‘O’ OFF position. (Fig. 10) O = OFF I = ON
- Remove the battery. (Fig. 11)
- Empty the collection tank into a suitable receptacle. (Fig. 12)
LIQUID VACUUM OPERATION
Note: The provided filter can be used for both wet and dry vacuum operation.
- Verify that the cartridge filter is securely mounted. ( Fig. 5) For installation instructions see page 12.
- Insert the hose into the vacuum port. (Fig. 6)
- Push required accessories onto the free end of the hose. (Fig. 7)
- Make sure the battery pack is correctly installed. (Fig. 8) For installation instructions see page 7.
- Turn the motor on by flipping the switch to the ‘I’ ON position. (Fig. 9)
- Once you have completed vacuuming, or when the tank is full, turn the motor off by flipping the switch to the ‘O’ OFF position. (Fig. 10)
- Remove the battery. (Fig. 11)
- Empty the collection tank into a suitable receptacle or drain. (Fig. 12)
 IMPORTANT! When vacuuming large quantities of liquids, do not immerse the nozzle completely in the liquid; leave a gap at the tip of the nozzle opening to allow air inflow. The machine is fitted with a float valve that stops the suction action when the collection tank reaches its maximum capacity. You will notice an increase in motor speed. When this happens, turn off the machine, disconnect from power supply, and drain the liquid into a suitable receptacle or drain. To continue vacuuming, refit the power head to the collection tank. After wet vacuuming, turn the machine off and remove the battery. Empty the collection tank, clean and dry the inside and outside before storage.
BLOWER OPERATION
This wet/dry vacuum has blowing capabilities. To use the blower feature follow the instructions listed.
![]() WARNING: ALWAYS WEAR SAFETY GOGGLES WHILE USING BLOWER.
WARNING: ALWAYS WEAR SAFETY GOGGLES WHILE USING BLOWER.
![]() WARNING: KEEP BYSTANDERS CLEAR FROM BLOWING DEBRIS.
WARNING: KEEP BYSTANDERS CLEAR FROM BLOWING DEBRIS.
![]() WARNING: WEAR A DUST MASK IF BLOWING CREATES DUST THAT MIGHT BE INHALED.
WARNING: WEAR A DUST MASK IF BLOWING CREATES DUST THAT MIGHT BE INHALED.
- Make sure the collection tank is empty before using as a blower.
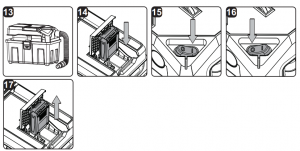
- Connect the hose to the blower port. (Fig. 13)
- Push required accessories onto the free end of the hose.
- Make sure the battery is correctly installed. (Fig. 14) For installation instructions see page 7.
- Turn the motor on by flipping the switch to the ‘I’ ON position. (Fig. 15) Once you have completed blowing, turn the motor off by flipping the switch to the ‘O’ OFF position. (Fig. 16) O = OFF I = ON
- Remove the battery. (Fig. 17)
INFLATOR NOZZLE ADAPTER OPERATION
INFLATING AN OBJECT
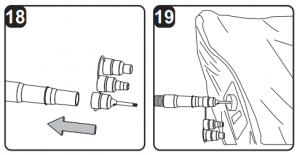
The included inflator nozzle adapter allows any wet/dry vacuum with a blower function to be used to inflate items such as air mattresses and recreational floatation devices. These nozzles can also be used to focus the air flow, allowing for more concentrated blowing.
- Make sure the collection tank is empty before using the wet/dry vac to inflate.
- Connect the hose to the blower port.
- Push the desired inflator nozzle onto the free end of the hose. (Fig. 18)
- Make sure the battery is correctly installed. For installation instructions see page 7.
- Insert the inflator nozzle into the air valve of the item being inflated. (Fig. 19)
- Turn the motor on by flipping the switch to the ‘I’ ON position. Once you have completedinflating, turn the motor off by flipping the switch to the ‘O’ OFF position.
- Remove the battery.
DEFLATING AN OBJECT
- Connect the hose to the vacuum port. (Fig. 6)
- Push the desired inflator nozzle onto the free end of the hose. (Fig. 19)
- Make sure battery is correctly installed. For installation instructions see page 7.
- Insert the inflator nozzle into the air valve of the item being deflated.
- Turn the motor on by flipping the switch to the ‘I’ ON position. Once you have completeddeflating, turn the motor off by flipping the switch to the ‘O’ OFF position.
- Remove the battery.
MAINTENANCE
![]() WARNING! TO REDUCE THE RISK OF INJURY, ALWAYS UNPLUG THE CHARGER AND REMOVE THE BATTERY PACK FROM THE CHARGER OR TOOL BEFORE PERFORMING ANY MAINTENANCE. NEVER DISASSEMBLE THE TOOL, BATTERY PACK OR CHARGER.
WARNING! TO REDUCE THE RISK OF INJURY, ALWAYS UNPLUG THE CHARGER AND REMOVE THE BATTERY PACK FROM THE CHARGER OR TOOL BEFORE PERFORMING ANY MAINTENANCE. NEVER DISASSEMBLE THE TOOL, BATTERY PACK OR CHARGER.
![]() IMPORTANT! BEFORE CLEANING YOUR VACUUM OR CARRYING OUT ANYMAINTENANCE, MAKE SURE THAT THE TOOL IS SWITCHED OFF AND REMOVE THE BATTERY BACK TO PREVENT ACCIDENTAL START-UP.
IMPORTANT! BEFORE CLEANING YOUR VACUUM OR CARRYING OUT ANYMAINTENANCE, MAKE SURE THAT THE TOOL IS SWITCHED OFF AND REMOVE THE BATTERY BACK TO PREVENT ACCIDENTAL START-UP.
EMPTYING & CLEANING THE COLLECTION TANK
![]()
- Verify that the battery has been removed from the battery bay. (Fig. 1)
- Disconnect the hose from the vacuum.
- Undo the latches and remove the power head from the collection tank.
- Clear all dirt or debris from the collection tank and clean with mild soap and water. Allow to dry before replacing the power head. (Fig. 2)
STORAGEBefore storing your vacuum cleaner, the collection tank should be emptied and cleaned. Thebattery should be stored in a dry location. The accessories should be cleaned and stored so theycan be readily available when needed. Store wet/dry vacuum indoors.
REPAIRSRepairs for this wet/dry vacuum should be performed only by qualified service personnel usingonly identical replacement parts.
INSTALLING & CLEANING CARTRIDGEFILTER

INSTALLING CARTRIDGE FILTER
- Verify that the battery is disconnected. (Fig. 1)
- Remove power head and place in an upside down position. (Fig. 2)
- Install the cartridge filter over the filter cage, securing it with the retainer nut. Do not overtighten. (Fig. 2)
REMOVING AND CLEANING CARTRIDGE FILTER
- Unscrew the retainer nut by turning counter clockwise. (Fig. 3)
- Carefully hold and pull the cartridge filter up for removal.
- Clean the cartridge filter by brushing or rinsing off the debris. (Fig. 4)
- Install cleaned or new filter as instructed in steps 2 & 3 of INSTALLING CARTRIDGE FILTER.
- Wet filters should be removed and allowed to air dry for 24 hours before installing onto the filter cage.
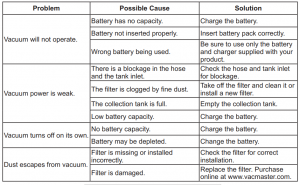
TROUBLESHOOTING
EXPLODED VIEW

PARTS LIST
For a replacement battery or battery charger please visit www.vacmaster.com or call Customer Service at 1-866-384-8432.
References
[xyz-ips snippet=”download-snippet”]