
AROMA ARC-753SG/753SGB/753SGR Rice & Grain Cooker Instruction Manual
Questions or concerns about your Aroma product?www.AromaCo.com/Support1-800-276-6286
Here at Aroma we strive to make a difference—to design and distribute products that enhance and enrich people’s lives.
Aroma offers an array of exceptional products to make cooking simple and satisfying. Discover other countertop appliances and cookware from our current product lineup to complement your kitchen.
Stay connected for more recipe ideas and monthly giveaways!
 Important Safeguards
Basic safety precautions should always be followed when using electrical appliances, including the following:
- Important: Read all instructions carefully before first use.
- Do not touch hot surfaces. Use the handles or knobs.
- Use only on a level, dry and heat-resistant surface.
- To protect against electrical shock, do not immerse cord, plug or the appliance in water or any other liquid. See instructions for cleaning.
- Close supervision is necessary when the appliance is used by or near children.
- Unplug from outlet when not in use and before cleaning. Allow unit to cool before putting on or taking off parts and before cleaning the appliance.
- Do not operate any appliance with a damaged cord or plug or after the appliance malfunctions or has been damaged in any manner. Contact Aroma® customer service for examination, repair or adjustment.
- The use of accessory attachments not recommended by Aroma® Housewares may result in fire, electrical shock or injury.
- Do not use outdoors.
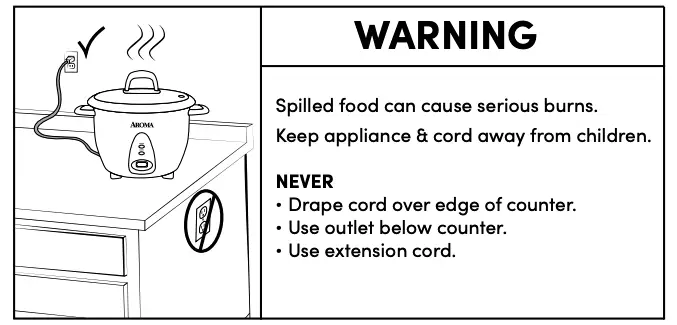
- Do not let cord touch hot surfaces or hang over the edge of a counter or table.
- Do not place on or near a hot gas or electric burner or in a heated oven.
- Do not use the appliance for anything other than its intended use.
- Use only with a 120V AC power outlet.
- Extreme caution must be used when moving the appliance containing rice or other liquids.
- Do not touch, cover or obstruct the steam vent on the top of the rice cooker as it is extremely hot and may cause scalding.
- Always unplug from the base of the wall outlet. Never pull on the cord.
- The rice cooker should be operated on a separate electrical circuit from other operating appliances. If the electrical circuit is overloaded with other appliances, the rice cooker may not operate properly.
- Always make sure the outside of the inner pot is dry prior to use. If the inner pot is returned to the cooker when wet, it may damage or cause the product to malfunction.
- Use extreme caution when opening the lid during or after cooking. Hot steam will escape and may cause scalding.
- Rice should not be left in the inner pot with the Warm function on for more than 12 hours.
- To prevent damage or deformation, do not use the inner pot on a stovetop or burner.
- To disconnect, turn Cook switch to Warm then remove the plug from the wall outlet.
- To reduce the risk of electrical shock, cook only in the removable inner pot provided.
Short Cord Instructions
A short power-supply cord is provided to reduce the risks resulting from it being grabbed by children, and becoming entangled in or tripping over a longer cord.
Polarized Plug
This appliance has a polarized plug (one blade is wider than the other); follow the instructions below:
To reduce the risk of electric shock, this plug is intended to fit into a polarized outlet only one way. If the plug does not fit fully into the outlet, reverse the plug. If it still does not fit, contact a qualified electrician. Do not attempt to modify the plug in any way.
If the supply cord is damaged, it must be replaced by the manufacturer, its service agent or a similarly qualified person in order to avoid a hazard.
Parts Identification
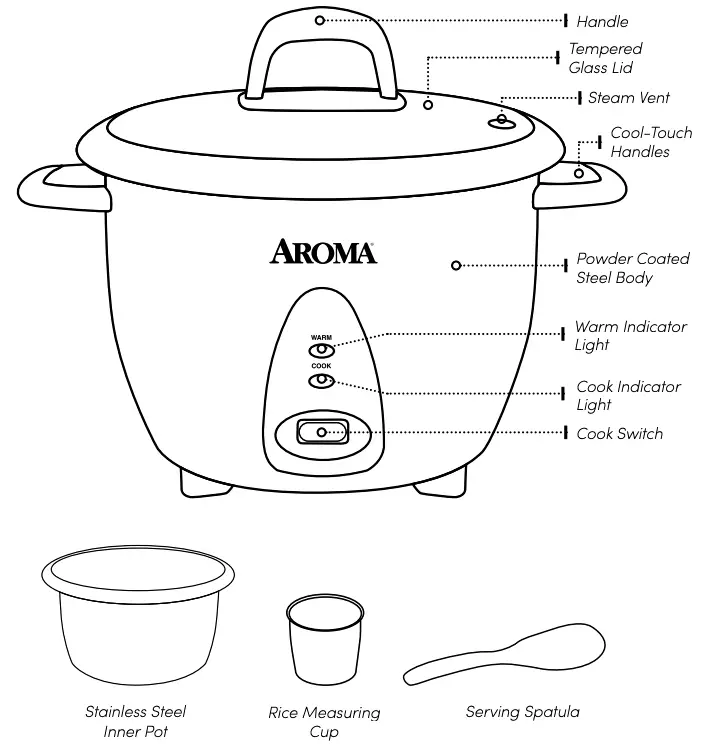
Controls/Functions
WarmAutomatically switches to Warm; perfect for keeping rice ready to serve.
CookSimply press the switch down to begin cooking food.
THIS APPLIANCE IS FOR HOUSEHOLD USE ONLY.
Before First Use
- Read all instructions and important safeguards.
- Remove all packaging materials and check that all items have been received in good condition.
- Tear up all plastic bags and dispose of them properly as they can pose a risk to children.
- Remove the Stainless Steel Inner Pot from the cooker and clean with warm, soapy water. Rinse and dry thoroughly before returning to cooker.
- Wash the Tempered Glass Lid and all other accessories in warm, soapy water. Rinse and dry thoroughly.
- Wipe cooker body clean with a damp cloth.
Note:
- If washing in the dishwasher, a slight discoloration to the inner pot and accessories may occur. This is cosmetic only and will not affect performance.
- Any other servicing should be performed by Aroma® Housewares.
To Clean
- Remove the inner pot when the cooker has completely cooled.
- Hand wash the Tempered Glass Lid and all accessories or place on the top rack of the dishwasher.
- Wipe rice cooker’s body clean with a damp cloth.
- Thoroughly dry cooker body, lid and all accessories. Reassemble for next use.
Helpful Hints:
The provided rice cooker cup is the equivalent to a 3/4 standard US cup

Troubleshooting
- Rice is too dry/hard after cooking.
If your rice is dry or hard/chewy when the cooker switches to Warm, additional water and cooking time will soften the rice. Depending on how dry your rice is, add ½ to 1 cup of water and stir through. Place on the lid and switch to Cook. When cooker switches to Warm mode, remove the lid and stir the rice to check the consistency. Repeat as necessary until rice is soft and moist.
- Rice is too moist/soggy after cooking.
If your rice is still too moist or soggy when the cooker switches to Warm, use the serving spatula to stir the rice. This will redistribute the bottom (moistest) part of the rice as well as release excess moisture. Place on the lid and allow to remain on Warm mode for 10- 30 minutes as needed, removing the lid and stirring periodically to release excess moisture.
Note:
- Because rice varieties may vary in their make-up, results may differ.
Cooking Rice & Grain
- Using the provided measuring cup, add rice or grain to the Stainless Steel Inner Pot.
- Rinse to remove excess starch. Drain.
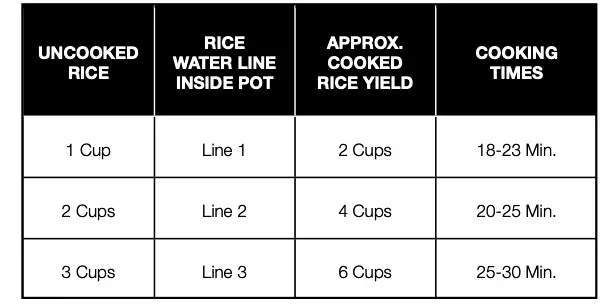
- For white rice, fill with water to the line which matches the number of cups of rice being cooked. For brown rice or grain, see the “Grain & Water Measurement Tables” on page 8.
- Place the Stainless Steel Inner Pot into the cooker.
- Place the Tempered Glass Lid securely onto the rice cooker.
- Plug the power cord into an available 120V AC wall outlet.
- Press the Cook switch down to begin cooking. The Cook indicator light will illuminate as the rice cooker begins cooking the rice or grain.
- When rice or grain is ready, the Cook switch will automatically flip up and switch on to Warm mode.
- For better results, stir the rice or grain with the Serving Spatula to distribute any remaining moisture.
- When finished serving rice, unplug the power cord to turn the rice cooker off.
 Caution:
The rice cooker will not switch to Warm mode until all liquid has evaporated. Follow your recipe carefully and do not leave the rice cooker unattended.
Note:
- Before placing the inner pot into the cooker, check that the inner pot is dry and free of debris. Adding the inner pot when wet may damage the cooker.
- Rice or grain should not be left in the cooker on Warm for more than 12 hours.
Grain & Water Measurement Tables
White Rice Measurement Table
Helpful Hints:
If you misplace the measuring cup, a ¾ standard US cup is an exact replacement.
To add more flavor to rice, try substituting a favorite meat or vegetable broth or stock. The ratio of broth/ stock to rice will be the same as water to rice.
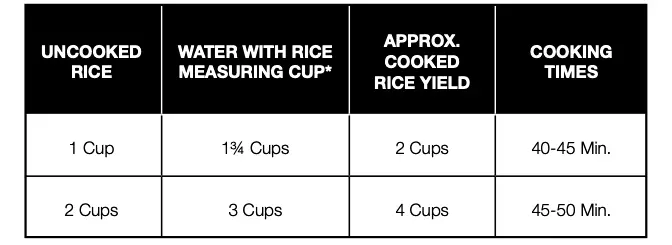
For approximate brown rice and grain cooking times and suggested grain/water ratios, see the “Grain & Water Measurement Tables” on page 8.
Brown Rice Measurement Table
Grain Measurement Table
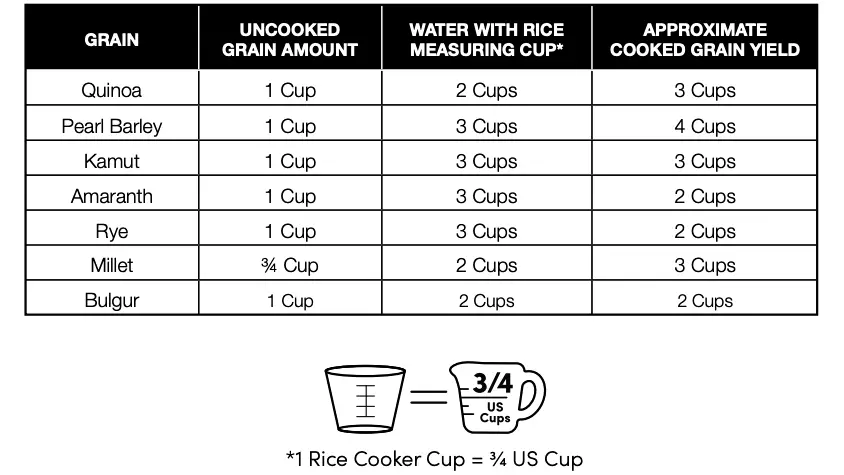
Note:
- Brown rice takes longer to cook and requires more water than white rice due to the extra bran layers on the grains. The water lines in the inner pot are meant for white rice only. Please see the chart above for brown rice and grain water ratios.
- Brown rice, wild rice and rice mixes vary in their make-up. Some variations may require longer cooking times and/or additional water in order to achieve optimum results. Refer to the individual package instructions for cooking suggestions.
- The measuring cup included adheres to rice industry standards (180mL) and is not equal to one U.S. cup. The chart above refers to cups of rice/water according to the measuring cup provided.
- Do not place more than 3 cups of uncooked rice (2 cups if brown rice) into this appliance at one time. The maximum capacity of this unit is 3 cups raw rice (2 cups if brown rice) which yields 6 cups of cooked rice (4 cups brown rice).
Cooking Soup, Chili, or Stew
- Add ingredients to the Stainless Steel Inner Pot.
- Place the Stainless Steel Inner Pot into the rice cooker.
- Place the Tempered Glass Lid securely onto the rice cooker.
- Plug the power cord into an available 120V AC wall outlet.
- Place the Tempered Glass Lid securely onto the rice cooker.
- Plug the power cord into an available 120V AC wall outlet.
- Press the Cook switch down to begin cooking. The Cook indicator light will illuminate as the rice cooker begins cooking.
- Using caution to avoid escaping steam, remove the lid and stir occasionally with a long-handled wooden spatula.
- Once food is fully cooked, push the Cook switch up to switch the rice cooker to Warm.
- When finished serving, turn the rice cooker off by unplugging the power cord.
Caution:Do not use the provided serving spatula to stir hot soup, chili, or stew. It is not intended to be used in contact with high temperatures. Use a long-handled wooden or heat-safe spoon to stir food while sautéing.
Note:
- Before placing the inner pot into the cooker, check that the inner pot is dry and free of debris. Adding the inner pot when wet may damage the cooker.
- Food should not be left in the cooker on Warm for more than 12 hours.
Recipes
Jambalaya
½ lb. spicy smoked sausage½ lb. shrimp, peeled and deveined1 10-oz. can chicken breast1½ cups rice3 cups chicken broth1 4-oz. can diced green chiles2 tbsp Creole seasoning
Cut the smoked sausage in half, lengthwise, then into ¼” half circles. Add all ingredients to the inner pot and mix well. Place the inner pot into the rice cooker, place the lid securely onto the rice cooker and press the Cook switch. Allow rice to cook until the rice cooker switches to Warm. Stir and serve immediately.SERVES 4.
Note:
- Before placing the inner pot into the cooker, check that the inner pot is dry and free of debris. Adding the inner pot when wet may damage the cooker.
- In these recipes, “cup” refers to the included Rice Measuring Cup, which is also equivalent to a 3/4 standard US cup.
Green Chili Chicken Rice
1 ½ cups rice3 cups chicken broth2 tbsp diced minced onion½ tsp salt1 10-oz. can chicken breast chunks, with liquid1 4-oz. can diced green chiles, with liquid
Place all ingredients into the inner pot and stir until evenly distributed. Place the inner pot into the rice cooker, place the lid securely onto the rice cooker and press the Cook switch. Allow rice to cook until the rice cooker switches to Warm. Stir and serve immediately.SERVES 4.
Ham & Swiss Frittata
6 eggs3 slices deli ham, chopped1/4 medium onion, chopped3/4 cup swiss cheese, shreddedpinch of nutmegpinch of garlic powder
Combine all ingredients (except cheese) in a large bowl, ensuring that they mix well. Pour the mixed ingredients into the inner pot and top with an even layer of cheese. Press the Cook switch. Cook for 12 to 14 minutes. When eggs are set, slide frittata onto a serving plate. Cut into wedges to serve.SERVES 4.
Helpful Hints:
Want even more great cooking options? Stainless steel steam trays are available for purchase at www.AromaCo.com.
A steam tray will transform your rice cooker into a valuable food steamer, providing an easy and healthy way to prepare a variety of meals.
Classic Mushroom Pilaf
1 cup rice2 tbsp butter1 small onion, sliced5 large mushrooms, trimmed and cut into matchstick-sized pieces1 small clove garlic1/4 tsp cardamom1 1/3 cups vegetable broth1/2 tsp salt1/2 cup green peas
Place butter into the stainless steel cooking pot. Press the Cook switch and the rice cooker will begin to heat. Once melted, add onion and sauté for 3 to 4 minutes using a long-handled wooden spoon. Add mushrooms and sauté an additional 5 to 6 minutes. Add garlic and rice and sauté until rice is well coated. Add cardamom, broth and salt. Cover and allow to come to a boil. Stir in peas. Re-cover and allow to simmer until the rice cooker completes its cooking cycle. Once the rice cooker switches to Warm, allow to stand 5 minutes, then fluff grains gently with the serving spatula. Serve immediately.SERVES 4.
Apple Cinnamon Oatmeal
2 cups apple juice1 cup water1 cup Irish steel-cut oats3/4 cup diced dried mixed fruit1 tbsp brown sugar1 tbsp butter (optional)1/4 tsp cinnamon1/4 tsp salt1 tbsp lemon juice1 dash nutmegmilk, for serving
Pour juice and water into the cooking pot of the rice cooker. Press the Cook switch. Stir in oats, fruit, brown sugar, butter (if using), cinnamon, nutmeg and salt. Let cook for 25 to 30 minutes. Add lemon juice and ladle into cereal bowls with milk and more sugar, if desired.SERVES 6.
Note:
- Before placing the inner pot into the cooker, check that the inner pot is dry and free of debris. Adding the inner pot when wet may damage the cooker.
- In these recipes, “cup” refers to the included Rice Measuring Cup, which is also equivalent to a 3/4 standard US cup.
Game Day Chili Cheese Dip
½ small onion, chopped1 tsp vegetable oil1 clove garlic, minced1 15-oz. can prepared chili without beans½ cup prepared medium salsa¼ cup black olives, sliced1½ oz. low-fat cream cheese,cubed1½ oz. cheddar cheese, grated—- Tortilla chips, for dipping
Place the onion, oil and garlic in the inner pot. Press the Cook switch and sauté for 3 minutes. Use a large wooden spoon to gently stir as the onion and garlic cook. Add the chili, salsa, olives, cream cheese and cheddar cheese. Stir to combine all of the ingredients, place the lid securely onto the rice cooker. Cook for 4 minutes. Carefully open the lid, keeping hands and face away to avoid steam, and stir the dip. Cook again for 3 minutes. Open the lid and stir again. Continue cooking until the dip is warm throughout and the cheeses are melted. When done, serve in a large bowl and use the tortilla chips for dipping.SERVES 3-6.
Pineapple Rice Pudding
13/4 cups vanilla-flavored Rice Dream non-dairy beverage1 1/4 cups water4 oz. egg substitute1 tsp vanilla extract8 oz. crushed pineapple, with juice3/4 cup jasmine rice1/3 cup sugar1 pinch salt1 tbsp dark rum (optional)
Pour water and 1 cup of the Rice Dream into the stainless steel cooking pot. Press the Cook switch and the rice cooker will begin to heat. Stir in salt and rice. Cover and allow to simmer for 30 minutes. In a small bowl, whisk together remaining 3/4 cup Rice Dream, sugar, egg substitute and vanilla. Stir pineapple with juice into the rice cooker. Stir in egg mixture and rum (if using). Allow to cook, stirring frequently, until mixture simmers and thickens. Switch rice cooker to Keep Warm. Pour pudding into a large bowl and allow to cool. Pudding will thicken as it cools. Serve warm or refrigerate and serve cold.SERVES 4-6.
Helpful Hints:
Want even more great cooking options? Stainless steel steam trays are available for purchase at www.AromaCo.com.
A steam tray will transform your rice cooker into a valuable food steamer, providing an easy and healthy way to prepare a variety of meals.
Linguine Your Way
4 oz. linguine (about 1/4 box)16 oz. jar pasta sauce (of your choice)2 cups liquid (water or broth)—- cheese of your choice for garnish (optional)—- chopped parsley for garnish (optional)
Combine all ingredients (except cheese) into the inner pot. Ensure they are evenly mixed. Close the lid and press the Cook switch. Cook for 15 to 20 minutes, stirring frequently to prevent strands from sticking. Add additional liquid if the sauce becomes too thick. Serve hot with a sprinkling of parsley and grated cheese.
SERVES 2.
Service & Support
In the event of a warranty claim, or if service is required for this product, please contact Aroma® customer service toll-free at:
1-800-276-6286M-F, 8:30am-4:30pm, Pacific Time
Or we can be reached online at:[email protected]
For your records, we recommend stapling your sales receipt to this page along with a written record of the following:
- Date of Purchase:
- Place of Purchase:
Note:
- Proof of purchase is required for all warranty claims.
 report this ad
Aroma Housewares Company6469 Flanders Drive, San Diego, CA 92121, U.S.A.1-800-276-6286 | www.AromaCo.comM-F, 8:30am – 4:30pm, Pacific Time
References
[xyz-ips snippet=”download-snippet”]