
INSTRUCTION MANUAL
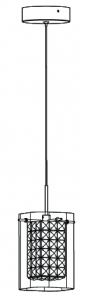
Artika For Living Inc. 1756, 50th Avenue Montréal (Lachine), Quebec Canada H8T 2V5Customer Service Monday to Friday 9 a.m. – 5 p.m. EST1-866-661-9606 www.artika.comITM. / ART. 1005578951 Model / Modèle / Modelo: PDT-1CC1-light LED pendant – Crystal Cube 1TM
Made in China Residential use only Indoor use only
Imported by: Home Depot U.S.A., Inc.2455 Paces Ferry Rd., NW Atlanta, GA 30339For assistance, call/Pour assistance, appeler/ Si necesita ayuda, llame al: 1-800-986-3460 www.homedepot.com/homedecorators
Rev. 09-03-2021
INSTRUCTION MANUAL
| Item | Description | Quantity |
 |
Wire connector | × 3 |
| Junction box screw | × 2 | |
| Canopy screw | × 2 + 1 extra | |
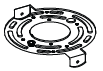 |
Mounting Bracket | × 1 |
 |
Inner glass diffuser | × 1 |
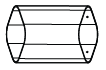 |
Outer glass diffuser | × 1 |
| Threaded rod | × 4 + 1 extra | |
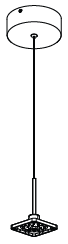 |
Canopy with LED assembled | × 1 |
WARRANTY
Artika For Living Inc. is proud to offer you a five-year (5) limited warranty on manufacturing defects from the date of purchase for residential use only. The warranty is extended to the original owner in USA, Canada, Mexico, UK, Iceland, France and Spain and is non-transferable. It does not apply to retailers, commercial applications or establishments. The original sales receipt is required for all warranty claims. The remedy under this limited warranty shall be product or part replacement at Artika’s discretion as provided herein and cannot exceed the original purchase price. This warranty is valid only on products installed in accordance with the building code and laws effective in the region where the unit is being used, as well as in accordance with the provided instruction manual. It does not cover products installed incorrectly or subjected to abnormal use. Product(s) or component part(s) may be required to be returned for inspection and verification. Normal wear and tear, misuse, negligence, vandalism, improper maintenance (surface damage due to chemical interaction or cleaning agents including, but not limited to, scouring pads, use of cleaners containing abrasives, alcohol or other organic solvents) improper handling, accident, abuse, fire, flood, theft, acts of God, neglect, or alteration of the product will not be covered under this limited warranty. It excludes any accessories that accompany the product including, but not limited, to bulbs or batteries. The warranty does not cover handling, labour, transportation, or any other cost associated with the installation or replacement of the product. This limited warranty is valid in the country of purchase and by Artika authorized retailers only. Artika for Living Inc. will not be held responsible for any direct or consequential damages or injuries related to the use of this product arising from improper use or installation of this product. Please visit www.artika.com to discover more about Artika for Living Inc.
INSTRUCTION MANUAL
USA (FCC)
WARNING:Changes or modifications to this unit not expressly approved by the party responsible for compliance could void the user’s authority to operate the equipment.
This device complies with Part 15 of the FCC Rules. Operation is subject to the following two conditions:
- this device does not cause harmful interference, and
- this device must accept any interference received,including interference that may cause undesired operation.
NOTE: This equipment has been tested and found to comply with the limits for Class B digital device, pursuant to part 15 of the FCC Rules. These limits are designed to provide reasonable protection against harmful interference in a residential installation. This equipment generates, uses and can radiate radio frequency energy and, if not installed and used in accordance with the instructions, may cause harmful interference to radio or television reception. However, there is no guarantee that interference will not occur in a particular installation. If this equipment causes harmful interference to radio or television reception, which can be determined by turning the equipment off and on, the user is encouraged to try to correct the interference by one or more of the following measures:
- Reorient or relocate the receiving antenna.
- Increase the separation between the equipment and the receiver.
- Connect the equipment into an outlet on a circuit different from that to which the receiver is connected.
- Consult the dealer or an experienced radio/TV technician for help.
INCLUDED
| Item | Description | Quantity |
| Diffuser screw | × 2 + 1 extra |
WHAT YOU WILL NEED…
Screwdriver
INSTRUCTION MANUAL
![]() WARNING: Risk of electrical shock. Turn off breaker at the panel.Switch off the main electrical supply from the fuse box/circuit breaker before installing the unit or doing any maintenance.Do not use outdoor.
WARNING: Risk of electrical shock. Turn off breaker at the panel.Switch off the main electrical supply from the fuse box/circuit breaker before installing the unit or doing any maintenance.Do not use outdoor.
CAUTION: If using a dimmer, it must be LED compatible.
IMPORTANTThe installer and/or user must read, understand and follow these instructions before installing the product. This product must be properly installed before it is used. If instructions are not followed, the manufacturer will not be held responsible for any problems or product malfunction. Failure to follow installation and/or operating instructions voids the warranty.We recommend that this product be installed by a certified electrician. In some states or provinces, it is a legal requirement for this type of product to be installed by a certified electrician, according to the electrical and building codes effective in the region where the unit is used.
REPLACEMENT PARTS
| Item | Description | Quantity |
|
Outer glass diffuser | PDT-CC/GL |
| Threaded rod | PDT-CC/TR |
TO ORDER REPLACEMENT PARTS, PLEASE CONTACT CUSTOMER SERVICE.(Service available only in the USA and Canada).
INSTRUCTION MANUAL
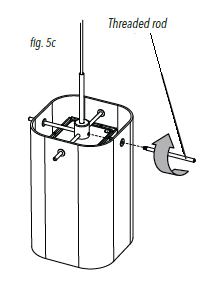
GLASS DIFFUSERS INSTALLATION
- Screw the two diffuser screws through the light fixture and into the notches on the inner glass diffuser (fig. 5a).
- Slide the outer glass diffuser up over the inner glass diffuser (fig. 5b).
- Attach the four threaded rods to secure the outer glass diffuser in place (fig. 5c).
- Restore electrical power

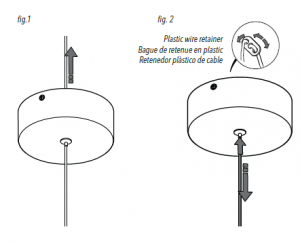
HEIGHT ADJUSTMENT
NOTE: It is recommended to make any major adjustments to the height of the light fixture before installation.
- With the power off, measure the distance from the ceiling to the bottom of where you would like your light fixture to hang.
- To retract the wire, gently push it into the light fixture base (fig. 1).
- To extend the wire, push the metal collar while gently pulling the wire down (fig. 2). When the metal collar is released, the wire will be fixed into position.
- Once the wire is at the desired length, turn the fixture over and slide the plastic wire retainer up to the wire nut, to prevent the pendant from slipping down when in use.
INSTRUCTION MANUAL
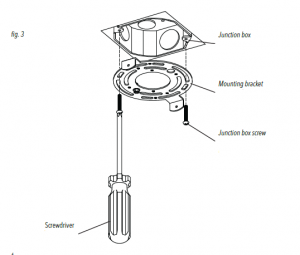
STEP-BY-STEP INSTALLATION1. Turn off power at the circuit breaker and the light switch. Ensure the power is off before continuing.2. Install the mounting bracket on the junction box using the junction box screws (fig. 3).
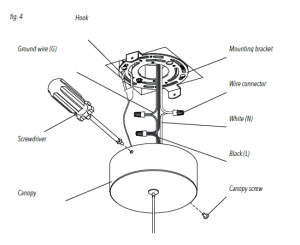 3. Attach the hook to the mounting bracket (fig. 4).4. Connect the white wire (N) from the light fixture to the white supply wire (N) from the junction box using a wire connector. Connect the black wire (L) from the light fixture to the black supply wire (L) from the junction box using a wire connector. Connect the ground wire (G) from the light fixture to the ground wire (G) from the junction box using a wire connector (fig. 4).5. Put the wires into the canopy.6. Mount the canopy onto the mounting bracket and secure it with the canopy screw.
References
[xyz-ips snippet=”download-snippet”]