
ARTILLERYHORNETInstallation ManualARTILLERY 3D PRINTER
READ ME FIRST
READ THIS MANUAL COMPLETELY BEFORE ASSEMBLING AND POWERING UP YOUR PRINTER!HAZARDS AND WARNINGSThe Artillery Hornet 3D printer has motorized and heated parts. When the printer is in operation, always be aware of possiblehazards.ELECTRIC SHOCK HAZARDNever open the electronics bay of the printer while the printer is powered on. Before removing the access panel, always powerdown the printer and unplug the AC power cord.BURN HAZARDNever touch the extruder nozzle, the heater block, or the heated bed without first turning off the hot end and heated bed and allowing it to completely cool down. The hotel and heated bed can take up to twenty minutes to completely cool down. Also, never touch recently extruded filaments. The filament can stick to your skin and cause a burn.FIRE HAZARDNever leave flammable materials or liquids on or near the printer when powered on or in operation. Liquid acetone and vapors are extremely flammable.PINCH HAZARDWhen the printer is in operation, be careful never to put your fingers in the moving parts, including the belts, pulleys, gears, wheels, or lead screws.STATIC CHARGEMake sure to ground yourself before touching the printer, especially the electronics. Electrostatic charges can damage electronic components. To ground yourself, touch a grounded source.AGE WARNINGFor users under the ages of 18, adult supervision is recommended. Beware of choking hazards around children.
LEGAL
PRODUCT WARRANTYThe Artillery Hornet 3D Printer is covered by a limited warranty. For terms and conditions, see https://desk.zoho.com/portal/evnovo/en/kb/articles/evnovo-limited-warranty
OVERALL PROVISIONSAll information in this user manual (“Manual”) is subject to change at any time without notice and is provided for convenience purposes only. Shenzhen Yuntuchuangzhi Technology Co., Ltd. and our respective affiliates and suppliers (“Artillery”) reserves the right to modify or revise this Manual in its sole discretion and at any time and makes no commitment to provide any such changes, updates, enhancements, or other additions to this Manual in a timely manner or at all. You agree to be bound by any modifications and/or revisions. Contact the Artillery Support Team for up-to-date information.
INTELLECTUAL PROPERTYThe design of this Manual and all text, graphics, information, content, and other material are protected by copyright and other laws. The contents are copyright 2020 Artillery. All rights reserved. Certain trademarks, trade names, and logos (the “Marks”) used in this Manual are registered and unregistered trademarks, trade names of Artillery and its affiliates. Nothing contained in this Manual grants or should be constructed as granting, by implication, estoppel, or otherwise, any license or right to use without the written permission of Artillery. Any unauthorized use of any information, materials, or Marks may violate copyright laws, trademark laws, laws of privacy and publicity, and/or other laws and regulations.
DISCLAIMERSArtillery does not warrant the accuracy or completeness of the information, products, or services provided by or through this Manual and assumes no responsibility for any typographical, technical, or other inaccuracies in this Manual, which is provided “as is” and without any express or implied warranties of any kind, including warranties of merchantability, fitness for a particular purpose, or non-infringement of intellectual property. In connection with your use of this Manual, Artillery shall not be liable to you for any damages whatsoever, be they direct, economic, commercial, special, consequential, incidental, exemplary, or indirect damages, even if Artillery has been advised of the possibility of such damages, including without limitation, loss of business revenue or earnings, lost data, or lost profits. Artillery assumes no responsibility, nor will be liable, for any damages to, or any viruses or malware that may infect, your computer, telecommunication equipment, or other property caused by or arising from your downloading of any information or materials related to this Manual. The foregoing exclusions do not apply to the extent prohibited by law please refer to your local laws for any such prohibitions.
LETTER FROM ARTILLERY
Dear Customer,Thank you for choosing the Artillery Hornet 3D printer.This guide will step you through the assembly and the first run of the printer. If you have any problems during assembly, please contact our customer service or visit our official Facebook group at: https://www.facebook.com/groups/artilleryhornet/For a detailed warranty policy, please visit https://desk.zoho.com/portal/evnovo/kb/articles/evnovo-limitedwarrantyFor support, please send an email to [email protected] or visit our ticketing page at https://desk.zoho.com/portal/evnovo/newticket Or you can visit our Facebook group at https://www.facebook.com/artillery3d Regards, Artillery
Shenzhen Yuntu Chuangzhi Technology Co., Ltd.Last update date: 29 January 2021This manual is updated to the date of printing, please refer to the electronic version if in doubt.
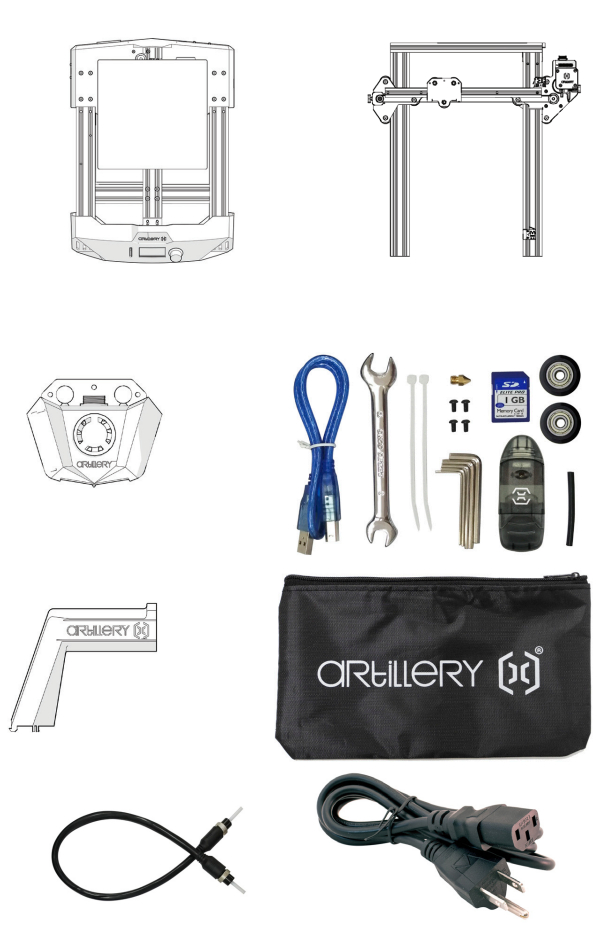
ACCESSORY CHECKLIST
ASSEMBLY
STEP 1Align the XZ gantry to the notch on the base, then fix the gantry to the base with the 4pcs of M5x25 pre-installed on the base.
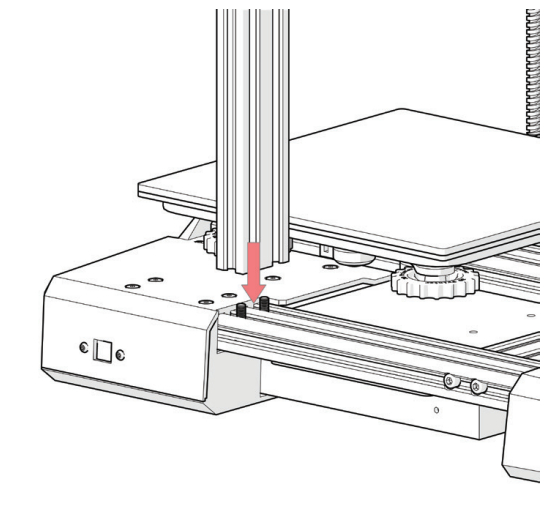
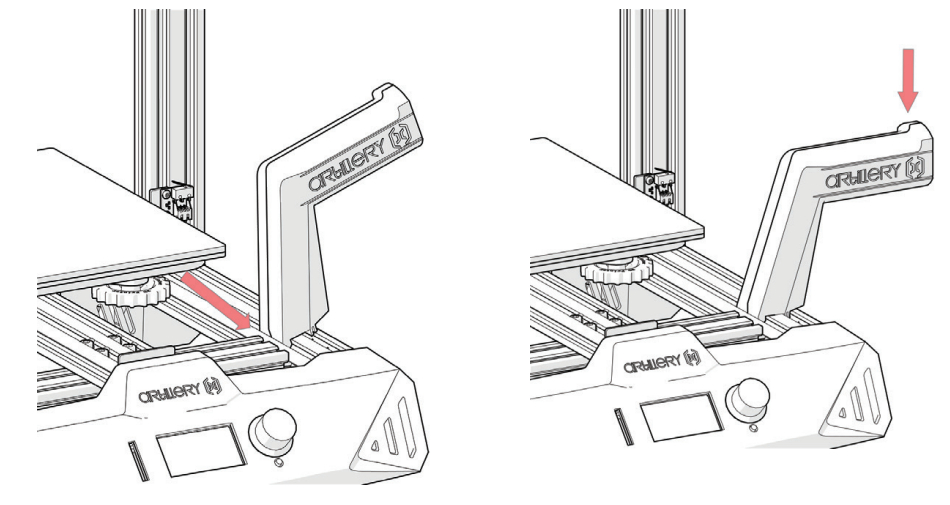
STEP 2Slide the spool holder into the groove on the base as shown in the picture below, and press it down to fix in place:
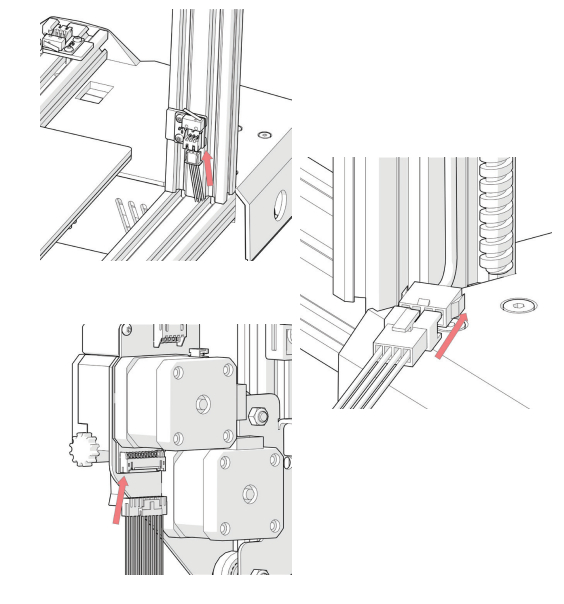
STEP 3Connect the Z endstop cable, then connect the Z stepper motor, finally, connect the main cable.
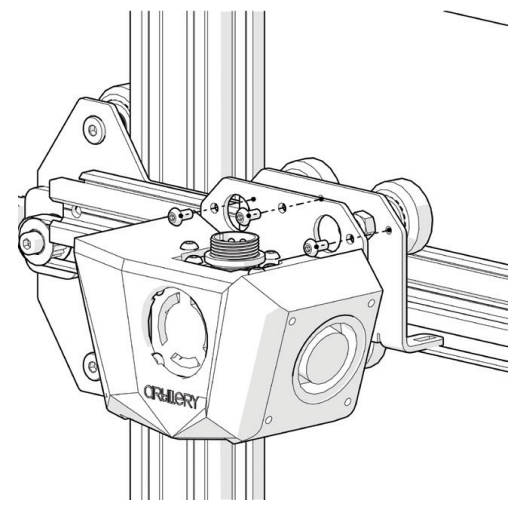
STEP 4Install the hotend onto the carriage with the M3x6 screws (3pcs) supplied in the tool bag.
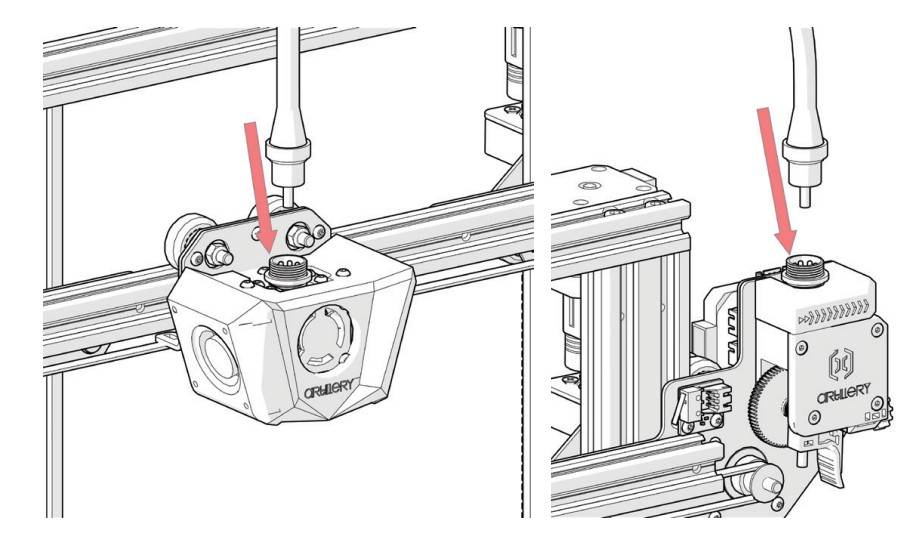
STEP 5Connect the extruder cable, tighten down the cable by turning the locking mechanism.
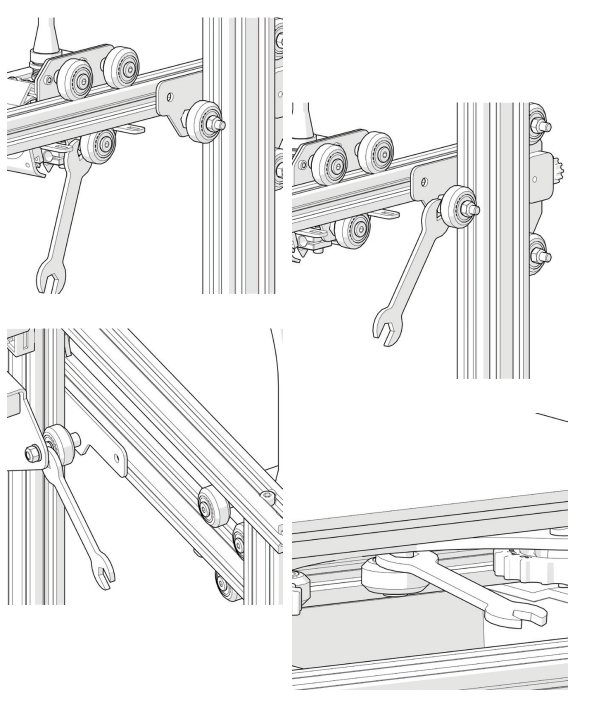
STEP 6Adjust the tension on the eccentric nuts with the spanner supplied when needed.
LEVELING THE BUILD PLATE
To print good parts, the build plate needs to be leveled, and the nozzle needs to be about 0.1mm from the build plate in all locations. This is about the thickness of a single piece of A4 paper. You want to adjust the height of the build plate so that you can barely slide the paper between the nozzle and the build plate with only a little resistance.
- Select Temperature -> Preheat PLA -> Preheat PLA. This will heat up the bed and the nozzle t actual printing conditions, making the leveling more accurate. Wait for 1 minute after the machine reached the target temperature.
- Select Motion -> Level Corners. This will home the machine first, then move the nozzle to the first corner.
- Slide a piece of A4 paper between the nozzle and the build plate.
- Turn the leveling knob under the bed closest to the nozzle until the piece of paper slides, with just a bit of drag.
- Choose Next to move to the Next Point, and repeat step 4.
- Leveling is completed after all 4 points are leveled.
- You may want to repeat steps 5-6 for 2-3 times for better results, since adjusting one corner will affect other corners.
- You may need to make fine adjustments to the bed level when you start printing. The first layer of the print will show whether the distance between the nozzle and the build plate is correct. You want it to be pushed into the build surface slightly to maximize surface area contact while still allowing good extrusion flow.• You can try to carefully adjust the leveling knob during the first layer of the print while the plate is moving until the distance between the nozzle and the build, the plate is producing smooth extruded lines.• After you have fine-tuned the bed level during the first layer, you may want to stop the print, clear the build plate, and restart the print.
PREPARING SLICING SOFTWARE
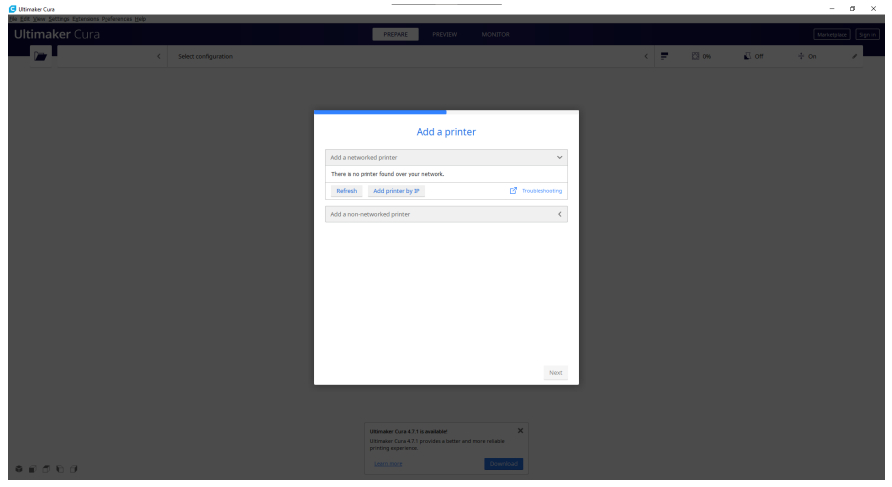
This printer works with most slicing software like Slic3r, Cura, Simplify3D, etc. But we will go in detail for Cura software and tell you how to set it up so that you can make your first print. First, we recommend you to install the software on the memory card included, for other operating systems, please download from their official site.After installation and start the software, you should see the following screen, continue until you see Add a printer page:

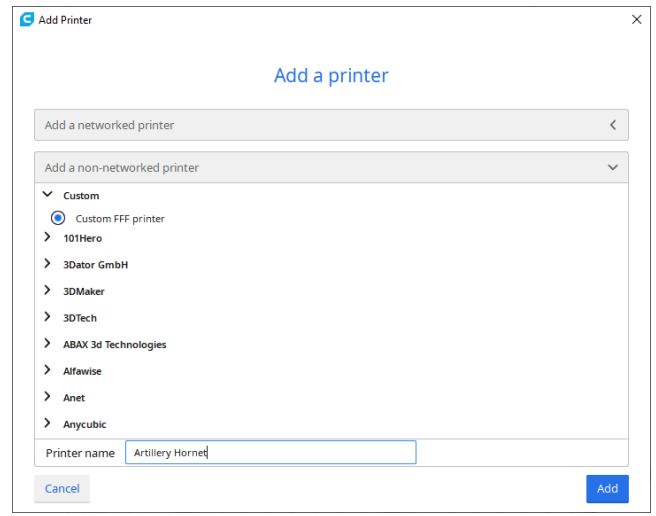
In the Add, a non-networked printer, scroll down to Custom and choose Custom FFF Printer, and type in Artillery Hornet in Printer name. Then click on the Next button.
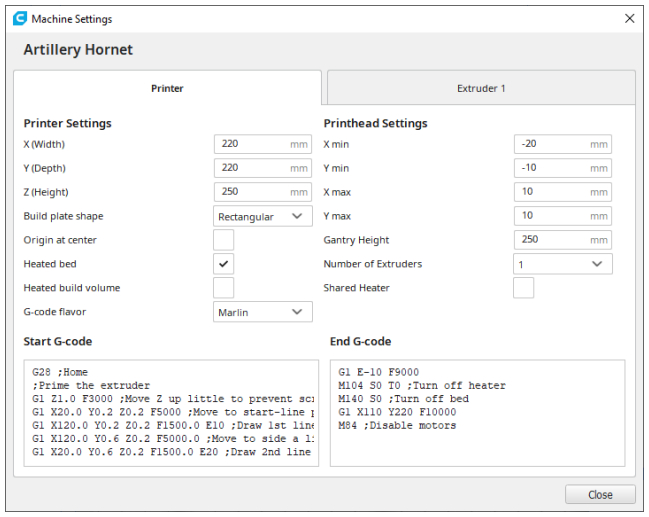
Set X (Width), Y (Depth) as 220, Z (Height) as 250. Make sure Heated Bed is checked, then copy and replace the content of the Start G-code. txt and End G-code.txt on the memory card to the respective fields.
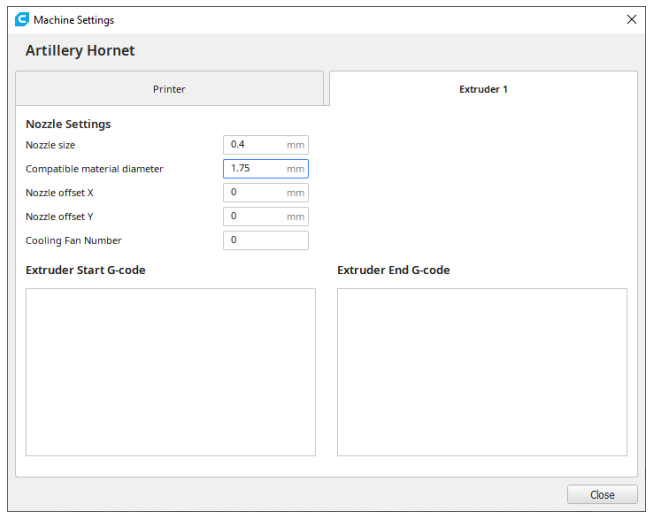
Change Compatible material diameter to 1.75
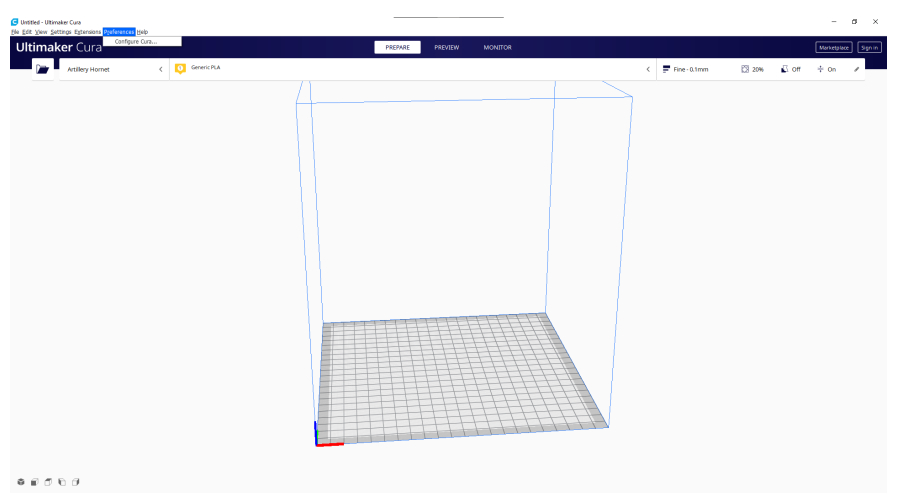
From the toolbar, click on Preferences -> Configure Cura…
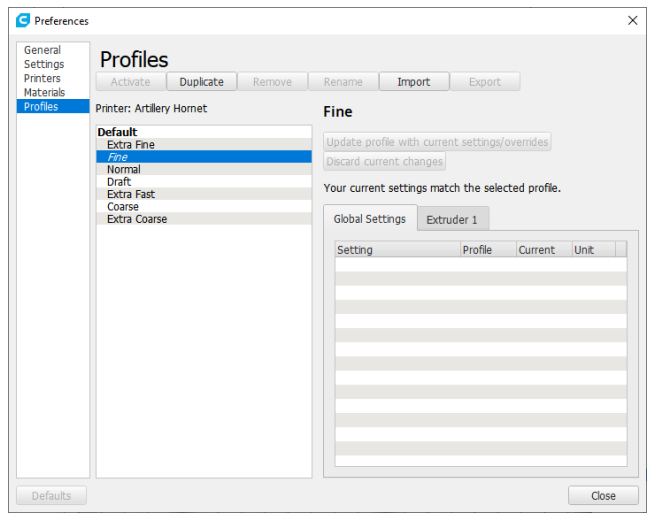
Click on Profiles then click on the Import button.

Browse to the memory card and import the profile files.

Profile successfully imported.
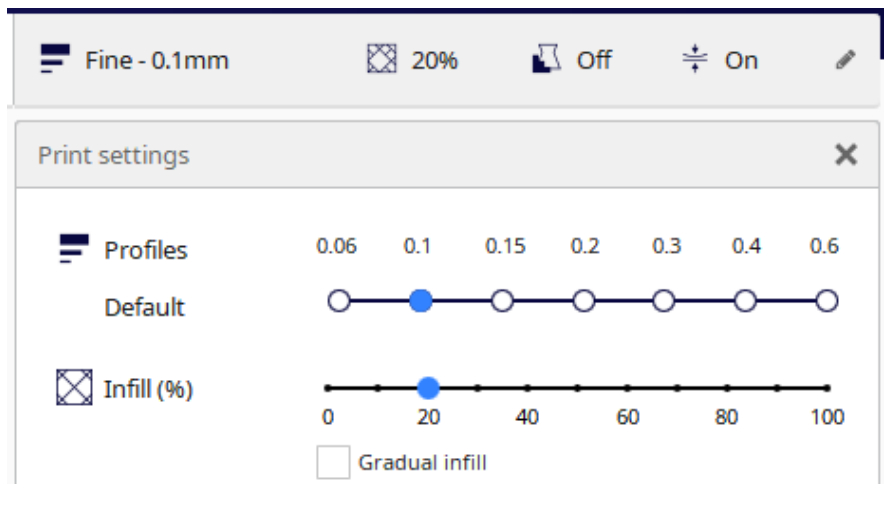
Click on Print settings and the floating window will pop up.
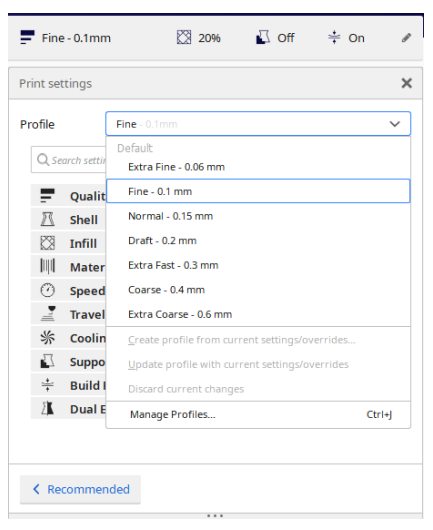
From the Profile dropdown, choose the imported profile.
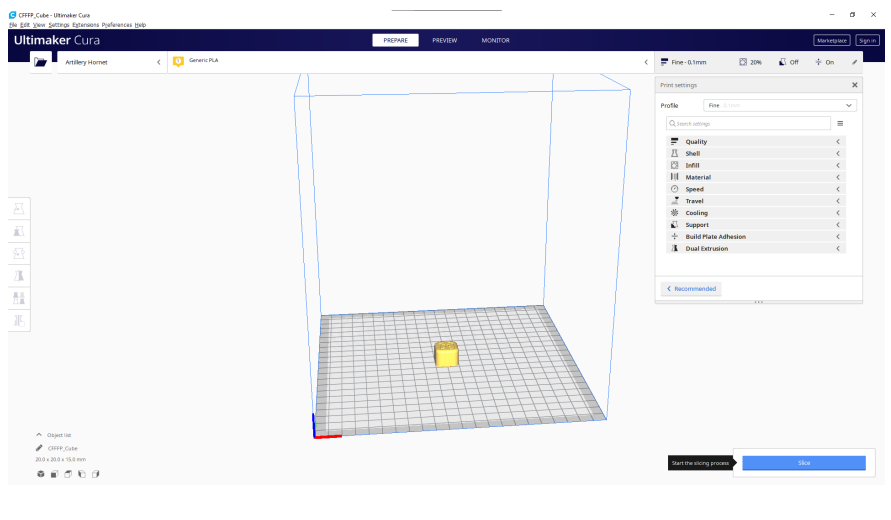
Drag and drop the STL file (or another supported format) to the slicer or load the model file with File -> Open File(s)… then click on the Slice button.
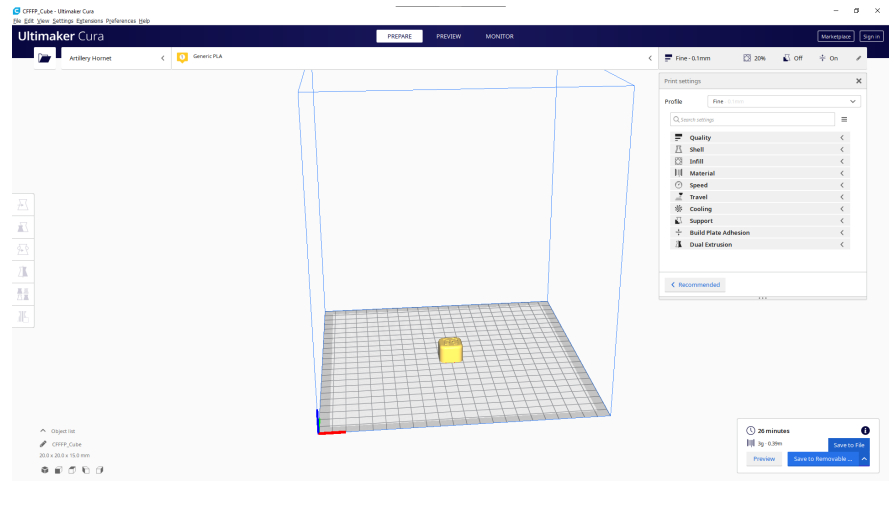
You can click on Save to Removable Drive (if the memory card is detected) or Save to file button to save the sliced file to the memory card.
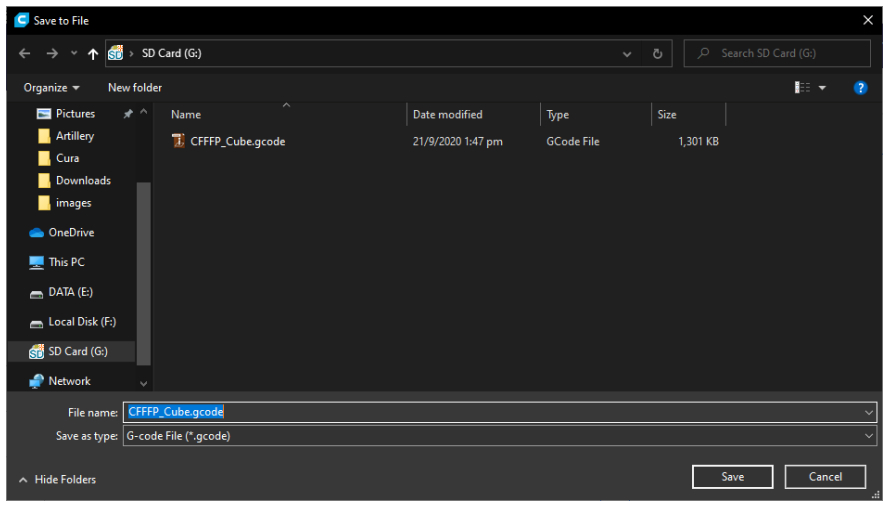
Save the file to the memory card for printing.
SPECIFICATIONS
PRINTING
| Print Technology: | Fused Deposition Modeling |
| Build Volume: | 220x220x250 mm (8.7×8.7×9.8 in) |
| Layer Resolution: | 100-300 microns |
| Filament: | 1.75 mm (0.069 in) |
| Nozzle Diameter: | 0.4 mm (0.015 in) |
| Print File Type: | Gcode |
| Material Compatibility: | PLA, PETG, TPU |
SIZE & WEIGHT
| Product Dimensions: | 470x410x450 mm (18.5×16.1×17.7 in) |
| Shipping Box: | 560x500x255 mm (22.0×19.7×10.0 in) |
| Printer Weight: | 8 kg (17.6 lbs) |
| Shipping Weight: | 9.8 kg (21.6 lbs) |
ELECTRICAL
| Power Requirements: | 110V/220V, 350W |
| Connectivity: | Memory Card, USB |
MECHANICAL
| Construction: | Aluminum, ABS |
| Build Surface: | Glass + Aluminum plate |
| Stepper Motors: | 1.8° step angle with 1/256 micro-stepping |
| XY Positioning Precision: | 10 microns |
| Z Positioning Precision: | 100 microns |
CONTACT
| Support | desk.zoho.com/portal/evnovo/en/newticket At Artillery, we take pride in offering expert, responsive, friendly customer support to customers around the world. If you need help resolving an issue with your Artillery 3D printer, visit the web address above to submit a ticket. |
| Sales | [email protected]To learn about other Artillery products, please email the address above. |
| Feedback | [email protected]For general questions, or to tell us what’s on your mind, send an email to the address above.We love to hear from you. |
References
desk.zoho.com/portal/evnovo/newticket
desk.zoho.com/portal/evnovo/en/kb/articles/evnovo-
desk.zoho.com/portal/evnovo/
desk.zoho.com/portal/evnovo/kb/articles/evnovo-limited-
desk.zoho.com/portal/evnovo/en/newticket
Artillery 3D Printers Genius Pro & Sidewinder X2 110V US PLUG SW-X2 FDM Extruder 220V EU Exclusive Ultra-quiet Stepper Driver with Filaments
Artillery Hornet 3D Printer Owners Group [Official]
[xyz-ips snippet=”download-snippet”]