
asti Ecotones Sound plus Sleep Machine Owner’s Manual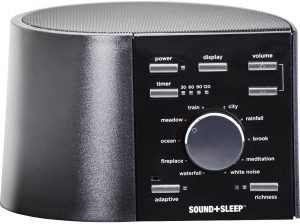
GETTING STARTED
Inside the package you’ll find:
- This Owner’s Manual
- A Sound Environments Guide
- A Sound+Sleep
- An AC Power Adapter and Cable
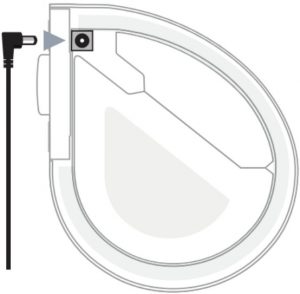
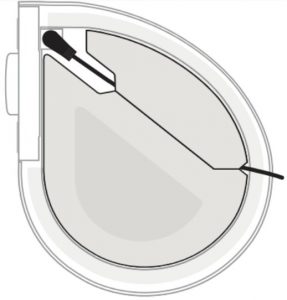
Connect to an AC Outlet
The power jack is located on the bottom of the Sound+Sleep.
- Push the power adapter plug at the end of the cable into the jack.

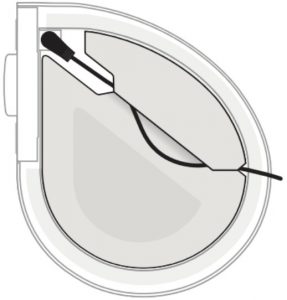
- Slip the cord under the rubber foot by separating the two pieces of the foot along the slit.
- The machine should sit flat on a table or nightstand if the cord is installed correctly. The slit should easily separate by running your finger down it. If not, you can use a knife to cleanly open the slit.
Next, connect the AC plug into an unswitched wall outlet. The first time you plug it in, it may take up to 30 seconds to perform a self-test. Please note that the ten painted dots around the dial do not light up.
We recommend that you do not use an outlet connected to a switch. Your Sound+Sleep automatically remembers its settings each time it’s turned off using the POWER button, but it may not remember its settings if it loses power.
You may use the Sound+Sleep internationally with any AC line voltage from 100–240 Volts, at 50 or 60Hz, using an AC plug adapter (available at many electronics and travel stores).
USING YOUR SOUND+SLEEP THE FIRST TIME
Turn it on and select a sound
- Press the POWER button and the Sound+Sleep will initialize and start playing in about two seconds. The Sound+Sleep may be turned off with the POWER button, or the TIMER button (see Sleep Timer).
- The Sound+Sleep will retain the last settings used when you last powered it off using the POWER button. If you power it off by unplugging the Sound+Sleep power adapter from the wall outlet, the settings may not be saved.
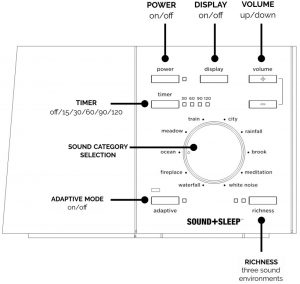
- Next, use the dial to select a sound category, and then press the RICHNESS button to choose between the three sound environments in that category.
- See the included Sound Environments Guide, or the sound listings later in this guide, for a complete list of sound environments.
- Use the VOLUME buttons to adjust the volume to your liking. Not all the sound environments are designed for sleep. Some environments are designed for relaxation, speech privacy, meditation, or studying and reading.
Adaptive Mode
The Sound+Sleep can adapt to noise in your environment. It uses its built-in microphone on the front panel to listen for disruptive noises, and raises the volume and/or adds enhancing sounds to the sound environment to compensate. Press the ADAPTIVE button to turn it on or off. The lamp next to the ADAPTIVE button will indicate when it’s active.
When Adaptive Mode is not active, your Sound+Sleep will maintain a steady volume level.
Adaptive Mode allows the Sound+Sleep to be customized to suit your personal preferences and situation. You might prefer a quiet, steady sound, especially if there is little noise, or steady noise, in your environment. Or, you might need the additional noise masking that Adaptive Mode provides. Experiment to find the setting you like best for different situations.
Note: When setting the volume in Adaptive Mode you are actually setting the maximum volume it can reach when it detects a loud noise. If the sound seems too low when it is quiet in your room, turn the volume up to a higher base level.
MORE USEFUL FEATURES
Sleep TimerThe Sleep Timer can be used to set the Sound+Sleep to play for a number of minutes and then shut off gradually and automatically. The time interval can be set to 30, 60, 90, or 120 minutes by pressing the TIMER button.
Turning off the Sound+Sleep clears the Sleep Timer. Pressing the TIMER button when the Sound+Sleep is off will turn it on and set the Sleep Timer to 30 minutes. Pressing the TIMER button again will advance the timer to the next interval. After 120 minutes has been selected, pressing the TIMER button again turns the timer off.
Headphone JackA standard 3.5mm stereo headphone jack is located on the side of the unit. Any ordinary set of headphones or earbuds with a 3.5mm connector may be used. Connecting headphones or earbuds disables the Sound+Sleep’s built-in speaker, so it’s a great way to enjoy private relaxation. As with any product, use common sense when using headphones. Avoid using them at high volume levels. Prolonged exposure to loud volume levels may impair your hearing.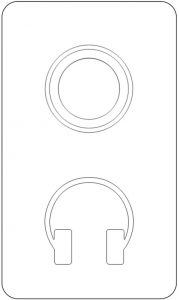
Turning Off the DisplayYou may use the DISPLAY button to turn off the front panel lamps if they’re a distraction. If you adjust any settings while the display lamps are off, they will turn on for 15 seconds and then dim again. If you would like the front panel lights to stay on, press the DISPLAY button once more.
Sound EnvironmentsUse the dial to select a sound category, and then press the selection button to choose an environment. Each sound category has three environments from which to choose. See the sound category list at the end of this guide
TECHNICAL INFORMATION
Specifications
|
Sound Categories |
10 |
|
Sound Environments |
30 |
|
Speaker Compensation |
Five-band parametric EQ |
|
Headphone Jack |
3.5mm stereo |
|
Power Requirements |
5 Volts, 500 mA DC max |
|
Power Consumption While Off |
< 0.25 Watts (typically 0.1 Watts) |
To Restore Factory SettingsThis procedure will reset your Sound+Sleep to its original “out of the box” settings.
- Turn off the Sound+Sleep
- Press and hold the POWER button
- Release the POWER button when the power lamp flashes once
Troubleshooting
|
Symptom |
Possible Cause |
Solution |
|
No operation when POWER button is pressed |
Disconnected power plug | Check the power connection on the bottom of the unit and at the wall outlet. Make sure that both are firmly seated. |
| Unit is connected to a switched wall outlet | Move the unit to an un-switched outlet. | |
| Faulty wall outlet | Move to a working outlet. | |
| Product needs to be reset | See To Restore Factory Settings | |
|
Unit is on, but no sound is heard |
Volume is set too low | Press or hold the VOLUME UP button to increase volume. |
| Headphones are plugged in | Remove the headphones. The speaker is muted when headphones are connected. | |
|
Unit is on, but volume is too low |
Volume is set too low | Press or hold the VOLUME UP button to increase volume. |
| Adaptive Mode is enabled | In Adaptive Mode, the sound will be low when there is no noise in the room. If you prefer to maintain the sound at high volume, turn off Adaptive Mode. | |
|
Volume is Too High |
– |
Press or hold the VOLUME DOWN button to decrease the volume. |
|
Other unexpected behavior |
– |
See To Restore Factory Settings |
Visit astisupport.com for more assistance.
Safety, Warranty and Certifications
Read and adhere to all safety and operating instructions before use.Keep this booklet for future reference.
- WARNING: Do Not Operate Heavy Machinery or Motor Vehicles While Using this Device.
- The unit should be cleaned regularly with a soft, dry cloth. The grill may be vacuumed to remove excessive dust or particle build-up. Do not use any liquids or sprays (including solvents, chemicals or alcohol) or abrasives to clean.
- The unit should not be used near water, such as a bathtub, swimming pool, faucet or basin to avoid electrocution.
- Be careful to avoid dropping objects or spilling liquids onto the unit. If liquid is spilled on the unit, unplug and turn it upside down immediately. Allow it to dry thoroughly (one week) before plugging it into a wall outlet again. Following these instructions does not ensure that the unit will be operational.
- Do not reach for the unit if it has fallen into water. Unplug it immediately at the wall outlet, and if at all possible drain water before retrieving the unit.
- The unit should be situated away from heat sources such as radiators, heat registers, stoves or other appliances (including amplifiers) that produce heat.
- Avoid placing the unit in areas that are exposed to direct sunlight or close to heat-radiating products such as electric heaters. Do not place unit on top of stereo equipment that radiates heat.
- Avoid placing in areas that are dusty, humid, moist, lack ventilation, or are subject to constant vibration.
- The unit may be subject to interference from external sources such as transformers, electric motors or other electronic devices. To avoid distortion from such sources, place the unit as far away from them as possible.
- Do not apply excessive force when using any switches or controls.
- The unit should only be used with the power adapter provided or AA batteries.
- Power cords should be routed to avoid being walked on or pinched by items placed on or against them.
- Unplug the power adapter from the outlet when the unit is unused for long periods of time or when moving the unit.
- Do not attempt to service the unit yourself.
One Year Limited Warranty
Adaptive Sound Technologies, Inc., hereinafter referred to as ASTI, warrants this product against defects in materials and/or workmanship under normal use for a period of ONE (1) YEAR from the date of purchase by the original purchaser (“Warranty Period”). If a defect arises and a valid claim is received within the Warranty Period, at its option, ASTI will either 1) repair the defect at no charge, using new or refurbished replacement parts, or 2) replace the product with a current product that is close in functionality to the original product. A replacement product or part, including a user-installable part installed in accordance with instructions provided by ASTI, is covered by the remaining warranty of the original purchase.
When a product or part is exchanged, the replacement item becomes your property and the replaced item becomes ASTI’s property.
Obtaining Service: To obtain warranty service please call, or email Adaptive Sound Technologies.
Limits and Exclusions: This Limited Warranty applies only to the ASTI Sound+Sleep unit, ASTI power adapter, and ASTI power cable. It does NOT apply to any bundled non-ASTI components or products. This warranty does not apply to: a) damage caused by failure to follow instructions relating to the product’s use or to the installation of components; b) damage caused by accident, abuse, misuse, fire, floods, earthquake or other external causes; c) damage caused by service performed by anyone who is not a representative of ASTI; d) accessories used in conjunction with a covered product; e) a product or part that has been modified to alter functionality or capability; f) items intended to be periodically replaced by the purchaser during the normal life of the product including, without limitation, batteries or light bulbs; or g) any and all pre-existing conditions that occur prior to the effective date of this Limited Warranty relating to any product sold “as is” including, without limitation, floor demonstration models and refurbished items.
ADAPTIVE SOUND TECHNOLOGIES, INC. SHALL NOT BE LIABLE FOR INCIDENTAL OR CONSEQUENTIAL DAMAGES RESULTING FROM THE USE OF THIS PRODUCT, OR ARISING OUT OF ANY BREACH OF THIS WARRANTY. TO THE EXTENT PERMITTED BY APPLICABLE LAW, ASTI DISCLAIMS ANY AND ALL STATUTORY OR IMPLIED WARRANTIES, INCLUDING, WITHOUT LIMITATION, WARRANTIES OF MERCHANTABILITY, FITNESS FOR A PARTICULAR PURPOSE AND WARRANTIES AGAINST HIDDEN OR LATENT DEFECTS. IF ASTI CANNOT LAWFULLY DISCLAIM STATUTORY OR IMPLIED WARRANTIES, THEN TO THE EXTENT PERMITTED BY LAW, ALL SUCH WARRANTIES SHALL BE LIMITED IN DURATION TO THE DURATION OF THIS EXPRESS WARRANTY.
Some geographic areas disallow the exclusion or limitation of incidental or consequential damages or the length of an implied warranty. As a consequence, some of the above exclusions or limitations may not apply to buyers residing in those areas. This warranty grants specific legal rights to buyers, but other rights may also be granted, which vary from country to country, state to state, etc.
FCC DECLARATION
This equipment has been tested and found to comply with the limits for a Class B Digital Device, pursuant to Part 15 of the FCC Rules. These limits are designed to provide reasonable protection against harmful interference in a residential installation. This equipment generates, uses, and can radiate radio frequency energy, and if not installed and used in accordance with the instructions, may cause harmful interference to radio communications. However, there is no guarantee that interference will not occur in a particular installation. If this equipment does cause harmful interference to radio or television reception, which can be determined by turning the equipment off and on, the user is encouraged to try to correct the interference by one or more of the following measures:
- Reorient or relocate the receiving antenna.
- Increase the separation between the equipment and receiver.
- Connect the equipment to an outlet on a circuit different from the one to which the receiver is connected.
- Consult the dealer or an experienced radio/TV technician for help.
© Adaptive Sound Technologies, Inc. All Rights Reserved. Sound+Sleep, Adaptive Sound, and the ASTI logo are trademarks of Adaptive Sound Technologies, Inc. All other marks are trademarks or registered trademarks of their respective owners. Use of this product is protected by US patents #8,243,937, #8,379,870, #8,280,068 and #8,280,067. Additional patents pending.astisupport.com
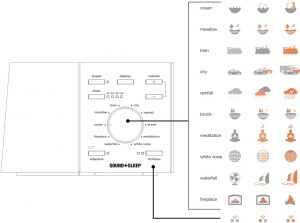
SOUND SELECTION GUIDE
Use the sound selection dial to choose between the ten categories. Then, use the RICHNESS button to select between three variations.
Visit: astisupport.com
References
[xyz-ips snippet=”download-snippet”]