
![]()
Portable FreezerUser Manual
Capacity:45L
– V1.0 –
This manual contains important information regarding the safety, operation, maintenance, and storage of this product. Before using, read and understand all cautions, warnings, instructions and product labels. Failure to do so could result in possibly injury or property damage. Please keep this manual for future reference.
Thank you for purchasing the AstroAI portable freezer. This is a portable freezer that can be used with both a 12/24-volt car outlet and a standard wall outlet. With an included chill and heat function, you’ll be able to keep everything at the perfect temperature.
We hope you enjoy your new portable freezer! If you have questions or concerns you are welcome to contact us with your questions via [email protected].
01 / SAFETY INFORMATION
- When using the 12/24V in-car adapter, the compact fridge should not be left connected for long periods of time when the engine is not running.
- Unplug this device during lightning storms or when not in use for long periods of time to prevent damage to the device.
- DO NOT open or remove covers, doing so may expose you to dangerous voltages or other hazards.
- The supply voltage should be the same as that indicated in the technical specifications and the appliance rating plate.
- In order to disconnect the device from the mains completely switch off the outlet and remove the mains plug completely.
- Do not bend, stretch or pull the supply cable in order to avoid electric shock.
- Avoid using locations where dust or other airborne contamination may be drawn into the fan.
- Allow at least 5 inches of distance from the back and sides of the device to permit proper air circulation and heat dispersal.
- Never leave the fridge running in poorly ventilated areas e.g. a car’s trunk.
- The installation of DC power on board must be performed by a professional electrician.
- Do not use electrical products inside the freezer.
- After initially unpacking the freezer, let it stand for at least 6 hours before powering on.
- Keep the freezer horizontal at all times.
- The freezer should be operated in a well-ventilated area away from heat sources and direct sunlight.
- Do not soak the freezer with water. If water accumulates inside the freezer, use a cloth to dry the condensation. Do not pour water out of the freezer.
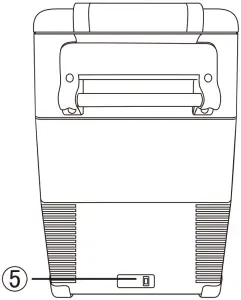
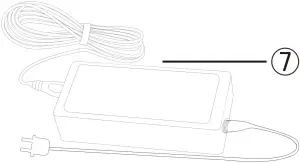
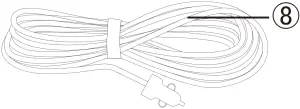
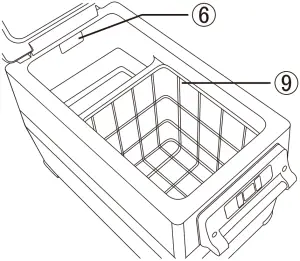
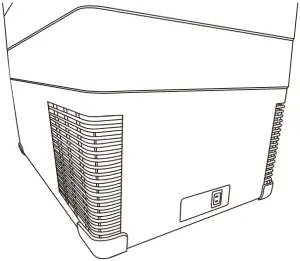
02 / DIAGRAM
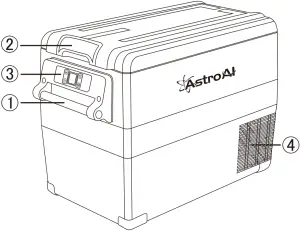
- Carrying Handle
- Door Handle
- Control Panel
- Heat Dissipation Port
- Power Port
- LED Light
- AC Cord and plug
- DC Cord and plug
- Shelf
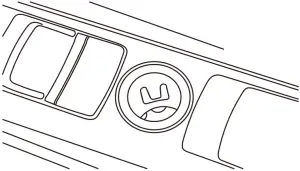
03 / DISPLAY INTRODUCTION
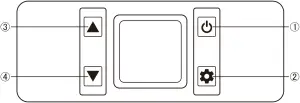
- Power Button
- Set Button
- Increase Temperature
- Decrease Temperature
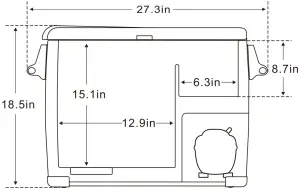
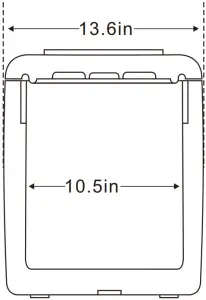
04 / SIZE DESCRIPTION
05 / SPECIFICATIONS
| Capacity: | 45L |
| Operating Input Voltage Range: | 100V-240V 50-60Hz |
| Car input Voltage Range: | 12/24V |
| Rated Current: | AC:0.5A-1.2A |
| DC:5.0A(12V)/2.5A(24V) | |
| Climatic Categopy: | T/ST/N/SN |
| Electric Shock Resistance: | Ⅱ |
| Refrigerant Amount: | 40g |
| Certifications: | CE, FCC, RoHS |
 |
Important note: After initially unpacking the freezer, let it stand for at least 6 hours before powering on. Always keep the freezer horizontal. |
06 / OPERATION INSTRUCTIONS
1 Connecting the power supply: Connect one end of the power supply to the freezer socket.
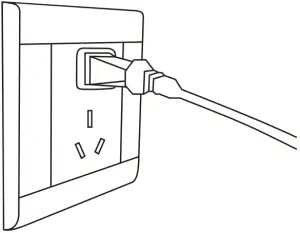 2 Connect the other end to a car cigarette lighter or a standard household outlet.3 Press the “
 ![]() ” button to turn on the freezer to cooling mode. The temperature on the display is the current internal temperature.4 Press the “
” button to turn on the freezer to cooling mode. The temperature on the display is the current internal temperature.4 Press the “ ![]() ” or “
” or “ ![]() ” button to set the cooling temperature. Hold “
” button to set the cooling temperature. Hold “ ![]() ” or “
” or “ ![]() ” to quickly increase/decrease the temperature. The first time you use the freezer, it will default to the lowest temperature. In subsequent uses, the temperature will default to the last user-set temperature.5 Press the “
” to quickly increase/decrease the temperature. The first time you use the freezer, it will default to the lowest temperature. In subsequent uses, the temperature will default to the last user-set temperature.5 Press the “ ![]() ” button to change the freezer to ECO (Energy Saving Mode) or MAX (Quick Cooling Mode). The factory default mode is MAX.6 Press the “
” button to change the freezer to ECO (Energy Saving Mode) or MAX (Quick Cooling Mode). The factory default mode is MAX.6 Press the “ ![]() ” button to turn off the freezer.
” button to turn off the freezer.
07 / TEMPERATURE UNIT SWITCHING
- Set the freezer to its “
 ” state.
 - Press and hold the “ ” button until the display reads “E1”.
- Press the “ ” button again to search through the settings until the display reads “E5”.
- Press the “ ” or “ ” button to switch between Fahrenheit and Celsius.
/ BATTERY PROTECTION SETTING
This freezer has a three-level battery protection function which not only guarantees normal operation of the freezer, but also protects the battery of the vehicle.
- Set the freezer to its “on” state.
- Long press the “ ” button until the display flashes “H”.
- Press the “ ” button again to select a low voltage protection level – L, medium voltage protection level – M, or high voltage protection level – H. The factory default is “H”.
| Battery Protection | ||
| L | M | H |
| 8.5-10.9V | 10.1-11.4V | 11.1-12.4V |
| Vehicle Battery | External Battery or Spare Battery | |
|
Note: Due to the different output voltages of different vehicle power supply, if the voltage protection appears (if the display reads “F1”), you can lower the battery protection setting by one level (H adjusted to M or L).We do not recommend that you run the freezer while the engine is off. If you must run the freezer while the engine is off, set the protection level to H (high). If the freezer runs for too long without the engine on, the vehicle may not be able to start. |
08 / TROUBLESHOOTING
| Freezer is not working |
|
| Excessive freezing inside the refrigerator |
|
| It sounds like water is running inside the freezer |
|
| Water droplets accumulate around the shell or door seal |
|
| The compressor starts loudly |
|
| Inaccurate Temperature displayed |
|
09 / CODE ANALYSIS
| F1 |
|
| F2 |
|
| F3 |
|
| F4 |
|
| F5 |
|
| F6 |
|
| F7/F8 |
|
10 / WARRANTY
1 Year Warranty Limited Warranty from AstroAI
Each AstroAI portable freezer will be free from defects in material and workmanship. This warranty does not cover damage from neglect, misuse, contamination, alteration, accident, or abnormal conditions of operation or handling. This warranty covers the original purchaser only and is not transferable.
 report this ad
AstroAI always wants to provide our customers with excellent product and customer service. To find out more about us, please visit astroai.com.
References
[xyz-ips snippet=”download-snippet”]