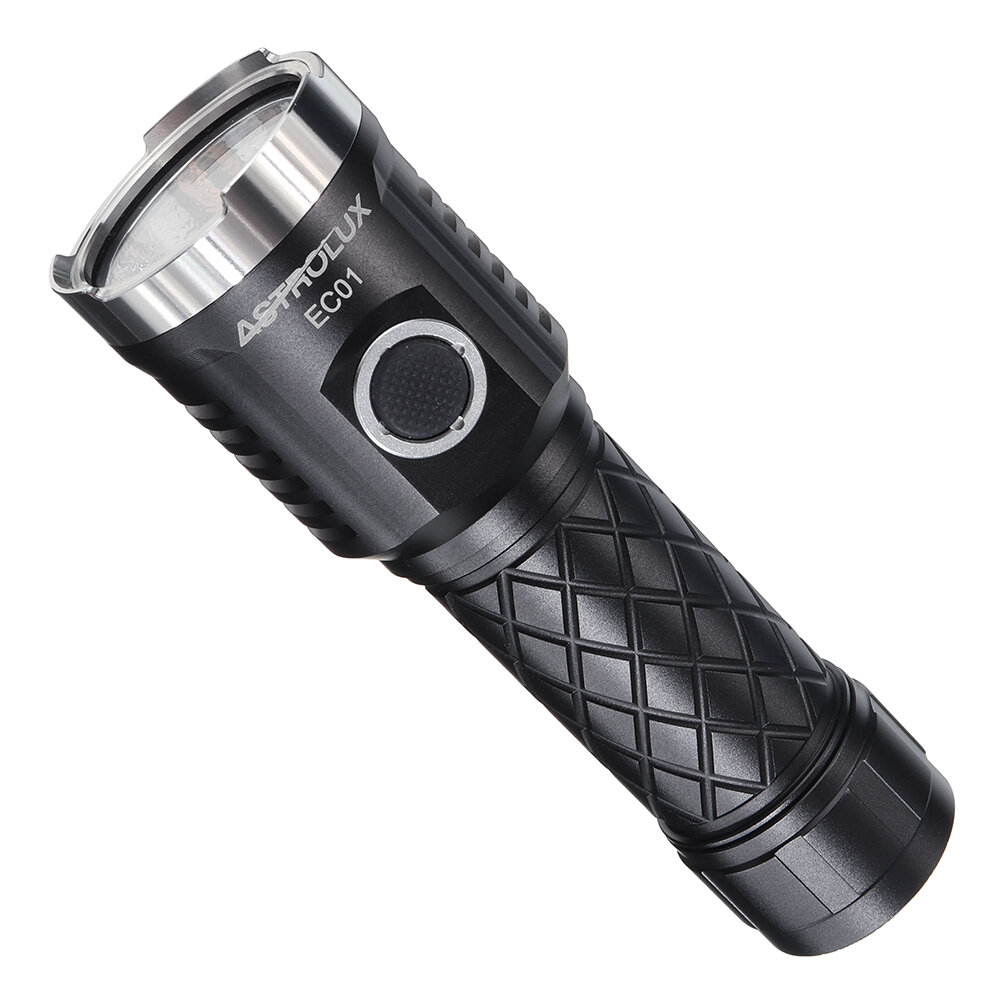
ASTROLUX EC01
Safety precautions
- Use only reputable 21700 cells of known origin.
- Remove and recharge the cell when the low voltage indication is given by the Lamp (repeated step-downs in light level and eventual shutdown of the light).
- The extraordinary energy density that 21700 cells offers also means that hazardous conditions are created when a cell is short-circuited or damaged. Always treat cells with respect and properly dispose of damaged cells.
- The EC01 is a very high-intensity flashlight. Do not point directly at a person, animal, moving vehicles or flammable materials.
- When running at higher output levels the head of the Lamp will quickly heat. This is normal. In warmer ambient conditions this temperature may exceed 50ºC depending on your settings, so please take the necessary precautions when handling the Lamp.
Quick start
- Use one 21700 cell.
- Unscrew the head and insert the battery. Take care with the polarity: Plus points toward the head.
- Screw the head back. The EC01 blinks once to confirm it has power and is now operational. Tighten the head. Do not over-tighten.
- All functions are performed using the electronic side switch. And basic usage is very simple: Click for on/off, hold to change brightness. Release and hold again to change brightness the other way.
- From OFF, hold the button. The light output will ramp up from a very low level to Ceiling-Of-The Ramp. Release the button when the required light level is reached. (The full ramp takes about 3 s.) Use a single-click at any time to turn the EC01 OFF. Please see below for further details.
- While ramping it does subtle blinks to signal: Max regulated level (1×7135) and CEILING.
- The EC01 has two different ramps: SMOOTH RAMP and STEPPED RAMP. You can change between them when the lamp is ON with three clicks. Each ramp has its own individual settings – for floor (lowest level), ceiling (highest level). And the stepped ramp can also have a configurable number of steps.
- TURBO is only for short times. At around a minute you may notice it dims slowly down! The user should use it only for short periods instead of relying on thermal regulation to prevent heat damage. Full turbo is powerful enough to start fires in just a few seconds, especially when aimed at dark-colored materials.
Integrated charger
The EC01 has a USB-C charging port. Please use a premium cable and a power adapter with 5V, 2A to charge your lamp.While charging the switch LED is red. It goes green when charging is finished. While charging you can use Batt Check mode from the Group 1 Blimkie’s to check the voltage level and all other flashlight functions can be used normally when charging.
Specifications
A 21700 CREE LED lamp with side switch and a great, easy user interface.Emitter: CREE XHP50.2(3V) LED on a copper DTP MCPCBLens: High transmittance glassFlux: ~3500 lmThrow: ~298 mFirmware: The EC01 uses free software called Andúril, distributed under the terms of the GPL v3. Code is available fromhttp://tiny.cc/TKAnduril
User interfaces:
- By default the EC01 is set to use SMOOTH RAMPING. Instant access to TURBO mode is also provided.
- A more conventional STEPPED RAMPING UI is available if you like discrete modes level. You can choose how many steps you want.
- MOMENTARY mode is useful for signaling purposes or rapidly/briefly lighting up targets. To exit this mode, physically disconnect power
- MUGGLE mode uses a reduced output.
- It has an electronic LOCKOUT for safety, but acts also as momentary low light.
Other functions: Battery check, sunset, beacon, tactical strobe, party strobe, bike flasher, candlelight, lightning stormBattery: one premium 21700 cells. Unprotected cells are recommended.Charging: Integrated charger via USB-CDriver: FET+1 driver. Low parasitic drain while OFFBody: Aluminum with HA III anodizingSwitch: Electronic side switchIngress rating: Equivalent to IPX8Weight: Approximately 119 g without cellsSize: 37 mm Ø head x 120 mm length.
Manual design and concept by J. Hollmann. Content from budget light forum, collected over time. Many thanks to Toy Keeper for her great software!
UI Diagram
Not everything is covered in the diagram, please read the text.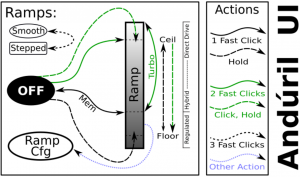

Default UI: Smooth ramping
This UI provides smooth dimming of the light output between FLOOR (lowest level) and CEILING (highest level), with an easily accessible 100% TURBO mode.
Switch to STEPPED RAMP: If the lamp is ON: Three clicks (Hint: If you use 3 clicks from OFF you engage battery check)Turn the lamp ON: single-click the button, the EC01 turns ON using the previously used light output level (MEM)Ramp up; brighter: hold the buttonReverse ramp: while ramping in one direction, release button briefly and hold againRamp down; darker: Click, hold, when ON (means: double-click, but hold the second click a bit longer) If you do this when the lamp is OFF, it ramps down from the CEILING (dashed double lines)Instant top CEILING: from OFF: double-click (double lines)TURBO: from ON: double-click toggles between turbo and the memorized level from OFF (You must first switch ON): Click, then double-clickFLOOR / MOON mode: from OFF: Hold turns on at the FLOOR level, it makes a subtle “blink” to provide a timing hint if you want to stay there.If you keep holding, it ramps upBattery check: from OFF: triple-click (4 blinks, a short pause, then 1 blink would indicate 4.1 V)Turn the EC01 OFF: single-click
UI: Stepped ramping
Using this UI the output does not ramp, it steps from one mode to the next using hold. The firmware tries to optimize these steps as equally-spaced on a cube-root curve (considered an ideal mode-spacing by many).In STEPPED RAMPING you can choose how many steps you want. (See Ramp configuration for details).All operations are the same as in smooth rampingSwitch to SMOOTH RAMP: when the lamp is ON:Three clicks (Hint: If you use 3 clicks from OFF you engage battery check)
UI: Momentary mode
5 clicks from OFF to enter Momentary mode To exit this mode, physically disconnect power (unscrew the light).This mode locks the flashlight into a single-mode interface where the LEDs are only on when the button is held down. It is intended for Morse code and other signaling tasks.Brightness is the last-ramped level, so adjust that before entering momentary mode.
UI: Muggle mode
Muggle mode is for lending the EC01 to others. It has a reduced output to make sure somebody won’t start a fire. An extremely simple interface with a limited brightness range — ~5 lm to ~240 lm, with slow smooth ramping and no blinkies. Persists after a battery change.
MUGGLE mode ON: from OFF 6 clicks to enterMUGGLE mode OFF: 6 clicks to exitOne click ON / OFF and HOLD to ramp up / down.
UI: Electronic Lockout
4 clicks form OFF to disable the EC01, same to reenable the lamp.Lockout makes the light safe to carry in a pocket or a bag or anywhere else it might be pressed by accident. Lockout doubles also as a momentary moonlight mode, so the user can do quick tasks without having to unlock the light. It uses the FLOOR of the current ramp.
Blinkies
Two groups worth of blinkies are included. To reach them, do “click click click” from OFF or a “click click hold” from OFF. To change to the next blinky use a double-click. These include:
Group 1 Blinkies / utility modes:(starts always at battcheck)from OFF: “click click click”
- BattCheck:Shows the remaining charge in volts and tenths. E.g. 4 blinks, then pause, 1 blink are 4.1 Volt. A “zero” is represented by a very quick blink.
- Sunset / Goodnight mode:Starts at a low level, then slowly dims down to moon for an hour, then shuts off. It is intended for use when going to bed.
- Beacon:Beacon mode uses the last ramped level for its brightness. You must adjust the brightness before you turn beacon on. It blinks at a slow speed: Once every N seconds at the last-ramped level.N is configurable in beacon config mode: Click 4 times to enter beacon config mode, wait for the light to stutter, then click to enter the number of seconds per blink. For example, to do a 10-second alpine beacon, click 10 times.Hint: If you want faster blinks per second use party strobe mode and set it to three blinks per second or more
- TempCheck:Blinks out the current temperature in degrees C. and optionally configure settings for thermal regulation. E.g. 3 blinks, then pause, 4 blink are 34 degrees Celsius. A “zero” is represented by a very quick blink.This number should be pretty close to what a real thermometer says. If not, it would be a good idea to click 4 times to enter thermal config mode, and calibrate the sensor.
Group 2 Strobes:(remembers the last-used mode)from OFF: “click click hold”
Click three times, but hold the third click for a moment. To change to the next blinky use a double-click. To set adjustments you can use:– Hold: Increase brightness, or strobe faster. (except lightning)Click, hold: Reduces brightness, or strobe slower. (except lightning)
- Candle mode:Simulates a flickering candle or fireplace, until youswitch it OFF.Or you add timer for 30min: Each triple click adds 30 min including a burn down simulation at the end. Candle mode timer can go for up to 4.5 hour. Adjustable brightness.
- Bike flasher:Steady output with a “stutter” once per second. Designed to be more visible than a normal ramping mode, but otherwise works mostly the same. Adjustable brightness.
- Party strobe:Motion-freezing strobe. Can be used to freeze spinning fans and falling water. Adjustable speed.
- Tactical strobe:Bright, disorienting strobe light. Can be used to irritate people. Adjustable speed, and the duty cycle is always 33%.Lightning storm mode:Flashes at random brightness and random speed to simulate lightning strikes during a busy lightning storm. Do not look directly at the flashlight when this mode is running, because it may suddenly go to full power without warning.
General configuration
Every config mode use the same interface. It has one or more options the user can set, and it will go through its configuration numbers in order. The EC01 confirms each click with a blink.
For each menu item, the light will follow the same pattern:
- Blink one or more times = configuration numberTo indicate which setting you are in. All config menus “fall through” with no changes if you don’t press the button.
- “buzz” = The lamp waits for inputBuzz is a stutter quickly between two brightness levels for a few seconds. The User can click one or more times to enter a number. It will keep buzzing until the user stops clicking, so there is no need to hurry.
- Pause, and then go to the next optionAfter the light has gone through all of the menu options, it should return to whatever mode the light was in before entering the config mode.
Ramp configuration
Both the SMOOTH RAMP and the STEPPED RAMP are configurable. The user can set the lowest level, the highest level, and (STEPPED only) the number of steps.
While the light is ON in one of the ramping modes, click 4 times to enter RAMP CONFIGURATION for the current ramp.
For SMOOTH RAMPING, there are 2 menu options:
- Floor (default level = 1/150)
- Ceiling (default = 120/150)
For the STEPPED RAMPING, there are 3 menu options:
- Floor (default level = 20/150)
- Ceiling (default = 120/150)
- Number of steps (default = 7)
To configure the floor level, click the button equal to the number of ramp levels (out of 150) at which the floor should be. To set the lowest possible level, click once. (MOON)To configure the ceiling level, each click goes one level lower. So 1 click sets the highest possible level, 2 clicks is the 2nd-highest, 3 clicks is the 3rd-highest level, etc. Ceiling clicks: 151 – ( level you want ) = Clicks To set the default of 120/150, click 31 times.
When configuring the number of steps, the value can be anything from 2 to 150.If you want to change the floor and ceiling to the lowest and highest values, you click once for each.
Thermal configuration
Look at a thermometer to check the current room temperature. Let us assume it says 21 Celsius.Turn the light off and wait for its temperature to settle to room temperature.Go to TempCheck (from OFF: “Click Click Click”. Ascend with double-clicks three times)
When you are in TempCheck, then click 4 times to enter thermal config mode, and calibrate the sensor.
Thermal config mode has two settings:
- Current temperature Calibration. Click once per degree C to calibrate the sensor. For our example, the ambient temperature is 21 C = click 21 times.
- Temperature limit. This sets the maximum temperature the light can reach before it will start doing thermal regulation to keep itself from overheating. Click once per degree C above 30. For example, to set the limit to50 C, click 20 times. The default is 45 C (15 clicks)
| °C | °F | |
| 100 | 212 | Boiling Water |
| 60 | 140 | |
| 55 | 131 | |
| 50 | 122 | Touch limit |
| 45 | 111 | [Default] |
| 40 | 104 | |
| 37,4 | 99 | Body temp. |
| 25 | 77 | |
| 20 | 68 | |
| 0 | 32 | Frozen Water |
| MaxTemp. – 30°C = Clicks |
Hint: If you don’t click, the lamp will leave the value unchanged. The lowest value the user can set is 31 C, by clicking once.
Switch Back Light
The switch LED can be configured to do different things while the main emitters are off. There is one mode for the regular OFF mode, and another mode for LOCKOUT mode. This allows the user to see at a glance whether the light is locked.
Switch LED modes typically include:– Off – Low – High – BlinkingTo configure the LEDs, go to the mode you want toconfigure and then click the button a few times:– OFF mode: 7 clicks.– LOCKOUT mode: 3 clicks.This change the LEDs to the next mode on this light.
The switch LED stays on while the main emitters are on. Its brightness level is set in a way which mirrors the main LED — off, low, or high.
Usage of the flashlight
|
Control of Switch LEDs – Defaults EC01 |
||
|
Setting |
Regular OFF |
In LOCKOUT |
|
Change setting via |
7 clicks |
3 clicks |
| Off-Low-High-Beacon |
Low |
Beacon |
Protection Features
Some features which aren’t visible on the diagram: Andúril includes low voltage protection (LVP) and thermal regulation.
LVP makes the light step down to a lower level when the battery is low, and if the light is already at the lowest level, it shuts itself off.
This activates at 2.8V. LVP adjustments happen suddenly, in large steps.
Thermal regulation attempts to keeps the light from overheating and otherwise adjusts output to stay as close as possible to the user-configured temperature limit. Thermal adjustments happen gradually, in steps so small they are difficult for humans to perceive. It ramps smoothly across 512 internal steps (from 1×7135 to full power) to adjust output while it searches for the highest level it can maintain without overheating.
Usage of the flashlight
You can do a little bit more with your new light …
Because the EC01 is a high powered light, it is recommended to use lockout. It can burn things! Backside is, a normal lockout is awkward if you need quick little illumination for the keyhole or in your bag.
EC01 LOCKOUT mode doubles as a momentary moon mode. That way, after locking it and tossing it in a bag, it can still be used to look around inside the bag without unlocking it.
Lockout uses as moonlight the floor of the current ramp. If you have two different settings for this, you can have different illumination also.
Or you can use Muggle Mode if you want a safer way to carry your lamp with a reduced output and don’t want lock out.
While on, a double click toggles between turbo and the memorized level. So, if you hear a noise and want full power for a moment, double click. When you’re done, double click again to return to the original brightness. This is handy for walking the dog: With low you can stroll, and when your dog runs away: TURBO, when he comes back, low again.
Now you can play with FLOOR, CEILING and two rampse.g.: Let’s say your favorite is smooth ramping and you don’t like the quick step down from a ceiling at level 130. You can choose level 101 (50 clicks) for the smooth ramp ceiling. This keeps the ceiling at a reasonable cooler level. Smooth floor on level 1 for a really dim moonlight. You can set 20 clicks for stepped floor for a usable low outdoors. And 130 for stepped ceiling if you also like to have a powerful ceil.
An option against too much heat can be different ceilings for SMOOTH RAMP and STEPPED RAMP. Lower for your preferred ramp the ceiling and with 3 clicks
you can switch to the other ramp, where you can have full power if you need it.
If you click zero times, the floor or ceiling value doesn’t change. This is great because you can change just the floor or just the ceiling without reprogramming the other.
The EC01 has a nice candlelight mode, the effect is bigger if you use a diffuser.Lightning storm is also more fun with a diffuser.
Searching things:If you drop a little piece, lay your light flat on the ground and rotate it like a lighthouse. The small piece should cast a long shadow and it is easier to find.
In case you lose your light, you can store a piece of paper in the tube with: “This Lamp belongs to NAME. If found please call: 1234 or
General voltage level of a Lion battery
| Voltage | Note for a 21700 |
| 4.2 V | fully charged |
| 3.7 V | half full * |
| 3.1 V | below 10% capacity, time to charge * |
| 2.8 V | low voltage protection from a lamp should start |
| 2.5 V | begin of deep discharge |
Pay attention that the voltage level under load is lower than without load.*on these two entries, please note smaller battery sizes (e.g. 16350, 18350) have a bit higher voltages.
There are also some other interfaces available for this hardware, but it requires the user to flash different firmware. You can make it work like other brands. However, these are not tested and not officially supported.
Links
Changes in Andúril: Commit log (instead a change log):https://bazaar.launchpad.net/~toykeeper/flashlightfirmware/fsm/changes
UI Diagram from ToyKeeper:http://toykeeper.net/torches/fsm/anduril-ui.png
Stable firmware from:Bazaar Launchpad resp. http://tiny.cc/TKAndurilNewest HEX from: http://toykeeper.net/torches/fsm/
FSM Thread:Andúril is part of a bigger framework called FSM. You can choose from different user interfaces.http://budgetlightforum.com/node/56105
A YouTube Video with a Andúril walk through: How to use and set up ToyKeeper’s Andúril flashlight firmware from Tech-testhttps://youtu.be/h_mZ35IPLMA
Hoops Flashing Firmware thread:http://budgetlightforum.com/node/36216
FAQ EC01
- You tried to configure your lamp and now it is only working if you press the button. When you press 4x from OFF you lock out the lamp. Press four times again to unlock. When you want to config the lamp must be ON, and then click four times.
- If I turn on using moon shortcut, it won’t memorize moon.In short: the EC01 has only memory if you ramp to a value.It doesn’t memorize the floor, ceiling, or turbo levels when they’re reached by a shortcut. This is on purpose, because people didn’t like losing their memorized level after using moon or turbo. To make it remember moon, the user must ramp to it… typically, by ramping up a little then back down. Basically, it behaves that way because that’s what people asked for.
Troubleshooting and Maintenance:
- Disassembling the sealed head can cause damage to the light and void the warranty.
- Astrolux recommends using high-quality batteries. Damage by battery leakage voids warranty.
- If the flashlight will not be used for an extended period, please remove the battery.
- Please unscrew the head one-half turn or take out the battery to prevent accidental activation during storage or transportation.
- Please use cleaning cloth to clean the thread every 6 months, and it will be better. Do use silicone grease to oil thread.
- Long-term usage can result in O-ring wear. To maintain a proper water seal, replace the ring with an approved spare.
- Periodic cleaning of the battery contacts improves the flashlight’s performance as dirty contacts may cause the flashlight to flicker, shine intermittently or even fail to illuminate for the following reasons:
Reason A: The battery needs replacement.Solution: please replace battery. Please confirm the correct installation
Reason B: The threads, PCB board contact or other contacts are dirty.Solutions: please clean the contact points with a cotton swab soaked in rubbing alcohol.
If the above methods do not work, please refer to the warranty policy before contacting your authorized distributor.
Made in China
ASTROLUX EC01 User Manual – ASTROLUX EC01 User Manual –
[xyz-ips snippet=”download-snippet”]