Instruction Manual
![]()
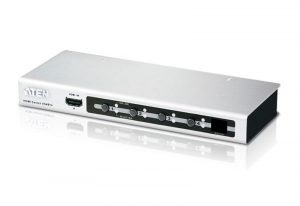
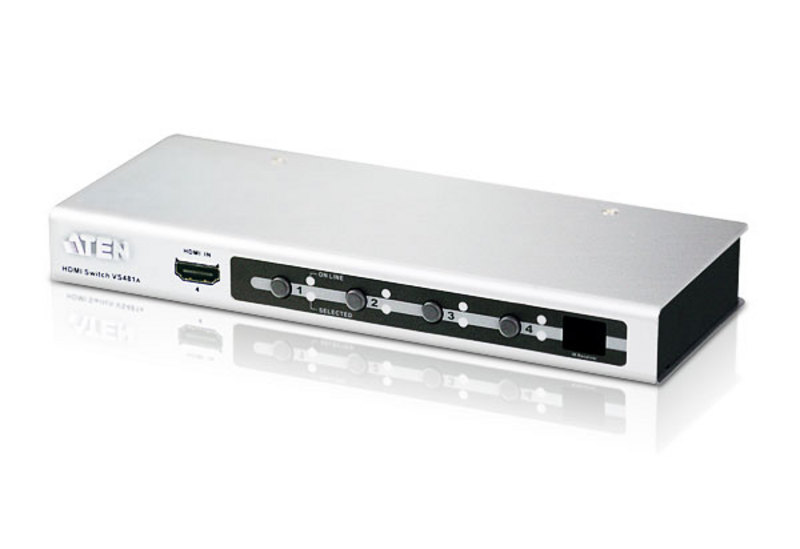
ATEN 4-Port HDMI Switch
© Copyright 2020 ATEN® International Co., Ltd.ATEN and the ATEN logo are trademarks of ATEN International Co., Ltd. All rights reserved. All other trademarks are the property of their respective owners.

Hardware Review
Front View
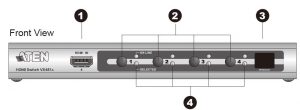
- HDMI In
- Port Selection Pushbuttons
- IR Receiver
- Port LEDs
Rear View
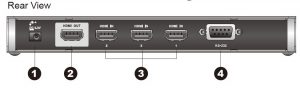
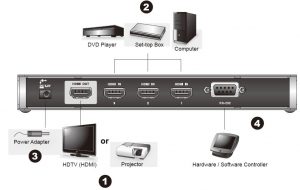
1. Power Jack2. HDMI Out3. HDMI In4. RS-232 Serial Port
IR Remote Control
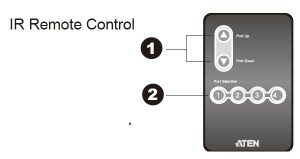
- Port Up / Port Down Buttons
- Port Selection Buttons
Package Contents
- 1 VS481A HDMI Switch
- 1 Standard HDMI Cable
- 1 Remote Control Unit
- 1 Power Adapter
- 1 User Instructions
Installation Diagram
Support and Documentation Notice
All information, documentation, fi rmware, software utilities, and specifi cations contained in this package are subject to change without prior notifi cation by the manufacturer. To reduce the environmental impact of our products, ATEN documentation and software can be found online at http://www.aten.com/download/
Technical Supportwww.aten.com/support
Scan for more information

EMC InformationFEDERAL COMMUNICATIONS COMMISSION INTERFERENCE STATEMENT:
This equipment has been tested and found to comply with the limits for a Class A digital device, pursuant to Part 15 of the FCC Rules. These limits are designed to provide reasonable protection against harmful interference when the equipment is operated in a commercial environment. This equipment generates, uses, and can radiate radio frequency energy and, if not installed and used in accordance with the instruction manual, may cause harmful interference to radio communications. Operation of this equipment in a residential area is likely to cause harmful interference in which case the user will be required to correct the interference at his own expense.
FCC Caution: Any changes or modifi cations not expressly approved by the party responsible for compliance could void the user’s authority to operate this equipment.
Warning: Operation of this equipment in a residential environment could cause radio interference.
This device complies with Part 15 of the FCC Rules. Operation is subject to the following two conditions:(1) this device mat not cause harmful interference, and(2) this device must accept any interference received, including interference that may cause undesired operation.
Important. Before proceeding, download the Installation and Operation Manual by visiting the website, www.aten.com and navigating to the product page. The manual includes important warnings, loading specifi cations and grounding instructions.
Requirements
Source Device(s)
- HDMI Type A output connector(s)
Display Device
- A display device or receiver with an HDMI Type A input connector
Cables
- 4 HDMI cables
Note: Not all cables are included in this package.
Hardware Installation
- Ensure that all equipment to be connected is powered off.
- Make sure that all devices you will be connecting up are properly grounded.
- Use an HDMI cable to connect the HDMI input port on the video display device to the HDMI output port on the rear of the VS481A.
- Use HDMI cables to connect the HDMI output ports on the source device(s) to the HDMI input ports on the VS481A. Three HDMI input ports are located on the rear of the switch; the fourth HDMI port is located on the front of the switch.
- Plug the provided power adapter into an appropriate AC power source; plug the power adapter cable into the Power Jack on the VS481A.
This completes the basic installation of the VS481A HDMI Switch. You may now power on the display and source devices.
Installing the RS-232 ControllerIn order to use the RS-232 serial interface to attach a high-end controller (such as a PC) to theVS481A, use a serial cable such as a modem cable. The end connecting to the VS481A should have a 9-pin male connector. Connect this to the serial interface on the rear of the VS481A.
Source Device Selection
The VS481A HDMI Switch offers easy and fl exible source device selection with either the front panel pushbuttons, with the remote control, or through the RS-232 serial interface.
- Manual SelectionTo select a source device, press the Port Selection button that corresponds to the port it isconnected to.
- Remote Control SelectionTo select a source device with a remote control, press the number button that correspondsto the port it is connected to.
Alternatively, you may also cycle through the available source devices by pushing the Port Up and Port Down buttons on the remote control unit.
- Use the Port Up button to select the next available port in ascending order (from left to right on the front view panel).
- Use the Port Down button to select the next available port in descending order (from right to left on the front view panel).
Powering Off and Restarting
If you power off the VS481A, follows these steps before powering it on again:
- Power off the attached devices.
- Unplug the power adapter cable from the VS481A.
- Wait 10 seconds, and then plug the power adapter cable back in.
- After the VS481A is powered on, power on the attached devices.
Note: Whenever the VS481A is powered on, it automatically selects Port 1.
References
[xyz-ips snippet=”download-snippet”]