
Atlantic Stainless Steel Copper Finish Spillways

1.330.274.8317www.ATLANTICWATERGARDENS.com
Introduction
Thank you for choosing Atlantic’s Stainless Steel and/or Copper Finish Spillways. Constructed of stainless steel, Copper Finish Spillways have an additional antique copper plating over the stainless steel for a warm traditional look.Atlantic 304 Spillways are constructed of 304 stainless steel and are intended for fresh water use only.Atlantic’s 316 Stainless Steel Spillways are designed specifically to be corrosion resistant in chlorinated pool water, salt water and acidic environments. All 316 Stainless Steel Spillways include a 1/4″ bonding lug for grounded pool applications.
ATTENTIONStainless steel can corrode if not maintained properly.
316 stainless steel withstands corrosion when immersed in swimming pool water because the chlorine concentration is typically mild (1 – 5 ppm). However, the areas above the waterline that get splashed frequently are extremely susceptible to corrosion. As the water that splashes on the stainless steel evaporates, the chlorine left behind becomes highly concentrated. These deposits are very corrosive and will discolor, rust, pit, and corrode stainless steel regardless of grade if not maintained properly. 316 Spillways used in swimming pool installations should be rinsed regularly with fresh water to remove accumulated chlorine deposits.
Installation
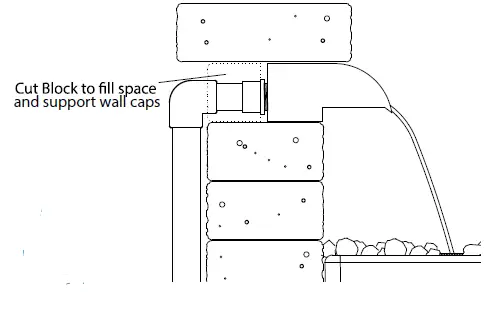
The opening in the wall where the Spillway will be placed is important to the function of the Spillway. The bottom of the Spillway must sit on a flat surface and be fully supported for its entire length. The Spillway must be level side to side and front to back to for proper water flow.Installation in a garden wall using 4”H x 8”W x 12”L garden stones is easy because the Spillway is also 4” tall. Simply remove the necessary number of wall stones (one, two or three) from the top course of the garden wall and replace them with the Spillway. The Spillway should be positioned so that the front of the body is even with the front of the wall, leaving lip projecting 41/2″. Cut 4” x 4” x 12” filler blocks to complete the wall course if needed to fill the area behind the Spillway, leaving a 21/2” wide opening in the center to connect the supply line. The Spillway is load bearing (80 lbs. per linear foot max) so caps can be placed on top of the Spillway to complete the installation.
Caution: Be sure to leave access to the Spillway in case future maintenance is required. Do not glue or permanently mortar the cap stones that are placed directly over the Spillway.
Installation Requirements
- 304 Spillways are designed for use in fresh water Pond-free and Formal Spillway applications. 316 Spillways are specifically designed for use in chlorinated and salt water pool and spa environments. Spillways are not intended for use in water gardens, ponds or any other installation with plant or aquatic life.
- Atlantic Spillways can support 80lbs. per linear foot of evenly distributed weight over the top of the Spillway. (Ex. A 24” Spillway can support 160 lbs.) If the weight of the wall stone and caps above the Spillway exceeds the recommended weight limits a lintel must be installed above the Spillway to carry the excess load.
- Atlantic Spillway are designed to easily install in dry stack garden walls utilizing a standard 4”H x 8”W x 12”L wall block. Although any size wall block can be used, a 4 x 8 x 12 is ideal as it requires very little alteration when installing the Spillway.
| Spillway | Maximum Falls Height Above Basin | Flow Rate |
| SS12 / CS12 / SS12-316 | 24” | 1200 GPH |
| SS24 / CS24 / SS24-316 | 30” | 2400 GPH |
| SS36 / CS36 / SS36-316 | 36” | 3600 GPH |
Plumbing the Spillway
Spillways have a 1½” female threaded inlet located at the center-back of the unit.Connect the plumbing using a 1½” male threaded fitting (not included) of your choice.Apply thread sealant or silicone to the threads of the male fitting. Thread the fitting into the inlet by hand until tight and finish off with a half turn from a wrench. Connect the plumbing line from the pump to the Spillway. Minimum 1½” I.D tubing is required for optimum water flow. When plumbing multiple Spillways off of one pump, run a main feed line along the back of the wall, teeing up to the individual Spillway. If installing multiple units, it is best to install a ball valve in each line feeding the Spillway to provide more control over the flow. When running more than one Spillway, the main feed line should be increased to at least 2”.If you are installing the Spillway in conjunction with an Atlantic CFBASINKIT, please refer to the installation/ plumbing instructions included with the Basin Kit for additional information.

Maintenance
Atlantic Spillways are one piece, closed units with internal baffling to diffuse the water flow. If large debris entering the Spillway becomes lodged, it will be difficult to remove. For this reason, take great care to ensure that large debris in the water is filtered out before reaching the Spillway. Atlantic Spillways will not corrode when used in fresh water, however periodic cleaning may be required depending on water conditions. Brushed stainless steel finishes can be cleaned using 3M stainless steel cleaner (available at any home center) and a soft cloth. Copper Finished Spillways can be cleaned with any non-abrasive cleaner and a soft cloth. 316 Spillways used in swimming pool installations should be rinsed regularly with fresh water to remove accumulated chlorine deposits. See Introduction for more details.
WinterizationAtlantic Spillways are self-draining for easy winterization. When the pump is turned off the water inside the Spillway will drain back through the supply line. Ensure that the supply line is fully drained. Remove the pump and store it indoors for the winter. If the Spillway is installed with an Atlantic CFBASINKIT, please refer to the Basin Kit instructions for proper basin winterization.
Warranty
Spillways carry a three-year warranty. This warranty is extended solely to the original purchaser commencing from the date of the original purchase receipt. The warranty is void if this product is used under any condition other than those for which it is specified. This warranty excludes labor / costs of labor for removal or installation of any product.
 report this ad
![]()
References
[xyz-ips snippet=”download-snippet”]