
Atlantic TT1500 – 73924 TT2000 – 73925 TT3000 – 73926 TT4000 – 73927 TT5000 – 73928 TT6000 – 73929 TT7500 – 73930 TT9000 – 73931 Water Gardens User Manual![]()
Introduction
Thank you for selecting Atlantic TidalWave TT-Series pumps. Before using this pump please take a moment to review this manual. To avoid an accident do not use the pump in any way other than as described in this manual. Please note the manufacturer cannot be responsible for accidents arising because the product was not used as prescribed. After reading this manual keep it as a reference in case questions arise during use.
Flow Chart: (GPH)
- Check the model number to make sure it is the product that was ordered and verify the voltage and frequency are connect.
Caution
- DO NOT operate this product under any conditions other than those for which it is Failure to observe this precaution can lead to electrical shock, electrical leakage, fire, water leakage or other problems.
- The pump is a 110/120 volt 60 Hz pump, please only use with a power supply voltage within 110-120 volt 60
- Never place your hand or any object in or near the inlet opening while this equipment is If pump inlet is clogged, always turn off the power supply and wait until the motor is completely stopped before attempting to remove any clogged material.
- Please make sure that the power plug and the AC outlet receptacle are protected and away from water or pump discharge hose to prevent accidental electric shock or short
- Always operate the pump completely submerged in
- Avoid dry operation, which will not only lower performance but can cause the pump to overheat/malfunction, leading to electrical leakage, shock or premature
- Always turn off power or unplug the pump prior to performing any maintenance or placing your hands into the water.
- CAUTION:THIS PUMP IS TO BE USED IN A CIRCUIT PROTECTED BY A GROUND CIRCUIT INTERRUPTER.
- CAUTION:THIS PUMP HAS BEEN EVALUATED FOR USE IN WATER ONLY.
- WARNING:RISK OF ELECTRIC SHOCK – THIS PUMP IS SUPPLIED WITH A GROUNDING CONDUCTOR AND GROUNDING-TYPE ATTACHMENT PLUG. TO REDUCE THE RISK OF ELECTRIC SHOCK, BE CERTAIN THAT IT IS CONNECTED ONLY TO A PROPERLY GROUNDED, GROUNDING TYPE RECEPTACLE.Electrical Safety
- Electrical wiring should be installed by a qualified electrician in accordance with all applicable safety Incorrect wiring can lead to a pump malfunction, electrical shock or fire.
- Pumps should operate on a designated, 110/120 volt
- Pump must be protected by a ground fault circuit interrupter (GFCI).
- Pump must be plugged into a standard, properly grounded, three pronged outlet.
Safety Instructions
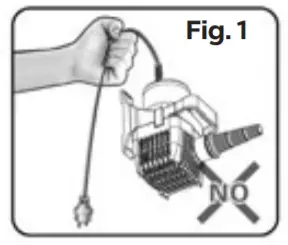
- Do not lift, lower or handle the pump by pulling on the electrical cord. Make sure the electrical cable does not become excessively bent or twisted and does not rub against a structure in a way that might damage(Fig. 1)

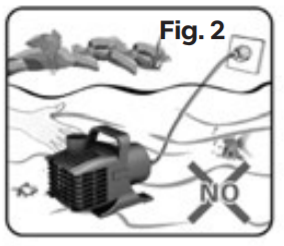
- Always disconnect the power supply before doing any maintenance or placing your hands into the water to which this pump is (Fig. 2)
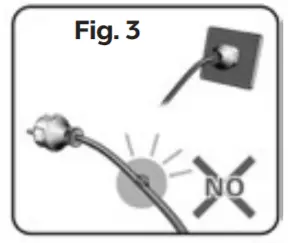
- The submersible pump should not be used if the electrical supply cable is damaged in any way. If a cable with damaged insulation is submerged in water, there is danger of water seeping into the pump motor and causing a short. The electrical cable cannot be replaced. If the cord is damaged, the pump should be discarded. Altering the electrical cable in any way will void the warranty. (Fig. 3)
 ATTENTIONMake sure the pump works at a proper water level. Do not operate the pump without water. If this occurs, immediately turn off the pump and check.
Operation
- TT-Series pumps are for use in water Water temperature should never exceed 95˚F (35˚C).
- TT-Series pumps must not be used to pump salt water, chlorine, sewage, flammable or corrosive liquids, greases, oils or food
- Pay careful attention to the water level while the pump is The pump must be fully submersed at all times of operation.
- Repeating cycles of stopping and restarting will damage the water pump. Do not continue operation at low water level or while the inlet is clogged with Not only will performance suffer, but also such conditions may cause noise, heavy vibration, and pump failure.
- In case of excessive vibration, unusual noise or odor, turn off the power immediately and consult your nearest dealer.
Maintenance and Inspection
- Regular maintenance and inspections are a necessity for continued efficient functioning of the If any abnormal conditions are noticed, refer to the section on Troubleshooting and take corrective measures immediately.
Monthly Inspection / Cleaning
- Check for any drop in Reduced performance is usually caused by debris blocking the pump intake.
- Detach the power cable from the receptacle or turn off the power supply (circuit breaker).
- Disconnect the pump discharge and remove the pump from the
- Remove any accumulated debris from the surface of the pump and pre-filter.
- Unlock the latches on either side of the pre-filter by pulling outward from the pump Slide the pre-filter off to expose the volute. Inspect the threaded inlet on the volute and remove any accumulated debris.
- Remove volute by rotating counterclockwise one quarter turn while pulling lightly outward from the pump
- Inspect the intake O-ring for nicks or
- Inspect the impeller and remove any debris that may be
- A stainless steel screen located behind the impeller draws water in to cool the If the screen becomes blocked the pump may overheat. Inspect the screen and remove any accumulated debris.
- Spin the If the impeller is difficult to turn, feels “gritty”, or a grinding noise is evident in the rotor chamber, remove the rotor as per the instructions below.
Removing the rotor
The rotor must be unlocked using the built-in wrench located on the bottom of the pre-filter before it can be removed from the rotor chamber. Slide the impeller wrench behind the impeller and engage two of the locking posts located on the face of the rotor. Push the wrench tightly against the rotor face and rotate counterclockwise one quarter turn. Once unlocked, remove the rotor by pulling the impeller outward from the pump body.
- Inspect the stainless steel rotor and the rotor chamber for built up Loose debris can be flushed out with clean water. Often in hard water, well water or pond-free applications, debris may appear as a crusty film around the rotor and in the rotor chamber. Remove this film using a scrub brush and white vinegar.
- Slide the rotor into the rotor chamber and lock it in place by rotating clockwise one quarter
- Attach the volute by applying pressure and rotating clockwise one quarter
- Replace the pre-filter and lock the latches.
Winterizing
- Under no circumstances should the pump be left in frozen
- When the pump is out of use for an extended period, wash it and dry it thoroughly, then store it Refer to cleaning instructions on page 4.
Note: When the pump is left installed in water it should be run at regular intervals (about once per week).
Warranty
All Tidal Wave TT-Series Pumps carry a three-year limited warranty. This limited warranty is extended solely to the original purchaser commencing from the date of original purchase receipt and is void if any of the following apply:
- The pump has been run while not fully
- The pump was not run on a dedicated
- The cord has been cut or
- The pump has been misused or
- The pump has been disassembled other than as described in this
- Serial number tag has been
Warranty Claims
In case of warranty claims, return the pump to the place of purchase, accompanied by the original receipt.
Troubleshooting Guide
Always turn off power before inspecting the pump. Failure to observe this precaution can result in a serious accident. Before ordering repairs, carefully read through this instruction booklet. If the problem persists, contact your dealer.
| Problem | Possible Cause | Possible Solution |
|
Pump does not run |
Power is off | Turn power on |
|
Power failure |
Check power supply or contact local power company | |
| Power cord is not connected |
Connect power cord |
|
| Impeller is stuck | Remove debris/clean impeller | |
|
Pump stops after starting |
Pump is overheating | Submerge pump/Raise water level/ Allow pump to cool/Clean impeller |
| Power/Current overload | Check length/size of power cable. Check or replace GFI | |
|
Intake is blocked/ Impeller needs cleaned |
Remove debris from the pump intake. Refer to page 4 for cleaning instructions. | |
|
Diminished flow rate or no water flow |
Impeller needs cleaned | Refer to page 4 for cleaning instructions |
| Obstruction in pump or piping |
Clear obstruction |
|
| Low water level | Stop operation/Raise water level | |
| Air-lock in the impeller chamber | Place pump in water. Turn the pump ON/ OFF intermittently 2 or 3 times. |
Read More About This Manual & Download PDF:
References
[xyz-ips snippet=”download-snippet”]