ATLI EON Time-Lapse Camera
| Searching for KeywordsSearch for keywords such as “battery” and “install” to find a topic. If you are using Adobe Acrobat Reader to read this document, press Ctrl+F on Windows or Command+F on Mac to begin a search. | |
 |
Navigating to a TopicView a complete list of topics in the table of contents. Click on a topic to navigate to that section. |
 |
Printing this DocumentThis document supports high resolution printing. |
Using this Manual
Legends
![]() Important
Important
![]() Hints and Tips
Hints and Tips
Recommendation for Use
Download “ATLI EON Quick User Guide” at www.atliview.com to learn more about ATLI EON.
Downloading the ATLI Cam App
 |
Please download and install ATLI Cam App before using the camera. Scan the QR code or search for ”ATLI Cam” on the App Store or Google Play |
|
The Android version of ATLI Cam is compatible with Android v5.0 and later. The IOS version of ATLI Cam is compatible with iOS v11.0 and latest. |
Product Introduction
Overview
ATLI EON is a multifunctional smart camera that specializes in time-lapse photography. Operated via its dedicated ATLI Cam App, ATLI EON records time-lapse and regular video in 1080p and captures high-resolution photo. With ATLI EON, you can create unique time slice photos without complicated post-editing, shoot in macro mode with a minimum focus distance of 7cm, set flexible schedules to automate the shoot, and utilize infrared imaging in low light environment. The camera is also pack with comprehensive accessories to make it weatherproof and offers a degree of protection from impact.
ATLI EON Part Names
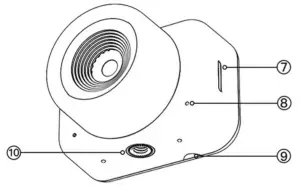
① Power Button② External Flash Interface③ USB Type C (For Power Only)④ Status LED⑤ Focus Ring⑥ Focus Mark⑦ Micro SD Card Slot⑧ Built-in microphone⑨ Battery Cover Opening Slot⑩ Tripod Mount (Size: 1/4” – 20)
Attaching the Battery
Please Install the battery before using this product.
a. Locate the battery compartment cover opening slot, and open the cover by pulling from it.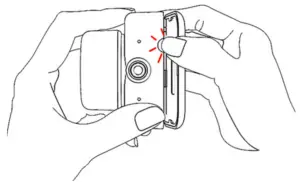 b. Insert the battery as shown below.
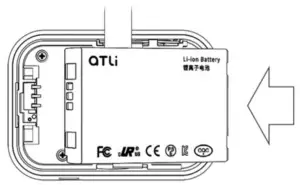 c. Close the battery compartment cover.
Connecting ATLI EON
a. Press and hold the power button for 4-5 seconds to boost the camera. Wait approximately 30 seconds till the status LED changes from orange to green.b. Open ATLI Cam App, and click on “Add Camera” to scan the camera QR code.
![]() Each ATLI EON camera has its own QR code, you can find it in either the “Quick User Guide” attached in the box or inside the camera battery compartment
Each ATLI EON camera has its own QR code, you can find it in either the “Quick User Guide” attached in the box or inside the camera battery compartment
Charging ATLI EON
To charge ATLI EON, connect a USB adapter (not included) to the USB-C port using the power cable (included). Status LED will stay in red while charging and change to green once charging is completed.
Charging time: approx.5 to 6 hours.*Charging time is for reference only
Operation
Camera Body Features
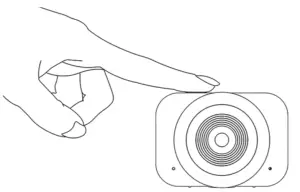
Power Button: Press and hold the power button for 4-5 seconds to turn on the camera when it’s off.Press the power button lightly to awake the camera when it’s in power saving state.Manual Focus: Rotate the focus ring to set the camera focus.Focus Mark: The green arrow mark(![]() ) on the focus ring is to be called the focus mark.
) on the focus ring is to be called the focus mark.
The camera is set to focus on objects beyond 80cm away when the focus ring is in the preset position(green focus mark aligning with the status LED).Rotate the focus ring counter-clockwise steadily to set focus on objects ranging in between 7 to 80 cm away until the image is sharp.
Focus Assist : Trigger focus assist by pressing on the screen to partially magnify 2.5 times on the image.
This feature is applicable to all shooting modes.
![]() You can adjust the focus manually with focus assist turned on.Cancel focus assist by tapping on the screen outside of the magnifier ring.
You can adjust the focus manually with focus assist turned on.Cancel focus assist by tapping on the screen outside of the magnifier ring.
Storing Photos and Videos
Footage shot by ATLI EON can be stored in the microSD card(included). You can download the footage to your smart device via ATLI Cam App, or access and save the footage on PC via a microSD card reader.
![]() USB cable can only be used for charging, not for data transmission.
USB cable can only be used for charging, not for data transmission.
LED Status Light
The LED status light indicates camera’s current status.

![]() Off: Power Off
Off: Power Off![]() Orange: Not Ready
Orange: Not Ready![]() Red: Charging
Red: Charging![]() Flashing Orange: Sleep
Flashing Orange: Sleep![]() Flashing Red: Ready(Power Low)
Flashing Red: Ready(Power Low)![]() Green: Ready/Fully Charged
Green: Ready/Fully Charged
![]() When the camera is in power saving state but there is no ongoing shoot, the LED status light will shut off. It will flash in orange when it enters power saving state during shooting.
When the camera is in power saving state but there is no ongoing shoot, the LED status light will shut off. It will flash in orange when it enters power saving state during shooting.
ATLI Cam App
Home Page![]() Refresh:Refresh page.
Refresh:Refresh page.![]() Camera List:Click to check out all connected cameras.
Camera List:Click to check out all connected cameras.![]() Camera Operation Page:Click to enter individual camera operation page.
Camera Operation Page:Click to enter individual camera operation page.![]() Album:Click to check out local album and camera album.
Album:Click to check out local album and camera album.![]() Tutorial:Click to check out camera operating tutorials and shooting tips.
Tutorial:Click to check out camera operating tutorials and shooting tips.
Camera Operation Page![]() Back:Click to go back to home page.
Back:Click to go back to home page.![]() Battery Life:Display battery life.
Battery Life:Display battery life.![]() Time-Lapse Mode:Shoot in time-lapse mode.
Time-Lapse Mode:Shoot in time-lapse mode.![]() Photo Mode:Shoot in photo mode.
Photo Mode:Shoot in photo mode.![]() Video Mode:Shoot in video mode.
Video Mode:Shoot in video mode.![]() New Updates Notification:New firmware updates notification.
New Updates Notification:New firmware updates notification.![]() Orientation:Set frame orientation.
Orientation:Set frame orientation.![]() Shooting Setting:Select auto, manual or pre-set mode.
Shooting Setting:Select auto, manual or pre-set mode.
Shooting Setting Menu![]() Auto:Auto adjustment on exposure and shutter speed.
Auto:Auto adjustment on exposure and shutter speed.![]() Cloud:Pre-set mode for shooting cloud movement.Recommended shooting interval: 3 seconds.
Cloud:Pre-set mode for shooting cloud movement.Recommended shooting interval: 3 seconds.![]() Cityscape:Pre-set mode for shooting cityscape at night.Exposure compensation: -2.0.Recommended shooting interval: 3 seconds.
Cityscape:Pre-set mode for shooting cityscape at night.Exposure compensation: -2.0.Recommended shooting interval: 3 seconds.![]() Flower:Pre-set mode for shooting flowers and other plants’ growth process.Recommended shooting interval: 600 seconds.
Flower:Pre-set mode for shooting flowers and other plants’ growth process.Recommended shooting interval: 600 seconds.![]() Star:Pre-set mode for shooting starry night.Recommended shooting interval: 600 seconds.
Star:Pre-set mode for shooting starry night.Recommended shooting interval: 600 seconds.![]() Sunrise/Sunset:Pre-set mode for shooting sunrise/sunset.Saturation: +5.Exposure Compensation: -2.0.Recommended shooting interval: 2 seconds.
Sunrise/Sunset:Pre-set mode for shooting sunrise/sunset.Saturation: +5.Exposure Compensation: -2.0.Recommended shooting interval: 2 seconds.![]() Manual:Use manual mode to adjust shutter speed, ISO, white balance, image and infrared image(advanced).
Manual:Use manual mode to adjust shutter speed, ISO, white balance, image and infrared image(advanced).![]() Setting:Setting Menu.
Setting:Setting Menu.
General![]() WLAN:Connect the camera to local Wi-Fi using WLAN.
WLAN:Connect the camera to local Wi-Fi using WLAN.![]() Grid:Use grid lines for alignment in frame composition.
Grid:Use grid lines for alignment in frame composition.
![]() Power Saving:Activate power saving can significantly improve camera’s battery life for long shooting task.Common: Power saving is activated on battery power.Mandatory: Power saving is always activated.Off: Power saving is deactivated.
Power Saving:Activate power saving can significantly improve camera’s battery life for long shooting task.Common: Power saving is activated on battery power.Mandatory: Power saving is always activated.Off: Power saving is deactivated.![]() Memory Card:View the memory card status and format the memory card.
Memory Card:View the memory card status and format the memory card.![]() About:Check out firmware information, serial number, MAC, up time and reset to factory settings.File Logging: Save log files to the memory card to help us improve user experience.
About:Check out firmware information, serial number, MAC, up time and reset to factory settings.File Logging: Save log files to the memory card to help us improve user experience.![]() Restoring the camera to factory setting will not erase image files stored in the memory card.
Restoring the camera to factory setting will not erase image files stored in the memory card.
Time-Lapse![]() Output:Video output in MP4 format only.Video output in MP4 format plus photo sequence output in JPEG format.
Output:Video output in MP4 format only.Video output in MP4 format plus photo sequence output in JPEG format.![]() Timestamp:Enable timestamp to display shooting date and time at the lower left corner of the video.
Timestamp:Enable timestamp to display shooting date and time at the lower left corner of the video.![]() Watermark:Enable watermark to display ATLI EON watermark at the lower right corner of the video.
Watermark:Enable watermark to display ATLI EON watermark at the lower right corner of the video.![]() Schedule:Customize shooting days, shooting periods and shooting intervals with our flexible schedule feature for continuously or intermittently long shooting tasks.Repetition – Once: Set schedule once for shooting continuous task.Repetition – Daily: Repeat schedule on a daily basis for shooting intermittent task.
Schedule:Customize shooting days, shooting periods and shooting intervals with our flexible schedule feature for continuously or intermittently long shooting tasks.Repetition – Once: Set schedule once for shooting continuous task.Repetition – Daily: Repeat schedule on a daily basis for shooting intermittent task.
Video![]() Split:5 minutes: Generate a video output every 5 minutes.10 minutes: Generate a video output every 10 minutes.
Split:5 minutes: Generate a video output every 5 minutes.10 minutes: Generate a video output every 10 minutes.![]() Mute:Enable “Mute” to record video without sound.
Mute:Enable “Mute” to record video without sound.![]() Start Recording/Take Photo:Click to start recording videos or take photos.
Start Recording/Take Photo:Click to start recording videos or take photos.![]() Camera Album:Click to check out camera album.
Camera Album:Click to check out camera album.
AlbumLocal:Check out image files downloaded to the local album.
Time Slice:Compose photo sequence into time slice photo.
 Camera album→ Photo Sequence folder → TimeSlice。
- Select Time Range, Number of Slices, Direction and Style, then click start.
![]()
- Photo sequence output is required for time slice.
- At least 8 photo sequences are required for composing a time slice.
![]() Display:Select a sampling display for better viewing experience due to the large number of sequences that may potentially exist.
Display:Select a sampling display for better viewing experience due to the large number of sequences that may potentially exist.![]() TimeSlice:Compose your unique time slice photo by selecting its Time Range, Number ofSlices, Direction and Style.Time Range:Choose its exact time range to be used for composing the time slice, down to the second.Number of Slices:Choose the number of slices for composing the time slice.View thumbnails of selected photo sequences. View thumbnails of selected photo sequences. Swipe left or right to view all photos. Swipe up to remove photos, swipe down to replace photos.
TimeSlice:Compose your unique time slice photo by selecting its Time Range, Number ofSlices, Direction and Style.Time Range:Choose its exact time range to be used for composing the time slice, down to the second.Number of Slices:Choose the number of slices for composing the time slice.View thumbnails of selected photo sequences. View thumbnails of selected photo sequences. Swipe left or right to view all photos. Swipe up to remove photos, swipe down to replace photos.
Direction:Select the direction of the slices placement.Forward – Slicing from left to right, or top to bottom.Reverse – Slicing from right to left, or bottom to top.
Style:Choose the style of the time slice. Choose the style of the time slice. Vertical slicing, horizontal slicing, right oblique slicing, or left oblique slicing.
Updating Firmware
ATLI EON can be upgraded via ATLI Cam App.When there is firmware update, corresponding prompt will appear after connecting the camera with ATLI Cam App, please follow the prompt to proceed for upgrade.During the updating process, the status LED light will first flash in orange, then flash in green, and eventually change to flashing in red, which indicates the completion of the update.
![]()
- A microSD card must be installed before upgrading the firmware.
- Be sure the camera to have sufficient power left before upgrading the firmware.
- Please DO NOT upgrade the firmware while shooting task is in progress.
- Please DO NOT turn off the camera while upgrading the firmware.
Notice
Usage Notes
Back Up Memory CardData may be damaged or lost under the following circumstances. Please back up your data for its safety.
- Remove the memory card, disconnect USB cable or shut off the camera during a read or write operation.
- Use memory card where there is static electricity and electrical noise.
Please DO N Please DO NOT Use/Store This Product In the Following Places
- Extremely hot, cold or humid places
- Under direct sunlight or close to a heat source
- Vibrating or shaking places
- Near a strong magnetic field
- Sandy or dusty places
- Places with high humidity
About Operating TemperatureThis product is designed for use in a temperature range of 0°C to 40°C. It is not recommended to use this product in extremely cold or hot places beyond this range.
About Water ResistanceThis product itself is not waterproof, please DO NOT use it under water. If you need to use this product outdoor in wet weather, please be sure to use it with ATLI EON customized silicone case, lens hood and U ATLI EON customized silicone case, lens hood and UV filter.
Clean Notes
- Please DO NOT use cleaners containing organic solvents (thinner, gasoline, etc.)
- When cleaning the surface of the lens, please use a lens pen, lens blower, lens cloth or a soft cloth or paper towel dipped in lens cleaner to remove or wipe fingerprints, dust, etc.
- Please DO NOT spray lens cleaner directly on the surface of the lens.
Specification
Basic Specifications
Lens: 4 Glass ElementsAperture: F2.8Field of View: 72°±5%Photo Resolution: 2688 ×1520 PixelsVideo Resolution: 1080PPixel Size: 2μm*2μmIR Cut Filter: App ControlFocus Mode: ManualFocus Range: 7cm to InfinityExposure Metering: Center-Weighted/Partial-WeightedShutter Speed: 1/20000 – 1.4sLanguage: English/中文APP: iOS/Android
Storage and Connectivity
Storage: 16GB Micro SD Pre-installed (Support Up To 128GB)Wi-Fi: 802.11n (Approx. Range 5 Meters Radius)
Photo / Video
Photo Format: JPEGVideo Format: H.264 MP4Play Back Frame Rate: 25fpsExposure Compensation: ±4EVISO: 100 – 4000Shooting Mode: Time-Lapse/Photo/Video
Battery Type: Li-ionCapacity: 2050 mAhVoltage: 3.7VCharging Limited Voltage : 4.2VCharging Method: USB CableOperational Environment: 0℃ – 40℃
Design
Weight: 125g (With Battery) 84g (Without Battery)Dimension: 54*70*50 mm
After-Sales Information
Please go to ATLI website at http://www.atliview.com/warranty to get our latest aftersales and warranty information.
※This content is subject to change.Download the latest version from www.atliview.com/tutorials
 report this ad
References
[xyz-ips snippet=”download-snippet”]