
ATOMIX 75320A1 Radio Controlled Clock User Manual
Congratulations on your purchase of an Atomix® Radio Controlled clock. Radio Controlled technology allows for the most accurate time keeping available as well as automatic changes for Daylight Saving Time (DST). Atomix… the first name in Radio Controlled timekeeping.
Clock Specifications
- Receives 60KHz WWVB signal transmitted by NIST in Fort Collins, Colorado
- Automatic time and date adjustment once the Radio Controlled (RC) signal is received.
- Hour, minute, second and calendar display with day-of-the-week display from January 1, 2000 to December 31, 2099
- Temperature measurement range : Indoor main unit: 32F – 122F (0C – 50C) Wireless remote unit: -4ºF to 144ºF (-20ºC to 62ºC)
- A maximum of 3 remote sensors can be used with this unit. Additional sensors are available separately.
- Transmission range: up to 100ft. in an open area
- Temperature resolution: 0.1 degree
- Main unit can be mounted on a wall or used on a desk or table by unfolding the attached legs.
ATTENTION
For the first installation, insert the batteries in the main unit and then the remote sensor
Battery installation
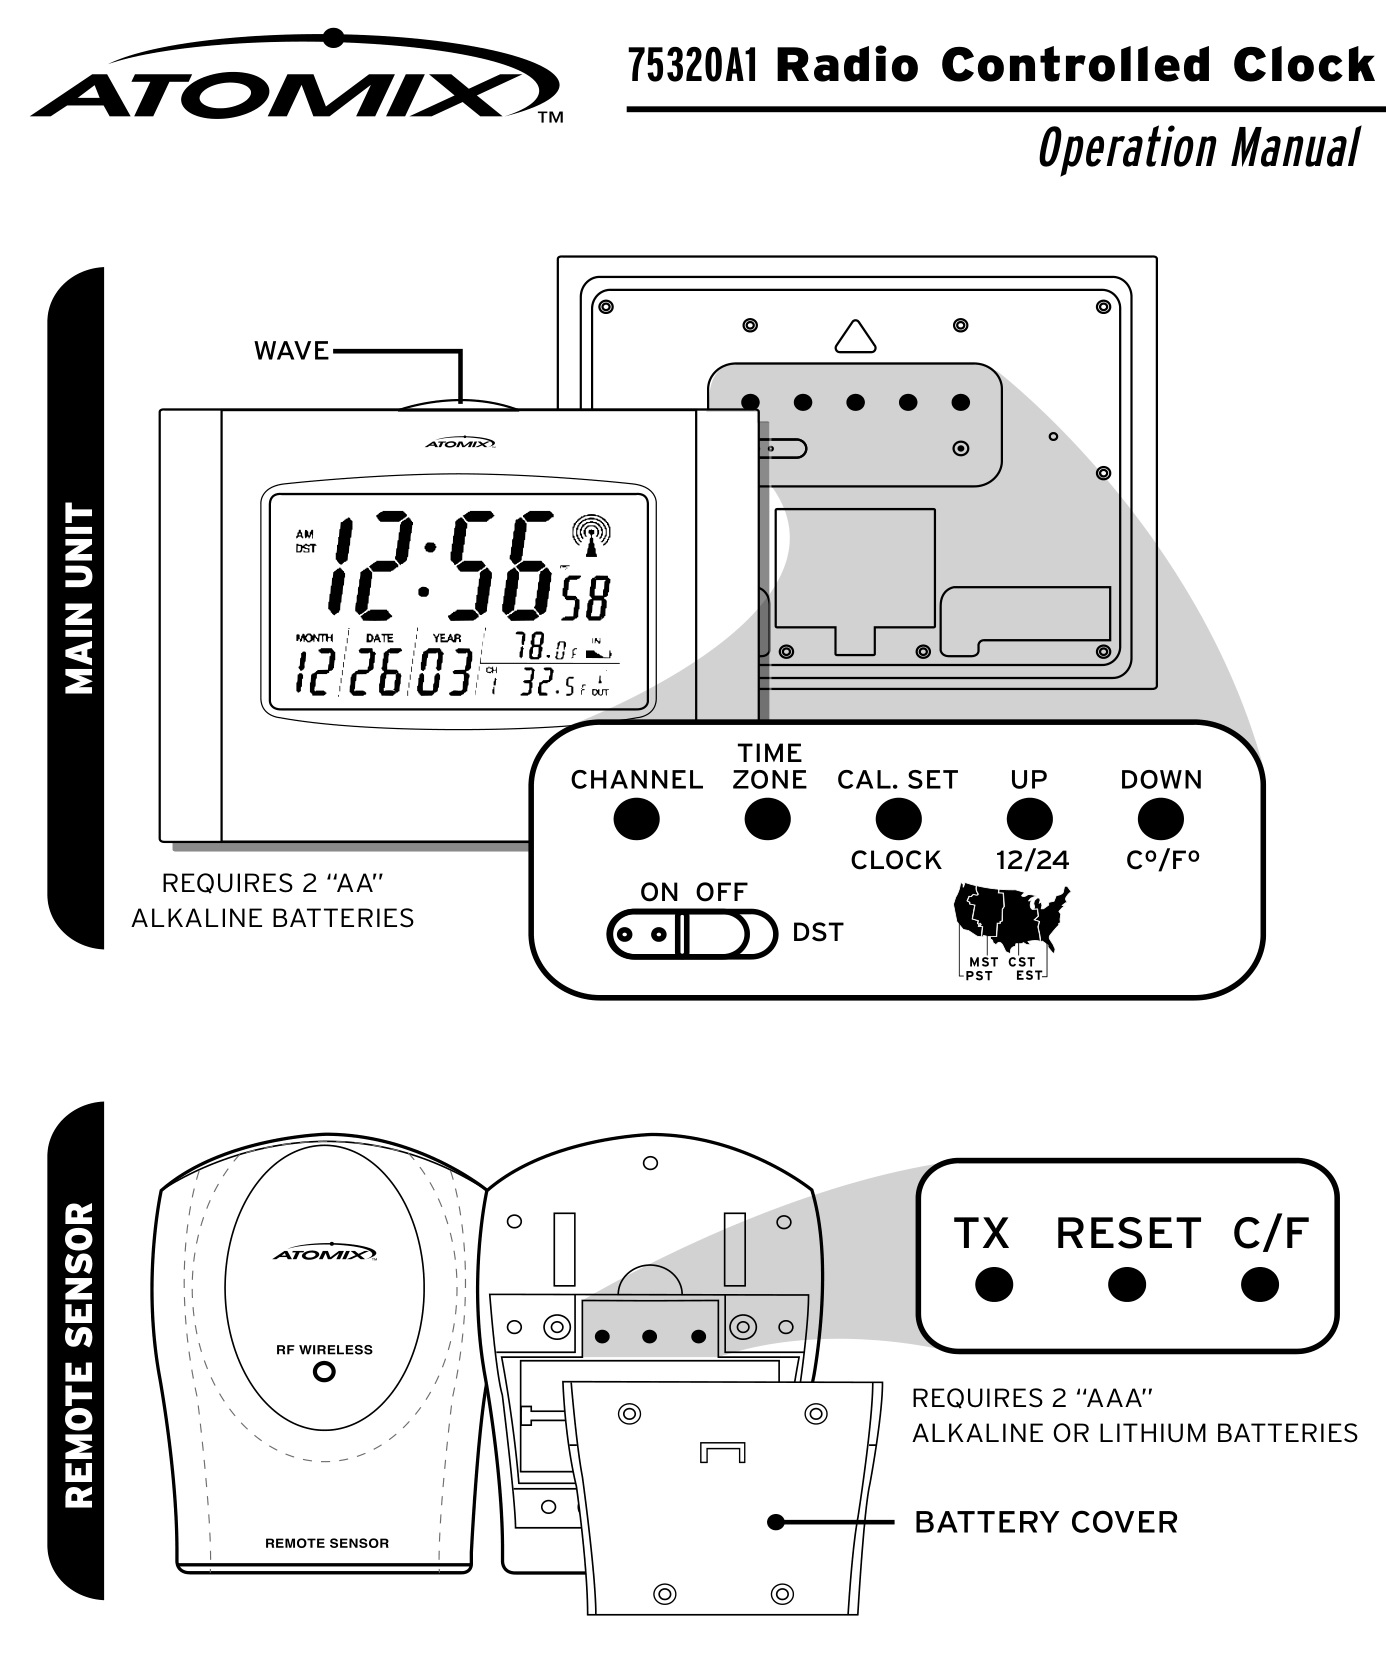
Atomix clock:Insert 2 “AA” alkaline batteries into the main unit. (Batteries not included)Remote sensor:Insert 2 “AAA” alkaline or lithium batteries into the remote unit. (Batteries not included) Four screws need to be removed to access the battery compartment.NOTE: It is recommended that lithium batteries be used instead of alkaline if the remote sensor is in below freezing temperatures. Lithium batteries function at lower temperatures better than alkaline batteries. Never mix valkaline and lithium batteries.
Wireless Thermometer Setup
- Insert batteries in the main unit first and then insert batteries in the remote sensor.
- On the remote sensor, press “Tx” button to send a signal to the main unit.
- On the remote sensor, press the C/F button located under the battery cover to select between Celsius and Fahrenheit temperature readings. (This function is available only on remote sensors with temperature displays.)
- The unit can handle up to 3 individual remote sensors. One remote sensor included. The first remote sensor will log in as channel 1.
- To add an additional remote sensor, please make sure batteries are in the main unit first, then insert batteries in the additional sensor and press “Tx” button. The main unit automatically searches for an open channel to register the signal.
- The remote sensor has a range of up to 100 feet in an open area and without barriers. Walls, fences and buildings will decrease the transmitter’s effective range.
Replacing Batteries
- When replacing batteries for the remote sensor, the channel in the main unit must be cleared. This can be done by selecting the respective channel (channel 1 if there is only 1 sensor) and pressing the “Channel” button for 3 seconds.
- When replacing batteries for the main unit, please remove batteries from all remote sensors and re-install the batteries sequentially in the sensors according to the desired channel. Then follow the above “Wireless Thermometer Setup” procedure.
Atomix clock:
First reception after inserting batteries
- After inserting batteries in the Atomic clock, it will show “12:56AM” and start to search for the wireless thermometer data.
- Until the clock reaches 1:00AM the Atomix clock will start to search for the WWVB signal every 10 minutes.
- The time signal should be acquired within 24 hours
- The tower and wave icon will keep scrolling while the clock is searching for the RC signal. This is normal and indicates the radio control circuitry is working.
- When the 4 “Wave” icons stop scrolling and remain showing it indicates successful reception of the RC time signal.
Auto mode setting
- After installation of batteries or after being reset, the clock will follow the “First reception after inserting batteries” procedure.
- If the clock fails to receive the signal in the first reception attempt, it will repeat a reception every hour until 2:00AM and go to “Automatic time update” mode. If the unit still cannot receive the RC signal after “Automatic time update” mode, it will search again at 2:00AM the next day.
- Once the RC signal is successfully received, the unit will automatically update the time using the “Automatic time update” mode.
Automatic time update
- The clock will automatically update its time at 2:00AM.
- If automatic time update fails, the clock will repeat the procedure 3 times in the next 3 hours. If the unit still cannot receive an RC signal, it will search again at 2:00AM the following day.
PLEASE NOTE: This clock is pre-set to show Pacific Standard Time (PST) with Daylight Saving Time (DST) as a factory setting. Please adjust the switches on the back of the clock for your local time zone.
IMPORTANT 1: When your Atomix clock is searching for or receiving the RC signal, it will ignore any signal or data from remote sensor(s).
IMPORTANT 2: It is recommended to put your Atomix Clock near a window facing towards Fort Collins, Colorado. Televisions, computers, microwaves or other sources of electrical power may interfere with the clocks ability to receive the RC signal. Please move the clock to another location if difficulty in signal reception is encountered.
Atomix Clock manual setting
Setting the Time Zone and Daylight Saving Time (DST)
- Press “TIME ZONE” button to display the time in the proper time zone. Time Zone Codes:
- PST = Pacific Standard Time
- MST = Mountain Standard Time
- CST = Central Standard Time
- EST = Eastern Standard TimeSlide “DST” switch to the ON or OFF position to reflect the correct setting in your area.**Special attention for usage in Arizona and Indiana**Parts of Arizona and Indiana do not use Daylight Saving Time (DST). Please slide the “DST” switch to the OFF position if the clock is used in an area without Daylight Saving Time.
To set the Time and Calendar
- Please follow procedure listed below to adjust the Hour, Minute, Month, Date and Year sequentially.
- Press “TIME/CALENDAR SET” button once and go to Hour set mode, press UP or DOWN button to set your desired Hour display.
- Press “TIME/CALENDAR SET” button again and go to Minute set mode, press UP or DOWN button to set your desired Minute display.
- Press “TIME/CALENDAR SET” button again and go to Month set mode, press UP or DOWN button to set your desired Month display.
- Press “TIME/CALENDAR SET” button again and go to Date set mode, press UP or DOWN button to set your desired Date display.
- Press “TIME/CALENDAR SET” button again and go to Year set mode, press UP or DOWN button to set your desired Year display.
- Finally, press “TIME/CALENDAR SET” button once again to exit the manual setting mode.
Using the Wave button
The Wave button is located on top of the clock.
- If the clock is searching for or receiving the RC signal, press the Wave key once to stop the clock from searching for or receiving the RC signal.
- If the clock is running, press the Wave key once and the clock will attempt to search for the RC signal. The time display will be updated if the time signal is acquired.
Using the Channel button
If a user connects more than one remote sensor, just press the CHANNEL button to view the different channel’s temperature information.
Care of your Atomix Clock and Remote Sensor
- Avoid exposing your clock and sensor to extreme temperatures, keep out of direct sunlight, away from water and severe shock.
- Avoid contact with any corrosive materials such as perfume, alcohol or cleaning agents.
- Do not subject the clock to excessive force, shock, dust, temperature or humidity. These conditions may shorten the life of the clock and sensor.
- Do not tamper with any of the internal components of this clock and sensor, this will void the warranty and may cause damage.
- Use only fresh alkaline batteries. Mixing old and new batteries may cause battery leakage.
- When the outside temperature falls below freezing, the batteries in the remote sensor may not be able to power the transmitter. If this happens, the Atomix clock will not show an outdoor temperature reading. Bring the remote sensor indoors during prolonged periods of sub-freezing temperatures.
Additional Remote Sensor Placement Suggestions:
Additional sensors can be purchased separately, Acu-rite model #00979
- Outside your home or place of business
- Wine cellars
- In the garage
- Childrens room
- Gardens or greenhouses
- Any location that remote temperature readings are beneficial
To order more sensors by phone, please call Klock-it at 800-556-2548
Do not return product to retail store. For Technical Assistance andproduct return information, please call Chaney Instrument Co. direct at:877-221-1252HOURS: Monday through Friday from 8:00 a.m. to 4:45 pm CST.
LIMITED WARRANTY – INTERNATIONAL
Consumer may have more remedies at law than follows. Chaney Instrument Company warrants to the owner, this product to be free from defect in material and workmanship for one year from date of purchase. CHANEY INSTRUMENT SHALL NOT BE LIABLE FOR ANY INCIDENTAL, INDIRECT OR CONSEQUENTIAL DAMAGES, WHETHER ARISING IN CONTRACT OR TORT. Chaney Instrument’s obligation (at its option) is limited to repair or replace this product. For in-warranty repair, send clock, accompanied by Guarantee, bearing Dealer’s name and date of purchase, with $5.00 to cover handling and postage, to:
www.chaneyinstrurnent.comTel: 877-221-1252Made in China
Chaney Instrument Company965 Wells StreetLake Geneva, Wisconsin 53147
![]()

![]()
This device complies with Part 15 of the FCC Rules. Operation is subject to the following two conditions: (1) this device may not cause harmful interference, and (2) This device must accept any interference received, including interference that may cause undesired operation.Warning: Changes or modifications to this unit not expressly approved by the party responsible for compliance could void the user’s authority to operate the equipment.Note: This equipment has been tested and found to comply with the limits for a Class B digital device, pursuant to Part 15 of the FCC Rules. These limits are designed to provide reasonable protection against harmful interference in a residential installation. This equipment generates, uses and can radiate radio frequency energy and, if not installed and used in accordance with the instructions, may cause harmful interference to radio communications.However, there is no guarantee that interference will not occur in a particular installation. If this equipment does cause harmful interference to radio or television reception, which can be determined by turning the equipment off and on, the user is encouraged to try to correct the interference by one or more of the following measures:– Reorient or relocate the receiving antenna.– Increase the separation between the equipment and receiver.– Connect he equipment into an outlet on a circuit different from that to which the receiver is connected.– Consult the dealer or an experienced radio/TV technician for help.
References
[xyz-ips snippet=”download-snippet”]