ATOMOS Shogun Studio 2 User Guide
www.atomos.com/registrationwww.atomos.com/supportwww.atomos.com/activationwww.atomos.com/activation
Introduction
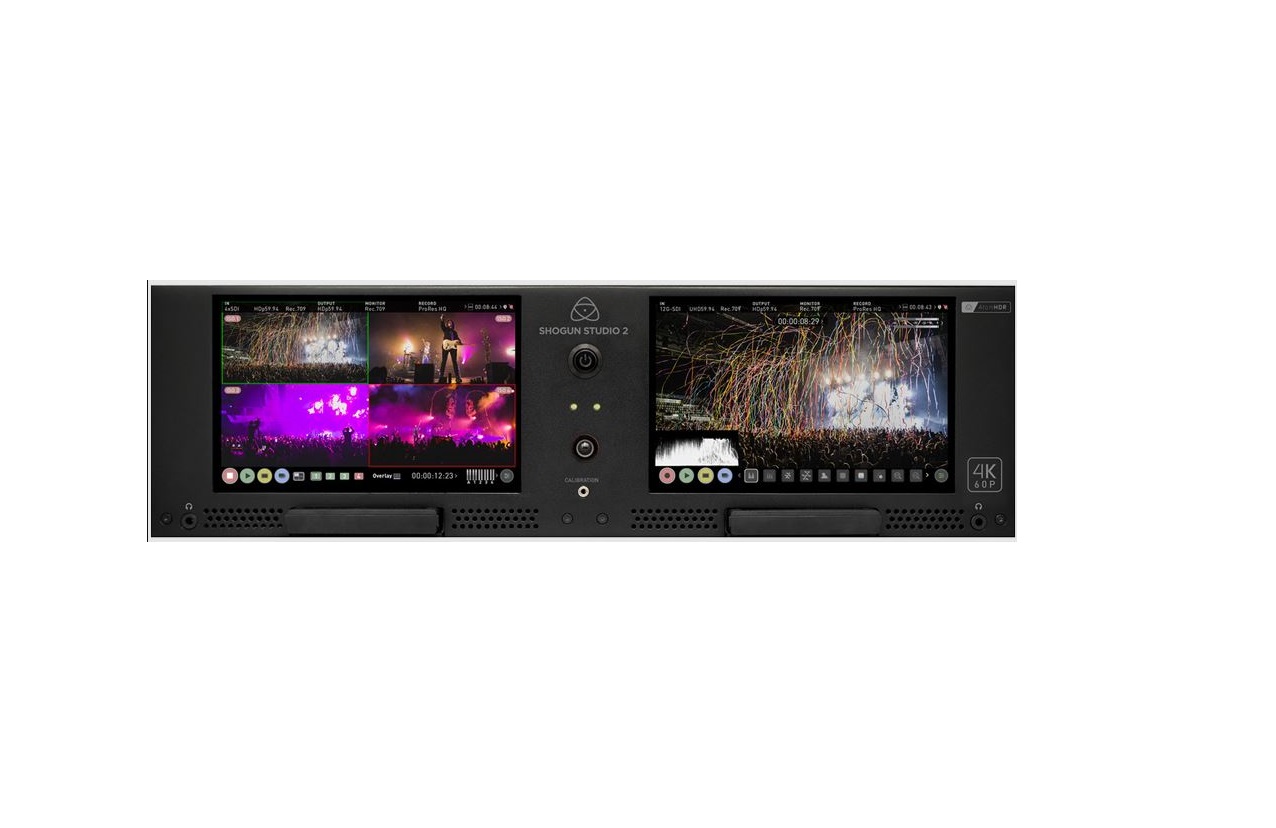
Thank you for purchasing the Atomos Shogun Studio 2, utilizing Quad Link SDI and HDMI 2.0 connectivity to record up to 4Kp60 video and high frame rate HD to Pro Res and Avid DNX or RAW at up to 5.7k in Pro Res RAW or 4k30p in CDNG. With 360 zone backlight combined with our Super Atom IPS panel and Dynamic Atom HDR engine provides the ability to display millions of color graduations and image detail. With up to 3000nits of peak HDR brightness and dynamic shadow control from the zoned backlight Shogun Studio 2 can display 15+ stops of dynamic range. With a calibratable screen the that supports up to 105% of DCI p3 you can display and transform for wide color gamut’s and log gammas out to HDR standards. With so many recorder, monitor, playback and edit features, please take the time to read through this Quick Start Guide and register your product for free updates and extended warranty.
Checklist
- 1 x Shogun Studio
- q 2 x Rack ears + screws
- 5 x Master Caddy II
- 2 x Short rubber feet for desktop mounting
- 2 x Larger rubber feet for increased elevation
- 2 x IEC power cable (or external PSU for Japan)
- 1 x USB-C Dock
- 2 x HDMI Cables
You will also need
SDI CablesIf you are connecting via 6G or 12G SDI please ensure your cable supports the Belden 1694A standard.
SSD DrivesWe test and approve SSD drives from the world’s leading media brands. There are specific approved drives depending on the resolution and frame rate you are capturing – for the full list of compatible drives please refer to: www.atomos.com/drives
Synchronization ConnectionsThe Gen Lock and LTC 1/0 are connected via BNC and can use 75 Ohm cable.
Media
Widely available 2.5″ SSDs are the basic storage media for Atomos 4K Monitor Recorders. We work closely with leading drive manufacturers to qualify as many options as possible. SSDs are required for 4K recording and for more demanding production environments that may not be suited to spinning hard disks.
We have worked closely with leading media manufacturers to develop media designed specifically for the Atomos Ninja V, that with the addition of Atom SSD mini handles is 100% compatible with Shogun Studio 2. The Atom SSD mini is smaller than a standard SSD, but utilizes the same SATA connection as normal HDD/SSD media and is compatible with all Atomos recorders and docking stations. Atom SSD mini (with SSD mini Handle) fits directly into the Shogun Studio 2 disk slot without the need for a Master Caddy II.
For more information about supported drives and accessories, visit: www.atomos.com/drives
Assemble the Master CaddyPosition a Solid State Drive (SSD) into the Master Caddy. Assemble completely and align screw holes on all three pieces. Insert screws last. Do not over-tighten. For more detailed instructions please download the full Shogun Studio 2 User Manual.
Handle SSD with careAvoid contact with circuit board and connectors. Refer to media manufacturer’s manual for handling instructions.Format SSD With your chosen SSD inserted in to the Master Caddy or SSD mini with attached handle insert the drive into the channel you would like to operate. Note each drive slot corresponds to the monitor it is located beneath.
With the drive inserted you can touch the drive icon in the top right of the touch screen interface. Select to the format option to erase and prepare the drive for use. For drives that support secure erase an option will be available for this. It will take slightly longer to perform the format process and SSD will be reset to factory settings.
Important: Never remove the SSD whilst recording as this may cause data corruption.
Connect and power-up
We recommend that you connect Shogun Studio 2 directly to a reliable connection or via a power distribution unit / strip to an interruptible power supply in your rack. The Shogun Studio has 2 x AC inputs and we advise using both where possible.
Connecting Power-up and about PSUsThe rear bottom left hand side of the unit are located AC1 and AC2 inputs with IEC C14 sockets (see next page). Connect the provided power cables to the sockets and then connect to main power. The dual power supplies internally balance the power draw across both units and additionally allows for backup power if one of the power supplies fail. If a PSU does fail a warning screen will be displayed. To continue using the unit, activate single power supply mode by clicking OK. Once connected press the power button on the front of the unit and both recorder channels will power up.
Connection layoutLooking at Shogun Studio 2 from the front, recorder channel 1 is on the left and recorder channel 2 is on the right. The rear panel has been laid out symmetrically to match what you see on the front. The major sections, recorder channel 1/control & updates/recorder channel 2, contain all of the in/ out connections relevant to that section.
The Connections of the Shogun Studio2Video: Each recorder Channel has 2 x 3G and 2 X 12G SDI inputs, and 1 x 12G SDI output, with the option to have a 2nd 12G SDI output when in playback mode. The 12G SDI are also backwards compatible to 6G, 3G, 1.5G SDI and can be used for dual or quad link to use with your existing equipment. Each recorder Channel also has a HDMI connection for input and output. These are both 2.0 specification to handle 4K video up to 60fps, allowing 10-bit video in and out.
Audio: Each recorder channel has 2 x XLR inputs and 2 x XLR outputs. These can be used at Line, Mic and Pro level, which can be defined by the Audio menu. The inputs can also provide 48V Phantom power to compatible microphones.
Synchronization: Each Recorder channel has Genlock input and output via BNC as well as LTC time code input and output. Operation of LTC can be found in the Timecode menu & operation of Genlock found in the output sections of the device menus. LTC can be activated whilst in Record mode and Genlock is available whilst in playback mode.
RS422 9pin D-Sub: Each recorder has it’s own dedicated 9pin D-Sub with RS422 machine control. Simply connect your RS422 cable from your device or controller and Shogun Studio 2 will receive and action the commands. Please refer to the Shogun Studio 2 User Manual for a list of supported RS422 commands and qualified controllers at www.atomos.com/support
USB: The USB connection on the rear is for SERVICE ONLY and should only be used if instructed to do so as part of firmware updates.
Headphone Monitoring Jack: On the front of the unit, each recorder channel has it’s own individual 3.5mm jack for audio monitoring. The channels to be monitored can be selected via the audio menu on the Shogun Studio 2 touchscreen.
Calibration Socket: Between the monitors of the recorder channels is a 2.5mm mini jack. This is for use with the optional x-rite i1 display pro calibrator and Atomos Calibration software. The single socket is able to calibrate both screens. Connect the x-rite unit, open the calibration software and select device 1 in the software to calibrate Recorder Channel 1 or select device 2 to calibrate Recorder Channel 2.
Control: Each of the Shogun Studio channels can be operated via the independent touch screens to adjust record, monitor, playback and edit functions. Please refer to the manual for further details.
Touch Screen interface: Pictured on page 6 are the main controls seen when the Shogun Studio 2 is powered on with video input connection present and recording media in the drive bay. Touch these items to access or cycle through the available options. For example, touching the Video Input Format will open the Settings menu panel and jump directly to the related Input settings.
Power Button: A single power button is used to turn both devices on and off. A simple tap of the power button will also lock or unlock the touch interface of both recorder channels. A long press (4 seconds) will turn both units off.
Record ButtonPositioned in the lower center of the front panel is a record button. Pressing this will trigger both channel to begin recording based on current settings. To stop recording, press and hold until recording has stopped.
Physical features
- Power ButtonThe power button as described earlier controls the simultaneous turning on or off both recorder channels. With both power supplies connected press the Power button and both units will power up .
 On initial connection of power the controller will go through a boot phase and the fan will spin up. Once this has happened the power button can be used to turn on the device.Once powered, pressing the power button for 4 seconds will turn both units off. After power down the unit’s fan will remain on whilst the internal controller of the Shogun Studio shuts down .
 - Calibration PortThe Calibration 2 .5mm jack port beneath the power button allows for connection of the optional x-rite i1 display pro unit . This single port is able to be used to calibrate both devices and each channel will display as a separate option in the Atomos Calibration software. This software will be available via www.atomos.com/support
- Headphone PortsBoth channels have an independent 3 .5mm headphone jacks for monitoring audio . The volume control is located in the Meters menu accessed by touching the Audio Meters on the main screen, or via the Setting Menu.
- Dual recordPressing this button will trigger both units to start recording based on current settings . To stop recording, press and hold until recording has stopped .
- Disk slotsInsert compatible media. Atom SSD mini may be used with the addition of SSD mini handles. DO NOT use SSD mini media without the attached handle or disks may become logged inside the unit .
![]() ATTENTION: Some screen printing/labelling on the front and rear of unit as illustrated above may differ from actual unit. When connecting any input or other device please ensure you are connecting to the correct connection by referring to the labelling on your actual unit.
ATTENTION: Some screen printing/labelling on the front and rear of unit as illustrated above may differ from actual unit. When connecting any input or other device please ensure you are connecting to the correct connection by referring to the labelling on your actual unit.
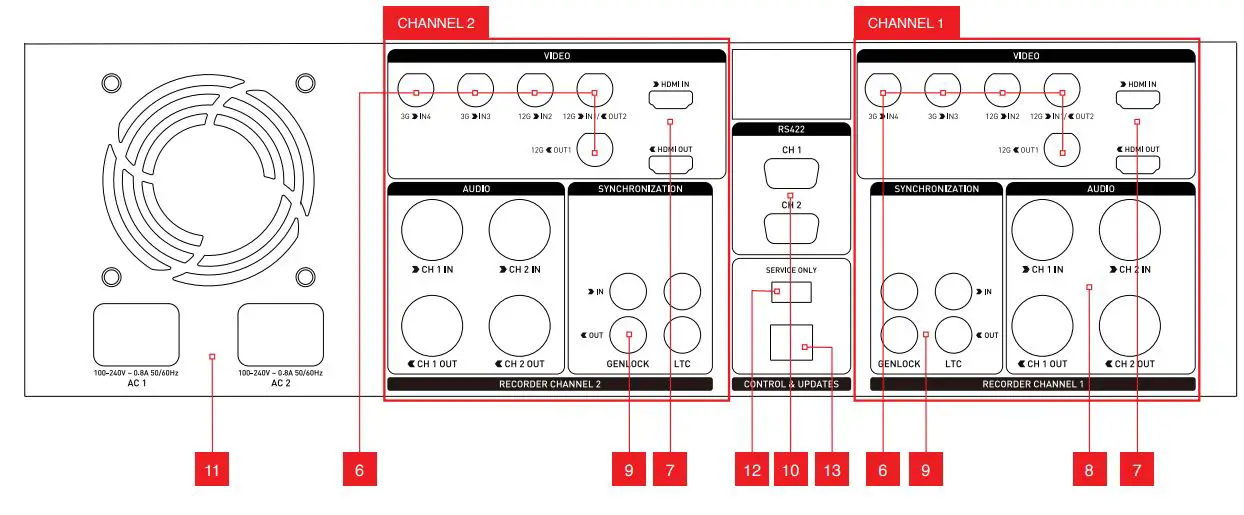
Rear of unitThe rear panel of Shogun Studio 2 has been laid out symmetrically to align the connections with the recorder channel monitor when viewed from the front.
6. SDI In/OutBNC connectors for SDI inputs in HD/3G/6G/12G as indicated. Loop supporting up to 12G 4kp60 and should be used to connect channel 1 to channel 2. SDI input 1 can also be used as a secondary output in playback mode.
7. HDMI In/OutHDMI input connection used to record to the Shogun Studio 2 supports up to 4Kp60. HDMI output connection provides a live loop out or play out when in Playback mode. Loop out between Channel 1 and Channel 2 is limited to 4kp30.
8. Analogue AudioEach recorder channel has 2x XLR inputs and 2x XLR outputs. The inputs can be configured at Line, Mic and Pro level in the Audio menu. The inputs can also provide 48V Phantom power to compatible microphones. The XLR outputs are for monitoring and the audio channel routed to them can be selected via the headphones selection in the Audio menu.
9. SynchronizationEach Recorder channel has Genlock input and output via BNC as well as LTC Timecode input and loop output.
![]() Please note that the output of the Genlock and LTC are only for loop out and the Shogun Studio 2 cannot generate either Genlock or LTC Timecode.
Please note that the output of the Genlock and LTC are only for loop out and the Shogun Studio 2 cannot generate either Genlock or LTC Timecode.
Operation of LTC can be found in the Timecode menu & operation of Genlock found in the Output menu when in Playback mode.
10. RS422 9pin D-SubEach recorder has its own dedicated 9pin D-Sub for RS422 machine control. Simply connect your RS422 cable from a qualified device or controller to the relevant port on the Shogun Studio 2. A list of supported devices and RS422 commands are defined in the user manual.
11. AC Power inputsAC1 and AC2 inputs with IEC C14 sockets. Refer to Shogun Studio 2 User Manual for more information.
Units purchased in Japan will have a different power input configuration, as pictured below.
12. USB PortFor SERVICE ONLY and should only be used if instructed to do so as part of firmware updates.
13. RJ45 connectionFor SERVICE ONLY and should only be used if instructed to do so as part of firmware updates.
Touchscreen / User Interface Basics
The Shogun Studio 2 is controlled by a simple user-friendly touchscreen interface. Pictured above is the home screen and main controls seen when the Shogun Studio 2 is attached to a compatible input. Touching the icons/ text will open menus for the relevant functions. Touch the settings icon located on bottom right to access more menus, or touch individual icons for specific settings such as timecode, audio, remaining disk space and more.For more info visit atomos.com/shogunstudio2 and click SUPPORT tab.
ControlsTapping Control icons will activate the relevant mode and function/s, ie. If you are in Record Mode, tapping Edit will reveal Edit tools, tapping Monitor will reveal monitor tools and tapping Play will switch to Play Mode.
For more information about multi-cam recording, monitoring, playback and advanced functionality please download the Shogun Studio 2 User Manual.
Monitor assist
Tapping Monitor assist icons will activate/deactivate monitoring tools.

For complete operational instructions please refer to the Shogun Studio 2 User Manual, available for download at www.atomos.com/support
Warranty & Conditions
NoticeCopyright © 2020 ATOMOS Global Pty Ltd (`referred to as ATOMOS’). All rights reserved. All information in this document is subject to change without notice. No part of the document may be reproduced or transmitted in any form, or by any means, electronic or mechanical, including photocopying or recording, without the express written permission of ATOMOS. A reference to ATOMOS includes its related entities, subsidiaries and parent company.
TrademarksShogun Studio 2 / ATOMOS are registered trademarks of ATOMOS Pty Ltd. Apple, the Apple logo, AppleShare, AppleTalk, FireWire, iPod, iPod Touch, Mac, and Macintosh are registered trademarks of Apple Inc. Final Cut Pro, QuickTime and the QuickTime Logo are trademarks of Apple Inc. All other trademarks are the property of their respective holders.
International Hardware Limited Warranty (1 Year Standard/3 Years if registered)ATOMOS warrants that:
- The main product, not including the IPS screen, or any external accessories, will be free from defects in materials and workmanship for a period of 1 year from the date of purchase; or 3 years upon completion of product registration within 1 year from the date of purchase at www.atomos.com
- The TFT/LCD, batteries, case and master caddies will be free from defects in materials and workmanship for a period of 1 year from the date of purchase regardless of registration. This warranty is exclusively for the benefit of the original purchaser and is not assignable or transferable.
If during the warranty period the product is shown to be defective ATOMOS may at its option: a) replace the goods or supply equivalent ones, b) repair the goods, c) pay the cost of replacing the goods or of acquiring equivalent ones and d)paying the cost of having the goods repaired; The customer must notify ATOMOS of any defect in the goods in writing prior to the expiry of the warranty periods set out above. The customer will be solely responsible for returning the goods to ATOMOS or its authorized distributor. Upon acceptance of a warranty claim by ATOMOS, where ATOMOS repairs or replaces the goods, it will be responsible for reasonable shipping costs incurred in sending the goods to the Customer, provided that customer is located in a country in which ATOMOS has an authorized distributor or repair center or agent.
Warranty ExclusionsThis warranty applies only to defects in workmanship and does not cover defects caused by:
- A failure to comply with the then current operating instructions issued by ATOMOS;
- Neglect;
- Improper or negligent acts or omissions;
- Unauthorized repairs or attempted repairs;
- Tampering with or modification of the goods;
- Connection to incompatible equipment or power sources;
- Exposure to water or weather;
- Exposure to magnetic fields or corrosive liquids or substances;
EXCEPT AS STATED IN THIS WARRANTY, ATOMOS, IT’S VENDORS, AGENTS, RESELLERS AND DISTRIBUTORS DISCLAIM IN THEIR ENTIRETY ALL OTHER WARRANTIES, EXPRESS OR IMPLIED, INCLUDING WITHOUT LIMITATION ALL WARRANTIES OF MERCHANTABILITY OR FITNESS FOR A PARTICULAR PURPOSE. THE REMEDIES OUTLINED IN THIS WARRANTY ARE
THE EXCLUSIVE REMEDY A CUSTOMER HAS ARISING FROM DEFECTIVE GOODS WHICH ARE SUBJECT TO THE WARRANTY. ATOMOS DOES NOT WARRANT THAT THE GOODS WILL OPERATE IN A MANNER WHICH IS ERROR FREE, OR UNINTERRUPTED. THE GOODS ARE NOT INTENDED TO BE THE PRIMARY OR ONLY DATA STORAGE DEVICE FOR DATA CUSTOMERS ARE SOLELY RESPONSIBLE FOR BACK UP AND PROTECTION OF DATA.
Software License AgreementIMPORTANT, PLEASE READ CAREFULLY. THIS IS A LICENSE AGREEMENT. This ATOMOS software, related documentation, any included sample images and other files (the “Software”), is protected by copyright laws and international copyright treaties, as well as other intellectual property laws and treaties. The Software is licensed, not sold.
This End User License Agreement (“EULA”) is a legal agreement between you (either an individual or a single entity) and ATOMOS with regard to the copyrighted Software provided with this EULA. Use of the Software provided to you by ATOMOS in whatever form or media, will constitute your acceptance of these terms, unless separate terms are provided by the software supplier, in which case certain additional or different terms may apply. If you do not agree with the terms of this EULA, do not download, install copy or use the Software. By installing, copying or otherwise using the Software, you agree to be bound to the terms of this EULA. If you do not agree to the terms of this EULA, ATOMOS is unwilling to license the Software to you.
- Eligible licensees. This Software is available for license solely to purchasers of the ATOMOS Shogun Studio 2, who have purchased a unit manufactured by ATOMOS Shogun Studio 2 and purchased through an ATOMOS authorized reseller, with no right of duplication or further distribution, licensing or sub-licensing.
- License Grant. ATOMOS grants you a personal, non-transferable and non-exclusive right to use the copy of the Software provided with this EULA. You agree you will not copy the Software except as necessary to use it with the ATOMOS Shogun Studio You agree that you may not copy the written materials accompanying the Software. Modifying, reverse engineering, translating, renting, copying, transferring or assigning all or part of the Software or any rights granted hereunder, to any other persons or reverse engineering the hardware on which the Software runs, is strictly prohibited. The software is license, not sold. You acknowledge that no title to intellectual property in the Software is transferable to you. You further acknowledge that title and full ownership rights to the Software will remain the exclusive property of ATOMOS and/ or its suppliers, and you will not acquire any rights to the Software, except as expressly set forth above. All copies of the software will contain the same proprietary notices as contained in or on the Software. All title and copyrights in and to the Software (including but not limited to any images, animations, video, audio, text incorporated), the accompanying printed materials, and any copies of the Software are owned by ATOMOS or its suppliers.
- Reverse engineering. You agree that you will not attempt, and if you are a corporation, you will use your best efforts to prevent your employees and contractors from attempting to reverse compile, derive circuits, modify, translate or disassemble the Software and/or the ATOMOS Shogun Studio 2 in whole or in part. Any failure to comply with the above or any other terms and conditions contained herein will result in the automatic termination of this license and the reversion of the rights granted hereunder by ATOMOS.
ATOMOS reserves the right to terminate this license without prejudice to any additional recourse ATOMOS may have against you if you violate any of its terms and conditions.
For more detailed instructions and important up-to-date information please download the Shogun Studio 2 User Manual from: www.atomos.com/support
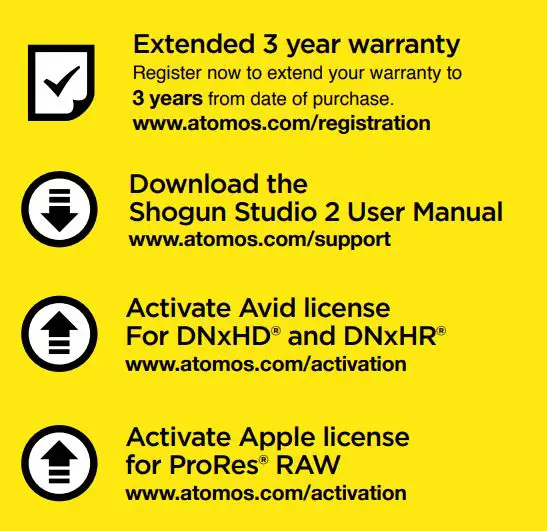
Extended 3 Year WarrantyRegister now to extend your warranty to 3 years from date of purchase. www.atomos.com/registration
 report this ad
© Atomos 2020. TM ® All trademarks and registered trademarks are the property of their respective owners.
References
[xyz-ips snippet=”download-snippet”]