
![]()
![]() AT-DAC100User ManualD/A Converter
AT-DAC100User ManualD/A Converter
Introduction
Thank you for purchasing this Audio-Technica product.Before using this product, please read through the Quick Start Guide, as well as this user manual when necessary, to ensure that you use the product correctly.This product can only be used in the country in which it was sold.Please confirm that the voltage and power cord plug of the product is suitable for the country in which you live.
Package contents
Before using the product, confirm that all the items shown below are in the package.If some items are missing or damaged, contact your local Audio-Technica dealer.

We recommend keeping all the packaging materials together in case you store, move, or ship the product after purchase.
Safety precautions
Although this product was designed to be used safely, failing to use it correctly may result in an accident. To ensure safety, observe all warnings and cautions while using the product.
Important information
Warning:
- To prevent fire or shock hazards, do not expose this apparatus to rain or moisture.
Caution:
- Do not expose this apparatus to drips or splashes.
- To avoid electric shock, do not open the cabinet.
- Refer servicing to qualified personnel only.
- Do not expose this apparatus to excessive heat such as that generated by sunshine, fire or other heat sources.
- Do not subject this apparatus to strong impact.
- This apparatus should be located close enough to the AC outlet so that you can easily grasp the AC adapter at any time.
- In case of emergency, disconnect the AC adapter quickly.
- Do not place any objects filled with liquids, such as vases, on this apparatus.
- To prevent fire, do not place any naked flame sources (such as lighted candles) on this apparatus.
- Do not install this apparatus in a confined space such as a bookcase or similar unit.
- Install this apparatus only in a place where ventilation is good.
- In order to maintain proper ventilation, do not place any objects around the rear of this apparatus. This apparatus should be placed at least 10 cm (3.94″) away from a rear wall. This apparatus should not be placed near other electrical apparatuses. Keep the top and sides of this apparatus at least 10 cm (3.94″) away from any other surface if sitting on shelving, such as an audio apparatus rack. Failure to do so may cause this apparatus to overheat, which in turn may cause it or surrounding items to catch fire.
- In the case of horizontal installation, be sure to attach the included feet to the four corners of the bottom of the product (two of the six are spare feet). In case of vertical installation, be sure to attach the included stand.
For customers in the USA
FCC NoticeWarning:This device complies with Part 15 of the FCC Rules. Operation is subject to the following two conditions: (1) This device may not cause harmful interference, and (2) this device must accept any interference received, including interference that may cause undesired operation.Caution:You are cautioned that any changes or modifications not expressly approved in this manual could void your authority to operate this equipment.Note: This equipment has been tested and found to comply with the limits for a Class B digital device, pursuant to part 15 of the FCC Rules. These limits are designed to provide reasonable protection against harmful interference in a residential installation. This equipment generates, uses, and can radiate radio frequency energy and, if not installed and used in accordance with the instructions, may cause harmful interference to radio communications. However, there is no guarantee that interference will not occur in a particular installation. If this equipment does cause harmful interference to radio or television reception, which can be determined by turning the equipment off and on, the user is encouraged to try to correct the interference by one or more of the following measures:– Reorient or relocate the receiving antenna.– Increase the separation between the equipment and receiver.– Connect the equipment into an outlet on a circuit different from that to which the receiver is connected.– Consult the dealer or an experienced radio/TV technician for help.Contact:Responsible Company: Audio-Technica U.S., Inc.Address: 1221 Commerce Drive, Stow, Ohio 44224, USATel: 330-686-2600
For customers in Canada
IC statement:CAN ICES-3 (B)/NMB-3(B)
Notes on use
- Be sure to read the connected device’s user manual before use.
- Purchase a cable suitable for the device to be connected.
- Fully insert the plug of the connecting cable.
- Stop music playback when plugging or unplugging cables.
- Before using the product for the first time, it is necessary to install the “dedicated driver software” on your PC (only for Windows). Please download from our Audio-Technica website. Before connecting the product to your PC, be sure to install the “dedicated driver software”. If you connect the product to your PC before installing the driver, the product may not work properly.
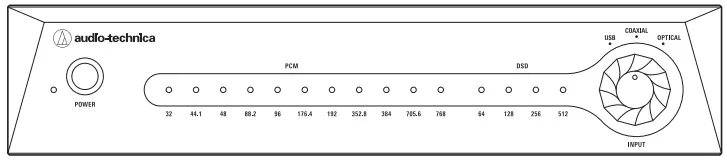
Part names and functions
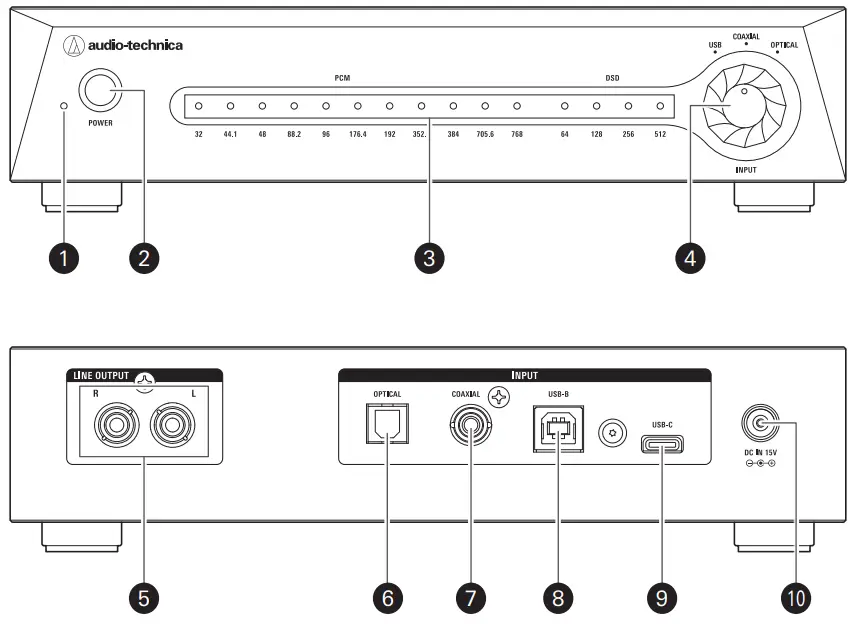
- Power indicator lampThe lights are white when the product’s power button is turned on.
- Power buttonPush-type switch to turn the power on/off.Pressing it turns the power on, and pressing it again turns the power off.
- Sampling frequency/DSD indicator lampShows the type of DSD or the sampling frequency of the input signal while playing audio.
- Input signal switching dialSwitches the input signal (USB terminal input, coaxial digital input (COAXIAL), an optical digital input (OPTICAL)).Input from the USB terminal supports both USB Type-B and USB Type-C™, but when both are connected, the USB Type-C input is given priority.
- LINE output terminalsOutput the input signal that is selected with the input signal switching dial.Connect to the LINE input terminals of the connected device by using an RCA audio cable (sold separately).
- Optical digital input terminalConnects to the optical digital output terminal of the audio source device by using an optical digital cable (sold separately).
- Coaxial digital input terminalConnects to the coaxial digital output terminal of the audio source the device by using a coaxial digital cable (sold separately).
- USB terminal (USB Type-B)Connects to the USB terminal of the audio source device by using a USB Type-B cable (sold separately).
- USB terminal (USB Type-C)Connects to the USB terminal of the audio source device by using a USB Type-C cable (sold separately).
- Power input jackConnects to the AC adapter provided.
Installing the product
- If a radio is placed near the product, the sound from the radio may be distorted. Whenever possible, keep radios away from the product.
- Keep the product at least 1 m (3.3′) away from inverter-type fluorescent lights, LED lamps, and wireless devices, such as mobile phones or Wi-Fi devices. Using them nearby could cause noise in the product.
- Install the AC adapter away from the main unit and the RCA audio cables. Using them nearby could cause noise in the product.
Installing the product horizontally
- Remove the protective seals from the two-sided tape on the feet, stick them evenly to the bottom of the main unit, and then install it.• If you need to remove a foot after sticking it on, slowly pull it off the main unit.
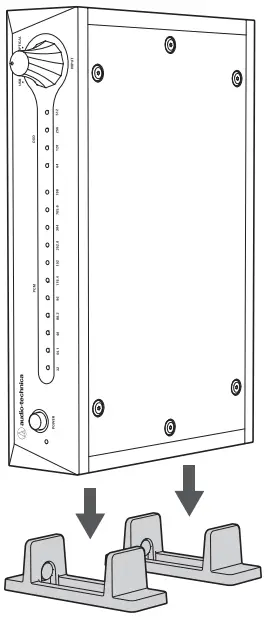
Installing the product vertically
- Attach the stands to the side of the main unit, and then install them.
Using the product
Before making connections
- Be sure to read the connected device’s user manual before use.
- Be sure to turn off devices before connecting them.
- Purchase a cable suitable for the device to be connected.
- Fully insert the plug of the connecting cable.
- Stop music playback when plugging or unplugging cables.
- Before using the product for the first time, it is necessary to install the “dedicated driver software” on your PC (only for Windows). Please download from our Audio-Technica website. Before connecting the product to your PC, be sure to install the “dedicated driver software”. If you connect the product to your PC before installing the driver, the product may not work properly.
Making connectionsRefer to the connection diagram below to connect the devices you want to use.
- Connect the power cord to the AC adapter.
- Connect the AC adapter to the power input jack, and then insert the power cord into the outlet.
- Turn on the connected devices.
- Turn on the product’s power button.
- Use the input signal switching the dial to select the device from which you want to input.• The signal that is input is shown by the sampling frequency/DSD indicator lamp.
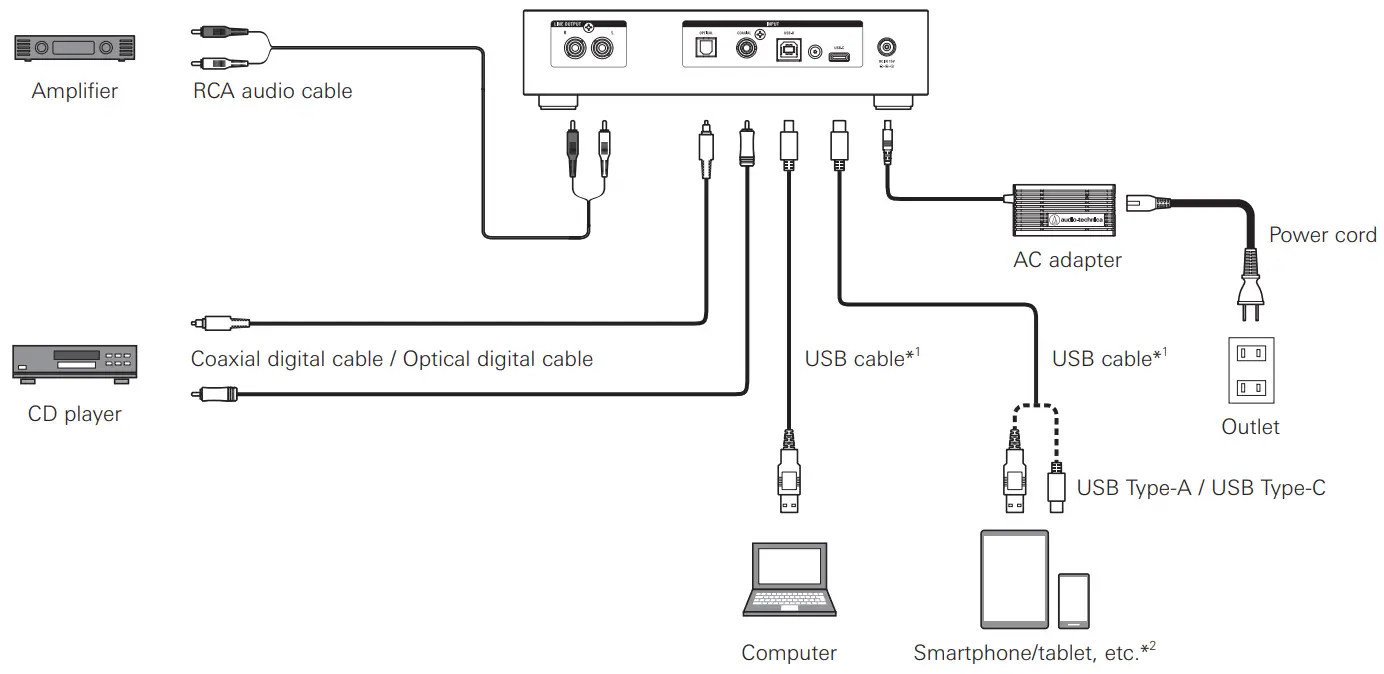
*1 For USB connection, USB Type-C connection is given priority.*2 A conversion adapter may be required depending on your smartphone/tablet, etc.
Cleaning
- If the product becomes dirty or dusty, turn off the power button, unplug the AC adapter, and then wipe the product with a soft, dry cloth.
- Do not use benzene or paint thinners.
- To store the product for an extended period, turn the power button off, unplug the power cord from the outlet, wrap the equipment in plastic and keep it away from moisture.
Dimensions
When feet are attached

When stands are attached
Specifications
| System requirements | A computer equipped with a USB 2.0 compatible USB portCPU: Intel Core i3 CPU 2.2 GHz or higher, or AMD CPU equivalent to Intel RAM: 32 bit OS, 2 GB or more, 64 bit OS 4 G8 or more |
| Supported OS | Windows 8.1, Windows 10, and Mac OS X or later (Please check the product’s web page for the latest information.) |
| Power supply | 100 – 240 VAC, 50/60 Hz, 15 VDC/2.4 A (AC adapter provided) |
| Input terminals | USB Type-8 (44.1 kHz to 768 kHz, 16 to 32 bit DSD64, DSD128, DSD256, DSD512) USB Type-C (44.1 kHz to 768 kHz, 16 to 32 bit DSD64, DSD128, DSD256, DSD512) Coaxial digital (32 kHz to 192 kHz, 16 to 24 bit)Optical digital (32 kHz to 192 kHz, 16 to 24 bit) |
| Output terminals | Analog output (pin jack) x 2 |
| Frequency response | 15 Hz to 90 kHz (0, -3 dB) |
| Total harmonic distortion | 10.005% or less (20 Hz to 20 kHz) |
| Signal-to-noise ratio | 105 dB (A-weighted, 1 Vrms output) |
| Separation between channels | 105 dB (20 Hz to 20 kHz) |
| Power consumption | Maximum 3 W |
| Dimensions | 210 mm (8.271 x 135 mm (5.311 x 44 mm (1.731 (W x D x H) (excluding protrusions) |
| Weight | About 1.0 kg (35.3 oz) |
| Included accessories | AC adapter (approx. 1.5 m (4.91), Power cord, Foot x 6, Stand x 2 |
For product improvement, the product is subject to modification without notice.
- USB Type-C™ is a trademark of USB Implementers Forum.
Audio-Technica Corporation2-46-1 Nishi-Naruse, Machida, Tokyo 194-8666, Japan©2020 Audio-Technica CorporationGlobal Support Contact: www.at-globalsupport.com
 report this ad
202400760-02-01 ver.1 2020.06.15
[xyz-ips snippet=”download-snippet”]