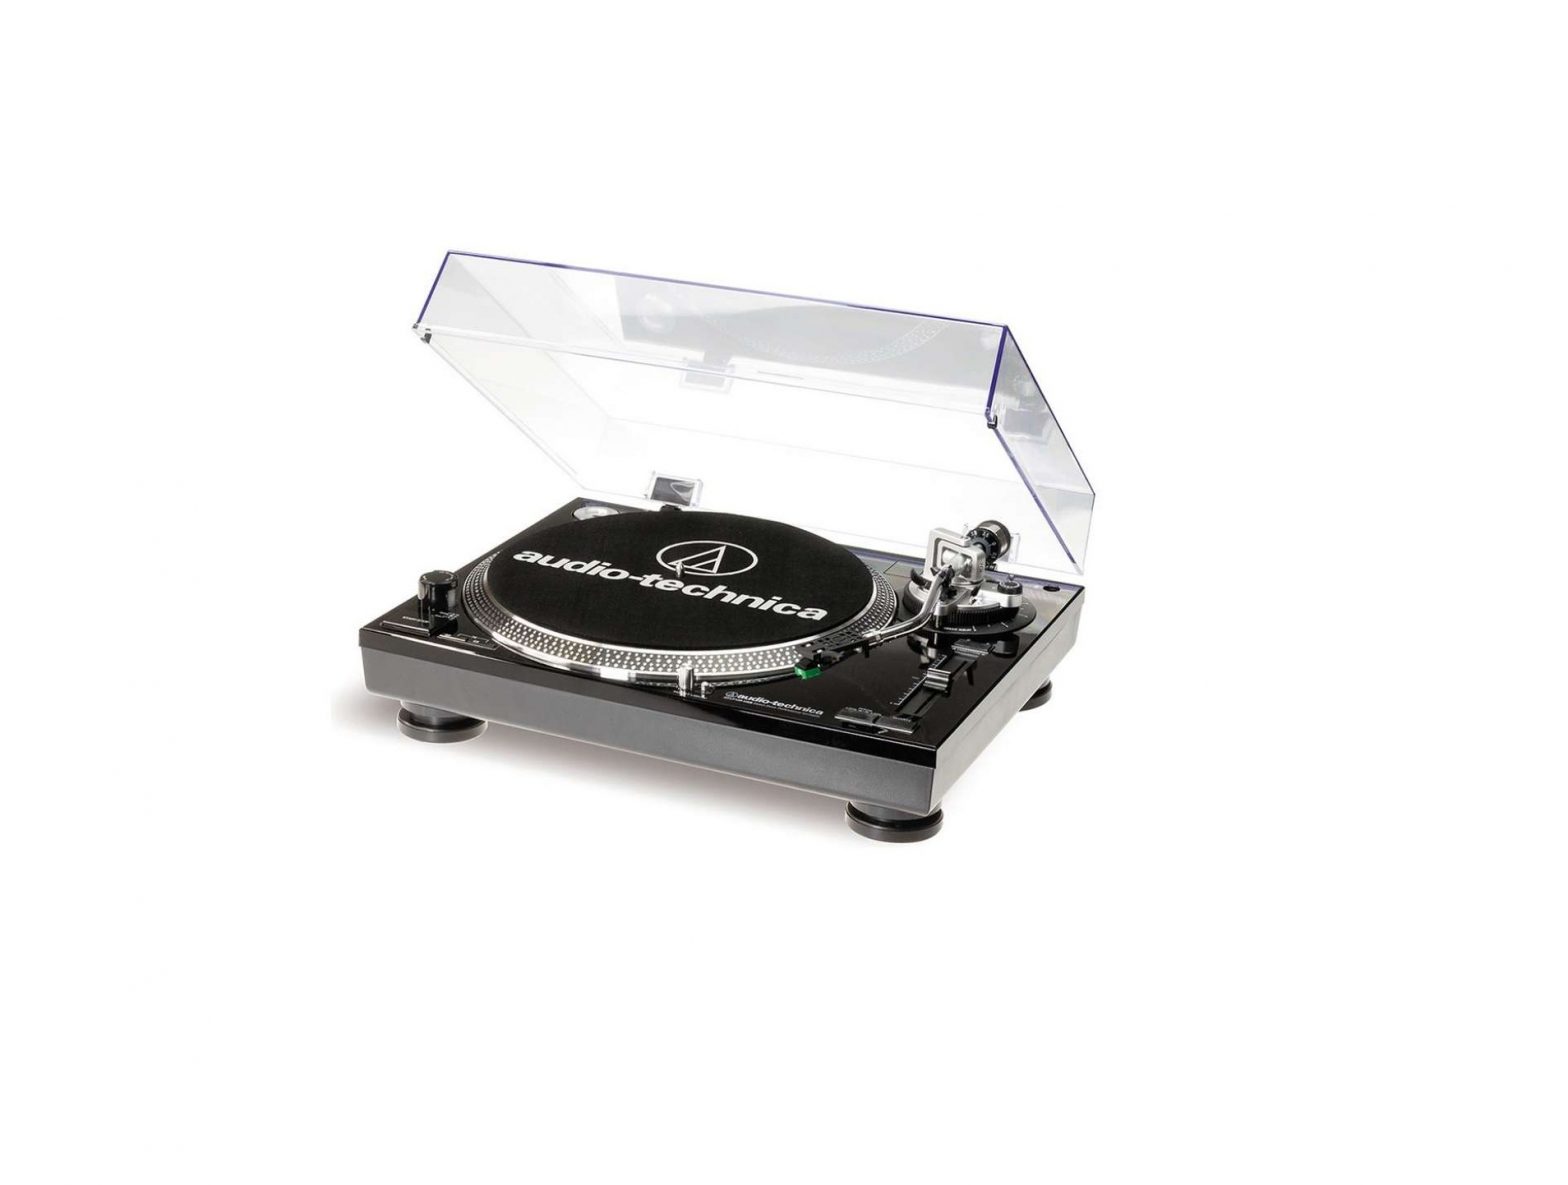
audio technica AT-LP60 Automatic Stereo Turntable System Installation and Operation Manual
Automatic Stereo Turntable System
Safety instructions
- Read these instructions.
- Keep these instructions.
- Heed all warnings.
- Follow all instructions.
- Do not use this apparatus near water.
- Clean only with a dry cloth.
- Do not block any of the ventilation openings. Install in accordance with the manufacturer’s instructions.
- Do not install near any heat sources such as radiators, heat registers, stoves, or other apparatus (including amplifiers) that produce heat.
- Do not defeat the safety purpose of the polarized or grounding plug. A polarized plug has two blades with one wider than the other. A grounding plug has two blades and a third grounding prong. The wide blade or the third prong is provided for your safety. If the provided plug does not fit into your outlet, consult an electrician for replacement of the obsolete outlet.
- Protect the power cord from being walked on or pinched particularly at plugs, convenience receptacles, and the point where they exit from the apparatus.
- Only use attachments/accessories specified by the manufacturer.
- Use only with a cart, stand, tripod, bracket or table specified by the manufacturer, or sold with the apparatus. When a cart is used, use caution when moving the cart/apparatus combination to avoid injury from tip-over.
- Unplug this apparatus during lightning storms or when unused for long periods of time.
- Refer all servicing to qualified service personnel. Servicing is required when the apparatus has been damaged in any way, suchas power-supply cord or plug is damaged, liquid has been spilled or objects have fallen into the apparatus, the apparatus has been exposed to rain or moisture, does not operate normally, or has been dropped.
- Where a mains plug is used as the disconnect device, the disconnect device shall remain readily operable.
- Please keep the unit in a good ventilation environment.
- Apparatus shall not be exposed to dripping or splashing and no objects filled with liquids, such as vases, shall be placedon apparatus.
Caution: To reduce the risk of fire or electric shock, do not expose this apparatus to rain or moisture. The apparatus shall not be exposed to dripping or splashing, and no objects filled with liquids, such as vases, shall be placed on the apparatus.
Warning: To reduce the risk of fire or electric shock, do not expose this apparatus to rain or moisture. The apparatus shall not be exposed to dripping or splashing and that no objects filled with liquids, such as vases, shall be placed on the apparatus.
The lightning flash with arrowhead symbol within the equilateral triangle is intended to alert the use to the presence of uninsulated “dangerous voltage” within the product’s enclosure that may be of sufficient magnitude to constitute a risk of electric shock.
The exclamation point within the equilateral triangle is intended to alert the user to the presence of important operation and maintenance (servicing) instructions in the literature accompanying this appliance.
Caution: To prevent electric shock, do not use this polarized plug with an extension cord, receptacle or other outlet unless the blades can be fully inserted to prevent blade exposure.
Introduction
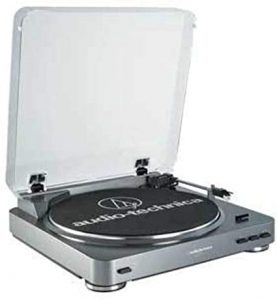
Thank you for purchasing the AT-LP60 automatic stereo turntable system. Audio-Technica has been a leading manufacturer of innovative stereo phonograph products for more than 40 years. We are pleased to provide this turntable, with its excellent performance and many convenient features, for your enjoyment.
- The AT-LP60 stereo turntable system features:
- Fully automatic operation
- Two speeds: 331 /3 RPM and 45 RPM
- Professional aluminum turntable platter
- Integral Audio-Technica Dual Magnet™ phono cartridge with replaceable diamond stylus
- Built-in switchable stereo phono/line level pre-amplifier. Permits use of turntable with stereo systems having either magnetic-phono inputs or “AUX” (line-level) inputs; also allows convenient use of turntable with most powered speakers
- Damped lift/cueing mechanism with front-panel control
- Removable dust cover
To assure maximum satisfaction from this product, please read the information and follow the instructions presented in this manual. Please keep the manual in an accessible location for future reference. We suggest that you save all the packaging materials for possible future storage, moving or shipping.
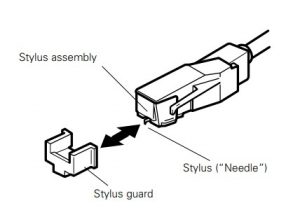
CAUTION: To avoid stylus damage, make certain the included stylus guard is in place whenever the turntable is being installed, moved or cleaned.
Front
- START BUTTONEngages the motor/platter and begins automatic operation.
- STOP BUTTONDisengages the motor/platter and returns tone arm to rest.
- TONE ARM LIFT BUTTONLifts and lowers tone arm for manual selection.
- PLATTER SPEED BUTTONSelect 33 RPM (button in high position) or 45 RPM(button in low position) platter speed.
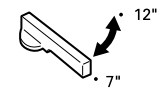
- SIZE SELECTORSelect the size of the record: 12″ or 7″.
- PLATTERAluminum platter mounts directly to center spindle/motor shaft.
- CENTER SPINDLEPrecision-machined platter-mount portion of the motor shaft.
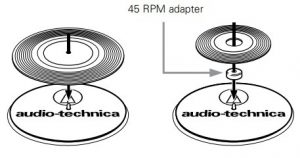
- 45-RPM ADAPTER (Shown in receptacle)Adapts 7″ records with large center holes to fit center spindle.
- DUST COVER HINGE HOLDERSAttachment points for removable hinged dust cover.
- DUST COVER
- TONE ARM/HEADSHELL ASSEMBLYTone arm is permanently attached to the headshell assembly.
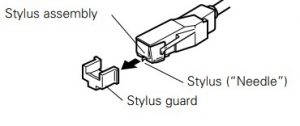
- STYLUS ASSEMBLY
- STYLUS (“NEEDLE”)
- STYLUS GUARD

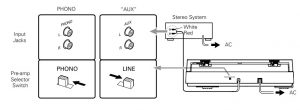
- PRE-AMP SELECTOR SWITCH (PHONO/LINE)(On back of turntable) Use PHONO setting when you connect to the phono input on your home stereo. Use the LINE level when you connect to CD/TAPE/AUX inputs of your home stereo.
Initial Setup
Assembling the Turntable
The AT-LP60 requires some assembly before first use.IMPORTANT: Do not connect the AC power cord until assembly is complete.
- Carefully place the turntable platter on the center spindle, making certain the platter is fully seated on the spindle.
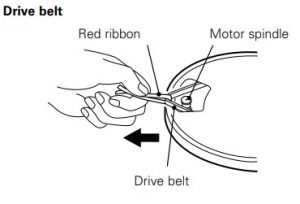
- While holding both ends of the red tape ribbon on theturntable belt, carefully pull the belt over the motor pulley. (If the belt drops off, remove the turntable platter and put the belt back on it,)
- Once the belt is seated in the pulley’s groove, carefully remove the ribbon. Make certain the belt is not twisted.
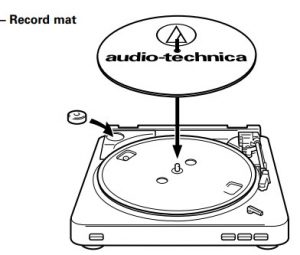
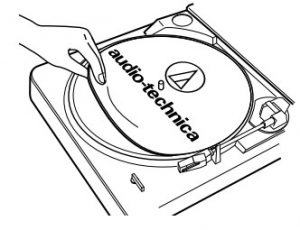
- Place the turntable mat on top of the turntable platter.
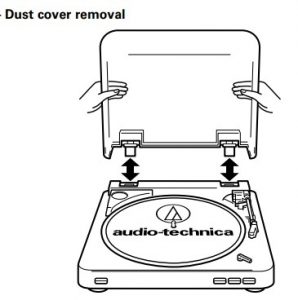
- If desired, the hinged dust cover may be removed. Hold both sides of the dust cover and pull upward gently and evenly to detach the cover from the turntable . Keep the cover in a safe, clean place.
- To re-install the dust cover, guide the dust cover hinges into the two hinge receptacles located at the back of the turntablehousing.
Setting the Pre-amp (Phono/Line) Switch
For increased flexibility of use, this turntable has an internal stereo phono pre-amplifier. The Pre-amp Selector (Phono/Line) Switch is located on the back of the turntable. If the stereo system you are using has a PHONO input, set the Pre-amp Selector Switch to the “PHONO” position. If your stereo system does not have a PHONO input, set the Pre-amp Selector Switch to the “LINE” position and connect the turntable’s output cables to the AUX or other high-level input on your stereo system (described later)
Connecting to Stereo System
- Connect the red RCA-type pin-plug to the right channel input and the white RCA-type pin-plug to the left channel input ofyour stereo system .
- With the tone arm still fastened to the tone arm rest, slowly turn the turntable platter clockwise ten times, to make certainthe automatic mechanism is fully cycled.
- Remove the vinyl tie that holds the tone arm on its rest.
- Connect the power cord plug to an AC outlet.
Connecting to Computers or Audio Devices with 3.5 mm Input
The AT-LP60 connects without adapters to devices equipped with RCA connectors. For maximum flexibility, we have included two adapter cables to fit other popular audio inputs. The first of these adapter cables–dual RCA to stereo 3.5 mm mini-plug (male)–is designed to fit most popular computer* audio inputs. It may also be used to connect the turntable’s RCA output to other equipment,including:
- a stereo/boombox* equipped with a 3.5 mm mini input
- powered speakers* equipped with a 3.5 mm mini input
- a mixer* or PA system* equipped with a 3.5 mm mini jack
The second included adapter cable–dual RCA to stereo 3.5 mm miniplug (female)–permits connection of the turntable output to amplified speakers* or similar devices. The 3.5 mm stereo mini-jack on the cable adapter accepts stereo mini-plugs. To use either adapter cable, connect the turntable’s red and white RCAtype plugs to the cable adapter’s RCA-type jacks.* When using either cable adapter, always set the AT-LP60 turntable’s Pre-amp Selector Switch to the “LINE” position.(Switch is located on the back of the turntable.)
NOTE: If connection is desired to a mono amplifier/speaker, make certain to use a stereo-to-mono adapter, available from your dealer or an electronic parts store. Inserting a mono plug in the stereo jack will disable one of the stereo channels. Other adapter cable configurations will be available from dealers and parts stores for connecting to devices needing different terminations.
Operation
Automatic Operation
- Remove the stylus guard from the stylus assembly.
- Put a record on the turntable. If needed, use the 45 RPM adapter.
- Select the size of record: 12″ or 7″
- Select the speed: 331 /3 RPM or 45 RPM .
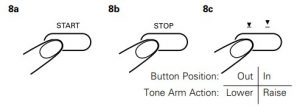
- Start: Gently push the START button . The turntable will start and the tone arm automatically will move to the leading groove. When the record has finished playing, the tone arm automatically will return to the tone arm rest and the turntablewill shut off.
- Stop: To stop playing the record before it reaches the end, press the STOP button. The tone arm will lift andreturn to the tone arm rest, and the turntable will shut off.
- Pause: To pause the record before it has completed playing, press the tone arm Lift button. Press the Lift button again to continue playing the record.

Caution:When the tone arm reaches the end of the record, it will lift and return to the tone arm rest automatically. When this happens, do not interfere with the tone arm’s motion, or damage to the mechanism may occur. If the tone arm does not return automatically to the tone arm rest after the record has finished playing, simply press the STOP button to complete operation.
Manual Operation
- Remove the stylus guard from the stylus assembly .
- Put a record on the turntable. If needed, use the 45 RPM adapter.
- Select the size of record: 12″ or 7″.
- Select the speed: 331 /3 RPM or 45 RPM .
- Press the Lift button IN to raise the tone arm .
- Gently move the tone arm so the stylus is over the point on the record where play is desired to begin.
- Press the Lift button again to gently lower the tone arm and play record.
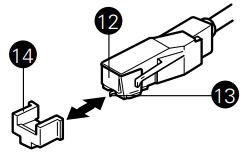
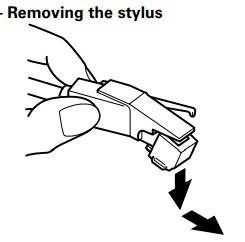
Replacing the Stylus
While holding the head of the tone arm, rotate the front of the stylus assembly in a forward and down motion to remove it.
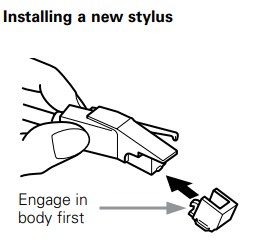
(As you remove the old assembly, note its position and “feel,” to aid in properly installing the new one.) Install the new stylus assembly as shown in Figures 10a/10b, being careful not to touch the actual stylus. Make certain that the projection at the back of the assembly is fully seated in the cartridge body first ,
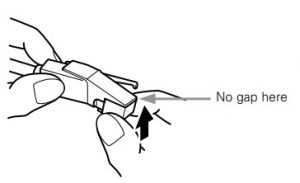
and that the ssembly “clicks” up into place, with no gap between its top edge and the front of the black plastic tone arm head .
Replace the stylus after 400 hours of use.
To maintain original performance, insist upon a genuine Audio-Technica brand replacement stylus. Look for the Audio-Technica trademark on the front of the stylus assembly and on the packaging.
Turntable does not operate
- Make certain the turntable’s AC cord is plugged into an AC outlet, and that the AC outlet is “live.”
- Check the drive belt to make certain it is on correctly.A) Remove the record mat from the turntable platter . Place the mat in the cardboard packaging sleeve for safekeeping.Through an opening in the turntable platter, visually inspect to see if the drive belt is around the motor pulley.B) If the drive belt is not around the motor pulley: Lift and remove the turntable. Place a thumb into each of the left and right openings on the turntable platter; and, using the fingers to press down on the turntable housing’s surface, pull the platter straight up. Avoid pressing on the tone arm.C) With the turntable platter bottom side up, place the belt along the outside wall of the turntable platter’s drive rim, making certain that the belt is smooth and flat all the way around .D) Put the turntable back on the center spindle, make certain it is fully seated, and align one of its openings over the motorpulley position.E) Through the opening, carefully hook the turntable belt with a finger or with the original red ribbon (never use a sharp object) and pull the belt over the motor pulley. Make certain the belt is not twisted between the pulley and the platter’s drive rim.F) Put the record mat back on the platter.G) While holding the tone arm in its rest position, slowly turn the platter by hand clockwise at least 10 rotations to clear themechanism’s automatic cycle.
 A) Remove the record mat from the turntable platter . Place the mat in the cardboard packaging sleeve for safekeeping.Through an opening in the turntable platter, visually inspect to see if the drive belt is around the motor pulley.
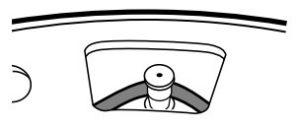 B) If the drive belt is not around the motor pulley: Lift and remove the turntable. Place a thumb into each of the left and right openings on the turntable platter; and, using the fingers to press down on the turntable housing’s surface, pull the platter straight up. Avoid pressing on the tone arm.
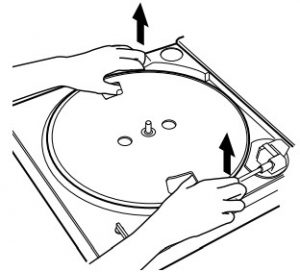 C) With the turntable platter bottom side up, place the belt along the outside wall of the turntable platter’s drive rim, making certain that the belt is smooth and flat all the way around .
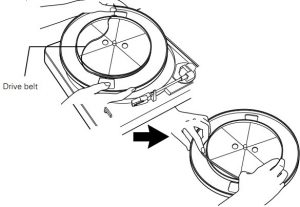 D) Put the turntable back on the center spindle, make certain it is fully seated, and align one of its openings over the motorpulley position.E) Through the opening, carefully hook the turntable belt with a finger or with the original red ribbon (never use a sharp object) and pull the belt over the motor pulley. Make certain the belt is not twisted between the pulley and the platter’s drive rim.
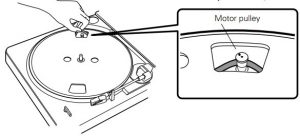 F) Put the record mat back on the platter.G) While holding the tone arm in its rest position, slowly turn the platter by hand clockwise at least 10 rotations to clear themechanism’s automatic cycle.
Turntable operates, but no sound at all
- The stylus guard is still in place.
- The tone arm Lift button is pressed in.
- Amplifier controls set incorrectly: wrong input selected, tape monitor on, speakers switched off, etc.
- Check the stylus on phone cartridge for correct placement. Refer to the instructions for replacing the stylus..
Turntable operates, but no sound, or sound not loud enough
- If the turntable is connected to an AUX (high-level) input: The Pre-amp Selector Switch may be set to the “PHONO” position (phono-input level).
- The input gain of the amplified speaker or similar device may be too low.
- The stylus assembly may not be fully seated in the cartridge body.
Sound is very distorted
- Turntable connected to an amplifier’s PHONO input: If the pre-amp switch is set to the “LINE” position (AUX high-leveloutput), a phono input will be overloaded.
Record/Tone Arm moves slightly up and down
- Usually this is a normal condition and not a problem. If this causes the turntable to be unable to track the record, pleasecontact your dealer or our service department. Make very certain the surface upon which the turntable is resting isnot picking up vibrations from the floor or walls, or from direct speaker sound.
Tips For Better Performance
Tips For Better Performance
- When opening or closing the turntable cover, handle it gently, moving it either at the center or equally from both sides.
- Do not touch the stylus tip with your fingers; avoid bumping the stylus on the turntable mat or a record’s edge.
- Clean the stylus tip frequently, using a soft brush with a back-to-front motion only.
- If you use a stylus cleaning fluid, use it very sparingly.
- Wipe the dust cover and turntable housing gently with a soft cloth. Use only a small amount of mild detergent solution toclean the turntable and dust cover.
- Never apply harsh chemicals or solvents to any part of the turntable system.
- Prior to moving the turntable, always unplug it from the AC outlet and fasten the tone arm on the tone arm rest with thevinyl twist-tie.
Specifications
| Type | Belt drive turntable, fully automatic |
| Platter | Aluminum |
| Motor | DC servo-controlled |
| Speeds | 331/3 RPM, 45 RPM |
| Wow and flutter | Less than 0.25% (WTD) @ 3 kHz (JIS) |
| Signal-to-noise ratio | >50 dB (DIN-B) |
| Cartridge | Integral Dual Magnet™ stereo cartridge with diamond stylus |
| Output level | |
| Pre-amp “PHONO” | 2.5mV nominal at 1 kHz, 5 cm/sec |
| Pre-amp “LINE” | 150 mV nominal at 1 kHz, 5 cm/sec |
| Phono pre-amp gain | 36 dB nominal, RIAA equalized |
| Power | 120V AC, 60 Hz, 3W |
| Dimensions | 360.0 mm (14.17″) W x 97.5 mm (3.84″) H x 356.0 mm (14.02″) D |
| Net weight | 2.98 kg (6.6 lbs.) |
| Furnished accessories | Dual RCA (female) to 3.5 mm (1/8″) mini-plug (male) stereo adapter cable; dual RCA (female) to 3.5 mm (1/8″) mini-plug (female) stereo adapter cable; 45 RPM adapter |
| Replacement stylus | ATN3600L |
System Installation and Operation Manual – audio technica AT-LP60 Automatic Stereo Turntable System Installation and Operation Manual –
[xyz-ips snippet=”download-snippet”]