ATR2500x-USBCardioid Condenser USB MicrophoneUser Manual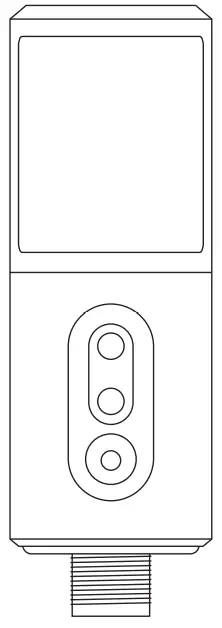
Compliance with FCC rules (the USA only)This device complies with Part 15 of the FCC rules. Operation is subject to the following two conditions:(1) this device may not cause harmful interference, and (2) this device must accept any interference received, including interference that may cause undesired operation.
FCC WARNINGYou are cautioned that any changes or modifications not expressly approved in this manual could void your authority to operate this equipment.Canada onlyThis Class B digital apparatus complies with Canadian ICES-003.Cet appareil numérique de la classe B est conforme á la norme NMB -003 du Canada.
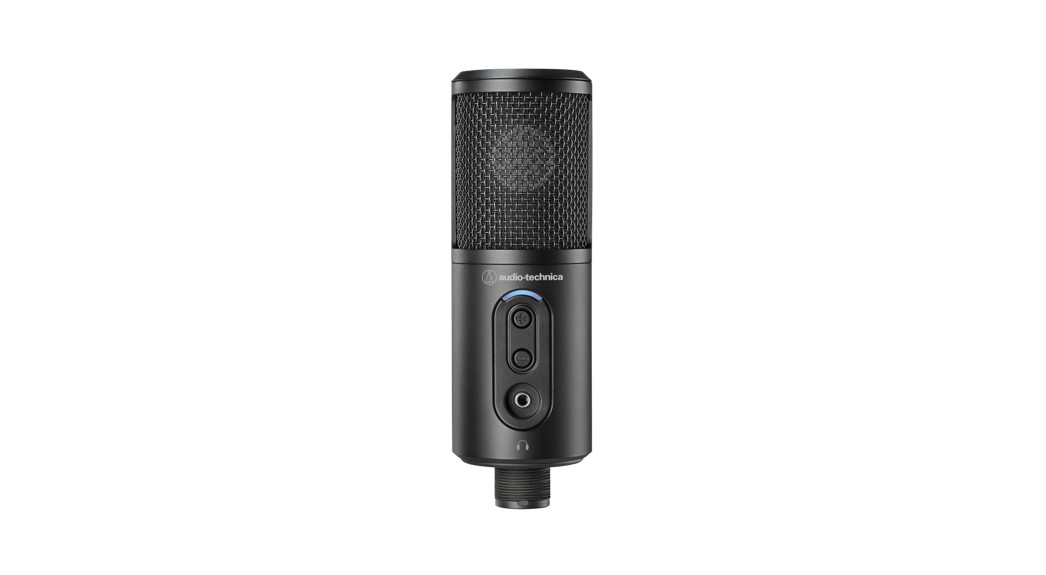
Thank you for buying the Audio-Technica ATR2500x-USB cardioid condenser microphone. Designed for computer-based recording, this microphone is ideal for digitally capturing music or any acoustic audio source using your favorite recording software.Equipped with a USB output for easy connection to your computer, the ATR2500x-USB offers studio-quality articulation and intelligibility perfect for home studio recording, field recording, podcasting, and voice-over use.The ATR2500x-USB also features a built-in headphone jack with volume control that allows you to directly monitor your microphone’s output during recording. The microphone’s focused pickup pattern delivers excellent off-axis rejection, while its A/D converter with up to 24-bit, 192 kHz sampling rate ensures clear, articulate sound reproduction.Audio-Technica’s state-of-the-art design and manufacturing techniques ensure that the microphone complies with the company’s renowned consistency and reliability standards.
Features
- Side-address condenser microphone with USB output for easy connection to your computer
- Ideal for podcasting, home studio recording, field recording, and voice overuse
- Built-in headphone jack lets you monitor directly from the microphone
- Controls on the front of the microphone allow you to easily adjust headphone volume
- High-quality A/D converter with up to 24-bit, 192 kHz sampling rate
- Compatible with Windows and Mac
- Low-mass diaphragm provides excellent frequency response
- Cardioid polar pattern reduces pickup of unwanted sounds from the sides and rear, improving isolation of the desired sound source
- Low self-noise – ideally suited for digital recording
- A sturdy tripod desk stand with folding legs is easy to set up and transport
- Pivoting, threaded stand mount attaches securely to a conventional microphone stand
- Durable metal construction for long-lasting performance
- Includes two 2 m (6.6′) cables: USB-C to USB-C, USB-C to USB-A
ATR2500x-USB Setup
- For desktop useScrew the microphone into the threaded portion of the tripod desk stand. The front of the microphone should face the A-T logo. Extend the tripod legs to provide a wide, secure base, and place the tripod desk stand on a flat surface.Formic stand useScrew the microphone stand clamp to your mic stand. Screw the microphone into the stand clamp.
- Use a screwdriver or coin to loosen/tighten the stand’s pivot screws for angle adjustment.
- Plug one of the provided USB cables into the USB output at the base of the microphone then connect the other end of the cable to your digital recording device.When connecting the microphone to a USB-C port, you must use a USB On-The-Go (USB OTG) cable like the one included.When using equipment that includes a built-in mic, consult that device’s user guide for instructions on disabling its mic.
- Optional headphone monitoring: Connect headphones with 3.5 mm (⅛”) plug into the front of a microphone. Use up/down buttons for volume control.
Preliminary setup with MacOS Mojave
NOTICE Regarding MacOS CatalinaWith the release of MacOS Catalina, Apple has introduced restrictions on using non-Apple software. Unless the recording application is officially supported to run under MacOS Catalina, you will not be able to access the microphone even if it shows up as a sound input device!If you are using an older version of MacOS, your computer will automatically recognize the USB device and install the appropriate driver.If you are using MacOS Mojave, you must enable software access to the microphone, using the security and privacy settings.
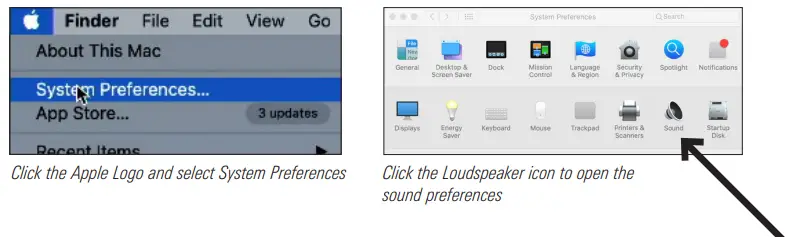
- Connect the ATR2500x-USB microphone to an open USB port on the Mac (Type A or Type C).Open the system preferences by clicking the Apple logo in the upper left corner of the menu bar and selecting System Preferences. Alternatively, you can click on the gear icon in the dock. Click the Loudspeaker icon to open the sound preferences.

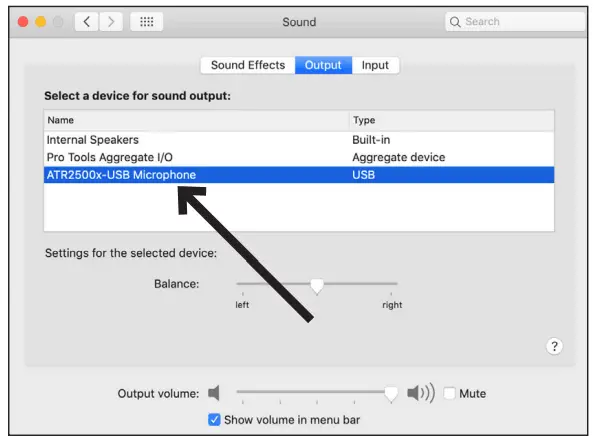
- By default, the Mac selects the internal microphone as the sound input device. When the ATR2500x-USB is plugged in, the Mac assumes that it is the desired input device and automatically selects it.Verify that the ATR2500x-USB is highlighted.The input volume for the microphone can be adjusted by moving the input slider and watching the level meter while speaking into the microphone. Setting the level too low will not provide enough input signal to your recording application. Setting it too high can overload the input to the recording application resulting in clipping or distortion.Note: The output volume slider controls Mac’s speaker or headphone jack output and does not affect the input sound level. This slider replicates the volume control associated with the small speaker icon in the menu bar and the volume controls on the keyboard.Preliminary setup with MacOS Mojave (continued)
- Because the ATR2500x-USB Microphone has a built-in headphone output, the Mac selects it as the output device.Should you desire to use the internal speakers for playback audio, click the Output tab and choose the desired output device.The balance control sets the left to right balance in the output device.The Output volume controls the playback level from the Mac. It is the same as clicking on the small speaker icon in the menu bar and adjusting volume or using the keyboard controls.
With recent updates to MacOS Mojave and the latest MacOS Catalina, Apple implemented a privacy setting allowing you to control which apps have access to the microphone.If you are using MacOS Mojave, you must enable software access to the microphone, using the security and privacy settings.
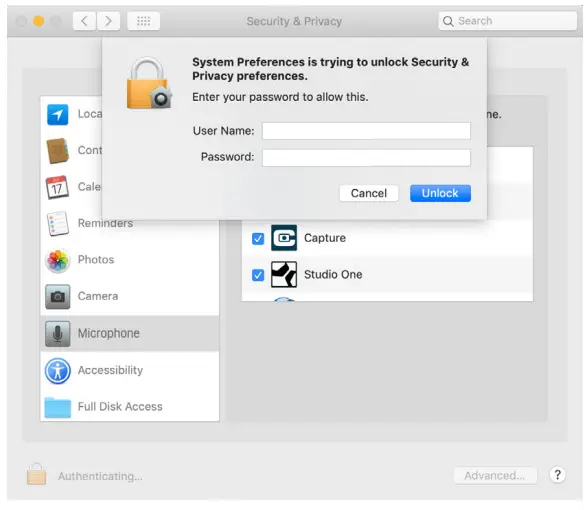
- In order to use the ATR2500x-USB microphone with certain applications, you need to verify that the apps are enabled to have access to the microphone.Open the system preferences and click on the Security and Privacy icon.
- To make changes, you will need to unlock the padlock on the Security and Privacy window by entering your user name and password.Scroll down to make certain the apps you want to use the microphone with are enabled. If not, use the switch slider associated with the App to turn it on.
- Click the microphone icon and verify that a checkmark appears next to the applications that need access to the microphone.Make certain to click the lock to lock it after making the changes.

Advanced setup with MacOS Mojave
Advanced Sound Settings
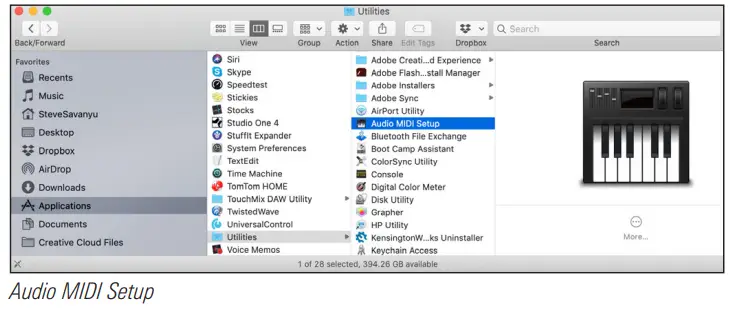
- At this point, the Mac is set up to use the ATR2500x-USB microphone as the input device and your selection as the output device. The sample rate is set for the default value (44.1 kHz CD Quality). However, additional settings are available that enable you to change the audio sampling rate and individually adjust left and right input signal levels if you desire.To access these settings, open a new finder window and navigate to “Applications—Utilities” and double-click the Audio MIDI Setup application.
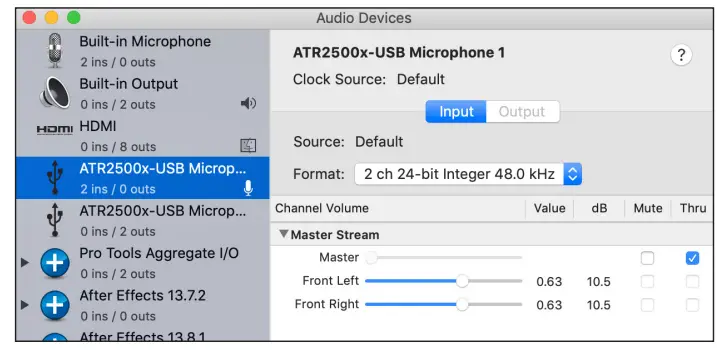
- A list of audio devices appears on the left side and the adjustable settings for the selected device appear on the right.The ATR2500x-USB appears as two separate devices. One is an input device (2 ins / 0 outs) while the other represents its output (0 ins / 2 outs).Clicking the input device (2 ins / 0 outs) shows the current settings.The Format section contains the sample rate settings.The Master Stream section allows you to individually adjust the microphone signal levels for the left and right audio inputs.Select input version ATR2500x-USB with 2 ins / 0 outs
Advanced setup with MacOS Mojave (continued)
- The ATR2500x-USB is capable of very high-quality recording and supports sample rates of up to 192 kHz. In some situations, higher sample rates can provide better results. However, as the sample rate increases, the file size becomes much larger.If you are recording voice-overs for video or music that will be synchronized with video, the default sample rate needs to be changed from 44.1 kHz to 48 kHz.To change the sample rate, click the drop-down arrows next to the Format box. A sub-window opens listing available sample rates. Click on the desired one to choose it and close the sub-window.Remember that the selected sample rate must match the value set in your recording application or you will hear pops and clicks in the recorded audio.
 Select input version ATR2500x-USB with 2 ins / 0 outs
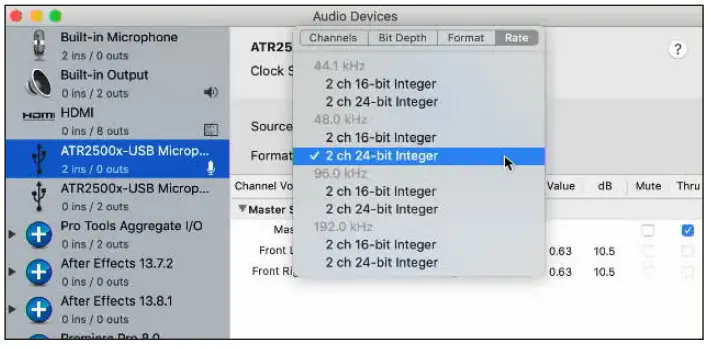
Preliminary setup with Windows 10
If you are using an older version of Windows, your computer will automatically recognize the USB device and install the appropriate driver.The first time you plug the microphone in, you may see a message that new hardware has been found, or you may see a driver software installed notice. After the first time, you will not see any of these as the computer has already installed the necessary drivers for a USB microphone.When the ATR2500x-USB microphone is connected, Windows 10 will automatically select it as the input and output device.
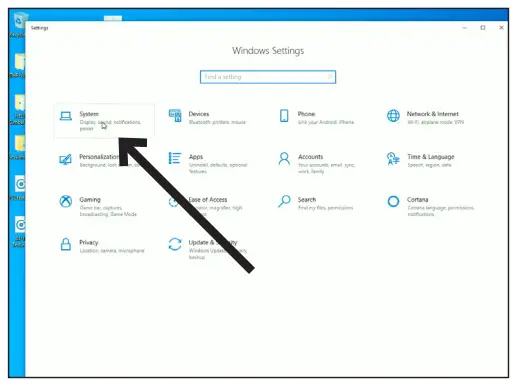
- To verify or make changes click the Start window and click settings (the gear).
- When the settings window opens, click “System.”Preliminary setup with Windows 10 (continued)
- When the System window opens, in the left column, click “Sound.”
- The Sound tab opens showing the active input and output device which should be the USB microphone.To use the computer speakers as your output device, click “Choose your output device” and in the drop-down menu choose the desired item.

 Preliminary setup with Windows 10 (continued)
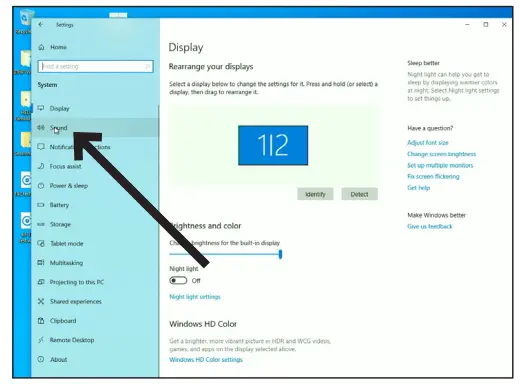

At this point, your computer is set up to use the ATR2500x-USB microphone as the audio input device and whatever you chose as the audio output device. However, in the recent versions of Windows 10, Microsoft has instituted some additional privacy settings, allowing users to control which apps and programs have access to the microphone. Refer to the section on privacy for more information.There are additional settings available for the microphone, allowing you to set the input level, change the sampling rate and manage other aspects of the audio. Refer to the next section for more details.
Advanced setup with Windows 10
At this point, Windows 10 is set up to use the ATR2500x-USB microphone as the input and output device. The sample rate is set for the Windows default (44.1 kHz CD Quality). However, additional settings are available, including input level and sampling rate.
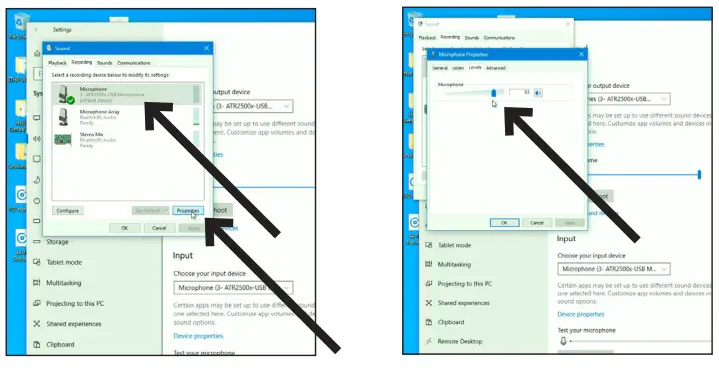
- To access these settings, click “Sound Control Panel.”
- When the Sound Control Panel opens, select the “Recording” tab and select the ATR2500x-USB microphone.
- Click “Properties.”
- Click the Levels tab and move the slider to the right or left to set the input gain for the microphone. Setting it too low will not provide enough signal to your recording application. Setting it too high can cause the recording application to distort.Note that this level setting is different from the volume control slider on the main sound settings window.Advanced setup with Windows 10 (continued)
- The ATR2500x-USB is capable of very high-quality recording and supports sample rates of up to 192 kHz. In some situations, higher sample rates can provide better results. However, as the sample rate increases, the file size becomes much larger.If you are recording voice-overs for video or music that will be synchronized with video, the default sample rate needs to be changed from 44.1 kHz to 48 kHz.To change the sample rate, click the Advanced tab. The default sample rate (44100 Hz CD Quality) is shown in the drop-down box. Click the drop-down and choose the desired sample rate.
- Leaving the “Exclusive Mode” boxes checked allows the recording application to take control of the microphone.This will set the sample rate correctly based on the recording project settings.When the sample rate is changed, a “Device in use” warning dialog box appears letting you know that a change has been made that may affect other applications (non-exclusive) that might be using the microphone.Click “Yes” to continue and use the new sample rate.

 Advanced setup with Windows 10 (continued)
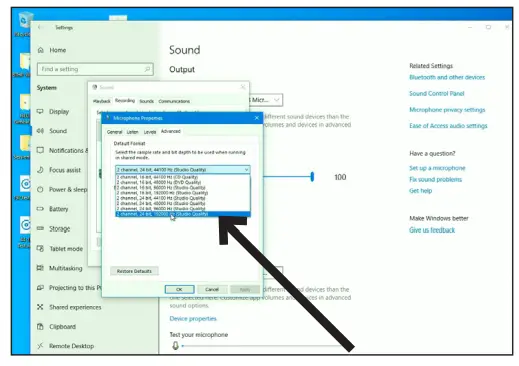
With recent updates to Windows 10, Microsoft has included a privacy setting allowing you to control which apps have access to the microphone.In order to use the ATR2500x-USB microphone with certain applications, you need to verify that the apps are enabled to have access to the microphone.
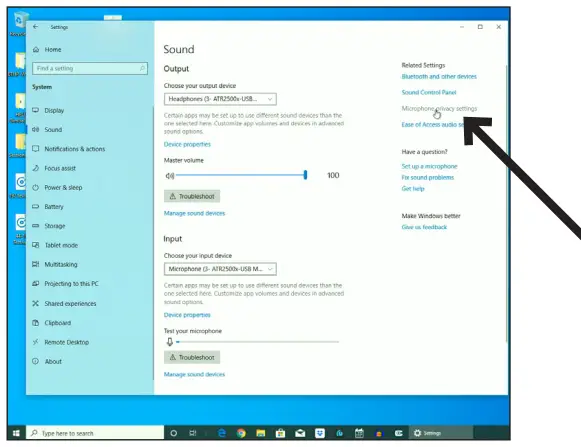
- In the main Sound setup window, click the “Microphone privacy settings.”
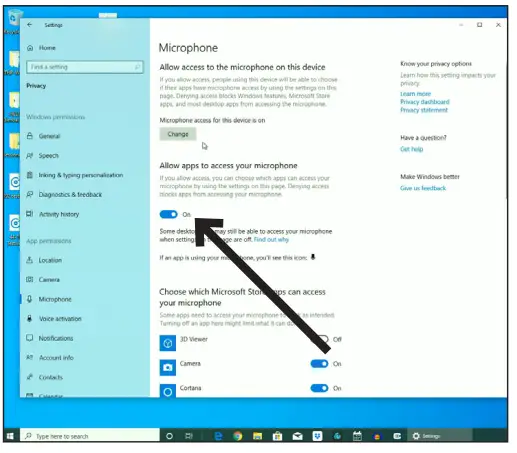
- The Privacy settings window for the microphone opens. Verify that the “Allow apps to access your microphone” switch is set to “On.”
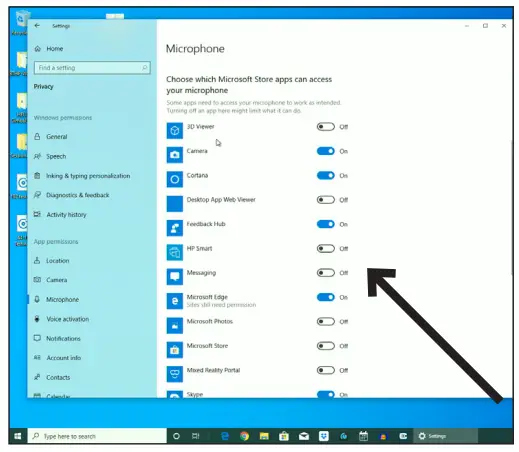
- Scroll down to make certain the apps you want to use the microphone with are enabled. If not use the switch slider associated with the app to turn it on.
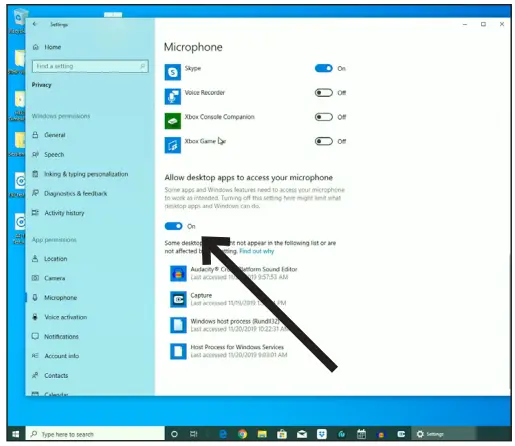
- Scroll down to the section ”Allow desktop apps to access your microphone” and verify that the switch is turned on. This allows applications such as Audacity to have access to the microphone (or other chosen audio source).
Additional Information
Using HeadphonesThe 1/8″ (3.5 mm) headphone jack on the bottom of the microphone allows you to directly monitor your recording with a pair of headphones. When your preliminary setup is completed, and your USB microphone is connected to your computer’s USB port (the microphone’s blue LED is illuminated), plug your headphones into the headphone jack on the bottom of the microphone. While talking into the microphone, you should hear yourself in the headphones. Adjust the volume up or down by pressing the Up and Down buttons on the front of the microphone. Note: The Up andDown buttons only adjust the volume of the mic’s headphone output; they do not adjust the microphone level.
Selecting softwareYou have many choices in recording software. Audacity, available for free online at http://audacity.sourceforge.net/, is a widely used software program that provides basic recording software.Setting your software levelsCorrect adjustment of microphone level is important for optimum performance. Ideally, the microphone level should be as high as possible without overloading the input of your computer. If you hear distortion, or if your recording program shows levels that are consistently overloaded (at peak levels), turn the microphone volume (or level) down, either through your control panel (or system preferences) settings or through your recording software. If your recording program shows an insufficient level, you can increase the microphone gain either from the control panel (or system preferences) settings or through your recording program.No further microphone level adjustments should be needed, as long as the acoustic input does not change significantly.Positioning your microphoneIt is important to position the microphone directly inline (on-axis) with the person speaking/singing or instrument (or another sound source) to achieve the best frequency response of the microphone.For use in speaking/singing applications, the ideal placement for the microphone is directly in front of the person speaking/singing. The same placement is optimal when making an instrument such as an acoustic guitar, drums, or piano. Experiment with different mic placements to find the best sound for your particular setup.Protecting your microphoneAvoid leaving your microphone in the open sun or in areas where temperatures exceed 110° F (43° C) for extended periods. Extremely high humidity should also be avoided.
ATR2500x-USB Specifications †
Element: CondenserPolar Pattern: CardioidFrequency Response: 30 – 15,000 HzPower Requirements: USB Power (5V DC)Bit Depth: Up to 24 bitSample Rate: 44.1 kHz/48 kHz/96 kHz/192 kHzControls: Headphone volume (up/down) buttonsWeight: 366 g (12.9 oz)Dimensions: 155.0 mm (6.10″) long, 50.0 mm (1.97″) maximum body diameterOutput Connector: USB-CHeadphone Output Power: 10 mW @ 16 ohmsHeadphone Jack: 3.5 mm ( 1 /8″) TRS (stereo)Accessories Furnished: Pivoting stand mount for ⅝”-27 threaded stands, tripod desk stand, 2 m (6.6′) USB-C to USB-C cable (USB On-The-Go Compliant), 2 m (6.6′) USB-C to USB-A cableSystem Requirements: Macintosh: Mac OS X; USB 1.0 or 2.0; 64 MB RAM (minimum);Windows: Windows 7/8/10; USB 1.0 or 2.0; 64 MB RAM (minimum)†In the interest of standards development, A.T.U.S. offers full details on its test methods to other industry professionals on request.Specifications are subject to change without notice.
Frequency Response

Polar Pattern

ATR2500x-USB U.S. Lifetime Limited Warranty
This product is warranted in the U.S.A. by Audio-Technica U.S., Inc. (A.T.U.S.) for the lifetime of the original purchaser.During the warranty period, A.T.U.S. will repair or replace these products, provided they are sent prepaid to the address below, with proof of original purchase and $15.00 for handling and return to a U.S. address. Check or money order required; no cash or stamps. A.T.U.S. reserves the right to replace any product with one of equal value.Except to the extent precluded by applicable state law, A.T.U.S. will have no liability for any consequential, incidental, or special damages; any warranty of merchantability or fitness for a particular purpose expires when this warranty expires. This warranty gives you specific legal rights, and you may have other rights which vary from state to state.Outside the U.S.A., please contact your local dealer for warranty details.
Register your product at audio-technica.comAudio-Technica U.S., Inc.1221 Commerce Drive, Stow, Ohio 44224 USA
Audio-Technica Corporation (Headquarters)2-46-1 Nishi-Naruse, Machida, Tokyo, 194-8666, JapanAudio-Technica U.S., Inc.1221 Commerce Drive, Stow, Ohio, 44224, USAwww.audio-technica.com© 2019 Audio-Technica Corporation P52831
 report this ad
References
[xyz-ips snippet=”download-snippet”]