
audio-technica Cardioid Condenser USB
Microphone Instruction Manual
![]()
FCC Notice
WarningThis device complies with Part 15 of the FCC Rules. Operation is subject to the following two conditions: (1) This device may not cause harmful interference, and (2) this device must accept any interference received, including interference that may cause undesired operation.
CautionYou are cautioned that any changes or modifications not expressly approved in this manual could void your authority to operate this equipment.
Note: This equipment has been tested and found to comply with the limits for a Class B digital device, pursuant to part 15 of the FCC Rules. These limits are designed to provide reasonable protection against harmful interference in a residential installation. This equipment generates, uses and can radiate radio frequency energy and, if not installed and used in accordance with the instructions, may cause harmful interference to radio communications. However, there is no guarantee that interference will not occur in a particular installation. If this equipment does cause harmful interference to radio or television reception, which can be determined by turning the equipment off and on, the user is encouraged to try to correct the interference by one or more of the following measures:
- Reorient or relocate the receiving antenna.
- Increase the separation between the equipment and receiver.
- Connect the equipment into an outlet on a circuit different from that to which the receiver is connected.
- Consult the dealer or an experienced radio/TV technician for help.
IC statementCAN ICES-3 (B) / NMB-3 (B)
Introduction
Thank you for buying the Audio-Technica AT2020USB+ Cardioid Condenser USB Microphone. Equipped with a USB output, this microphone is designed for digitally capturing music or any acoustic audio source using your favorite recording software. The AT2020USB+ offers studio-quality articulation and intelligibility perfect for home studio recording, field recording, podcasting, and voiceover use.
The AT2020USB+ features a built-in headphone jack with volume control that allows you to directly monitor your microphone signal with no delay. It also offers mix control that blends microphone and pre-recorded audio. The microphone’s cardioid pickup pattern delivers excellent off-axis rejection, while its A/D converter with a 16-bit, 44.1/48 kHz sampling rate ensures extremely articulate sound reproduction.
Audio-Technica’s state-of-the-art design and manufacturing techniques ensure that the microphone complies with the company’s renowned consistency and reliability standards.
Features
- Condenser microphone with USB output for digital recording
- High quality A/D and D/A converter with 16 bit, 44.1/48 kHz sampling rate for superb audio
- Headphone jack with volume control allows you to monitor the microphone signal with no delay
- Mix control allows you to blend your microphone signal and pre-recorded audio
- High-output internal headphone amplifier delivers superior clarity and musical detail as well as more volume overall
- Smooth, extended frequency response ideally suited for podcasting, home studio recording, field recording and voiceover use
- Compatible with Windows 7, 8, 8.1,10 and Mac OS X
- Tripod desk stand with folding legs for secure and easily portable tabletop use
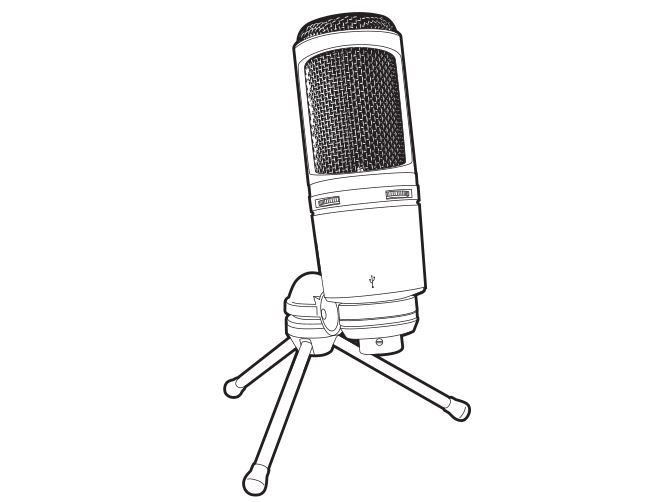
AT2020USB+

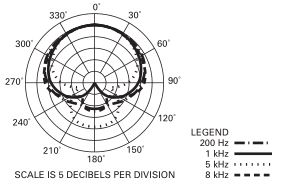
- Capsule — Condenser microphone element with cardioid polar pattern
- Blue LED — Blue light shows microphone is receiving USB power
- Headphone Level Control — Dial controls headphone volume
- Mix Control — Blends microphone and pre-recorded audio
- Headphone Jack — 1/8-inch (3.5 mm) stereo jack for connecting your headphones
- Metal Construction — Tough, durable, resilient design
- USB Connector — Use the included USB cable to connect AT2020USB+ to your Mac or PC
- USB Cable
Setting up your microphone with included pivot mount and tripod desk stand
- A. Screw the pivot mount onto the top of the tripod desk stand.
- B. Place the tripod desk stand on a flat surface. (The tripod legs will extend to provide a wide, secure base.)
- C. Install the AT2020USB+ microphone into the threaded collar of the pivot mount and tighten collar while holding the microphone in place. The front of the microphone should be facing the sound source. (A USB icon and blue LED indicate the front of the microphone; the product model number is displayed on the rear of the microphone.)
- D. If necessary, adjust the microphone’s angle with the pivot mount’s thumbscrew.
- E. Plug the provided USB cable into the USB digital output at the base of the microphone.
Note: Many recording software programs are available online. Audacity is widely used free software for recording and editing sounds. It is available online at http://audacity.sourceforge.net/
Preliminary setup with Mac OS X
- Plug the free end of the provided USB cable into the USB port on your computer. The microphone’s blue LED will illuminate, indicating the microphone is receiving power. Your computer will automatically recognize the USB device and install a driver.
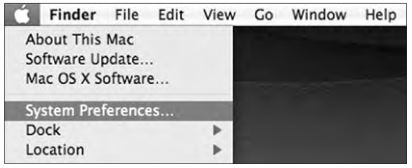
- To select the AT2020USB+ as your audio input, first, open your System Preferences.

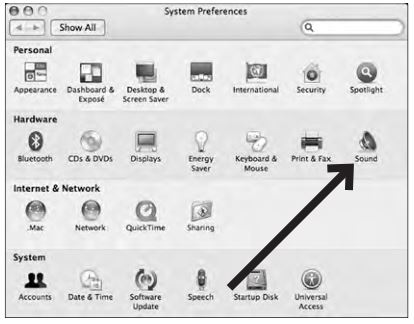
- Next, click Sound to display the Sound preference pane.
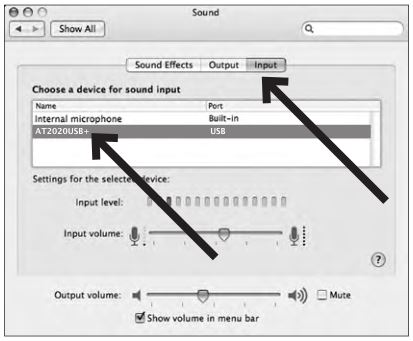
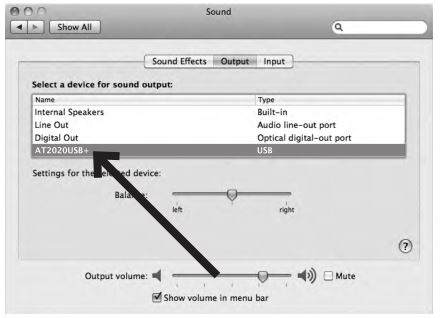
- Click the Input tab and select the AT2020USB+ as the device for sound input.
- Click the output tab and make certain AT2020USB+ is selected as the default output device. (This should have happened automatically.) Your preferences are now set to use the AT2020USB+ on your Mac with GarageBand or another recording program of your choice.
 Your preferences are now set to use the AT2020USB+ on your Mac with GarageBand or another recording program of your choice.
Preliminary setup with Windows 7
- Plug the free end of the USB cable into the USB port on your computer. The microphone’s blue LED light will illuminate, indicating the mic is receiving power. Your computer will automatically recognize the USB device and install a driver.
- In the lower right portion of your screen you may get a message that new hardware was found; or you may see a driver software installation notice.
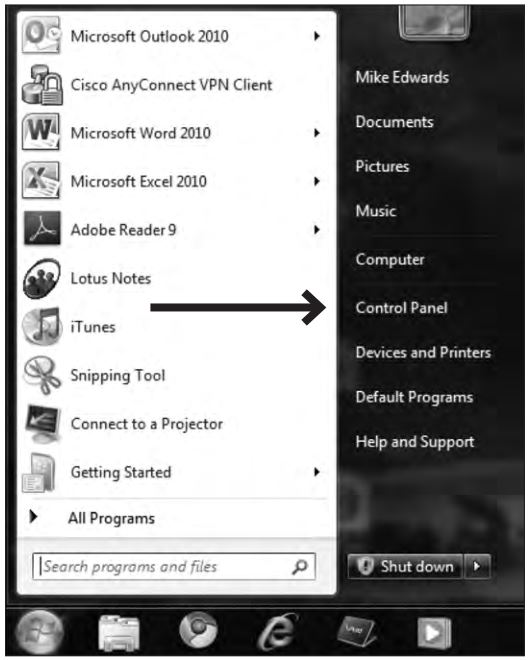
- Start menu > Control Panel > SoundTo select the AT2020USB+ as your default recording device, begin at your Start menu. Select Control Panel.
- Select Sound.
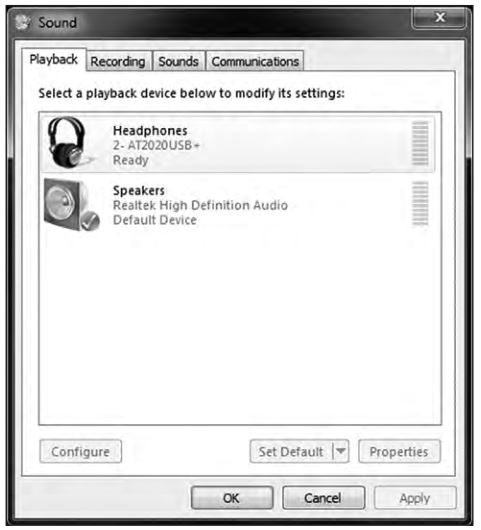
- The following screen will pop up:
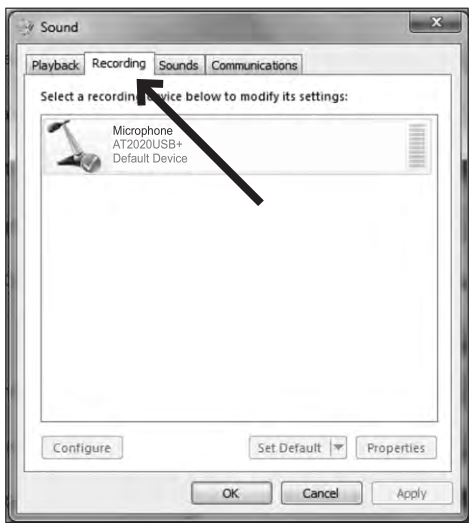
- Select the Recording tab, and choose AT2020USB+ as the default device.
- Double click on the AT2020USB+ icon to open the Microphone Properties window. Select the Levels tab to adjust microphone level (loudness). You may need to come back to this window to readjust the level after you begin recording. Your preferences are now set to use the AT2020USB+ with Windows 7 and the recording program of your choice.

Additional Information
Using headphonesWarning: Turn the volume control down before using the headphones.
The 1/8″ (3.5 mm) headphone jack on the rear of the microphone allows you to directly monitor your recording without the delay that occurs when monitoring through your computer’s headphone output. When your preliminary setup is completed, and your USB microphone is connected to your computer’s USB port (the microphone’s blue LED is illuminated), plug your headphones into the headphone jack on the rear of the microphone. While talking into the microphone, you should hear yourself in the headphones. (If Mix Control is set on COM you may not be able to hear yourself. Set Mix Control between COM and MIC to assure you will be able to hear live audio through your headphones.)
Adjust the volume by rotating the Headphone Level Control dial on the front of the microphone. Note: The Headphone Level Control dial only adjusts the volume of the mic’s headphone output; it does not adjust the microphone level.
Note: The AT2020USB+ is equipped with a high-output internal headphone amplifier that provides superior clarity and musical detail as well as more volume overall.
Using Mix ControlThe AT2020USB+ allows you to monitor previously recorded tracks while recording new audio. Adjust the Mix Control to balance levels of live audio from your microphone and pre-recorded audio on your computer. Turn the Mix Control dial towards COM (computer) to hear more pre-recorded audio; turn the dial towards MIC (microphone) to hear more of your voice or instrument in the mix.
Selecting softwareYou have many choices in recording software. Audacity, available for free online at http://audacity.sourceforge.net/, is a widely used software program that provides basic recording software.
Setting your software levelsCorrect adjustment of microphone level is important for optimum performance. Ideally, the microphone level should be as high as possible without overloading the input of your computer. If you hear distortion, or if your recording program shows levels that are consistently overloaded (at peak levels), turn the microphone volume (or level) down, either through your control panel (or system preferences) settings, or through your recording software. If your recording program shows insufficient level, you can increase the microphone gain either from the control panel (or system preferences) settings or through your recording program.
No further microphone level adjustments should be needed, as long as the acoustic input does not change significantly.
Positioning your microphoneIt is important to position the microphone directly in line (on axis) with the person speaking/ singing or instrument (or other sound source) to achieve the best frequency response of the microphone.
For use in speaking/singing applications, the ideal placement for the microphone is directly in front of the person speaking/singing. The same placement is optimal when miking an instrument such as an acoustic guitar, drums or piano. Experiment with different mic placements to find the best sound for your particular setup.
Protecting your microphoneAvoid leaving your microphone in the open sun or in areas where temperatures exceed 110° F (43° C) for extended periods. Extremely high humidity should also be avoided.
AT2020USB+ Specifications
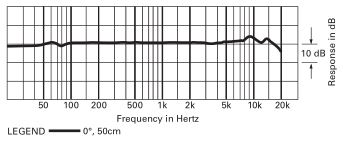
Element: Fixed-charge back plate, permanently polarized condenserPolar Pattern: CardioidFrequency Response: 20 20,000 HzPower Requirements: USB Power (5V DC)Bit Depth: 16 bitSample Rate: 44.1/48 kHzControls: Mix control; Headphone volume controlWeight: 386 g (13.6 oz)Dimensions: 162.0 mm (6.38″) long, 52.0 mm (2.05″) maximum body diameterOutput Connector: USB-typeHeadphone Output Power: 130 mW (at 1 kHz, 10% T.H.D., 32 ohm load)Headphone Jack: 3.5 mm (1/8″) TRS (stereo)Accessories Included: Pivoting stand mount for 5/8″-27 threaded stands; 5/8″-27 to 3/8″-16 threaded adapter; soft protective pouch; tripod desk stand; 10′ (3.1 m) USB cableSystem Requirements: Macintosh: Mac OS X; USB 1.0 or 2.0; 64 MB RAM (minimum) Windows: Windows 7, 8, 8.1,10 ; USB 1.0 or 2.0; 64 MB RAM (minimum)
In the interest of standards development, A.T.U.S. offers full details on its test methods to other industry professionals on request. Specifications are subject to change without notice.
Frequency Response
Polar Pattern
To reduce the environmental impact of a multi-language printed document, product information is available online at www.audio-technica.com in a selection of languages.
Warranty
(Please be sure to read the notes below.)
For USA only
End-User LIMITED WARRANTY information for the USA is available at www.audio-technica.com/usawarranties. You may also contact Audio-Technica U.S., Inc. to request a written copy of the Limited Warranty at 1-330-686-2600 or via mail at 1221 Commerce Drive, Stow, OH 44224.
Audio-Technica Corporation2-46-1 Nishi-naruse, Machida, Tokyo 194-8666, Japan ©2017 Audio-Technica CorporationGlobal Support Contact: www.at-globalsupport.com
P52458 ver.1 2012.11.01149405940-01-02 ver.2 2017.07.20
References
[xyz-ips snippet=”download-snippet”]