 AT-LP1240-USBXP EDITION
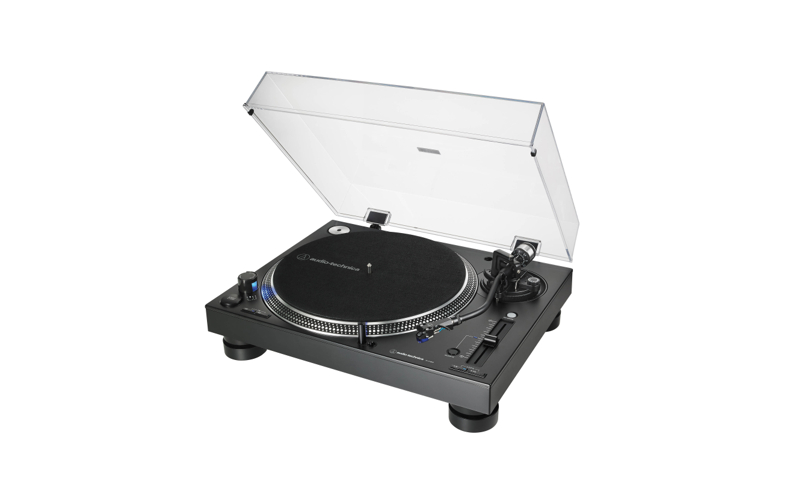
User ManualDirect Drive Professional Turntable
Introduction
Thank you for purchasing this Audio-Technica product.Before using the product, read through this user manual to ensure that you will use the product correctly. Please keep this manual for future reference. This product can be used only in the countries where the product is sold. Make sure that the operating voltage of the product is correct for the country you live in.
Package contents
Make sure that you have all the included items listed below before using this product.If some items are missing or damaged, contact your local Audio-Technica dealer.
- Turntable body
- Dust cover
- Platter
- Slipmat
- Counterweight
- Headshell (AT-HS1) with cartridge (AT-XP5)
- 45 RPM adapter
- USB cable (1.9 m (6.2′))
- RCA audio cable (Approx. 1.4 m (4.6′))
- Power cable
- Stylus target light
- User manual (this document)After purchase, we suggest that you save all packaging materials for possible future storage, moving, or shipping.
Safety precautions
Although this product was designed to be used safely, failing to use it correctly may result in an accident. To ensure safety, observe all warnings and cautions while using the product.
Cautions for the product
Warning:
- Do not use a power cable other than the included one. Doing so may cause a fire, electric shock, damage, or malfunction.
- Stop using the product and disconnect the power cable from the product if the product begins to malfunction, producing smoke, odor, heat, unwanted noise, or showing other signs of damage. In such a case, contact your local Audio-Technica dealer. Continuing to use the product may cause fire or damage.
- Do not place any naked flame sources (such as lighted candles) on the product.
- Do not disassemble, modify or attempt to repair the product to prevent electric shock, malfunction, or fire.
- Do not subject the product to strong impact to prevent electric shock, malfunction, or fire.
- Do not handle the product with wet hands to prevent electric shock or injury.
- Do not expose the product to drips or splashes to prevent electric shock, malfunction, or fire.
- Do not put foreign matter such as combustible materials, metal, or liquid in the product to prevent electric shock, malfunction, or fire.
- Do not cover the product with a carpet or a cloth to prevent fire or injury by overheating.
- Store the included plastic bag out of the reach of small children or away from heat sources to prevent accidents or fire.
- Place the product close enough to the AC outlet to easily grasp the power cable plug at any time. In case of emergency, disconnect the power cable plug of the product quickly.
- Connect the product with Class Ⅰ construction to the AC outlet with a protective grounding connection. Caution:
- Do not install the product on an unstable surface to prevent injury or damage from the product falling.
- Do not install the product in a poorly ventilated place to prevent accidents or fire by accumulated heat. Make enough clearance around the product to radiate heat when installing it on a rack.
- Do not store the product in direct sunlight, near heating devices, or in hot, humid, or dusty places to prevent electric shock, malfunction, or fire.
- Do not place any objects filled with liquids, such as vases, on the product to prevent electric shock, malfunction, or, in the worst case, fire in the worst case.
- Do not use chemicals such as benzene, thinner, or electrical contact cleaner to prevent damage or malfunction.
For customers in the USA
UL/CSA notice


Caution:To prevent electric shock, do not remove the cover. There are no user-serviceable parts inside. Internal adjustments are for qualified professionals only. Refer all servicing to qualified service personnel.
 The lightning Flash Symbol, with “The Lightning Flash with arrowhead symbol within an equilateral triangle, is intended to alert the user to the presence of uninsulated “dangerous voltage” within the product enclosure that may be of sufficient magnitude to constitute a risk of shock to persons”.
The Exclamation Point Symbol, with “The exclamation point within an equilateral triangle is intended to alert the user to the presence of important operating and maintenance (servicing) instructions in the literature accompanying the product”.
Caution: To prevent electric shock, do not use this polarized plug with an extension cord, receptacle, or another outlet unless the blades can be fully inserted to prevent blade exposure.
Safety instructions
- Read these instructions.
- Keep these instructions.
- Heed all warnings.
- Follow all instructions.
- Do not use this apparatus near water.
- Clean only with dry cloth.
- Do not block any ventilation openings. Install in accordance with the manufacturer’s instructions.
- Do not install near any heat sources such as radiators, heat registers, stoves, or other apparatus (including amplifiers) that produce heat.
- Do not defeat the safety purpose of the polarized or grounding-type plug. A polarized plug has two blades with one wider than the other. A grounding-type plug has two blades and a third grounding prong. The wide blade or the third prong are provided for your safety. If the provided plug does not fit into your outlet, consult an electrician for the replacement of the obsolete outlet.
- Protect the power cord from being walked on or pinched particularly at plugs, convenience receptacles, and the point where they exit from the apparatus.
- Only use attachments/accessories specified by the manufacturer.
- Use only with the cart, stand, tripod, bracket, or table specified by the manufacturer, or sold with the apparatus. When a cart is used, use caution when moving the cart/apparatus combination to avoid injury from tip-over.
- Unplug this apparatus during lightning storms or when unused for long periods of time.
- Refer all servicing to qualified service personnel. Servicing is required when the apparatus has been damaged in any way, such as power-supply cord or plug is damaged, liquid has been spilled or objects have fallen into the apparatus, the apparatus has been exposed to rain or moisture, does not operate normally, or has been dropped.
Safety precautions
FCC Notice
Warning:This device complies with Part 15 of the FCC Rules. Operation is subject to the following two conditions: (1) This device may not cause harmful interference, and (2) this device must accept any interference received, including interference that may cause undesired operation.Caution:You are cautioned that any changes or modifications not expressly approved in this manual could void your authority to operate this equipment.Note: This equipment has been tested and found to comply with the limits for a Class B digital device, pursuant to part 15 of the FCC Rules. These limits are designed to provide reasonable protection against harmful interference in a residential installation. This equipment generates, uses, and can radiate radio frequency energy and, if not installed and used in accordance with the instructions, may cause harmful interference to radio communications. However, there is no guarantee that interference will not occur in a particular installation. If this equipment does cause harmful interference to radio or television reception, which can be determined by turning the equipment off and on, the user is encouraged to try to correct the interference by one or more of the following measures: – Reorient or relocate the receiving antenna.– Increase the separation between the equipment and receiver.– Connect the equipment into an outlet on a circuit different from that to which the receiver is connected.– Consult the dealer or an experienced radio/TV technician for help.
For customers in Canada
IC statement:CAN ICES-3 (B)/NMB-3(B)
Notes on use
Turntable body
- Do not set and use the product in locations that are considered hot or humid, dirty, or subject to extreme vibrations.
- The product should be positioned on a flat, level surface.
Cartridge
- Attach the protector to protect the stylus when the product is not inuse.
- Do not touch the stylus of the cartridge with your finger.
- Do not allow the cartridge’s stylus to bump against the platter or the edge of the record.
Part names and functions
Overall diagram
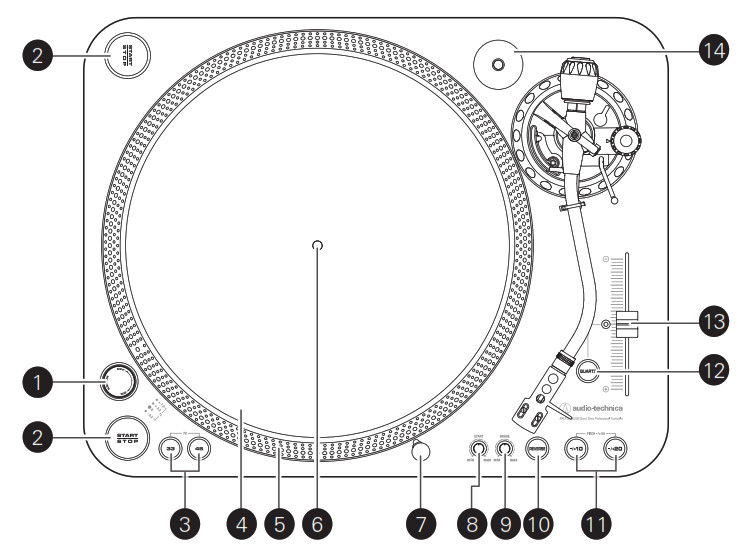
- Power dialControls power to the unit.
- Dual start/stop buttonsEngages and disengages the motor/platter.
- Platter speed buttonsSelect 33 or 45 RPM platter speed. 78 RPM is selected by pressing both the 33 and 45 buttons simultaneously; both buttons should be illuminated.
- PlatterCast aluminum platter mounts directly to center spindle/motor shaft.
- Strobe dots (on platter edge)Operate in conjunction with stroboscopic light located under the power dial to provide a visual indication of accurate platter speeds.
- Spindle
- The removable stylus target lightProvides illumination directed at the stylus position for easier cueing in low light. Easily plugs into a jack on top of turntable deck.
- Start control knobRotate the start control knob to increase or decrease the platter start time between 0.2 – 6.0 seconds. (Minimum setting is the quickest start; the maximum setting is the slowest start to reach selected speed.)
- Brake control knobRotate the brake control knob to increase or decrease platter brake time between 0.2 – 6.0 seconds. (Minimum setting is the quickest stop; maximum setting is slowest.)
- Reverse control buttonControls the platter’s rotational direction.
- Speed range buttonSelect +/- 10 or 20% speed range.• +/-50% is selected by pressing both the 10 and 20 buttons simultaneously.
- Quartz buttonTurns the pitch function on and off. When the quartz is activated the platter will hold the RPMs at 0% pitch, regardless of the pitch slider position and speed range control settings.
- Pitch adjust slide controlUse in conjunction with the pitch button to vary the platter’s rotational speed. In the center detent, position quartz lock is active.

- 45-RPM adapterAdapt 7″ records with large center holes to the fixed center spindle
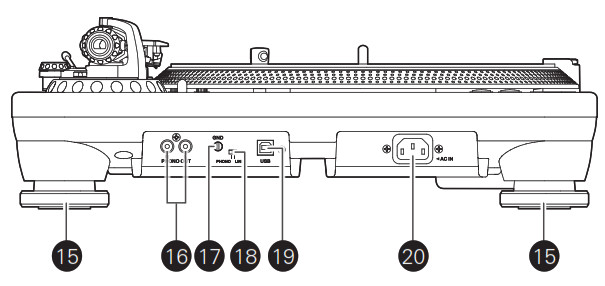
- FeetAdjust the level of the product.
- Stereo output terminals Connect the RCA audio cable. Connect it to either the amplifier’s (DJ mixer’s) PHONO input jack or its line input jack. The red terminal is the right channel and the white terminal is the left channel.
- Ground (earth) terminalConnect the amplifier’s ground (earth) terminal to this terminal using the RCA audio cable’s ground line.
- Pre-amplifier selector switchIf connecting to an amplifier’s (DJ mixer’s) PHONO input jack, set this switch to the PHONO position. If connecting to the LINE/AUX jack of an amplifier (DJ mixer), set this switch to the LINE position.
- USB outputUse this output to connect your turntable to the USB input of your computer.
- AC inletUse to connect the included power cable.
Part names and functions
Tonearm
 21. CounterweightBalances the tonearm and provides adjustment for proper downward tracking force on the stylus.22. Tracking force gauge ringUse to adjust the tracking force.23. Tonearm height lockLocks the tonearm height setting.• Always fully unlock before attempting to make a height adjustment.24. Anti-skate control dialWhile the record is playing, a force acts on the stylus tip to pull it inward.This force can be counteracted by setting the same values for the anti-skate and the tracking force.25. Tonearm lift control leverControls action of tonearm lift.• Lift mechanism is hydraulically damped to slow tonearm descent.26. Tonearm rest with clampUse the clamp to secure the tonearm so that it does not move.27. Tonearm liftMoves the tonearm vertically to and from the face of the record.28. Tonearm height adjustment dialRaises and lowers the tonearm to allow it to remain parallel to the record surface.29. Locking ringRotate the ring to the left (counterclockwise) to secure the headshell. To remove the headshell, rotate the ring to the right.30. HeadshellThe cartridge (AT-XP5) is attached to the headshell (AT-HS1).
Preparation for use
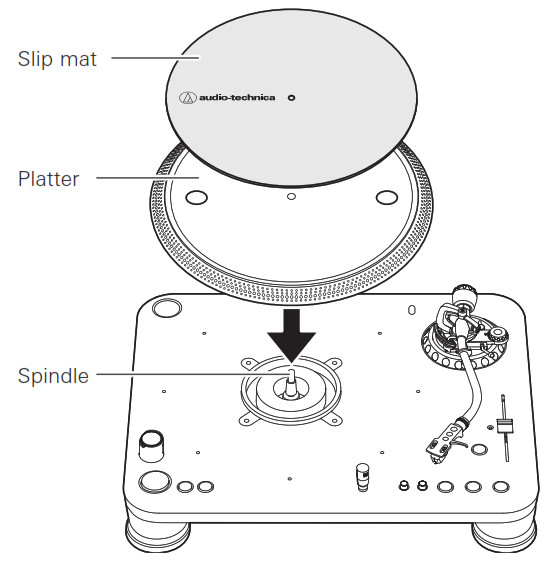
Placing the platter
This product requires some assembly before using it for the first time.Do not connect the power cable until assembly is complete.
- Set the platter on the spindle.• To avoid damaging the spindle when seating the platter, align the positions of the spindle and the platter’s hole, and then slowly seat the platter.• Make certain that the platter is fully seated on the spindle.
- Place the slip mat on top of the platter.
Setting up the turntable
 Setting up the turntable
- Position the product on a level surface.
- To avoid the effects of vibrations and acoustic pressure, do not mount the product next to such items as speakers.
- The product may pick up radio static if placed next to a radio.Therefore, try to keep the product away from radios.
- If the product is near equipment (cell phone, etc.) that emits strong radio waves, noise may occur.
Leveling the turntable’
After positioning the product where you want to use it, adjust the feet so that the product is level.• Use a level (sold separately) as needed to ensure that the product is level.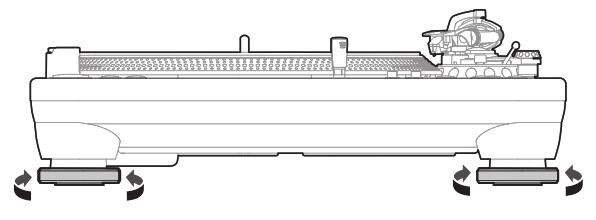
Assembling the tonearm
- Remove the cable tie used to secure the tonearm at the time of delivery.• Use the clamp to temporarily secure the tonearm to the tonearm rest.
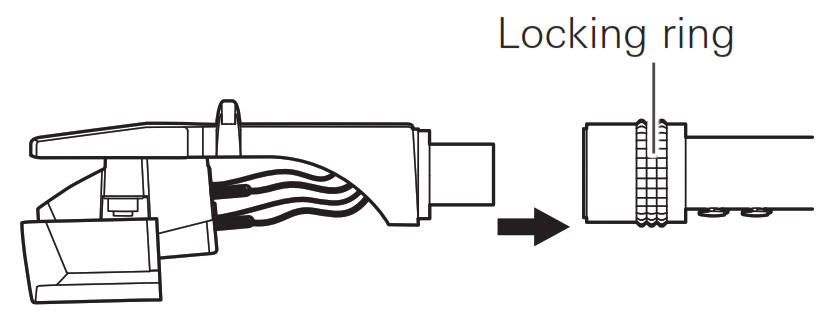
- Insert the headshell into the tonearm.• Hold the right and left edges of the headshell so that you do not damage the stylus or cut the cartridge’s wires.
- With the headshell inserted, turn the locking ring counterclockwise (to the left).
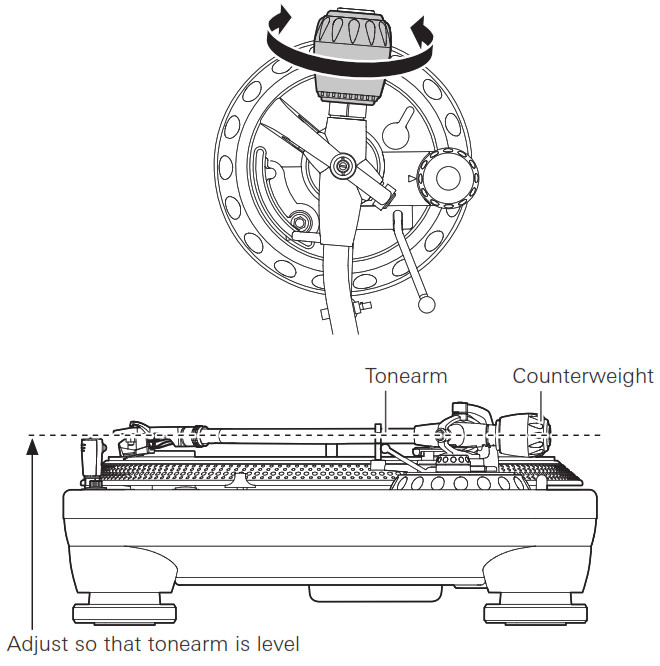
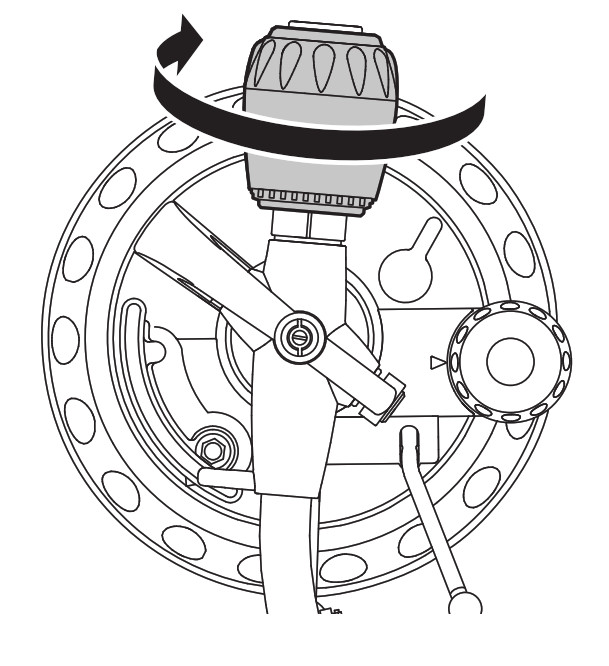
- With the tracking force gauge ring facing forward, attach the counterweight to the back of the tonearm, and slowly turn it counterclockwise (to the left).
Tonearm balance and tracking force
In order for the cartridge to pick up sound correctly from the record’s grooves, the tonearm’s balance and tracking force must be adjusted to fit the specifications of the cartridge. If the tonearm’s balance and tracking force are not properly adjusted, the record or the cartridge’s stylus may become damaged.
• Do not drag the cartridge’s stylus across the record or platter when adjusting the tonearm’s balance or tracking force. Doing so may damage the stylus.
Preparation for use
Setting tonearm balance
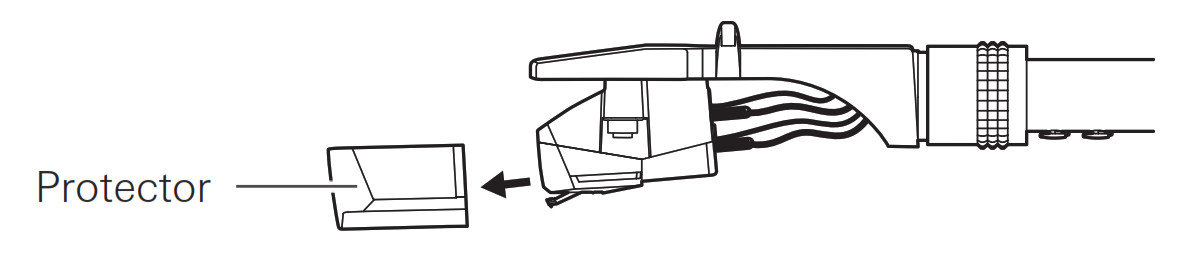
- Remove the cartridge’s protector.
- While lightly holding the headshell so as not to move the tonearm, unlatch the clamp.• The tonearm is tilted because the balance has yet to be adjusted.
- While still lightly holding the headshell, turn the counterweight to adjust the tonearm’s balance.• Adjust the balance so that the tonearm is level when you release the headshell.
- Return the tonearm to the tonearm rest and latch the clamp.

Setting tracking force
- While supporting the counterweight so that it does not move, turn the tracking force gauge ring so that its “0” position lines up with the centerline on the back of the tonearm.• The tracking force is not adjusted simply by turning the tracking force gauge ring.
- Turn the counterweight and the tracking force gauge ring together counterclockwise (to the left) until the centerline value matches the recommended tracking force value for the cartridge you are using.• Refer to the cartridge maker’s specifications for the recommended tracking force value.• The standard tracking force value for the cartridge provided with this product is 3.0 g.
Setting the anti-skate adjustment
While the record is playing, a force acts on the stylus tip to pull it inward. This force can be counteracted by setting the same values for the anti-skate and the tracking force. Adjust the anti-skate control dial to have the same value as the tracking force value.• The standard tracking force value for the cartridge provided with this product is 3.0 g.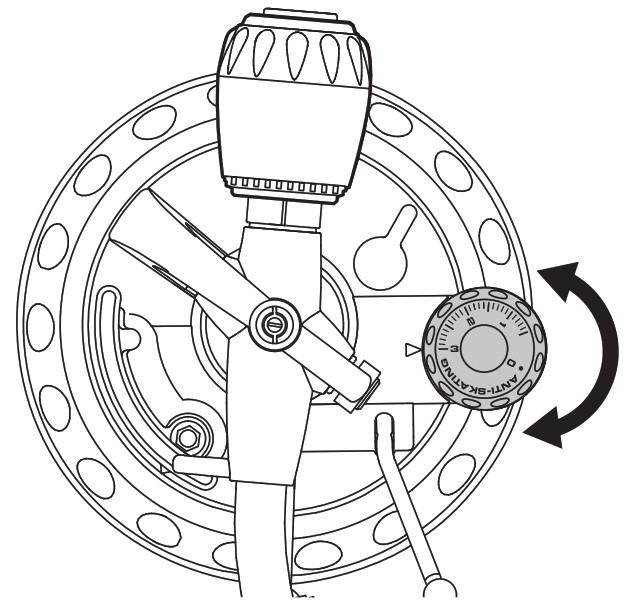
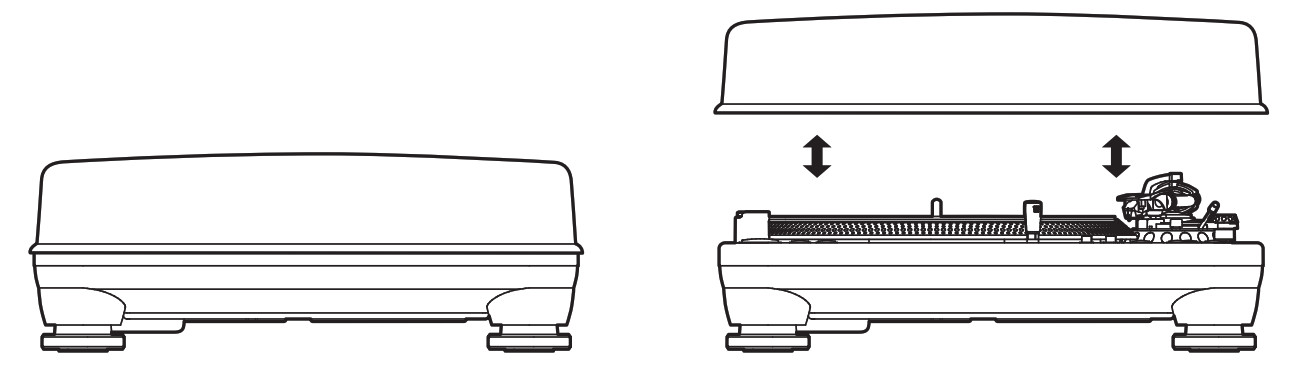
Installing/removing the dust cover
- The dust cover is designed to protect the product’s sensitive components when the product is not in use. It should remain off while records are playing.
- Using the dust cover during play may result in record damage or sound degradation.
- Always remove and replace the dust cover carefully.
Preparation for use
Setting pre-amplifier selector switch
This product has a built-in phono equalizer function. You can use the product, even if you do not have a phono amplifier or connectable equipment with a built-in phono amplifier, by connecting an active speaker, etc. Use the pre-amplifier selector switch to set the output, as shown below.
| Connectable equipment being used | Position of pre-amplifier selector switch | Where to connect the RCA audio cable |
| Device with phono input | PHONO | Phono input jack and ground (earth) terminal of connectable equipment |
| Device without phono input | LINE | AUX or line input jack of connectable equipment |
| PC sound card | LINE | Sound card’s line input jack*1 |
| Device with USB input | LINE | USB input of your computer*2 |
*1 An audio adapter (sold separately) may be required to connect the RCA audio cable to the PC sound card’s line input jack.*2 Use included USB cable instead of RCA audio cable to connect.
Connecting to connectable equipment (active speakers, amplifiers, DJ mixer, etc.)
Connecting to audio sourceAlign the settings for the pre-amplifier selector switch and connect the RCA audio cable to an input jack that is compatible with the connectable equipment you are using (amplifier, receiver, active speakers, sound card, etc.). The RCA audio cable’s red jack is for the right (R) channel, and the white jack is for the left (L) channel.
 • Depending on the equipment you are connecting, a ground (earth) terminal may exist near the phono input jack. If this is the case, connect to it using the ground line from the RCA audio cable. This will help prevent a low humming noise that might otherwise be heard during playback.
Connecting to computers with USB inputFollow the settings for the pre-amplifier selector switch to connect the included USB cable to the USB input of your computer. The included USB cable connects the product to your computer without the need for special drivers. Audacity (refer to http://www.audacityteam.org for details) and other compatible third-party recording software packages are available, allowing you to record from the product to your computer. • Be sure to set the pre-amplifier selector switch to the LINE position.
Connecting the power cable
Finally, after all audio connections are made, attach the included power cable to the product. Then connect the power cable’s plug to a convenient AC outlet.
Playing a record
Before playing a record
- Remove the cartridge’s protector.• If the tonearm is fixed to the tonearm rest, unlatch the clamp.
- Turn the power dial to the ON position.• The speed selector and strobe illuminator will light up.
- If desired, plug in the stylus target light for illumination of the stylus tip position on the record.
- Place the record on the platter so that the center hole aligns withthe spindle.• If playing a 45 RPM record, attach the 45 RPM adapter (see the diagram to the right below).
- Set the platter rotation speed (33/45/78) to match that of the record.• To set the platter speed for 78 RPM, press both the 33 and 45 RPM buttons simultaneously.
Playing a record
Lower the volume of the amplifier, speakers, etc. sufficiently.
- Press one of the start/stop button.• The platter begins to rotate.
- Raise the tonearm by lifting the tonearm lift control lever to the UP position.
- Position the tonearm over the desired location (groove) on the record.
- Lower the tonearm by moving the tonearm lift control lever to the DOWN position. The tonearm descends slowly onto the record and play begins.• Alternatively, you can skip steps 2 to 4, and use your fingers to lift the headshell, move the tonearm over the desired location on the record, and then place the headshell down to begin playing the record.• Do not subject the product to strong impact during playback.
Setting pitch
- Press the quartz button to turn the pitch function off.• The internal quartz lock holds the platter at the precise rated speed (0 % pitch), regardless of the pitch slider position and speed range control settings when the quartz button is on.
- Use the pitch adjust slide control in conjunction with the pitch buttons to vary the platter’s rotational speed by as much as +/- 50%.• When the pitch adjust slide control is in the center detent position, the quartz lock is active.
Measuring pitch
Four rows of strobe dots on the platter edge are designed to measure and verify the platter speed (pitch). Confirm the moves of strobe dots illuminated by the stroboscopic light located under the power dial. When the corresponding row of strobe dots appears to be stationary, the turntable will be at the operating speed percentage indicated below. If the dots appear to be moving to the right, the platter is moving below rated speed. If they appear to be moving to the left, the platter is moving above rated speed.
+7.2 % change in pitch when the dots in the top row are stationary [point to top row of dots]+3.3 % change in pitch when the dots in the second row are stationary [point to second row of dots]0 % change in pitch (normal speed) when the dots in the third row are stationary [point to third row of dots]-3.3 % change in pitch when the dots in the bottom row are stationary [point to bottom row of dots]
Adjusting platter start speed and brake speed
Rotate the start control knob to increase or decrease the platter start time between 0.2 – 6.0 seconds. (Minimum setting is the quickest start; maximum setting is the slowest start to reach selected speed.) Rotate the brake control knob to increase or decrease platter brake time between 0.2 – 6.0 seconds. (Minimum setting is the quickest stop; maximum setting is slowest.)
Playing a record
Reversing the record
If desired, press the reverse control button to reverse the rotation of the platter.• The reverse control button will illuminate.
Pausing the record
After lowering the volume of the amplifier, speakers, etc. sufficiently, lift the tonearm with the tonearm lift control lever.
Stopping the record
- Lower the volume of the amplifier, speakers, etc. sufficiently.
- Lift the tonearm lift control lever, return the tonearm to the tonearm rest, and fix it with the clamp.
- If using the stylus target light, turn it off by removing it from the jack.
- Press one of the start/stop buttons to stop the platter rotation.• The platter slows down and rotation stops.
- Turn the power dial to the OFF position.
- Remove the record after the platter has come to a complete stop.
• To prevent the record from becoming scratched or warped, remove it after use.• Do not use a platter other than the one provided.
Care
Turntable body
• When the turntable body is dirty or dusty, first disconnect the power cable plug, and then wipe off the dirt and dust with a soft, dry cloth.• Do not use benzenes, thinners, etc.• When storing the product for a long time, disconnect the power cable plug from the outlet and wrap the equipment in plastic; do not allow it to become damp.
Stylus tip
• If dirt and grime are stuck to the stylus tip, clean it before each use.• We recommend using a stylus cleaner (sold separately) if the stylus tip is considered dirty. Clean the stylus tip by moving the brush from the rear to the front of the stylus tip.
Replacing the stylus
 Replacing the stylus
Removing the stylus
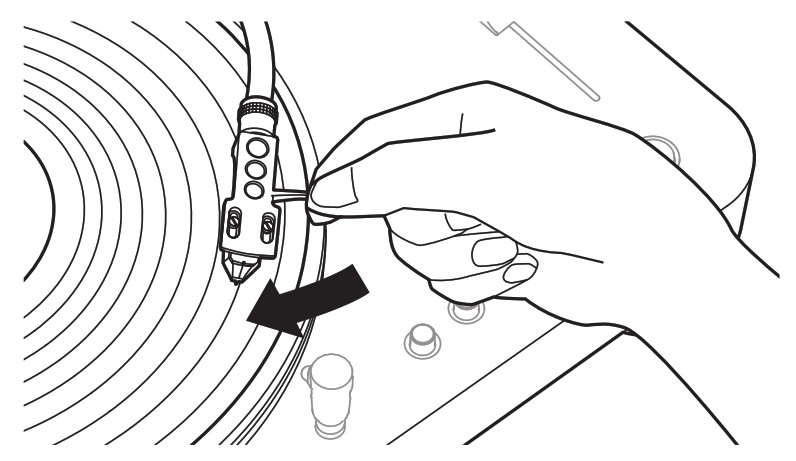
• In addition to the deterioration of sound quality, records may also be damaged as the cartridge’s stylus tip wears down.• As a rule of thumb, replace the stylus after 300 hours of use. Heavy scratching may shorten the life of the stylus.• Be sure to disconnect the product’s power cable plug from the outlet.1. Release the headshell from the tonearm.• Fix the tonearm with the clamp and then remove the headshell gently.2. After removing the cartridge’s protector, remove the stylus by pulling in the direction of the arrow without touching the cantilever, stylus tip, and magnets.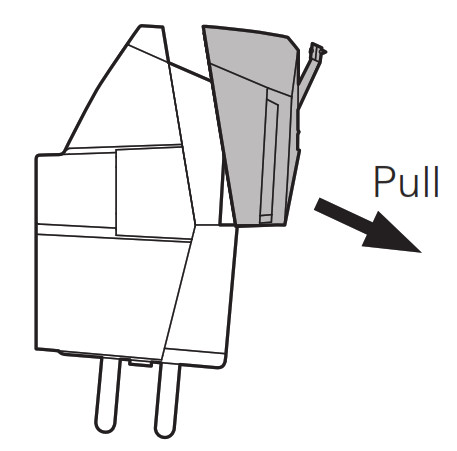
Installing a new replacement stylus
- Mount the new replacement stylus to the cartridge.
- Mount the headshell onto the tonearm.

Replacing a cartridge
Refer to the user manual for the cartridge that you will be using if you are replacing the cartridge (AT-XP5) included with this product with another, commercially available cartridge. After you replace the old cartridge with a new one, you must readjust the overhang and the tonearm’s balance and tracking force.
- Release the headshell from the tonearm.• Use the clamp to secure the tonearm and then remove the headshell gently.
- Remove the stylus from the cartridge.• Refer to “Removing the stylus” on p. 11 (this page).
- Remove the lead tips.• Be careful not to damage the lead tips.
- Using a commercially sold, non-magnetic slotted screwdriver, remove the installation screws, and then remove the cartridge from the headshell.
- Refer to the user manual for the new cartridge for mounting instructions and connecting to the lead tips.
- Using a commercially sold, non-magnetic slotted screwdriver, tighten the screws in both places, and then adjust the overhang.• After the adjustments are complete, tighten the screws securely.
- Attach the headshell to the tonearm.
- Adjust the tonearm’s height.• Refer to “Adjusting the tonearm’s height” on p. 12 while doing the adjustments.
- Adjust the tonearm balance and tracking force.• Refer to “Setting tonearm balance” and “Setting tracking force” on p. 7.
Adjusting the tonearm’s height
When installing a cartridge other than the one provided, you must maintain a suitable distance between the cartridge and the surface of the record. Place the stylus on the record and confirm that the tonearm is parallel to the record’s surface. If it is not parallel, adjust the height of the tonearm.
- Rotate the tonearm height lock to loosen the tonearm’s anchor.
- Rotate the tonearm height adjustment dial and adjust the tonearm’s height.
- After the adjustments are complete, rotate the tonearm height lock to set the tonearm.

When the turntable is moved
Using the product’s original packing materials, wrap the turntable in the reverse order from when you unwrapped it. If you do not have the packaging materials, take the following measures:
- After unplugging the power cable plug from the outlet, remove the platter, and then wrap it so that it does not get damaged. If the product is moved while the platter is still seated, it may damage the spindle.
- Fix the tonearm with the clamp.
- Remove the counterweight.
- Remove the headshell from the tonearm with the cartridge’s protector attached, and then wrap the entire headshell assembly so that it does not get damaged.
- Wrap the turntable body with a soft cloth so that it does not get damaged.
Troubleshooting
| Problem | Solution |
| The platter does not spin. | • Is the power cable connected to the outlet? Connect power cable to the outlet.• Has the power cable’s plug come off? Check whether or not the plug is properly attached to the product. |
| The platter spins, but there isno sound or the volume is notloud enough. | • Is the cartridge’s protector still in place? Remove the cartridge’s protector.• Is the tonearm in the lift position? Lower the tonearm.• Are the function settings and input for connected equipment (amplifier, etc.) selected correctly? Check whether the settings for the connected equipment are correct.• Is the stylus damaged? Check the stylus and replace it, if necessary.• Is the stylus placed correctly on the body of the cartridge? Check the cartridge and adjust it, if necessary.• Are the setting positions for the pre-amplifier selector switch correct? Check that the pre-amplifier settings are correct, noting the following common problems and their causes:– If there is no sound, or if the volume is not loud enough, the product is set to the “PHONO” position and connected to the amplifier’s AUX/LINE input.– If the volume is too loud or is distorted, the product is set to the “LINE” position and connected to the amplifier’s PHONO input.• Is the tracking force set too heavy? Adjust the tracking force. |
| The stylus skips. | • Is the tracking force set too light or too heavy? Adjust the tracking force.• Is the anti-skate set improperly? Verify anti-skate is set for the same value as cartridge tracking force.• Is the record warped? Check the record.• Is the record scratched? Check the record. |
| There is howling. | • Is the product picking up excessive vibrations from the floor, surfaces of the walls, or nearby speakers?Decrease the vibrations or mount the product on a surface that is not subject to the effects of vibrations.• Is the product mounted on an unstable surface? Check whether the surface on which the product is mounted is suitable. |
| There is noise when the record is playing. | • Is there dust on the cartridge’s stylus tip? If dust is stuck to the stylus tip, clean it with a commercially sold brush. |
| The sound when the record isplaying is either too fast or tooslow. | • Are the speed settings for the product correct? Use the platter speed buttons to select the correct speed for the type of record being played.• Is variable pitch engaged? Depress quartz button or return pitch adjust slider to center detent position to engage quartz lock. |
| Moving pitch adjust the sliderproduces no effect. | • If the LED next to the pitch adjust slider center detent position remains blue when the slider is moved, quartz lock is engaged. Depress the quartz button to disengage the quartz lock and activate variable pitch. The LED should turn off. |
| Strobe dots are difficult to see and/ or the stylus illuminator is very dim. | • Excessively bright or fluorescent light interferes with strobe indicator. Hold hand, record jacket, etc. over strobe indicator to shield it from bright light. |
| Humming is heard duringplayback. | • Is the ground line connected correctly? Make sure the ground line is properly connected.• Is the headshell attached to the tonearm firmly? Make sure the locking ring is tight. |
Dimensions
Specifications
| Turntable specifications | |
| Type | 3-Speed, fully manual operation |
| Motor | 16-pole, 3-phase, brushless DC motor |
| Drive method | Direct drive |
| Speeds | 33-1/3 RPM, 45 RPM, 78 RPM |
| Turntable platter | 332 mm diameter die-cast aluminum |
| Starting torque | >4.5 kgf.cm |
| Braking system | Electronic brake |
| Wow and flutter | < 0.1% WRMS (JIS WTD) with 33 RPM |
| Signal-to-noise ratio | > 55 dB (DIN-B) |
| Output levels“PHONO”“LINE (MM)” | 5.5 mV nominal at 1 kHz, 5 cm/sec300 mV nominal at 1 kHz, 5 cm/sec |
| RIAA | 20-20kHz, +1/-3dB (In: 1.5mV 1kHz) |
| Tonearm specifications | |
| Type | Static balanced S-shaped tonearmwith detachable headshell |
| Effective length | 230 mm |
| Overhang | 15 mm |
| Maximum tracking error angle | Less than 3° |
| Stylus pressure adjustmentrange | 0 to 4.0 g |
| Applicable cartridge weightrange (including headshell) | 13 to 18 g |
| Height of tonearm adjustmentrange | 0 to 6 mm |
| Anti-skating range | 0 to 3 g |
| Cartridge and headshell specifications | |
| Cartridge Model | AT-XP5 |
| Cartridge Type | VM |
| Recommended loadimpedance | 47,000 ohms |
| Output voltage | 5.5 mV (1 kHz, 5 cm/sec) |
| Stylus | 0.3 × 0.7 mil bonded elliptical stylus |
| Cantilever | ABS with carbon |
| Tracking force range | 2.0 to 4.0 g (3.0 g standard) |
| Cartridge weight | 6.2 g (0.22 oz) |
| Headshell model | AT-HS1 |
| Headshell weight | 10 g (0.35 oz) |
| Headshell overhangadjustment | ± 4 mm |
| USB function | |
| A/D, D/A | 16 bit 44.1 kHz or 48 kHz USBselectable |
| Computer interface | USB 1.1 Compliant Windows 7 or above, or MAC OSX or above |
| General specifications | |
| Power supply requirements | 120V AC, 60 Hz (U.S.A)240V AC, 50 Hz (Australia)230V AC, 50 Hz (Singapore) |
| Power consumption | 13 W |
| Dimensions | 450 mm (17.72″) × 353 mm (13.90″)× 166.5 mm (6.56″)(W × D × H) |
| Weight | 12.5 kg (27.6 lbs) |
| Accessories | Slipmat, dust cover, platter, 45 RPM adapter, counterweight, headshellwith cartridge, power cable, USB cable, dual RCA (male) cable with integrated ground wire, stylus target light |
| Replacement stylus(sold separately) | ATN-XP5 |
| Replacement headshell (sold separately) | AT-HS1 |
Specifications are subject to change without notice due to improvements.
Visit our website www.audio-technica.com
One-Year Limited WarrantyAudio-Technica brand products purchased in the U.S.A. are warranted for one year from the date of purchase by Audio-Technica U.S., Inc.(A.T.U.S.) to be free of defects in materials and workmanship. In event of such defect, product will be repaired promptly without charge or, at our option, replaced with a new product of equal or superior value if delivered to A.T.U.S. or an Authorized Service Center, prepaid, together with the sales slip or other proof of purchase date. Prior approval from A.T.U.S. is required for return. This warranty excludes defects due to normal wear, abuse, shipping damage, or failure to use product in accordance with instructions. This warranty is void in the event of unauthorized repair or modification, or removal or defacing of the product labeling.For return approval and shipping information, contact the Service Dept., Audio-Technica U.S., Inc., 1221 Commerce Drive, Stow, Ohio 44224.Except to the extent precluded by applicable state law, A.T.U.S. will have no liability for any consequential, incidental, or special damages; any warranty of merchantability or fitness for a particular purpose expires when this warranty expires. This warranty gives you specific legal rights, and you may have other rights which vary from state to state.Outside the U.S.A., please contact your local dealer for warranty details.
Audio-Technica Corporation2-46-1 Nishi-naruse, Machida, Tokyo 194-8666, Japan©2017 Audio-Technica CorporationGlobal Support Contact: www.at-globalsupport.com
[xyz-ips snippet=”download-snippet”]