
Dear Customer,Congratulations on purchasing this equipment.Please read this manual carefully and take care of the following hints on installation and use to avoid technical damages. Any failure caused by ignoring the items and cautions mentioned in the operation and installation instructions are not covered by our warranty and any liability.
TECHNICAL DATA
Item number: 10034071, 10034072
Rated voltage: 100-240-V~ 50/60 HzPower consumption: 28 WUSB rating: 5 V / 1 AAudio output: 2×5 W RMSFM Radio,Frequency range: 87,5 MHz – 108 MHzDAB,Frequency range: 174-240 MHz
SPOTIFY CONNECT
Use your phone, tablet or computer as a remote control for Spotify.Go to spotify.com/connect to learn how. LicensesThe Spotify Software is subject to third party licenses found here: https://www.spotify.com/connect/third-party-licenses
SAFETY INSTRUCTIONS
Read all the instructions carefully before using the unit and keep them for future reference.
- Check that the voltage marked on the rating label matches your mains voltage.
- The unit must be placed on a flat stable surface and should not be subjected to vibrations.
- Do not place the unit on sloped or unstable surfaces as the unit may fall off or tip over.
- The mains socket must be located near the unit and should be easily accessible.
- Avoid extreme degrees of temperature, either hot or cold. Place the unit well away from heat sources such as radiators or gas/electric fires. Avoid exposure to direct sunlight and other sources of heat.
- Never place any type of candle or naked flame on the top of or near the unit.
- To reduce the risk of fire, electric shock or product damage, do not expose this unit to rain, moisture, dripping or splashing. No objects filled with liquids, such as vases, should be placed on the unit.
- If you spill any liquid into the unit, it can cause serious damage. Switch it off at the mains immediately. Withdraw the mains plug and consult your dealer.
- To prevent the risk of electric shock or fire hazard due to overheating, ensure that curtains and other materials do not obstruct the ventilation vents.
- Do not install or place this unit in a bookcase, built-in cabinet or in another confined space. Ensure that a minimum of 10cm should be kept around the unit for ventilation.
Safety
- Always disconnect the unit from the mains supply before connecting/ disconnecting other devices or moving the unit.
- Unplug the unit from the mains socket during a lightning storm.
- This unit will become warm when used for a long period of time. This is normal and does not indicate a problem with the unit.
Mains Adapter
- Make sure the unit is not resting on top of the mains cable, as the weight of the unit may damage the cable and create a safety hazard.
- If the mains cable is damaged it must be replaced by the manufacturer, its service agent, or similarly qualified persons in order to avoid a hazard.
Interference
- Do not place the unit on or near appliances which may cause electromagnetic interference. If you do, it may adversely affect the operating performance of the unit, and cause a distorted sound.
Supervision
- Children should be supervised to ensure that they do not play with the unit.
- Never let anyone especially children push anything into the holes, slots or any other openings in the case – this could result in a fatal electric shock.
Service/Maintenance
- To reduce the risk of electric shock, do not remove screws. The unit does not contain any user serviceable parts.
- Leave all maintenance work to qualified personnel.
- Do not open any fixed covers as this may expose dangerous voltages.
- Ensure to unplug the unit from the mains socket before cleaning.
- Do not use any type of abrasive pad or abrasive cleaning solutions as these may damage the unit’s surface.
- Do not use liquids to clean the unit.
UNPACKING
Remove all items from the packaging. Retain the packaging. If you dispose of it, please do so according to local regulations.The following items are included:
Main Unit
Speaker x 2

Remote
Instruction Manual
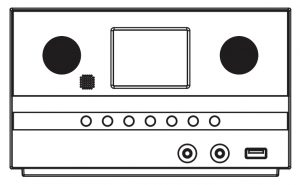
PRODUCT OVERVIEW
Front view
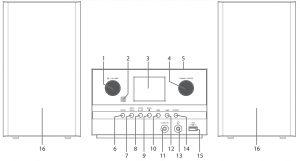
 / VOLUME dial
- Remote Control Sensor
- Display
- TUNING/ENTER dial
- CD door
- MODE button
- INFO/MENU button
- SCAN/ 12 button
- BACK/ 3 button
- Skip backward button
- Audio in socket
- Skip forward button
- Earphone socket
- PRESET button
- USB 5V 1 A charging port
- Speaker
Rear view
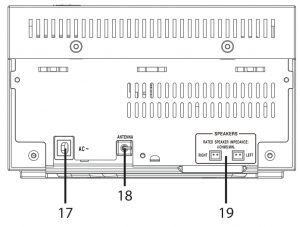
17. Mains Cable18. Aerial19. SPEAKER (L/R) Sockets
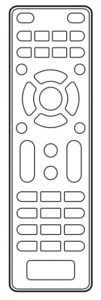
Remote Control
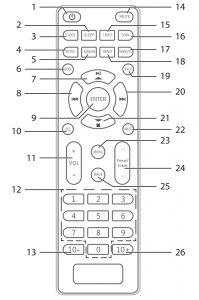
- STANDBY
- SLEEP
- CLOCK
- INTRO
- RANDOM
- MODE
- Play/Pause/Nav up
- SCAN/Play Pause
- ENTER
- EQ
- VOL +/ –
- Number buttons
- 10–
- MUTE
- TIMER
- SCAN
- MONO/ST.
- REPEAT
- INFO
- Skip forward
- STOP/Nav down
- PRESET
- MENU
- Preset/Folder
- BACK
- 10+
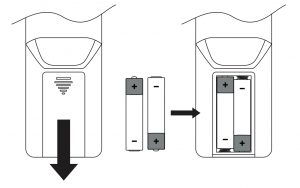
Battery replacement for the remote control
- Open the battery cover.
- Insert 2 x AAA 1.5V alkaline batteries (not included). Make sure to match the (+) and ( – ) ends of the battery with the (+) and ( – ) ends indicated in the battery compartment.
- Close the cover.
Handling the Battery
- Improper or incorrect use of batteries may cause corrosion or battery leakage, which could cause fire, personal injury or damage to property.
- Only use the battery type indicated in this manual.
- Use two identical batteries. Batteries of different age and charge may cause heat to build up.
- Do not dispose of the used battery as domestic waste. Dispose of it in accordance with local regulations.
- Remove the battery from the remote control when not in use for a long period of time, as corrosion or battery leakage may occur and result in physical injury, and/or property damage, and/or fire.
Remote control operation range
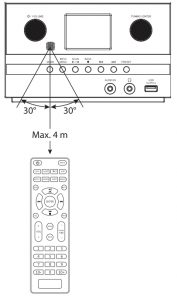 The remote control sensor on the front unit is sensitive to the remote control’s commands up to a maximum of 4 metres away and within a maximum of 60° arc.Note: that the operating distance may vary depending on the brightness of the room.
CONNECTIONS
Connecting to the Mains Supply
Unwind the mains adapter cable to its full length. Connect the mains adapter to the mains socket. The unit is now connected and ready to use.Connecting the unit to any other power source may cause damage to the unit.
Network Connection
This product only supports wireless network connection for network access and did not support wired LAN connection
Wireless network
- Check first of all whether the control lamps (LINK/ACT) of your LAN connection or your router light up.
- Proceed with the operations described in the below “Getting Started”. It is recommended to run through the setup wizard in the System Settings section.
This unit cannot be connected to a standalone modem directly. A router or a modem incorporated with a router has to be used.Since there are various connection configurations, follow the specifications and instructions of your telecommunication carrier, internet service provider, and router setting guidebook.
GETTING STARTED
Powering ON/OFF
When you first connect the unit to the mains socket, the unit will be in STANDBY mode after showing “Welcome to Internet Radio”
- Press the STANDBY / VOLUME dial on the unit or on remote control to switch the unit on.
- Press the STANDBY / VOLUME dial on the unit or on remote control to switch the unit back to standby mode.

Selecting Modes
Press the MODE button repeatedly on the unit or remote control to switch between Music player, DAB radio, FM radio, AUX; CD, BT, and Internet radio modes.When the unit is idle for approximately 15 minutes , it will automatically switch to standby. To switch the unit off completely, remove the mains plug from the main socket. Turn the unit off completely to save energy when not in use.
Adjusting the Volume
Press the VOLUME dial on the unit or press the VOL +/– buttons on the remote control to adjust the volume.If you wish to turn the sound off, press the MUTE button on the remote control. Press the MUTE button again or press the VOL +/– buttons on the remote control or press the VOLUME dial on the unit to resume normal listening.
- Press the INFO/MENU button on the unit or press the MENU button onthe remote control to access the menu.
- Turn the TUNING/ENTER on the unit or press the / buttons on theremote control.
INITIAL SET-UP
When you first connect the unit to the mains socket, the display will show the welcome screen then with the privacy policy page come up. Please visit the website mentioned in the page for the details of the privacy policy.Press TUNING/ENTER dial on unit or ENTER button on remote control to accept for next step.
- To launch the initial Setup wizard, turn the TUNING/ENTER dial on the unit or / buttons on remote control to select [YES], then press the TUNING/ENTER dial on the unit or ENTER button on the remote control to confirm.
- In the next step you can select the time format. Select the desired setting [12] or [24] and press the TUNING/ENTER dial on the unit or ENTER button on the remote control to move on to the next step.
- Here it is possible to select which source (DAB/FM/Network/No update) the unit uses to obtain and update the time and date. If “Update from Network” selected, proceed to the next step to select time zone to ensure that the time is displayed correctly. And then select the “Daylight savings” is [ON] or [OFF].
- In the next step you can specify whether the product should remain connected to the Internet when on standby. Turn the TUNING/ENTER dial on the unit or press / buttons on the remote to select [YES], then press the TUNING/ENTER dial on the unit or press ENTER button on the remote to confirm.
- Your radio will now scan for your wireless network, this may take a few seconds then a list of all the wireless networks will appear on the screen. Select the WLAN network you know and whether to use WPS (Push Button/ Pin) or Skip WPS to enter the password using the displayed keyboard.
- While you press “Skip WPS”, the virtual keyboard is shown on the display, you can turn the TUNING/ENTER dial on the unit or press PLAY/ PAUSE or / buttons on the remote control to move the highlight. PressTUNING/ENTER dial on unit or ENTER button on remote to select the key.
- After enter the password, select [OK] and then press TUNING/ENTER dial on unit or ENTER button on remote to confirm. If the password entered is correct, a connection to the network is now established. Press TUNING/ENTER dial on unit or ENTER button on remote to exit.
- Settings can be changed at any time by pressing the MENU button to display the menu. Press / to select system settings and then press the ENTER button to confirm. And press / buttons to select Setup wizard and then press the ENTER button to launch Setup wizard again.
This instruction manual explains the basic instruction for operating this unit. Unless otherwise stated, all operations described are based on remote control use.
SYSTEM SETTINGS
Press the INFO/MENU button to display the menu or MENU button on remote to display the menu. Turn the TUNING/ENTER on unit or press ![]() /
/ ![]() on the remote control to select System settings and then press the ENTER button to confirm.
on the remote control to select System settings and then press the ENTER button to confirm.
Equalizer
This system supports a variety of equalizers and sound effects.Press the EQ button to access the Equaliser menuAlternatively:During System settings mode, press ![]() /
/ ![]() to select Equaliser and thenpress the ENTER to confirm.
to select Equaliser and thenpress the ENTER to confirm.
- The display will show : FLAT > CLASSIC > ROCK > POP > JAZZ
- Press the / buttons to select and then press the ENTER button to confirm.
Network
- During System Settings mode, press the / , buttons to select Network and press the ENTER button to confirm.
- Press / , buttons to select from the following settings, and then press the ENTER button to confirmNetwork wizard:SSID – select the desire wireless network. Rescan – Scan for available networks. Manual config – select wireless network with DHCP enable/disable.PBC Wlan setup:Select WPS on the unit and press the WPS button on the modem device that you wish to connect with. Press the ENTER button to continue.View settings:Display the setting on the unit.Wlan region:Select a country of your choice.Manual settings:Select wireless network with DHCP enable/ disable.NetRemote PIN Setup:Allows you to define a PIN number to be entered before being able to connect the device remotely over a network.Network profile:View the connected network..Keep network connected:Allows you to define whether the device remains connected to its network in Standby mode and when not in Network radio mode.
- Press the BACK button on the unit or on the remote control to cancel the setting and return back to the previous menu.
Time/Date
The Time/Date can be automatically set once it has been connected to the Internet, DAB+ or FM radio station with time/date information. You may also adjust the Time/Date manually.In System settings mode, press the ![]() /
/ ![]() buttons to select Time/Date and press the ENTER button to confirm. Press the / buttons to select Set Time/ Date and press the ENTER button to confirm.
buttons to select Time/Date and press the ENTER button to confirm. Press the / buttons to select Set Time/ Date and press the ENTER button to confirm.
- The date digits will flash on the display.
- Press the / buttons to adjust the day and then press the ENTER button to confirm.
- Repeat above Step (2) to set the Month/Year/Hour/Minute.
- The date and time settings are now complete.
For the other settings under Time/Date, press the ![]() /
/ ![]() buttons to selectfrom the following options and then press the ENTER button to confirm.
buttons to selectfrom the following options and then press the ENTER button to confirm.
Auto updateUpdate from DAB / FM / Network or No update.Set format12 / 24 hour format.Set timezoneSelect a time zone. (Only available when Auto update from Network is on.)Daylight savingsSelect daylight savings. (Only available when Auto update from Network is on.)
The default auto time update setting is “Update from Network”. If you would like to manually set the time, it is recommended to turn the Auto update function off.
Language
- During System settings mode, press the / buttons to selectLanguage and then press the ENTER button to confirm.
- Press the / buttons to change the display language of your choice.
- Press ENTER to confirm.
Factory Reset
There may be times when you need to reset your unit back to the factory settings especially when you have moved house. If you experience reception problems you may want to reset and try again.If you move to another part of the country and pick up the local and national DAB+ stations in that area, your previously tuned channels may no longer be available.
- During System settings mode, press the / buttons to select “Factory reset”, and press the ENTER button to confirm.
- Press the / buttons to select Yes, and press the ENTER button to confirm or select No to cancel.
After the system reset, all the tuned stations, Internet, DAB & FM preset stations will be erased.
Software update
- During System settings mode, press the / buttons to select Software update and then press the ENTER button to confirm.
- Press the / buttons to select Auto-check setting or Check now, and then press the ENTER button to confirm.
Before downloading software, ensure that the radio is plugged into a stable mains power connection. Interrupting the mains supply during software download can lead to functional disturbances and/or damage to the unit!
Setup wizard
The setup wizard is available in the system settings section; you can run through this to configure settings for date/time and network. Once this has finished, your radio is ready to use.Info
- During System settings mode, press the / buttons to select Info and then press the ENTER button to confirm.
- The software version, Radio ID and Friendly Name will show on the display.
Info
- During System settings mode, Press / buttons to select Info and then press ENTER button to confirm.
- The software version, Radio ID and Friendly name will show on the display.
Backlight
- During System settings mode, press the / buttons to select Backlight and then press the ENTER button to confirm.
- For the other settings under Backlight, press the / buttons to select the following options and then press the ENTER button to confirm.
Operation ModeHigh / Medium/ LowStandby ModeTimeout off/ 10 sec / 30 sec / 60 secStandby Level: High /Medium/Low/Of
INTERNET-RADIO
This radio can play thousands of radio stations and podcasts from all over the world via a broadband internet connection. When Internet Radio mode is selected, the radio connects with the Frontier Silicon Internet radio portal to download a list of stations. Once a station is selected, the radio will connect directly to that station.
Press the MODE button repeatedly to select internet radio mode. (F.3)During Internet Radio mode, press the MENU button on the remote control to access the menu. You can choose between: Last listened, Station list, System settings and Main menu.
Press the ![]() /
/![]() buttons to select and press the ENTER button to confirm.
buttons to select and press the ENTER button to confirm.
Last listened
- Press the / buttons to select the history of stations that you have listened to before.
- Press the ENTER button to confirm.
Station list
Press the ![]() /
/![]() buttons to select from the following options, and then pressthe ENTER button to confirm.
buttons to select from the following options, and then pressthe ENTER button to confirm.
Local “Country”You can search specifically for stations from your country.Within this scope, you can further limit your search according to genres, or display all station.StationsSelect stations from various categories in the menu:Location, Genre, Popular Stations, New Stations.You can also search stations using various keywords.The name and a description of your selected station will show on the display.Press the INFO/MENU button repeatedly to view further information for the station. Information displayed cycles through name/description, genre/location, reliability, bitrate/ codec/sampling rate, playback buffer and current date.PodcastsSelect podcasts from the categories in the Podcast menu: Location, Genre.You can also select a particular episode by entering keywords to search podcastsHelpYou can find the portal address and visit for support.
Press the BACK/![]() button on unit or BACK button on remote control can move back a menu level.
button on unit or BACK button on remote control can move back a menu level.
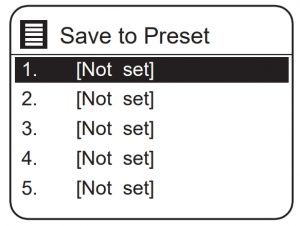
Preset Stations
The preset Internet radio stations are stored in the radio and cannot be accessed from other radios.
- To store an Internet radio preset, press and hold the PRESET button until the display shows the “Save toPreset”.
- Select one of the 10 presets to store the current station by pressing the / buttons to select the number and then press the ENTER button to confirm.
Recalling a Stored Station
- To select a preset, press the PRESET button, and then press the / buttons to select one of the listed preset stations.
- Press the ENTER button to confirm the selection.
Alternatively,
- Press PRESET/FOLDER / buttons on remote can switch to next/ previous preset station.
- Or press the number buttons on remote to switch to the preset station. (“0” for preset station 10).’
- If there is no station be saved, it will show “Preset empty”.
Internet Radio Display Modes
Every time you press the INFO/MENU button on unit or INFO button on remote control, the display will show the following display modes:Channel Info – Description – Genre/Show country – Reliability – Bit rate/ Sound format – Playback buffer – Date
MUSIC PLAYER OPERATION
The built-in Music Player allows you to play unprotected audio files (AAC, MP3, WMA, FLAC) stored on a networked computer. To play music from the computer, you must setup a shared file or media library on the computer.Press the MODE button repeatedly to select Music Player mode.
Media Sharing
Ensure that your computer is available on the network, and that your computer is set up to allow sharing your media folders or files. Check how to setup a folder for sharing from your computer’s instruction manual.
- During Music Player mode, press the /, buttons to select Shared media and press the ENTER button to scan for all the available shared media folders or files.
- The display will show all found media folders from the network. Press the /, buttons to select the computer that you wish to connect to.
- The unit will search for all shared media from the computer.
- Press the /, buttons and select your desire shared media, and then press the ENTER button.
- This unit cannot access your computer, until your computer allows it.
- Press the ENTER button to start playback of the desired track.
Prune servers
- During Music Player mode, press the /, to select Prune servers andpress the ENTER button toconfirm.
- Press the /, buttons to select YES to remove servers that are no longer available. Press the ENTER button to confirm, or select NO to cancel.
USB OPERATION
Charge your device
You can charge your device through the USB socket on this unit with a USB cable (not supplied).
- The maximum current for USB charging is 1A.
- All devices for USB charging are not guaranteed.
Music playback modes
Every time you press the INFO/MENU button on unit or INFO button on remote control , the display will show the following display modes:Artist – Album – Bit rate/sound format – Playback buffer – Date.
Buttons: Function
![]() : Press to pause playback or resume normal playback.
: Press to pause playback or resume normal playback.
![]() Press to skip to the previous track.Press and hold to fast rewind the current track.
Press to skip to the previous track.Press and hold to fast rewind the current track.
![]() Press to skip to the next track.Press and hold to fast forward the current track.
Press to skip to the next track.Press and hold to fast forward the current track.
Repeat Mode
- Under menu of Music Player mode, press / buttons to select Repeat play and press ENTER button repeatedly , or press REPEAT button on remote during playback to turn repeat play on/off.
- When repeat play is ON, will show on the display and it will play the current folder repeatedly
Shuffle Mode
- Under menu of Music Player mode, press 12 w / 3 s buttons to select Shuffle play and press ENTER button repeatedly , or press RANDOM button on remote during playback to turn shuffle play on/off.
- When Shuffle play is ON, will show on the display and it will play the song files randomly.
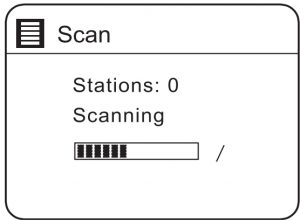
DAB OPERATION
Press the MODE button repeatedly to select “DAB radio”. The unit will enter DAB mode and perform the auto scan function. During the scan the display will show “Scanning… ” together with a slide bar that indicates the progress of the scan and the amount of stations that have been found so far. (F.7)Once the scan has finished, the unit will select the first alpha numerically found station. To explore the found stations, press the ![]() /
/![]() buttons to select and press ENTER to confirm.
buttons to select and press ENTER to confirm.
Station List
- During DAB mode, press the MENU button to access DAB menu.
- Press the / buttons to select “Station List” and then press the ENTER button to confirm.
- A list of DAB+ stations will show on the display.
Auto Scan
- Press MENU, and then press the / buttons to select Scan. Press the ENTER button to confirm.
- The display will show “Scanning…” and a progress slide bar.
- All the stations that have been found will be stored automatically. To explore and listen to the found stations, press the / buttons to select and the press the ENTER button to confirm.
Manual Tuning
As well as the auto tune function, you can manually tune the receiver. This can help you when aligning your aerial or when adding stations that were missed while auto tuning.
- Press MENU on the remote control to display the menu.
- Press the / buttons to select “Manual tune”, and press the ENTER button to confirm.
- The display will show the multiplex 5A to 13F.
- Press the / buttons to select the channel, and press the ENTER button to confirm.
- To listen to any stations found, return to the now playing screen and press the / buttons to select the required station from the station list and press ENTER button to confirm.
DAB Display Modes
Every time you press the INFO/MENU button on the remote control or press and hold the INFO/MENU button on the unit, the display will show the following display modes:
DLS: Programme Type – Ensemble/Frequency – Signal error/Strength – Bit rate/Codec/Channels – DateDLS (Dynamic Label Segment): This is a scrolling message giving real-time information, e.g. song titles, news headlines, etc.Programme Type: This describes the “style” or “genre” of the programme that is being broadcast.Ensemble Name/Frequency: This display the name of the multiplex that contains the station you are listening to and the frequency. A multiplex is a collection of radio stations that are bundled and transmitted on one frequency. There arenational and local multiplexes. Local ones contain stations that are specific to that area.Signal Error/ Signal Strength: The error is shown as a number. If the number is 0, it means the signal received is error free and the signal strength istrong. If the error rate is high, it is recommended to reposition the radio aerial or reposition the unit. The display will show a slide bar to indicate the signal strength, the stronger the signal, the longer the bar will be from left to right.Bit Rate / Codec / Channels: The display will show the digital audio bit rate being received with additional information about the audio codec and channel configuration.Date: This displays the current date provided automatically by the broadcaster.
Prune Invalid
You may remove all unavailable stations from the list.
- During DAB mode, press the MENU button and press the / buttons to select Prune invalid and then press the ENTER button to confirm.
- Press the / buttons to select YES and press the ENTER button to confirm, or select NO to cancel.
DRC (Dynamic Range Compression)
If you are listening to music with high dynamic range in a noisy environment, you may wish to compress the audio dynamic range.
- During DAB mode, press the MENU button and press the / buttons to select DRC and press the ENTER button to confirm.
- Press the / buttons to select DRC high/low/off and press the ENTER button to confirm the setting.
Station Order
You may wish to arrange the station listing order.
- During DAB mode, press the MENU button and press the / buttons to select Station Order and press the ENTER button to confirm.
- Press the / buttons to select Alphanumeric/Ensemble/Valid order and press the ENTER button to confirm the setting.
Saving and Recalling Preset Station
Refer to “Preset Stations” and “Recalling a Stored Station” under Internet Radio section for instruction.
FM OPERATION
To switch the unit to FM mode, press the MODE button repeatedly to switch to FM mode. The display will show the frequency
Auto Scan
Press the SCAN button on the unit or on the remote control to start searching for a station. Once a station has been found, the scanning will stop automatically.
Manual Tuning
To search for FM stations manually, press the TUNING buttons repeatedly until your desired frequency is reached.With FM radio, it may be necessary to fine tune each station by pressing the TUNING buttons repeatedly. Each press will adjust the frequency by 0.05 MHz. If reception is still poor, adjust the position of the aerial or try moving the radio to another location.
Scan Setting
- Press the MENU button to access FM menu.
- Press the / buttons to select Scan setting and then press the ENTER button to confirm.
- Press the / buttons to select Yes to receive Strong stations only and then press the ENTER button to confirm.
Audio SettingPress the MONO/ST. button on the remote control to toggle between theStereo or Mono selection.Alternatively
- Press the MENU button to access the main menu.
- Press the / buttons to select Audio setting and press the ENTERbutton to confirm.
- Press the buttons to select YES to listen in Mono only or NO to letthe unit select Stereo or Mono automatically.
- Press the ENTER button to confirm.
FM Display ModesEvery time you press the INFO/MENU button on unit or INFO button on remote control, the display will show the following display modes: Radio Text – Programme Type – Frequency – DateiRDS Radio Text: This is a scrolling message information about the current 7programme.Programme Type: This describes the “Style” or “Genre” of music that is being broadcast.Station Name / Frequency: When an RDS station is received, the name of that station will be displayed, or if not the frequency will be displayed.Date: This displays the current date provided automatically by the broadcaster.Saving and Recalling Preset Station: Refer to “Preset Stations” and “Recalling a Stored Station” under Internet Radio section for instruction.
CD OPERATION
Compatible disc types
Disc type: Disk-Logo: Recorded Content
CD-Recordable:  : AudioCD-RW (CD Rewritable):
  AudioAudio CD (Compact Disc Digital Audio):
  Audio
Audio
Press MODE repeatedly on the unit or press CD/USB repeatedly on the remote control to select CD mode.
Playback
- Press the OPEN/CLOSE ( ) to open the CD door.
- Place the CD with the label side up into the CD compartment, and then press the OPEN/CLOSE Disk Tray , button to close the disc tray.
- If there is no disc or the disc can’t be read, “No disc” will show on the display.
- The total number of tracks will display on the display, then press the button on the unit or the remote control to play the first track of CD/ MP3 disc automatically
To pause playback: Press the ![]() button to pause the playback. And resume playback by press this button again.To stop playback: Press the
button to pause the playback. And resume playback by press this button again.To stop playback: Press the ![]() button to stop playback.Skiping to another track: Press the
button to stop playback.Skiping to another track: Press the ![]() buttons to skip backwards to the beginning of the track or previous track or skip forwards to the next track. Press and hold the
buttons to skip backwards to the beginning of the track or previous track or skip forwards to the next track. Press and hold the ![]() buttons to perform fast forward/reverse playback.
buttons to perform fast forward/reverse playback.
Repeat playback
- Press the REPEAT button repeatedly to choose a function. It will play the current track repeatedly. 1 It will play all les in the current folder repeatedly (for data CDs only). Alle Titel wiederholen.
- Press the REPEAT button once more again, the REPEAT function will turn off.
Random playback
All tracks on the disc can be played in a random order.
- Press the RANDOM button on the remote control. The . indicator will show on the display. All tracks will be played randomly.
- Press the buttons to playback the next random track.
- After all the tracks have played once, the playback will stop automatically.
- To cancel random playback, press the RANDOM button during Random playback. Normal playback will resume.
Intro playback
- Press the INTRO button on the remote control. The “ INTR ” indicator will show on the display. The unit will play the rst 10 seconds of each track.
- Press the INTRO button on the remote control again to resume normal playback.
Programme setting
User can program up to 20 tracks in any desired order. And Programme mode is activated while in STOP mode.
- Press the MEMORY button to enter programme mode..
- Press the buttons to select the track that you want to preset.
- Press the ENTER button to conrm the track.
- Repeat steps 2-3 to programme more tracks. When nished selecting tracks, press the , button to start playback of the programmed tracks.
Programme cancel: Press the ![]() button twice, or open the disk tray and close it again to erase the memory
button twice, or open the disk tray and close it again to erase the memory
BT OPERATION
The unit has a BT function that can receive a signal within 8 metres.Pairing the unit with a BT device to listen to music:
- Press the MODE button repeatedly to select BT mode.
- If the unit is not paired with any BT device, the right hand corner will show a flash the BT symbol.
- Activate your BT device and select the search mode.
- “Connect System S” will appear on your BT device list.
- Select “Connect System S” and enter “0000” for the password if necessary.
- To disconnect the BT function, switch to another function on the unit or disable the function from your BT device.
Playing Music via BT
You may need to adjust the volume on your radio and BT device.
- Press the SCAN/ button on unit or button on remote control to play/pause music or
- Press buttons on unit or remote control to skip to the previous/ next track
- If the signal strength is weak, your BT receiver may disconnect, but it will re-enter pairing mode automatically.
- For better signal reception, remove any obstacles between the unit and the BT device.
- This unit supports A2DP (Advanced Audio Distribution Profile) and AVRCP (Audio Video remote Control Profile) functions. This can only be paired with one BT device at one time.
- Compatibility with all devices and media types is not guaranteed.
- Some mobile phones with the BT function may connect and disconnect as you make and end calls. This is not an indication of a problem with your unit.
AUX OPERATION
There is an “AUDIO IN” socket located at the rear of the unit. Analogue audio sound signals from other sources can be input to the unit through this socket.
- Connect the input to another audio device via an AUX cable (not included) with an “AUDIO IN” socket.
- Press the MODE button repeatedly to select AUX mode.
- Turn the VOLUME dial on the unit or press the VOL +/– buttons on the remote control to adjust the volume control for your desired sound output level.
- In AUX mode, operate your audio device directly for playback features.
When connecting the external audio device, refer to the owner’s manual of the external device.
NETREMOTE
The device gives a feature of NetRemote by smartphone or tablet in iOS or Android system. By downloading the assigned app named UNDOK, you can view all the modes of Internet radio, Music player, DAB, FM, BT and AUX in. Search UNDOK from Google Play or Apple Store for UNDOK app, and install it to your smartphone or tablet. Before using the UNDOK app, make sure the device and the smartphone or tablet are in the same WiFi network. Launch the app.The app initializes and scans for the device in the network. Tap the device to make the NetRemote connection.
- Once the smartphone or tablet has already accessed the device, they will automatically connect the next time when you open the app again.
- Be aware that if another smartphone or tablet with the app in the same network has access with the device; the original connection will be cut off.
When it is the first time that you connect the device to the unit, the app may ask you to enter the PIN. Default PIN is 1234. For details of changing the PIN for security, please refer to System Settings section: Network – NetRemotePIN Setup. Select your desired mode in the main page. You may then control the selected mode on your smartphone or tablet and on the device simultaneously.
USING HEADPHONES
Do not listen to music at high volume when using headphones. Doing so can cause permanent hearing impairment. Turn the tuner volume level to the lowest before using headphones.
- Only use headphones with a 3.5 mm jack plug.
- Insert the headphone connector in the headphone socket in front of the unit.
SLEEP SETTING
This function allows you to program the unit to turn to standby mode by itself after a set period of time.
- To activate the sleep function, press the SLEEP button repeatedly. The time will change in the below sequence on every press: SLEEP OFF -> 15 minutes -> 30 minutes -> 45 minutes -> 60 minutes -> 90 minutes -> 120 minutes.
- When your desired sleep time appears in the display, stop pressing the button and the sleep function will be activated in two seconds. “ ” will show on the display. Also the time remaining until switch off is displayed next to the symbol in the display.
- When the sleep timer counts down to zero, the unit will turn to standby mode. To turn the sleep function off while the sleep timer is still counting down, press the SLEEP button repeatedly to select “SLEEP OFF”. “ ” will disappear from the display.
- Press the SLEEP button once to show the sleep timer status on the display when it is turned on.
Alternatively:
- Press the MENU button on the remote control to display the function main menu. Press the / buttons to select Main menu, and then press the ENTER button to confirm.
- Press the / buttons to select Sleep mode, and then press the ENTER button to confirm.
- Press the / buttons to select sleep timer, and then press the ENTER button to confirm..
SETTING THE ALARM
- Press the TIMER button on the remote control, the display shows “Alarm (1 or 2): Off [hh:mm]”.
- Press the / buttons to select the Alarm number (1 or 2) and then press the ENTER button to start the setting of the following parameters.
- For the following setting, press the / buttons to select then press the ENTER button to confirm.Enable: Off/ Daily/ Once/ Weekends/ WeekdaysTime: (Alarm On time)Mode: Buzzer/ Internet radio/ DAB/ FMPreset: Last Listened/ (Preset station)Volume: Muted, 1-32Save: Save and confirm the alarm setting
- Finally, select “Save” and press the ENTER button to save the alarm setting. When the alarm is set, the alarm icon will appear on the display during standby mode.
- To turn off the alarm when it sounds, press the STANDBY or ALARM button. During Standby mode, press the ALARM button repeatedly to turn the saved Alarm on/off.
Cancelling the Alarm
- Press the TIMER button on the remote control, the display shows “Alarm (1 or 2): On [hh:mm]”..
- Press the / , buttons to select the Alarm number (1 or 2) and then press ENTER to start the setting of the timer.
- Press the / buttons to select “Enable” then press the ENTER button to confirm.
- Press the / “buttons to select “Off” then press the ENTER button to confirm.
- Finally, select “Save” and press the ENTER button to save the setting.
If no button is pressed within approx. 15 seconds, the unit exits timer setting mode automatically.
DISPOSAL CONSIDERATIONS
 According to the European waste regulation 2012/19/EU this symbol on the product or on its packaging indicates that this product may not be treated as household waste. Instead it should be taken to the appropriate collection point for the recycling of electrical and electronic equipment. By ensuring this product is disposed of correctly, you will help prevent potential negative consequences for the environment and human health, which could otherwise be caused by inappropriate waste handling of this product. For more detailed information about recycling of this product, please contact your local council or your household waste disposal service.Your product contains batteries covered by the European Directive. 2006/66/EC, which cannot be disposed of with normal household waste. Please check local rules on separate collection of batteries. The correct disposal of batteries helps prevent potentially negative consequences on the environment and human health.
Declaration of ConformityProducer: Chal-Tec GmbH, Wallstraße 16, 10179 Berlin. GermanyThis product is conform to the following European Directives:2011/65/EU (RoHS)2014/53/EU (RED)
The complete declaration of conformity of the manufacturer can be found at the following link.Scan this QR code or enter the URL.
 use.berlin/10034071
Auna Connect System S Micro System Speaker User Manual – Auna Connect System S Micro System Speaker User Manual –
[xyz-ips snippet=”download-snippet”]