AURA PRO Golf Cart Underbody

COMPONENTS

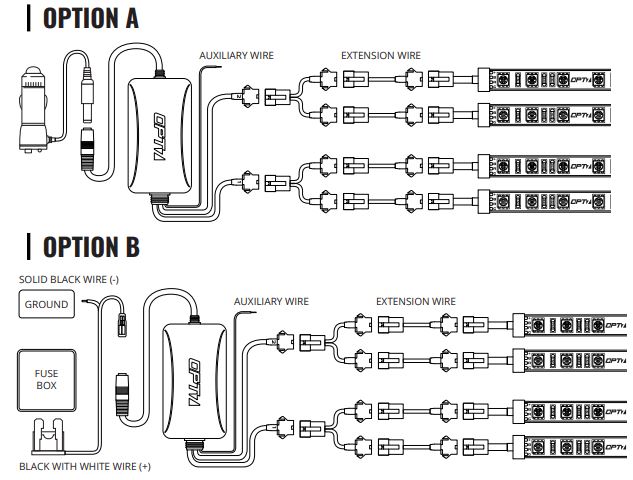
INSTALLATION
STEP 1Inspect kit to ensure all contents were included.
STEP 2Decide where to locate the light strips and ensure wiring has enough length for the control box to be installed in the desired location.

STEP 3Scan the QR code on the back of the control box to download the app.STEP 4Secure Control box in the desired location with Velcro or zipties.* The control box is NOT waterproof. Tuck it away from the elements.
STEP 5Secure the light strips using the zip ties to tie all the wiring away from the moving components.* IMPORTANT: The LED connectors are not waterproof. You will need to use HEAT SHRINK TUBE or ELECTRICAL TAPE around the LED connectors to ensure the longevity of the lighting kit.
STEP 6Open the OPT7 Aura App, pair your smart device to the control box, and pick your desired color!
AUX WIRING FOR A DOOR/DOME LIGHT
You may choose the desire color choice directly on the Aura app.This feature will activate when the aux wiring is connected to the trigger wire for the door light or the positive wire of the dome light.* NOTE: Trigger wire for door light is recommended if your dome light lights up progressively when opening the door.OPT 7 AURA APPQR Code to download– Colors– Modes– Door Assist– Support– Ability to control up to 4 devices at once


DISCLAIMEROPT7 Lighting is not liable for damages or personal injuries while installing this product. The Installation Guide is intended as assistance to reduce setup time. OPT7 Lighting assumes no responsibility for improper installation.If you are unfamiliar with your vehicle or inexperienced with aftermarket upgrades, please seek professional assistance.

NEED SUPPORT?Scan for tutorial videos, troubleshooting tips, and more.
[xyz-ips snippet=”download-snippet”]