![]()

 Please read through this manual thoroughly before use, any damage caused by misuse of the product will not be covered by the warranty.

Safety Instructions
- Please keep this manual for future reference.
- Always make sure that you are connecting to the proper voltage, and that the line voltage you are connecting to is not higher than that stated on the bottom of the fixture.
- This product is intended for indoor use only. It must be connected to an earthed mains outlet.
- To prevent risk of fire or shock, do not expose fixture to rain or moisture. Make sure there are no flammable materials close to the unit while operating.
- The unit must be installed in a location with adequate ventilation, at least 20cm from adjacent surfaces. Be sure that no ventilation slots are obstructed.
- Always disconnect from power source before servicing or replacing fuse and be sure to replace with same fuse size and type.
- Maximum ambient temperature is 40°C. Do not operate the fixture at higher temperatures.
- In the event of a serious operating problem, stop using the unit immediately. Never try to repair the unit by yourself. Repairs carried out by unskilled people can lead to damage or malfunction. Please contact the nearest authorised technical assistance centre.
- Make sure the power cord is never crimped or damaged.
- Never disconnect the power cord by pulling or tugging on the cord.
- Avoid direct eye exposure to the light source while it is on.
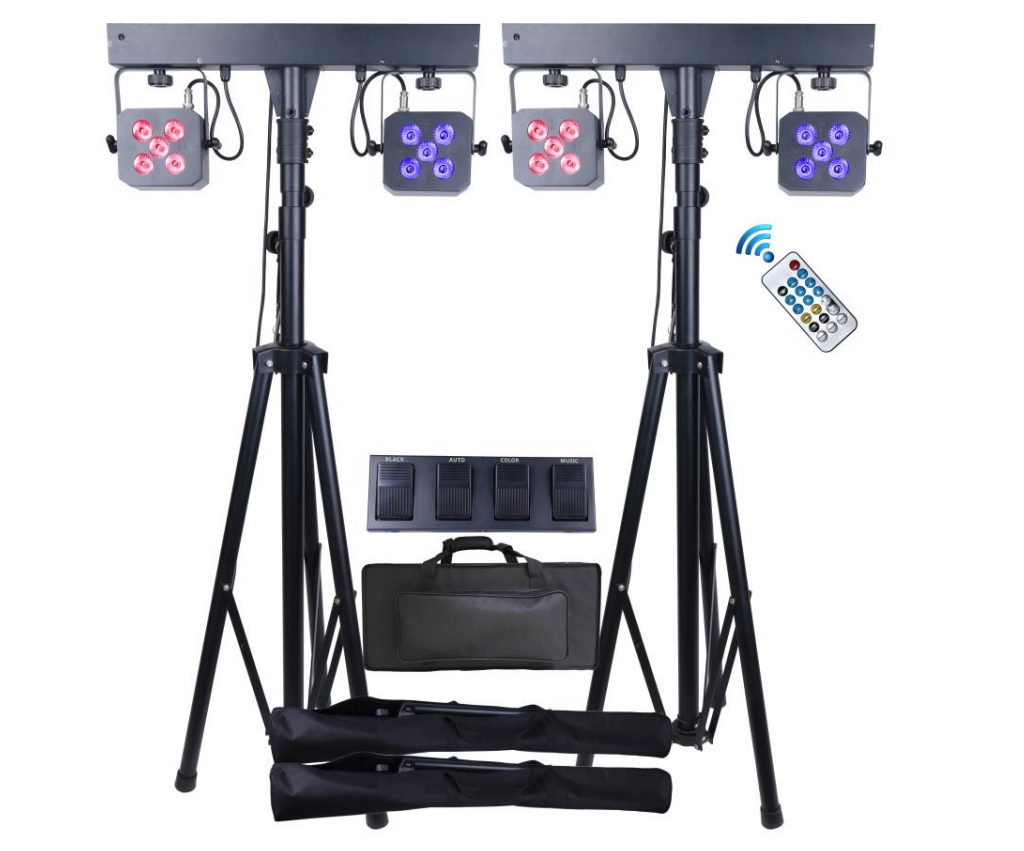
Contents in the box
- PAR Bar x2
- Tripod stand x2
- Foot Controller
- Remote control
- Carry Case for Par Bar and Foot control
- Carry case for tripod x2
- Instruction Manual
- Power cable x2
- 10M DMX cable
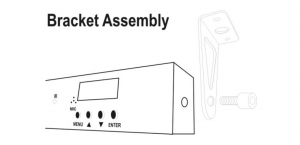
- Hanging Bracket and Screw Set x4
Features• Twin PAR Bar lighting set with 2x2x5pcs 10W Quad LEDs• High output with 3255Lux at 2M when full on with one separate head• Saturated wash effect without multicoloured shadows• Foot controller with 10M cable and IR remote control• Separate light head control with various built-in colour macros• Easy setup and tear-down with tripod stand and carrying bags
Specification
- Power supply 220-240 Vac, 50/60Hz (IEC)
- Fuse rating 2A
- Power consumption 200W
- IP rating IP20
- Cooling Fan
- LED Type 10W RGBW 4in1 LED x 20pcs
- Colour Temp. 8000K
- Average life span 50,000 Hours
- Standard beam angle 25°
- Dimming 0-100%
- Luminance 3255Lux @2M per head
- Strobe 1-25 Hz
- Dimensiono PAR bar 600x245x65mmo Stand Compact 140x110x1025
- Height extension 1140 – 1870mmo Foot Controller 420x155x38mmo Main Carry Case 660x300x220mm
- Weighto Overall 18Kgo Main Carrier with contents 12Kgo Stand in carrier 3.0Kg
Setup/Installation
This lightweight, versatile PAR bar system is prefect for mobile DJs and performers who need their lighting to be quick to set up and easily transportable. 4 PAR Cans are each loaded with 5 LEDs in red, green, blue and white for super smooth colour blending.
- Remove stands from the carrier and open the tripod legs onto the floor, make sure it is on a stable footing.
- Remove the PAR bars from the main carrier and attach them onto the tripod stand.
- Tighten the screw to secure the PAR bar.
- Connect the Power cables on both units.
- Setting the PAR BARs to Master and Slave (see PAR Bar mode settings.)
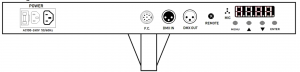
- Connect the multi-core lead to the foot controller and the Master unit.
- Connect the XLR cable (3 Pins) to the DMX OUT socket on the Master unit and the DMX IN socket on the Slave unit.
- Adjust height of the extension pole, insert safety pin and tighten the locking screw.
- Hanging Brackets are included for permanent fitting on trusses (Truss attachments are not included) or screw to the ceilings. Attach bracket with screw onto the ends of the PAR bar as shown: –
PAR Bar Mode Setting
When using the unit for the first time or resetting to default, it is recommended a factory default reset is performed.
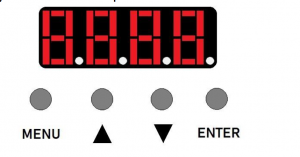
Factory Default Setting: –
- Press the MENU button once, display will show
- Press UP button once, display will show
- Press the Enter button once, display will show. This means that you have set unit to Default setting, the unit now is in Slave mode.
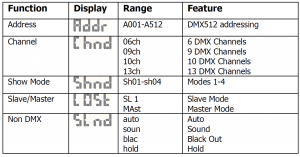
Function Menu Table
Below is a table showing the options and settings available for the PAR Bar, Press the MENU button once and you can scroll the function list in the order as shown. Press the Enter button once to access the range setting, then pressing Up/Down buttons allows you to adjust the setting, press enter to select or Menu to exit.
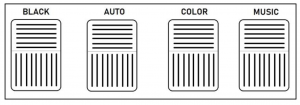
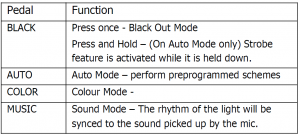
Foot Controller
To use the Foot Controller, it must be connected to the PAR Bar set as the Master and switch on the power at the back of the Foot Controller. When a DMX controller is connected to the PAR Bar it overrides the foot controller.
Remote Control

| Button | Functions |
| Stand By | Power On/Off |
| DMX | DMX mode |
| Show 1 | Show 1 |
| Show 2 | Show 2 |
| Show 3 | Show 3 |
| Show 4 | Show 4 |
| Show 5 | Show 5 |
| Show 6 | No function |
| Show 7 | No function |
| Show 8 | No function |
| Led Color | LED color Jump |
| LED Random | No function |
| Sound on | Sound on |
| Laser color | No function |
| Laser Random | No function |
| Sound Off | Sound off |
| Speed- | Show1-show4 speed increase |
| Speed | Show1-show8 speed in middle(default) |
| Speed+ | Show1-show8 speed decrease |
DMX Connection and ControlThe PAR Bar can be connected as a daisy chain by using standard XLR cables. The units are labelled with DMX IN and DMX OUT –
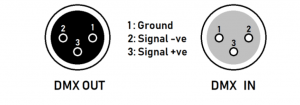
Connect the DMX controller output to the DMX IN on the first unit. Then connect the first unit’s DMX OUT to DMX IN on the next unit, and so on if there are more units. A DMX starting address must be assigned to each fixture; allowing the DMX controller to control each fixture individually. This fixture has 13 channels so the first unit should be assigned with an address of 001, the next unit should be 014 (13+1) and next one at 027 (2×13+1) etc. All fixtures can be set to the same address, this way all connected the fixtures will be act in unison. Please refer to the DMX tables for the function and features.
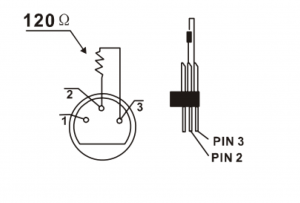
DMX TerminatorIf there are many lines or lights, it is recommended to use a DMX terminator to prevent DMX signal corruption, the DMX terminator is an simple XLR plug with a 120 Ω resistor connected between pins 2 and 3,which is then plugged into the output XLR socket of the last fixture in the chain.
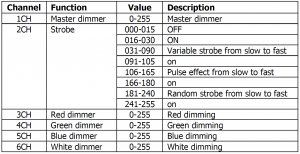
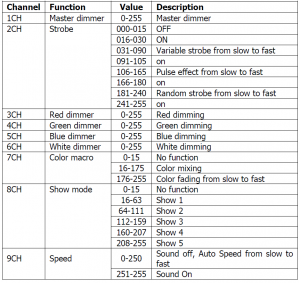
DMX Control Table6CH Mode
9CH Mode
10CH Mode

13CH Mode


This product is classed as Electrical or Electronic equipment and should not bedisposed with other household or commercial waste at the end of its useful life.The goods must be disposed of according to your local council guideline
Read More About This Manual & Download PDF:
Stereo Twin PAR Bar Lighting Set User Manual – Stereo Twin PAR Bar Lighting Set User Manual –
[xyz-ips snippet=”download-snippet”]