axis 13.3" Roof Mount FHD Monitor System
 AX1513 User Manual

SPECIFICATIONS:
GENERAL
– 13.3 Inch (33.8cm) HD LED-TFT Monitor– 1080P Decoding– PAUNTSC Auto Color System– 1920(W) x RGB x 1080(H) RGB Resolution– Slimline & Compact– LED Backlight– 16:9 Screen Format-HDMI Input-AV Input-AV Output– Multi-language OSD Menu– IR Transmitter (2 Ch for Wireless Headphones)-Wireless FM Modulator (8 Ch for Audio Output)Frequencies: FM 87.7MHzFM 88.1 MHzFM 88.5MHzFM 88.9 MHzFM 106.7MHzFM 107.1MHzFM 107.5MHzFM 107.9MHzFunction Buttons on Pod– Built-In Dome LED Lights– On-Board Stereo Speakers– Universal Installation– 12/24V DC Input/ Negative Ground– Minus 10° to +60°C Operating Temperature– 350(W) x 300(L) x 32(H)mm Dimensions (when closed)
DVD/CD PLAYER/MULTIMEDIA
– DVD/CD/M P3/M P4/WMNM PEG2/MPEG4/MKV/H.264/ AVS/VCI/RM/RMVB/ AVI/VP6/VP8, etc. Playback Systems-USB2.0 Port– SD/MMC/MS Card Reader– Supports 1080P
FUNCTIONS:
- Light Switch
- Eject
- Next Track/ Decrease
- Previous Track/ Increase
- Mode
- Menu
- Power Off
- HDMI input/USB/SD
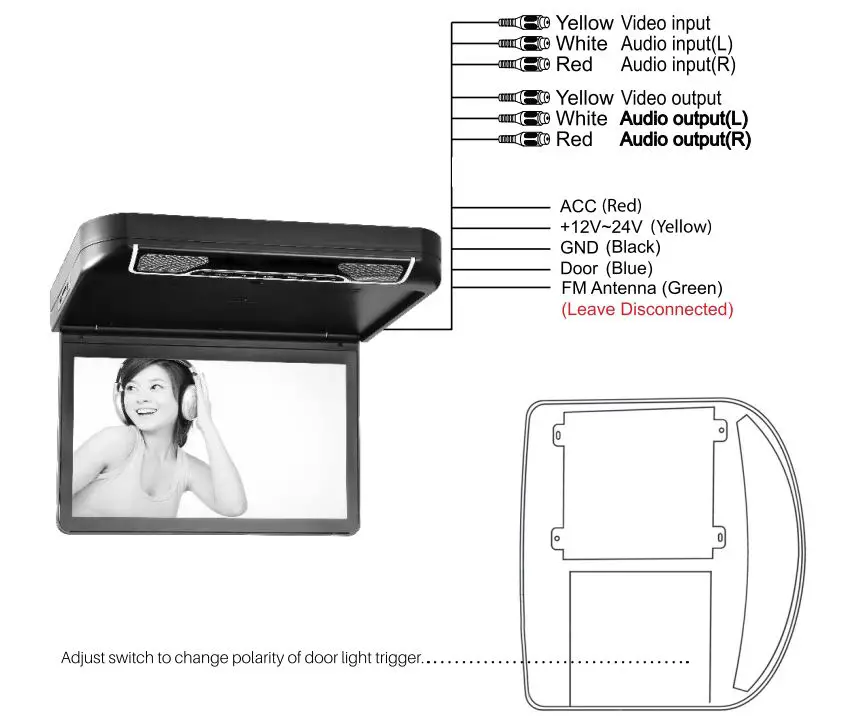
DVD Connection Diagram:
REMOTE CONTROL:
OPERATION OF DVD SYSTEM/USB/SD:
Play DVD/CD/MP3
- Turn on the player and insert a disc with the label facing up.
- The disc will automatically play.
- To stop, press STOP button on remote.
- To pause, press PLAY/PAUSE button on remote.
- To resume again, press PLAY/PAUSE button on remote.
To select a track:
- Choose the desired track by using NEXT or PREVIOUS buttons or
- Enter the number of the track to play directly.
OPERATION OF DVD SYSTEM/USB/SD:
Disc Menu
- To display the recorded menu of DVD/VCD 2.0 disc, press DVD menu button.
- If embedded in the disc, a menu will appear. Scene selection, Special Features, etc. (Menu appearance will differ on various discs – NOTE: CD+ VCD1 .1 does not have this function)
- Press the arrow buttons to find the desired setting. Press the ENTER button
Menu
Press “Menu” repeatedly to select one of the below options.
- Volume — Press I« or» I to adjust volume up or down.
- Brightness — Press I« or »I to adjust black level.
- Contrast — Press I« or» I to adjust white level.
- Color — Press I« or» I to adjust color saturation.
- Aspect Ratio — Press I« or» I to select 4:3 or 16:9 widescreen view.
- FM Mode — This will enable you to listen to the audio through your radio tuner.Press I« or» I to select- Off, or one of8 FM radio frequencies.
- IR Mode — This will enable you to listen to the audio through wireless IR headphones.(Optional) Press I« or »I to select- Off, or one of 2 IR frequencies.
- Sleep Timer — Activate for auto turn off.Press I« or »I to select- Off, 240, 120, 180, 90, 60, 30, 20, 10min.
- Language — Select menu language. Press I« or »I to select- One of 10 languages.
- Mode — Select playback source Press I« or »I to select- DVD, USB, SD, HDMI, AV.
- Reset — Select to reset the unit to default settings.
IR TRANSMITTER (For optional IR headphones)
To use IR function for optional IR headphones*, please find the IR Mode icon in the menu. Select to open or close IR Mode.
There are two IR channels: A & B. When using IR headphones, please set the channel of your IR headphone exactly the same as the IR channel of the player.For example: When your IR headphones channel is A, then your player IR channel also should be at A position.
FM TRANSMITTERTo use FM function, please find the FM Mode icon in the menu.Select to open or close FM Mode.To transfer the sound to your car audio system, make sure your car radio frequency is exactly the same as the AX1513.
* Contact your nearest AXIS stockiest to purchase
INSTALLATION
- Remove mounting screws (main chassis) and remove mounting plate.
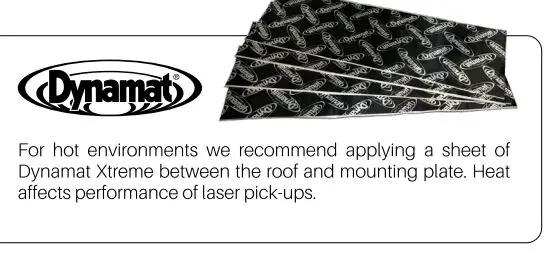
- Carefully align metal mounting plate with installation position and secure. Use correct screws to suit the vehicle and location.*NOTE: If the ceiling structure is cu Ned or uneven, a backing board (eg plywood) may be required first as a base to hold the metal mounting plate.
- Carefully locate all cables so no damage occurs to either the unit or vehicle and attach monitor frame to metallic mounting plate.(Do not overtighten screws)
TROUBLESHOOTING
CAUTIONS
- Do not expose the unit to rain, damp environments, dust and direct sunlight, or excessive vibration.
- Do not attempt to repair the unit by yourself. Please turn off and if any problems arise, seek professional advice.
- Do not use strong chemical cleaners when cleaning the unit. Please use a soft damp cloth.
- The unit storage temperature is from -20°C to 60°C. The operating temperature is from -10°C to 60°C.
- For your safety, please do not operate this monitor when driving as it is illegal in most regions.
- Safe power supply: DC12/24V
Attention!There may be some small bright spots appear on the screen. This is common technical matter with TFT pixels and does not indicate a defect of this unit.
WARRANTY
Congratulations on your purchase of a quality ![]() Mobile Audio System! You’re joining thousands of satisfied customers who enjoy & experience the benefits of the products we distribute. In the unlikely event that some technical difficulty arises with your purchase, be assured that we are most anxious to see that the problem is quickly rectified to your satisfaction. Please familiarize yourself with the following simple conditions of our warranty.This warranty covers faults through component failure or failure of the product to operate in accordance with published specifications. Product failure as a result of unreasonable environmental conditions, accident, misuse, improper installation, unauthorized repair, vehicle electrical or wiring faults or neglect etc., will not be covered by this warranty. Removal and installation costs, if any, would be paid by the owner as well as any freight or postage costs of transporting the product to Audio Xtra. AudioXtra shall not be liable or responsible for any loss of use of this product or any form of consequential loss.
Mobile Audio System! You’re joining thousands of satisfied customers who enjoy & experience the benefits of the products we distribute. In the unlikely event that some technical difficulty arises with your purchase, be assured that we are most anxious to see that the problem is quickly rectified to your satisfaction. Please familiarize yourself with the following simple conditions of our warranty.This warranty covers faults through component failure or failure of the product to operate in accordance with published specifications. Product failure as a result of unreasonable environmental conditions, accident, misuse, improper installation, unauthorized repair, vehicle electrical or wiring faults or neglect etc., will not be covered by this warranty. Removal and installation costs, if any, would be paid by the owner as well as any freight or postage costs of transporting the product to Audio Xtra. AudioXtra shall not be liable or responsible for any loss of use of this product or any form of consequential loss.
CONSUMER WARRANTY
This product is warranted by AudioXtra Pty Ltd to be free from defects in materials and workmanship under NORMAL USE for a period of TWENTY FOUR MONTHS from the date of purchase.
WITHIN 30 DAYS OF PURCHASE DATE:Please return the unit for replacement to our National Service Centre or the Retailer from where you made the purchase. All accessories must be included. Proof of purchase date must accompany the products.
AFTER 30 DAYS OF PURCHASE DATE:
Warranty repair and service is carried out by our National Service Centre. Repair and service will be carried out at no cost to the owner if proof of ownership and the date of purchase can be verified to the satisfaction of the authorized center concerned with this repair. This proof should take the form of either:
a) The warranty card accompanying this product stamped and dated by the dealer.b) A Tax Invoice or Receipt showing full details of original vendor, purchaser, model number and serial number.
COMMERCIAL WARRANTY
A product used in or associated with a commercial application will carry a limited SIX MONTH warranty. An abnormal commercial application is one where usage, dust, vibration, heat/cold and other environmental conditions exist at an extreme level.
Our goods come with guarantees that cannot be excluded under the Australian Consumer Law. You are entitled to a replacement or refund for a major failure and for compensation for any other reasonably foreseeable loss or damage. You are also entitled to have the goods repaired or replaced if the goods fail to be of acceptable quality and the failure does not amount to a major failure.
Please complete details below in the event of warranty service being required.
National Service Centre:
report this ad10 STODDART ROAD, PROSPECT, SYON EY NSW 2148 AustraliaTelephone: (02) 8841 9000 Fax: (02) 9636 1204email: [email protected]
![]() PTY LTD
PTY LTD
[xyz-ips snippet=”download-snippet”]