
AXIS P37-PLE Network Cameras Repainting Instructions
AXIS P37-PLE Network CamerasAXIS P3717-PLE Network CameraAXIS P3719-PLE Network Camera
Impact on warranty
This product is approved for repaint by Axis, provided that you follow the instructions in this document and at www.axis.com/warranty-implication-when-repainting
Risks with repainting
There are several risks when disassembling or assembling an Axis product. There is always a certain yield loss during assembly. Training of operators and the use of correct tools mediates some of the problems but they can never be fully avoided. Some of the risks include:
ESD Damage – Always handle the product in an ESD safe environment. Even if precautions are taken there is always a risk of ESD damage. The damage can remain undetected and cause problems during the lifetime of the equipment.
Dust contamination – Opening a camera may expose the lens and sensor to dust or paint. Dust will affect the optical performance. Lenses need to be disassembled in a dust-free environment, preferably a cleanroom.
Paint overspray – Masking the different components of the equipment is critical. Failure to mask sensitive areas can cause problems with assembling the equipment. Any areas that are not painted at factory or have a different surface treatment than the rest of the parts (threads, ground and electrical contact surfaces) must also be masked to ensure function.
How to repaint the product
Preparations
- If applicable, disassemble the equipment according to the instructions in this document.
- Clean all parts to be repainted thoroughly to remove grease, dust, or oil.
- To ensure reassembly and functionality of the product, mask openings for screws, LED indicators, or microphones before painting.
Pretreatment of parts
Depending on the part material and type of paint applied at factory, different pretreatment should be done for the new paint to adhere as well as possible. Clean the parts properly to remove oil, grease and dust.
For more information on the materials used in the product, see its datasheet at www.axis.com
Powder coated parts – Use a primer. Alternatively, remove the original powder coating down to the base material, using fine sandpaper, and clean the parts before painting.
Anodised and chromated parts – Use a primer.
Uncoated stainless steel – No special pretreatment is needed, but make sure that the surface is clean before painting.
Plastic – Use a primer.
Disassembly

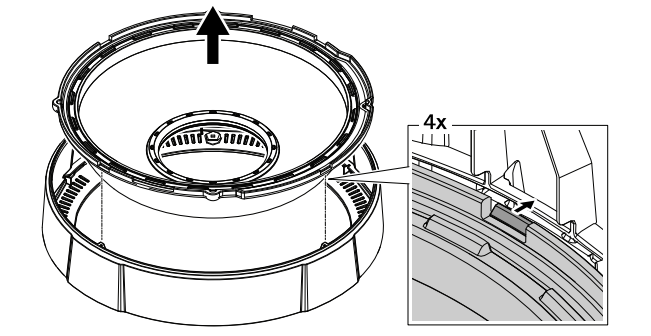
- Remove the dome cover.
- Remove the dome from the dome cover.
Repainting
- Make sure all necessary preparations of the dome cover have been made. See Preparations on page 3 .
- Apply a thin and even layer of spray paint according to the instructions of the paint manufacturer.
- Let the paint dry.
- To get a better coverage and clearer color, apply a second layer of spray paint.
- When the paint is dry, remove the masking.
Reassembly
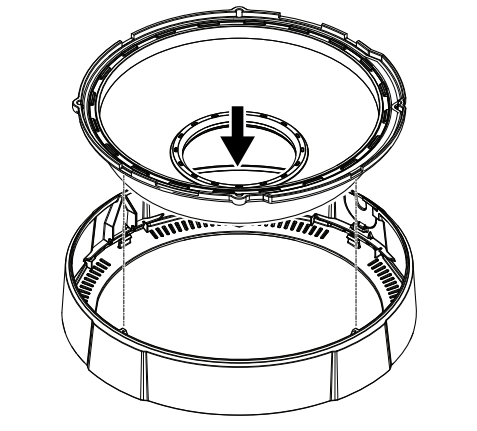
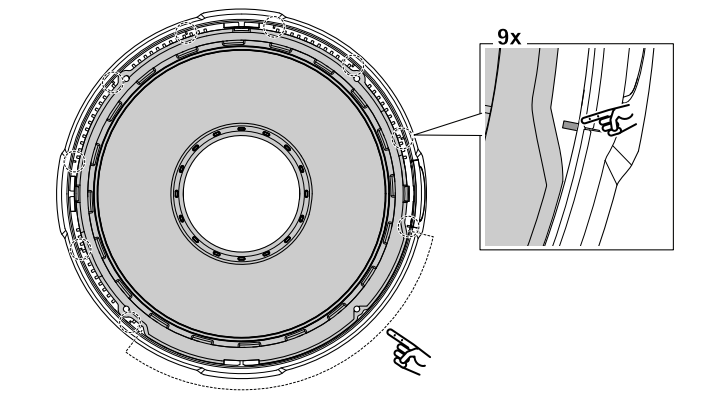
- Line up the dome to the dome cover and snap the two parts together (4 snaps). Make sure to line up the dome and dome cover in the correct position before snapping them together. The wider part of the dome fits with the part of the dome cover where there are no ribs.
- Reassemble the dome cover and the camera and tighten the screws (torque 1.0 Nm, 0.7 lb ft).
Repainting InstructionsAXIS P37-PLE Network Cameras© Axis Communications AB, 2018
Ver. M3.1Date: November 2018Part No. T10127372
References
[xyz-ips snippet=”download-snippet”]