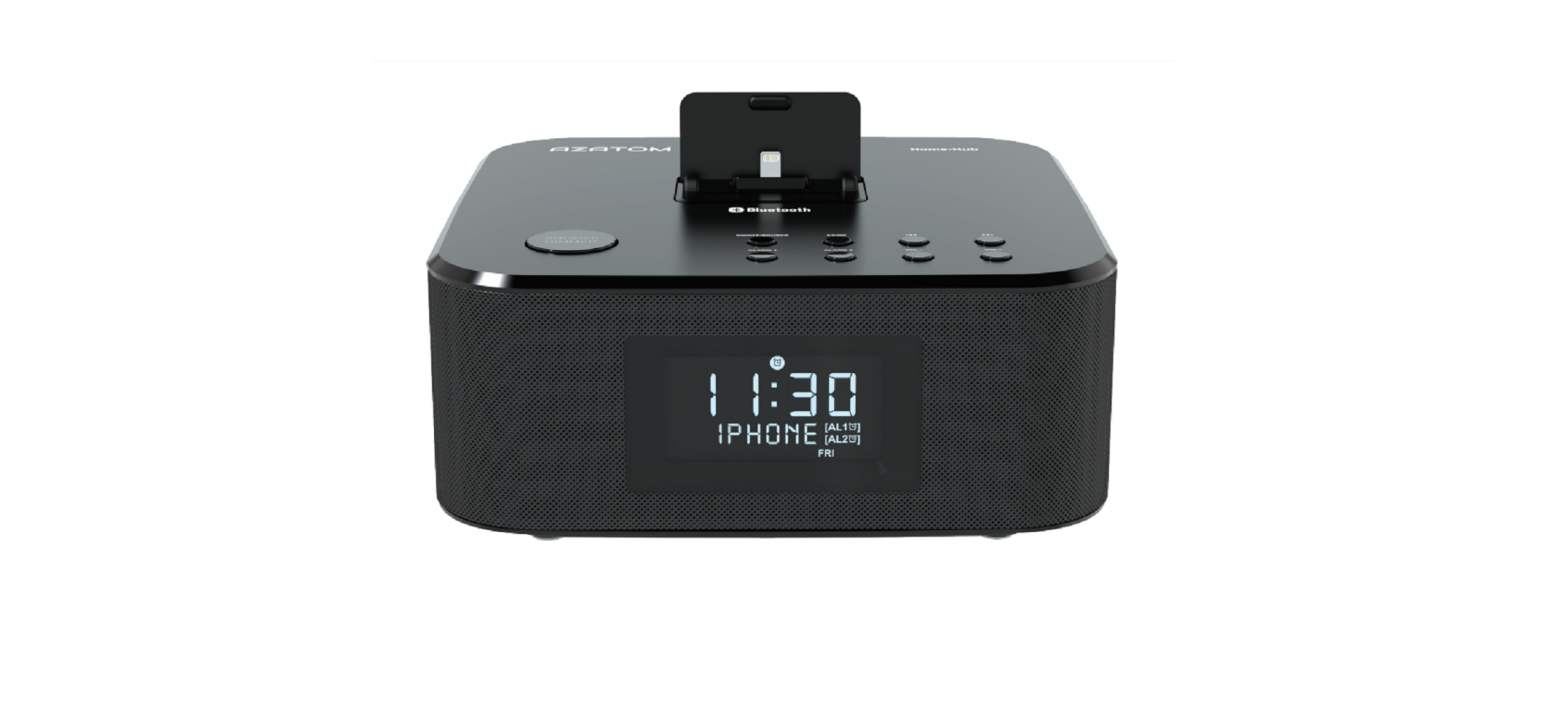
AZATOM HomeHub B1 FM Radio with BT Audio and Lightning Dock User Manual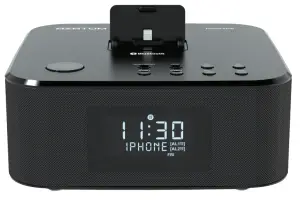
Controls & Interface

- SNOOZE/DIMMER– Repeat the alarm– Adjust the display brightness
- ON/OFF/SOURCE– Turn on or turn off the unit– Select the play function
- ►|| / OK– Start or pause play
- FORWARDS ► ► | / BACKWARDS |◄ ◄– Skip to previous/next audio file– Search radio stations manually– Press and hold this button tosearch radio stations automatically
- ALARM 1/ALARM 2– Set the alarm timer– View alarm settings
- VOLUME +/-– Decrease or increase thevolume level
- DOCK for iPod/iPhone/iPad– Load an iPod/iPhone/iPad
- Display Panel– Show the current status
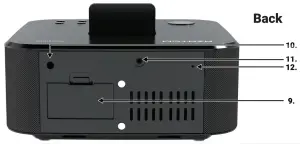
- Battery Compartment
- AC– Connect to power
- LINE IN– Connect to an external audio device
- FM ANT– Radio Antenna wire
Remote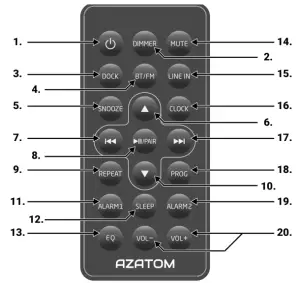
- ON/OFF– Turn on or turn off unit
- DIMMER– Adjust display brightness
- DOCK– Select iPod/iPhone/iPad function
- FM/BT– Select between FM and BT Wireless Audio functions
- SNOOZE– Snoozes the Home Hub Alarm
- UP ▲– Navigate through iPod/iPhone menu– Select a next preset station– Adjust time
- SKIP BACKWARDS |◄ ◄– Skip to previous audio file.– Search radio stations manually– Press and hold this button to search radio stationsautomatically.
- ►|| / PAIR– Start or pause play,– Press and hold to enable Bluetooth pairing mode inBluetooth mode.
- REPEAT– Select repeat play modes
- DOWN ▼– Navigate through iPod/iPhone menu-Select a previous preset station– Adjust time
- ALARM 1– Set the alarm 1 timer– View alarm 1 settings
- SLEEP– Set the sleep timer
- EQ– Select a preset sound effect: Classic, Rock, Jazz, etc.
- MUTE– Mute or resume the sound
- LINE IN– Select LINE IN function
- CLOCK– Press and hold this button in the standby mode to setthe clock
- SKIP FORWARDS ► ► | – Skip to next audio file– Search radio stations manually– Press and hold this button to search radio stations automatically
- PROG– Preset stations for tuner
- ALARM 2– Set the alarm 2 timer– View alarm 2 settings
- VOL+ /VOL-– Increase/Decrease the volume level
Install Batteries
![]() Note:
Note:
- You can only use AC power as power supply. Batteries (not supplied) are for powering the clock and alarm back memory only.
- If the system is unplugged or if a power failure occurs, all setups of the unit will be erased unless there are batteries in the unit.
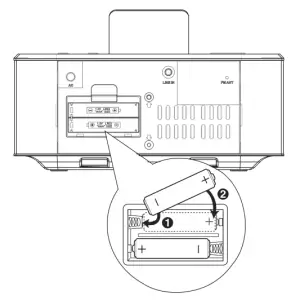
- Open the batteries compartment
- Install two AAA batteries (not supplied) with above
- Close the battery compartment
Connect Power
Caution:
- Risk of product damage! Ensure that the power supply voltage corresponds to the voltage printed on the back or the underside of the unit
- Before connecting the AC power cord, ensure you have completed all other connections. Connect the AC power cord to the wall socket
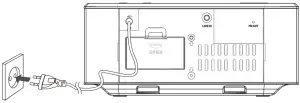
Connect the AC Power cord to the wall socket
Prepare the Remote Control:
The provided Remote Control allows the unit to be operatedfrom a distance.
- Even if the Remote Control is operated within the effective range (6m), remote control operation may be impossible if there are any obstacles between the unit and the remote control
- If the Remote Control is operated near other products which generate infrared rays, or if other remote control devices using infrared rays are used near the unit, it may operate incorrectly. Conversely, the other products may operate incorrectly
For First-time use:
The unit has a pre-installed lithium CR2025 battery. Remove the protective tab to activate the remote control battery
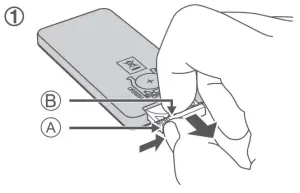
To Replace the Remote Control Battery:
- Pull out the battery tray and remove the old battery
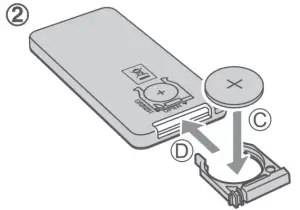
- Place a new CR2025 battery into the battery tray with correctpolarity (+/-) as indicated
- Insert the battery tray back into the slot
Precautions Concerning Batteries
- When the Remote Control is not going to be used for a long time (more than a month), remove the battery from the Remote Control to prevent it from leaking.
- If the batteries leak, wipe away the leakage inside the battery compartment and replace the batteries with new ones.
- Do not use any batteries other than those specified.
- Do not heat or disassemble batteries. Never throw them in fire or water.
- Do not carry or store batteries with other metallic objects. Doing so could cause batteries to short circuit, leak or explode.
- Never recharge a battery unless it is confirmed to be rechargeable.
What’s in the box?
- Home Hub Docking Station
- User Manual
- Aux Cable
- iPad Stand Adapter
- Remote Control
- Warranty Card
Using the Home Hub
General Operation
Power:
You can use all the functions on the top of the unit or the remote control after connecting to power supply (called Standby Mode)
Turn On:
Press ON/OFF button to turn the system on from standby mode.Press ON/OFF/SOURCE to select different functions.When turning the system on, the unit will start in the same mode as it was in when it was switched off.
Turn Off:
Press and hold ON/OFF button on the unit or press the button on the remote control again to turn the system off and go to standby mode.The unit will automatically revert to Standby Mode when not in use for 15 minutes.Be sure to unplug the power cord from the outlet when the system is not in use for an extended period of time.
Set Time:
The built-in clock shows the correct time in the display.
- In standby mode, press and hold the CLOCK button for some seconds, hour indicator will blink.
- Set the hour with the ▲ button or ▼ button.
- Press the CLOCK button to confirm, minute indicator will blink.
- Repeat steps 2-3 to set the minutes, day, month and year.
In standby mode, press and hold the CLOCK button for 3 seconds, then press the ►|| button to select 12 / 24 hour format.
Set the Alarm Timer:
You can set two alarms which go off at different times.
- Ensure that you have set the clock correctly. Press and hold the ALARM (1 or 2) buttons in standby mode on the main unit to select an alarm sound.
- Press ▲/▼ on the remote control to select an alarm sound source: FM tuner or buzzer.
- Press and hold ALARM 1 or ALARM 2. The hour digits will begin to blink.
- Press ▲/▼ repeatedly to set the hour then press either Alarm 1 or Alarm 2 depending on which you are setting.
- Press ALARM 1 or ALARM 2 to move on to setting the minutes. The minute digits begin to blink.
- Repeat steps 5-6 to set the minute.
- Repeat steps 5-6 to select whether the alarm will ring for the whole week, on weekdays, or at the weekend.
- Repeat steps 5-6 to set the alarm volume
Activate and Deactivate the Alarm Timer:
With the time correctly set, Press either ALARM 1 or ALARM 2 to activate or deactivate the timer. Pressing once will display the alarms settings – time, volume, source etc. and pressing the alarm button again will enable or disable the alarm.
- If the timer is activated, [AL1 ] or [AL2 ] is displayed.
- If the timer is deactivated, [AL1 ] or [AL2 ] the alarm clock icon disappears
Repeat Alarm:
You can press to adjust the interval to repeat alarm. When the alarm rings, press SNOOZE/ DIMMER. The alarm repeats ringing 9 minutes later.
Stop Al Ring:arm
When the alarm rings, press the corresponding ALARM 1 or ALARM 2. The alarm stops but the alarm settings remain.
View the Alarm Settings:Press ALARM 1 or ALARM 2 to view the alarm settings.
Set the sleep timer:
- This unit can switch to standby automatically after a set period of time. Press SLEEP repeatedly to select a set period of time (in minutes).• When the sleep timer is activated, the display will show, the volume will gradually decrease before the unit powers off.
- Press SLEEP repeatedly until [OFF] is displayed.• When the sleep timer is deactivated, disappears on the display.Adjust Display Brightness:Press DIMMER repeatedly to select different levels of display brightness.Adjust Volume Level:During play, press the VOL+/- buttons to increase/decrease the volume level.Select a Preset Sound EffectDuring play, press the EQ button repeatedly to select: [FLAT], [Pop], [Classic], [Rock], [Jazz]Mute Sound:During play press the MUTE button to mute or restore sound. Press this button again to cancel the effect.
Play from iPod/iPhone/iPad:
iPod/iPhone/iPad OperationUsing the iPod/iPhone/iPad dock, you can use the unit to play music files stored on your iPod/iPhone/ iPad.
Listening to your iPod/iPhone/iPad
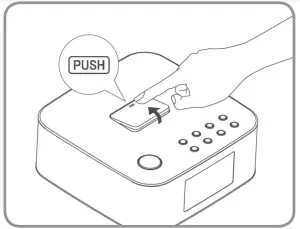
- You can enjoy audio from iPod/iPhone/iPad through this unit. Press down on the PUSH logo on the docking cover of the unit to flip the docking cover up.
- Insert your iPod/iPhone/iPad into the iPod/iPhone/iPad dock.
- Press the Dock button on remote control or SOURCE button on top panel to select the iPod/iPhone/iPad source.
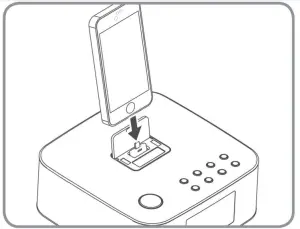
Start to play the connected iPod/iPhone/iPad.
- To pause/resume play, press the ►|| button.
- To skip to a track, press the |◄ ◄ / ► ► | buttons.
- To search during play: press and hold |◄ ◄ / ► ► | buttons, then release to resume normal play.
- To navigate the menu (only for iPod/iPhone): Press MENU button, then press ▲,▼ to select, and press ►|| to confirm.
- To select repeat play options: press the REPEAT button repeatedly to select a repeat option play mode.Before docking your iPad, remove the rubber inserts either side of the connector and attach the iPad support rest (included)Charging your iPod/iPhone/iPad:The docked iPod/iPhone/iPad begins to charge as soon as the unit is connected to AC power.
Play with BT Wireless Audio Device:
You can listen to music from a BT Wireless Audio-enabled device via this player.
Pair BT Wireless Audio-enabled Devices Manually
The first time you connect your BT Wireless Audio device to this player, you need to pair your device to this player
Note:
- The operational range between this player and a BT Wireless Audio device is approximately 8 metres.
- Before you connect a BT Wireless Audio device to this unit, familiarise yourself with the BT Wireless Audio capabilities of the device.
- Compatibility with all BT Wireless Audio devices is not guaranteed.
- Any obstacle between this unit and a BT Wireless Audio device can reduce the operational range.
- Keep this player away from any other electronic device that may caus interference.
- Turn on the BT Wireless Audio function on your device.
- Switch player’s source to BT Wireless Audio, Display panel shows “BT”, then shows “NO BT” (if no BT Wireless Audio device is connected).
- Press “PAIR “ button on remote control for a few seconds to activate BT Wireless Audio pairing mode, display panel shows “PAIR”.
- Search for BT Wireless Audio device with your device.
- Select “AZATOM Hub” in the pairing list.
- If prompted, enter default password “0000”, when the pairing succeeds the display panel shows “BT” again.
- To disconnect connection, turn off the BT Wireless Audio function on your device or switch the player to another source.
Tip:
- If a connection exist, hold and press “ PAIR “ button on remote control for a few seconds to re-activate the pairing mode, the connection will be interrupted.
- If no other BT Wireless Audio device pairs with this player within two minutes, the player will your device is moved beyond the operational range.
- If you want to reconnect your device to this player, place it within the operational range. – If the device is moved beyond the operational range, when it is brought back, please check if the device is still connected to the player.
- If they are connected, display panel shows “BT”.
- If the connection is lost, display panel shows “NO BT”. Follow the instruction above to pair your device to the player again
Controlling Music from your BT Wireless Audio Device:
- If the connected BT Wireless Audio device supports Advanced Audio Distribution Profile (A2DP), you can listen to the music stored on the device through the player.
- If the device also supports Audio Video Remote Control Profile (AVRCP), you can use the player’s remote control to play music stored on the device.
- Pair your device with the player.
- Start to play music via your device (if it supports A2DP)
- Use supplied remote control to control play (if it supports AVRCP)– To pause/resume play, press the ►|| button.– To skip to a track, press the |◄ ◄ / ► ► | buttons.
Play from an External Audio Device:
You can listen to an external audio device through this unit.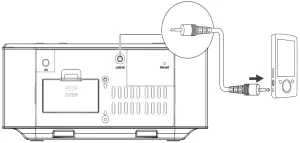
- Connect the audio player.
- Connect the LINE IN cable to the LINE IN socket on the rear of unit and to the headphone socket on the audio player.
- Press the LINE IN button to select the LINE IN source.
- Start to play on the audio player
Listening to FM Radio
Tuning in a Station:
- Press the FM button to select the FM source.
- Press and hold the |◄ ◄ / ► ► | buttons, the frequency changes down or up automatically until an station is found.
- Press |◄ ◄ / ► ► | buttons repeatedly until you find the station you want.
Presetting Stations, You can preset up to 20 FM stations.
Program radio stations automatically:
Press and hold the PROG button for 2 seconds to activate automatic programming. All available stations are programmed in the order of wavebandreception strength.
– The first programed radio station is played automatically.
Program radio stations manually:
- Tune in the desired station, then press the PROG button.
- Press the ▲/▼ buttons to select the preset number.
- Press the PROG button to store the station.
- Repeat above steps 1 to 3 for each station you want to store in memory with a preset number
If the system is unplugged or if a power failure occurs, the preset stations will be lost unless there are batteries in the unit.
Tune to a Preset Radio Station:Press the ▲ or ▼ buttons to select a preset number that you want
Technical Specifications
General:
| Power Requirements | AC 220-240V ~ 50Hz |
| Max Output Power | 30W MAX Power |
| Audio Input Sensitivity/Impedance | 500mV |
| Frequency Response | 40Hz – 20kHz |
| Tuning Range | 87.5 – 108.0MHz |
| Unit Dimensions (W x H x D) | 198 x 89 x 198mm |
Speaker:
Impedance : 2Ω
Remote:Max Distance : 6mMax Angle : 30O
Standard Accessories:
Remote Control3.5mm Aux CableOwner’s ManualWarranty Card
iPad Stand Adapter
Troubleshooting Guide
To keep the warranty valid, never try to repair the system yourself. If you encounter problems when using this unit, check the following points before requesting service.
No power:
- Ensure that the AC cord of the apparatus is connected properly.
- Ensure that there is power at the AC outlet.
- Press ON/OFF button to turn the unit on.
Remote control does not work:
- Before you press any function button, first select the correct source.
- Reduce the distance between the remote control and the unit.
- Insert the battery with its polarities (+/-) aligned as indicated.
- Replace the battery.
- Aim the remote control directly at the sensor on the front of the unit
No Response From the Unit:
- Disconnect and reconnect the AC power plug, then turn on the unit again.
Poor radio reception:
- Increase the distance between the unit and your TV or VCR.
- Fully extend the FM antenna.
- Connect an outdoor FM antenna instead.
Timer does not work:
- Set the clock correctly.
- Switch on the timer.
Clock/timer setting erased:
- Power has been interrupted or the power cord has been disconnected. Reset the clock/timer.
Using iPhone to play music:
- While the iPhone is playing the music through the dock, there may be a chance that the iPhone may experience interference on the incoming call signal.
IMPORTANT SAFETY INFORMATION
- Read these instructions.
- Keep these instructions. Instructions are also available for download at www.azatom.com
- Heed all Warnings.
- Follow all instructions.
- Do not clean the apparatus near or with water.
- Clean only with a dry cloth.
- Do not block any ventilation openings. Install in accordance with the manufacturer’s instructions.
- Do not install near any heat sources such as radiators, heat registers, stoves, or other apparatus (including amplifiers) that produce heat.
- Protect the power cord from being walked on or pinched particularly at plugs, convenience receptacles, and the point where they exit fromthe apparatus.
- Only use attachments/accessories specified by the manufacturer.
- Unplug this apparatus during light storms orwhen unused for long periods of time.
- Refer all servicing to qualified service personnel.Servicing is required when the apparatus has been damaged in any way, such as powersupply cord or plug is damaged, liquid has been spilled or objects have fallen into the apparatus, the apparatus has been exposed to rain or moisture, does not operate normally or has been dropped.
- No naked flame sources, such as lit candles, should be placed on the apparatus.
- Dispose of used electrical products and batteries safely according to your local authority and regulations.
ADDITIONAL WARNINGS
The apparatus shall not be exposed to dripping or splashing and no objects filled with liquid, such as vases, shall be placed on apparatus
Main plug is used to disconnect device and it should remain readily operable during intendeduse. In order to disconnect the apparatus from the main mains completely, the mains plug should be disconnected from the main socket outlet completely
Battery shall not be exposed to excessive heatsuch as sunshine, fire or the like.
RECYCLING ELECTRICAL PRODUCTS
You should now recycle your waste electrical goods and in doing so help the environment.
![]() This symbol means an electrical product should not be disposed of with normal household waste. Please ensure it is taken to a suitable facility for disposal when finished with.
This symbol means an electrical product should not be disposed of with normal household waste. Please ensure it is taken to a suitable facility for disposal when finished with.
![]() IMPORTANT: Please read all instructions carefully before use and keep for future reference
IMPORTANT: Please read all instructions carefully before use and keep for future reference
- Risk of electric shock. Do not open
- Read all instructions carefully before use and keep for future reference.
- When servicing, use only identical replacement parts.


 report this ad
References
[xyz-ips snippet=”download-snippet”]