AZDOME M06 Camera
Product Specification
| Product Feature |
HD Camera, Super HDRecording |
| LCD Screen Size |
2.4 inch |
| Lens |
170°A+ Ultra HD Wide Angle |
| Lens Aperture |
Fl.8 |
| Video Code |
H.264, MP4 |
| Video Resolution |
2880×2160 P24 1920xl080 P60 1920xl080 P30 1280x720Pl20 1280×720 P60 1280×720 P30 FHD P30+VGA P30 |
| Language | English, French, Spanish, Portuguese, Deutsch, Italian, Chinese, Russian, Japanese, Thai, Polish, Vietnamese, Dutch |
| GPS |
Built-in GPSGeo-Tagging Support |
| WiFi |
Built-in |
| AVIN | Only support installing VGA 4 Pin rear view camera (Optional) |
| Memory Card | Micro SD Card Class 10 or Higher, Max Support 64 GB (Micro SD Card NOT Included – Required for camera operation) |
| G-sensor | Built-in 3-Axis Impact Accelerometer Gravitational Sensor to lock & protect current video. |
| Frequency |
60Hz, 50Hz |
| Loop Recording |
Support seamless recording |
| Motion detection |
Support |
| Parking Mode |
Support |
| WDR |
Support |
| Year/Month/Day/Hour/Minute |
Support |
| Mic/ Speaker |
Support |
| Auto turn on/off | Support turn on while vehicle starts. And turn off while vehicle shutdowns |
| Mini-USS port |
|
| Power Interface |
5V, l.5A |
| Battery |
Built-in Li-ion Battery 250mAh |
| Operating Temperature |
-20°C to 60°C (-4°F to 140°F) |
| Storage Temperature |
-20°C to 70°C (-4°F to 158°F) |
| Working Humidity |
10-90% |
Product Diagram
- Menu/Mode
- Up
- Emergency Lock
- Down
- OK/Confirm
- Power
- Micro SD Slot
- Built-in GPS
- Mini-USB Port
- MIC
- Reset
- Speaker
- Lens
- Holder
- AV/IN Port
- LCD Screen
|
Key |
Function |
Instruction |
| Power | Power On/Power Off | 1. Power On:Short press Power to turn on and indicator will light up
2. Power Off: Long press Power to turn off and indicator off 3. LCD off:Short press once to turn off LCD screen, RED LED indicator confirms camera ls still ON |
| Reset | Reset | When device crashes, shot press here to reboot |
| Menu/Mode (M) | Long Press:
Video Mode/ Playback ModeShort Press: System Setting/ Playback Setting |
1. After power on, press OK button to pause recording, long
press “M” button to switch Video/Playback Mode 2. On the Video/Playback Mode, short press to enter System Setting/Playback Setting |
| OK | Start/StopRecording Playback Confirm Setting | 1. On Video Mode:Short press to start/stop recording
2. On Playback Mode:Short press to playback 3. On System Setting:Confirm setting |
| UP | UP Take Photo Audio Recording ON/OFF | 1. On System Setting/Playback Setting: Up
2. On Video Mode: Short press to take photo when start recording 3. On Video Mode: Long press to turns on/off Audio Recording |
| Down | Down Parking mode On/Off Picture in Picture mode shift | l. On System Setting/Playback Setting: Down
2. On Video Mode long-press: Parking mode On/Off 3.Shift 4 modes of PIP, when connected with rear camera(optional) |
| Emergency Lock | Lock Video WiFi On/Off | 1. On Video Mode, when recording, short press to lock video
2. Long press to turn on/off WiFi |
| Micro SD Slot | Micro SD Card Slot | Insert Micro SD card with the gold contacts facing the LENS |
| Mini-USS Port | Charging USS Storage PC Camera | 1.With Mini-USS long charging cable, you can use it to charge
2. With Mini-USS data cables (not included), you can connect it with computer to view your video files on “Mass Storage” mode or use as a computer camera on “PC Camera” mode |
| AV IN Port | AV IN | Only support installing VGA 4 Pin rear view camera (Optional) |
Using Your DashCAM
Tips:We strongly recommend that please format your memory card before using it at the first time by camera’s system settings. Battery is mainly used to save files in emergency. Please always connect Dash Cam to external power while it is in use.
- Auto Power ON/OFF:
- Connect the car charger and Dash Cam by using the charging cable.
- Plug the other end of the car charger to your vehicle’s cigarette lighter socket.
- When the car engine is started, Dash Cam automatically turns ON and start recording. When the car key is turned to LOCK position, Dash Cam automatically saves the recording and turns OFF within few seconds.
- Manual Power ON/OFF:
- To Manually Turn ON: Press the power button once.
- To Manually Turn OFF: Press and hold the power button for at least 2 seconds.
Parking Mode & Motion Detection Instructions
Tips:Please understand PARKING MODE and MOTION DETECTION fully before turning ON these features.
PARKING MODE
- Do NOT turn ON this feature until you install the camera to your windshield.
- If PARKING MODE is turned ON while you explore and learn the features of the camera in your hands, the camera will turn ON/OFF and START/STOP recording randomly, as PARKING MODE will keep getting activated every time camera senses the movement by its built in Gyro Sensor (G-Sensor).
- You would want PARKING MODE turned ON after you install your dash camera to your windshield.
- You can test and learn how parking mode works, by setting it to ON, then exit the menu settings, and without moving your camera press and hold power button to turn the camera OFF. Now shake the camera, it will turn ON the camera, and if memory card is installed then It will start recording video for 1-min, then save and lock that video and turn OFF the camera automatically.
MOTION DETECTION
CAUTION: We do NOT recommend this feature to be turned ON while you are driving and for your daily commute. If you turn ON motion detection while driving around and during your daily commute, then your camera will NOT record videos continuously, and it will have missing video seconds.
- Motion Detection is designed to be used for surveillance when your car is parked and NOT moving. Usually when you are not inside your car. During your car is parked and you wanted continuous surveillance.
- To use motion detection, first make sure you set “AUTO POWER OFF” to OFF under system settings. Now turn ON Motion Detection while your camera is installed on windshield. Now the camera will START recording video when there is motion detected in front of the camera’s field of view and it will automatically STOP recording when there is no more motion. To save the battery you can also set “LCD ON/OFF Setting” to either 1, 3 or 5-min for LCD to be turned OFF automatically.
- We recommend “HARD-WIRE” your dash camera to your car’s battery as the internal battery is NOT designed to last more than 8 minutes when fully charged and depending upon video resolution. We recommend to purchase the “Mini-USB Hard Wire Kit” which has protection from dying car’ s battery. Basically this feature will cut the power to the camera when the battery voltage of your car’s starting to run critically low. You can search YouTube “how to connect hard wire with a dash cam” for demonstration videos.
System Setting ADN Playback Setting
- Video System SettingAfter inserting a TF card and power on, short press OK button to pause recording, and short press M button to enter to System Setting.
Resolution 2880×2160 P24 1920xl080 P60 1920xl080 P30 1280×720 Pl20 1280×720 P60 1280×720 P30 FHD P30+VGA P30 Language English, French, Spanish, Portuguese, Deutsch, Italian, Chinese, Russian, Japanese, Thai, Polish, Vietnamese, Dutch Loop recording Off/3 min/5 min/10 min, default 3 min Audio Recording On/Off, default On Date Stamp On/Off, default On GPS Stamp On/Off, default On GPS Info Number/ Time/ Speed/ Longitude/ Latitude/ Direction Speed Unit KMH/ MPH, default KM/H Exposure “+2.0″,”+1.7″,”+1.3″,”+1.0″,”+0.7″,”+0.3″,”0.0” “-0.3″,”-0.7″,”-l.0″,”-l.3″,”-1.7″,”-2.0″ (Default value 0.0)
Time Lapse Video Off/200ms/500ms/lsecond/2seconds Motion detection On/Off, default Off Parking Mode On/Off, default Off WiFi On/Off, default Off WDR On/Off, default Off G-sensor Off/High/Medium/Low, default Medium Beep Sound On/Off, default On Date/Time YY/MM/DD, Press M to save Timezone Setting UTC/GMT+1 to UTC/GMT+12 UTC/GMT-1 to UTC/GMT-12 (Default GMT +8) Auto Power Off Off/3 min/5 min/10 min, default Off. When stop recording and no operation the camera will turn off automatically. LCD Auto Off Off/1 min/ 3 min/ 5 min, default 3 min Clock Screensave rOn/Off, default On Frequency 50HZ/60HZ, default 60Hz Storage Space Total/Free/Event/Movie/Picture Format Cancel or OK Default Setting Cancel or OK Version M06V#.#YY/MM/DD - Playback SettingAfter inserting a TF card and power on, short press OK button to pause recording, and long press M button to switch to Playback Mode, then short press M to enter Playback Setting.
Delete Delete Current/ Delete All Protect Lock Current/Un lock Current/Lock All/Un lock All Slide Show 2s/5s/8s
WiFi Introduction
- DOWNLOADING LuckyCam APPSearch for “LuckyCam” in App Store or Google Play Store to find the App and then download and install it.
 Note:Apple logo &App Store are trademarks of Apple Inc.,Google logo and Google Play are trademarks of Google Inc.
 - Connecting AZDOME M06 Dash Cam With Smart Phone
- TURN WIFI ON from AZDOME Dash Cam first, by Pressing & Holding emergency lock button for 2-seconds. This will turn ON WiFi router (signal) from the dash cam.
- CONNECT WiFi from your Smart Phone: Go to Phone’s Settings> WiFi > Select M06 Dash Cam’ WiFi (WiFi Name SSID: M06_••••••••, PASSWORD: 12345678).
- Now open LuckyCam App to view live video stream, view/download recorded videos & even change settings.
- When Done: To disconnect WiFi, press and hold “Emergency Lock” button for 2-seconds to return to the video mode.
 Note:Apple logo &App Store are trademarks of Apple Inc.,Google logo and Google Play are trademarks of Google Inc.
P.S. (You can only operate it on your phone App when connecting AZ DOME M06 Dash Cam with your phone. Make sure your phone is close to AZDOME M06 Dash Cam)
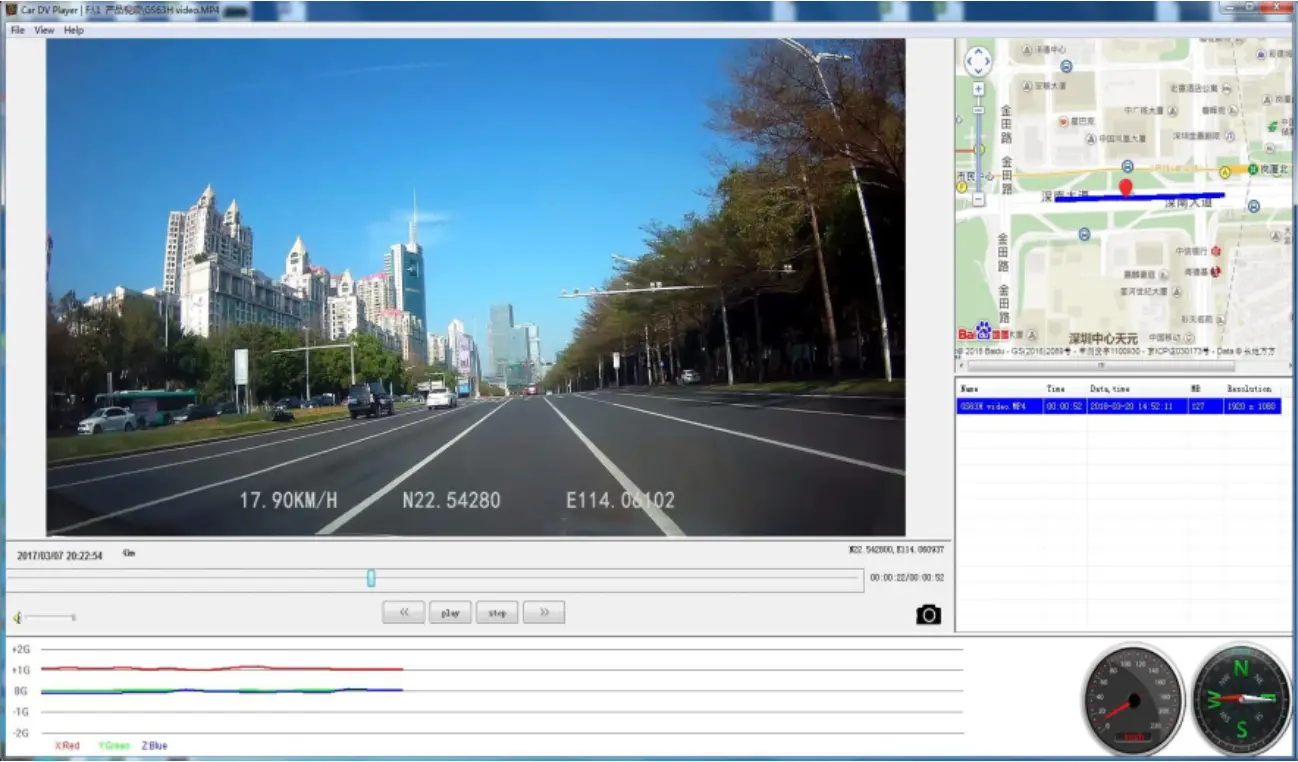
GPS & Car DV Player Installation
GPS Player Software Installation and Use Instruction:
- Before viewing yourvideo with GPS trace, Please install Car DV Player from your AZDOME M06 Dash Cam first.
- Please visit www.azdome.hk/downloads.html to download FREE Car DV Player. You can email us to [email protected]
- Click File Menu> Click Open to select the video file, you like to play. You can also drag and drop your video file into the video play area to play the video also.
- If the Google Map can’t be normally loaded by GPS Player, please try the following operations:
- Run GPS Player as the administrator (right click on the Car DV Player, then choose running as the Administrator)
- Upgrade the Internet Explorer to IE 10 or above
- If the GPS player still can’t work, please contact us at [email protected]
P.S. (Please do NOT use “Windows Media Player” to play this high bit-rate videos. We recommend downloading our free Car DV Player or free VLC Media Player to enjoy stream less high quality videos from your AZDOME Dash Cam.)
FAQ
Q l: Camera does not turn ON?Please make sure you charge camera for 2 hours before first use. Make sure memory card is inserted properly. Then plug in power cable which should turn on camera and it should start recording.
Q 2: My date and time is not staying the same even after I set date and time?Please go to camera’s system settings> Time Zone Setting> Set your correct GMT value> OK to confirm. Now every-time you have GPS signal, you will always have correct date and time.
Q 3: Camera turns ON/ OFF frequently automatically?Please reset your camera. Please make sure that “Motion Detection” is set to OFF. Also Please make sure “Auto Power Off’ “Parking Mode” is also set to OFF.
Q 4: My Video playback on PC is lagging?You are viewing high-bit rate version of video files. General computer configuration may have problem with faster data processing. Please record videos at lower resolution and try again. Contact us if problem still persists.
Q 5: Camera gets HOT?It is normal for your camera to run slightly hot. Due to the higher video resolution, the dash cam may be hot during using. (no more than 140° F/60°C).
Q 6: Video is fuzzy?Please make sure the lens of camera is clean and there is no dirt on windshield also.
Q 7: Camera Freezing/Lagging or Crashing?Please make sure you are only using class 10 or above Micro SD memory card. Insert paper clip into reset. Restart with another Micro SD card and try again .
Q 8: Camera Locks many videos automatically?Please make sure you increase your G-sensor setting. If you choose higher setting then it can trigger even with smaller bump. This setting depends on type of car or truck you are driving and how much vibration your car/truck is creating based on suspensions and road condition.
Q 9: Error/Message “Card Full”?Format card by going into System Settings> Format> OK> Select Yes> OK. Then Go to System Settings> Loop Recording> Choose either 1-min, 3-min, 5-min. This will allow Loop Recording function to be turn ON and it will keep recording over and over.
Q 10: Camera showing “Memory Error” or 11 Please Insert Micro SD Card” even though memory card is already installed into the camera?
- Please make sure memory card is at least Class 10, U3 and purchased from trusted vendor such as Walmart, target, best buy, Ship &Sold by Amazon” etc. (there are many fake cards out there Online, remember if it’s cheap, its fake.
- Now go to camera’s system settings and FORMAT your memory card. After formatting memory card, please press and hold power button to turn the camera off. Now unplug power cable, and re-plug the power cable, camera should now turn ON automatically and start recording.
Disclaimer
The videos/pictures taken by Car DashCam is only for a reference, we don’t take any responsibility due to data-loss in the abnormal circumstances. Special version: The device will records files in normal recording status. But in the following situation, it will lead to files to be damaged or lost;
- If pulling out the TF card in the recording status, final video files will be damaged or lost.
- If there is illegal blackout in the recording status, final video files will be damaged or lost.
- If there is a destructive collision in the recording status, video and audio files will be damaged or lost.
 report this ad
[xyz-ips snippet=”download-snippet”]