![]()
Smart & SecureSectional Door OpenerQuick Operation Guide
User Operating Controls
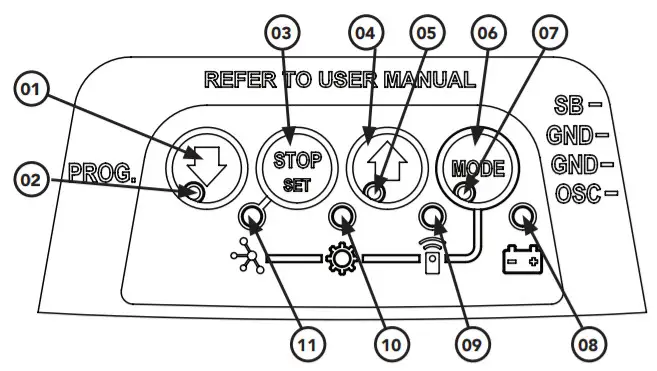
| Button | Function |
| 01 | Close |
| 02 | Close indicator |
| 03 | Stop |
| 04 | Open |
| 05 | Open indicator |
| 06 | Mode |
| 07 | Status indicator |
| 08 | Battery status indicator |
| 09 | Remote status indicator |
| 10 | Adjustment indicator |
| 11 | Network indicator |
Manual Door Operation
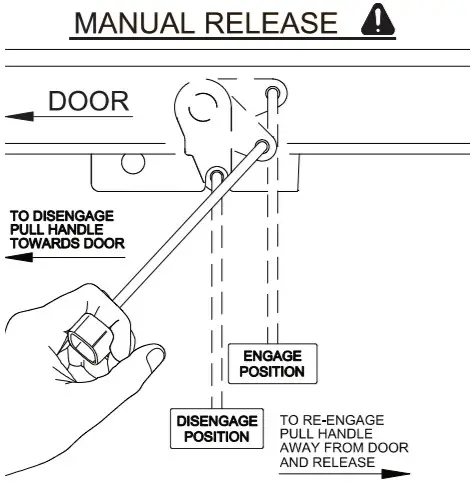
2.1 To Disengage the Opener:
- It is recommended to do so with the door in the closed position.
- Pull the manual release cord towards the door, until you hear a click.
- Move the door manually.
 CAUTION: When the opener is manually disengaged, the door is no longer locked. To lock the door manually, re-engage the opener after the door is closed.
2.2 To Re-Engage the Opener:
- Check the door has not been locked by a locking device.
- Pull the manual release cord away from the door, untilyou hear a click.
- The door will now operate from the opener.CAUTION: Do not use the string handle as a mechanism to open the door. Failure to comply may cause serious injury.
Coding a Remote Control
3.1 Storing the Remote Control Code:The opener can only be operated from remote controllers that have been programmed into its memory. Up to 64 remotes can be stored in thememory.
- Remove the controls cover to access the buttons.
- Press the MODE button repetitively until the REMOTE INDICATOR is lit.
- Press and HOLD the CLOSE button to set the Open / Stop / Close function. The Main light will start to flash rapidly.
- Press one of the four (4) buttons on the transmitter until the main light starts to flash rapidly, then release the transmitter button.
- Press the remote control button again until the main light stops flashing rapidly.
- Release both buttons. Press the MODE button to exit. and refit controls cover. The remote button is now coded, press to test.
| Main Light | Remote Status |
| ON | Button added |
| OFF | Button removed |
| 2 flashes, then OFF | Remote control deleted |
| 4flashes, then OFF | Memory full |
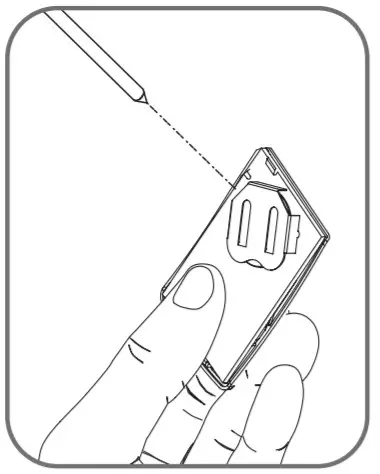
3.2 Battery Replacement:Battery Type: 1 x CR2032.
- To test the battery is working, press and hold a remote button. Check the Light Status table to determine if the battery needs replacing.
Light Status Battery Status Solid OK Flashing Replace No light Replace - Use fingernails to separate the remote casing to expose the circuit board.
- Use a non-metallic object to push the battery down through the side opening to remove the battery.
Smart Phone Control (Smart SDO-7 Only)
4.1 Connecting to WiFi:The Smart Phone Control works via your home’s WiFi network. The initial setup involves linking your phone app and smart opener to your home network.
- Download the B&D App.
- Remove the controls cover on the opener to access the buttons.
- Ensure the WiFi router is within range of the opener.
- On the opener press the MODE button repetitively until the NETWORK Indicator is lit.
- Press and hold the OPEN button on the opener for 4 seconds. The NETWORK indicator will turn purple when Hot Spot is Active.
- Go to phone settings, then WiFi, and select (B&D000000).
- Open App and tap on Start.
- Select setup a new Smart Opener
- Follow on-screen instructions in the B&D App.
- Upon completion, refit the controls cover and test the opener operation through the B&D App.


Troubleshooting
Main Light = Service / Warning Indicator:Requirements for a service and user warnings are indicated after operation by the main light repeatable flashing OFF a number of times followed by a pause.The below table identifies the issues and remedies.
| Flashes | Issue | Remedy |
| 1 | Normal operation (door is fully open) | |
| 2 | PE is preventing the door from moving |
Clear away any obstructions. Test Door. If unable to move the door and suspect beam is faulty, enter Safety Beam Emergency Close by pressing and holding a pre-coded button on the transmitter for more than five seconds and the door will start closing. |
| 3 | Wireless Auto-Lock battery is low | Change Auto-lock battery |
| 4 | Wireless PE battery is low |
Change PE Battery |
| 5 | Wireless Auto-Lock is not unlocked and preventing the door from moving | Check Auto-Lock, test by pressing the emergency release button on the lock, and then test door operation. |
| 6 | Maintenance is due after a pre-set number of cycles. | Contact dealer to arrange service. |
| 7 | The standby battery is faulty | Contact 1300 769 850 within Australia for assistance |
| 8 | Door was obstructed | Clear away any obstructions and the test door opens/closes correctly. (If the door is damaged, contact your door professional) |
| 9 | Motor overloaded or stalled | Contact dealer to arrange a door service. |
| 10 | Unit running on battery power
 report this ad report this ad(Only available with SDO-7) |
The main light will flash (3) three times at the start of the cycle to indicatethe opener is running from battery backup and 10 flashes at the end of the cycle. Check power supply. |
Caring for your Opener
Preventative servicing of your garage door and opener is important. Your garage door is made up of numerous moving parts designed to lift and lower your door safely and efficiently.Ongoing preventative servicing ensures that your door continues to function within factory specifications, greatly reduces the risk of failure and repair bills down the track, and ensures you maintain your Warranty.Refer to your Owners Opener Handbook for your service schedule.
![]() Refer to the installation manual for monthly testing procedures in Section 13 to ensure the garage door is fit for use.
Refer to the installation manual for monthly testing procedures in Section 13 to ensure the garage door is fit for use.
Need a Service Call?
If the opener needs service please call the dealer who installed the garage door opener (their contact details are usually on a sticker on the back of your garage door).
For the installation manual, please visit:bnd.com.au/manualFor product assistance, general inquiry, or moreinformation, please visit:bnd.com.auor call 13 62 63.P/N# 87797DOC# 161068_00
References
[xyz-ips snippet=”download-snippet”]