
Bakery – GPU LightmapperManual (v1.5)
Why use Bakery
Bakery is designed as an alternative to existing lightmappers and focuses on solving following problems:
- Fixing various baking artifacts, such as seams, light/shadow leaks, incorrect shadow terminators, etc. Baking a lightmap should not bring more problems than rendering a camera frame in an offline renderer.
- Baking all kinds of lighting data, not just complete lighting or GI only. As of today, you can ask Bakery to generate mixed direct and indirect lighting from all supported light sources and their shadow masks.Lighting can be also baked per-vertex instead of using textures.
- Directional information can be baked in the form of dominant direction map (classic “directional” mode in Unity), 3 maps for Radiosity Normal Mapping, or 4 maps for per-pixel Spherical Harmonics (much higher quality than classic directional). Multiple directional modes can be used in a single scene on different objects.
- Physical correctness. Bakery results were thoroughly compared against M itsuba, a well-known unbiased renderer. Unlike Unity’s built-in solutions, Bakery supports correct inverse-squared lighting attenuation (or if you don’t like it, you can always use Unity-compatible attenuation mode).
- IES light support.
- Render Selected (see details)
- LOD support.
- Baked prefab support.
- Baking multiple switchable lightmaps per object is planned.
Quickstart
- Open Unity, create a new scene and import Bakery (A ssets->Import Package->Custom Package).

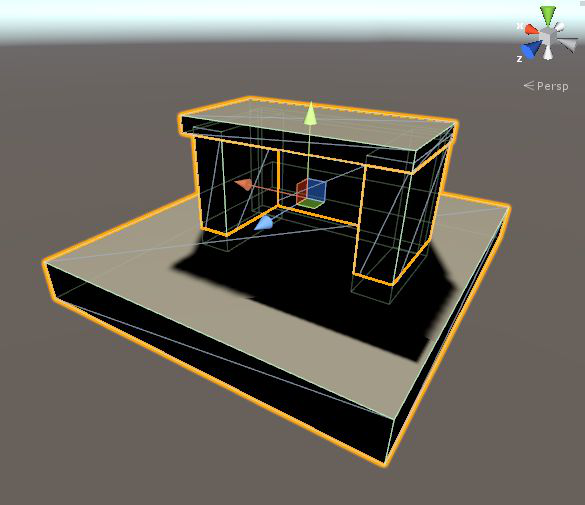
- Add some model or primitive and mark it as Static.
- Select Directional Light (the one Unity created for you) and add Bakery Direct Light component to it.● Bakery light sources are separate from Unity light sources.
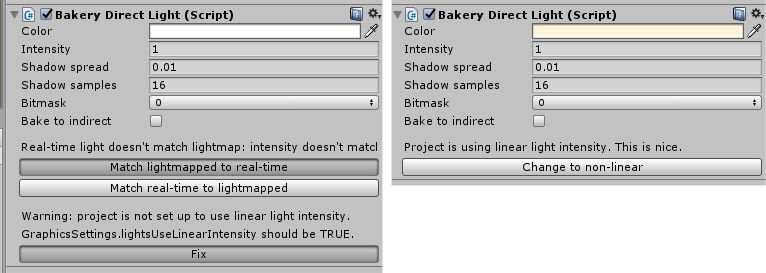
- Bakery Direct Light has many settings to tweak, but you can easily match it to Unity light. Click Match lightmapped to real-time. Now Bakery light should have the same yellowish color as Unity’s default Directional.● Bakery Direct Light may complain about project not using linear light intensity. The problem is that by default Unity applies gamma correction to light source colors in a wrong way. Correct mode can be enabled by scripting, and that’s what the “Fix” button does. If you already have many light sources set up with incorrect intensity mode, and you don’t want to change them again, you may skip fixing. Even if you press “Fix”, you can always revert the change anytime.
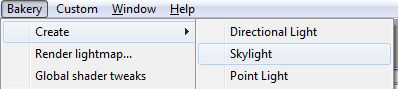
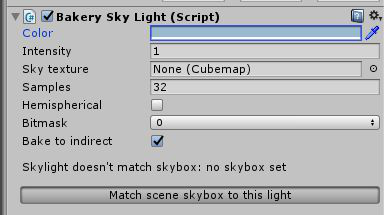
- To get shadowed ambient lighting, create Skylight (Bakery->Create->Skylight).
- Select Skylight, give it some bluish color and click M atch scene skybox to this light. This will make skybox match lighting exactly.● You can always do it both ways: match skybox to skylight or skylight to skybox.
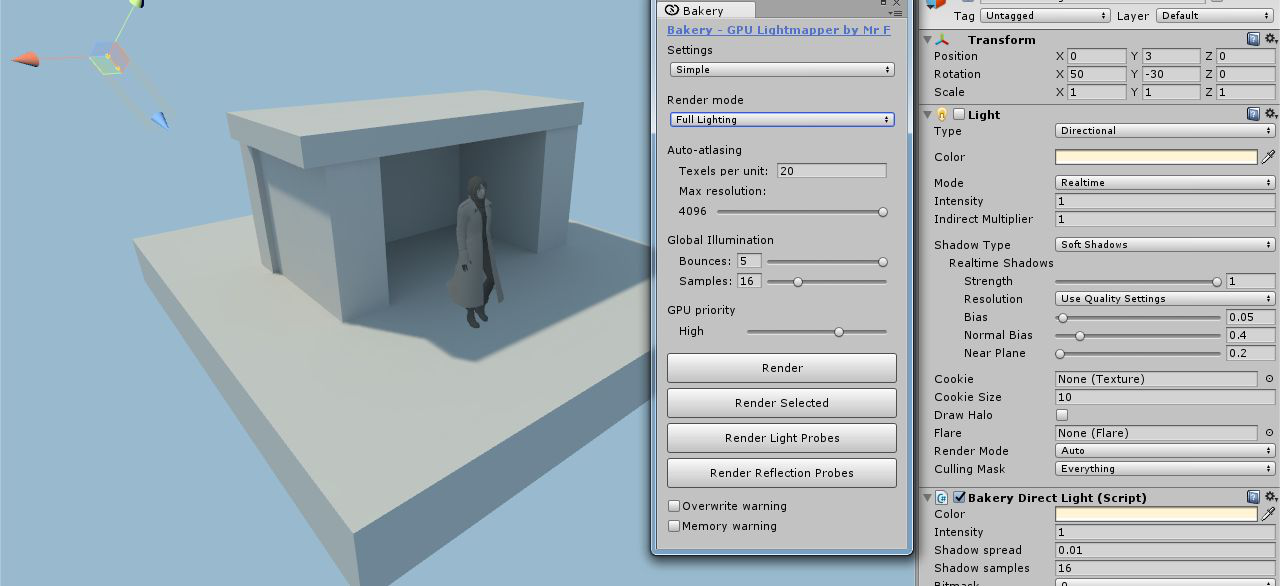
- Click Bakery->Render Lightmap. By default, Full Lighting mode is active. It will bake both direct and indirect contribution from all lights. If you want to combine real-time shadows with baked GI, change it to Indirect.● Bakery may complain that you are using old gamma mode and suggest to change it. If you care about quality of lighting, using Linear mode is highly recommended. The only excuse not to use it is when you already have a big project set up with incorrect gamma, and you don’t want to change it.
- Click Render.
- Done! You should now have baked GI.
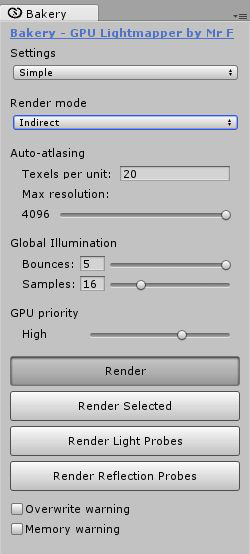
Render settings
All render settings can be accessed via Bakery->Render Lightmap. Settings are saved for every scene. First option you will see (named Settings) allows to switch between Simple, A dvanced and Experimental settings. Simple is enough for most tasks.Common settings:
- Render mode: defines what kind of lightmaps to bake.
- Full Lighting will generate complete direct and indirect lighting. If you have both Unity and Bakery components on the same light, you will need to disable Unity ones to avoid double brightness.
- Indirect is a basic mixed mode. It will look at the Bake to Indirect checkbox on every light: if it’s ON, the light is baked as in Full Lighting mode. If it’s OFF, only indirect contribution (GI) from this light is baked. In the latter case you should keep both Unity and Bakery lights on the object, one giving real-time direct contribution, and another for precomputed GI. Bake to Indirect is enabled by default for Skylights and Light Meshes, because Unity can’t reproduce their lighting in real-time.
- Shadowmask is a more advanced mixed mode. It works by generating 2 types of lightmaps – one with indirect color (as in Indirect mode, so Bake To Indirect checkboxes still apply), and another with shadows from static objects. It has several benefits:
- Real-time shadows can render only a handful of dynamic objects, instead of the whole scene.
- Real-time and baked shadows blend together properly.
- Real-time lights can render bump, specular and other surface effects, while still being occluded by high-quality baked shadows.Currently only Direct, Point and Spotlights can interact with shadowmasking (because they are the only types Unity supports in real-time). To enable this behavior, you must have both Unity and Bakery lights on the same object, with Shadowmask checkbox enabled on the latter.
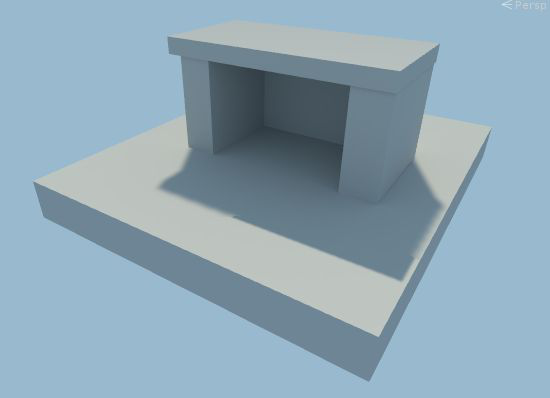
- Distance Shadowmask: this checkbox is only visible if you chose shadowmask and simply toggles equally named setting in project’s Quality Settings.● This checkbox doesn’t appear on Unity 5.6.x due to the lack of corresponding scripting API. Instead, you can toggle it in Window->Lighting->Mixed Lighting->Lighting Mode.Top: Bakery is set to Indirect mode, and the real-time light is enabled. Only GI is baked.Bottom: Bakery is set to Full mode, and the real-time light is disabled. Both GI and shadows are baked, but there is no shadow from the dynamic character.A more complete render mode comparison, now with Shadowmask:As one can conclude, Distance Shadowmask is the highest quality mode available so far, with the only problem of unshadowed dynamic objects outside of the dynamic shadow range, while regular Shadowmask mode also being relatively cheap to render.Here is also a comparison of different light configurations using Shadowmask mode. Little cubes are static, while capsules are dynamic:Left: completely baked light. Center: dynamic light with baked GI. Right: capsule shadow, bump and specular are dynamic, but cube shadow and GI are baked.When camera gets far away enough or if dynamic shadows are disabled, the same scene will look like this:
- Due to old Unity limitations, rendering Shadowmask lightmaps on versions prior to 2017.3 may clear the light probes. They will need to be re-rendered again after bake. It shouldn’t happen on 2017.3 and newer versions.
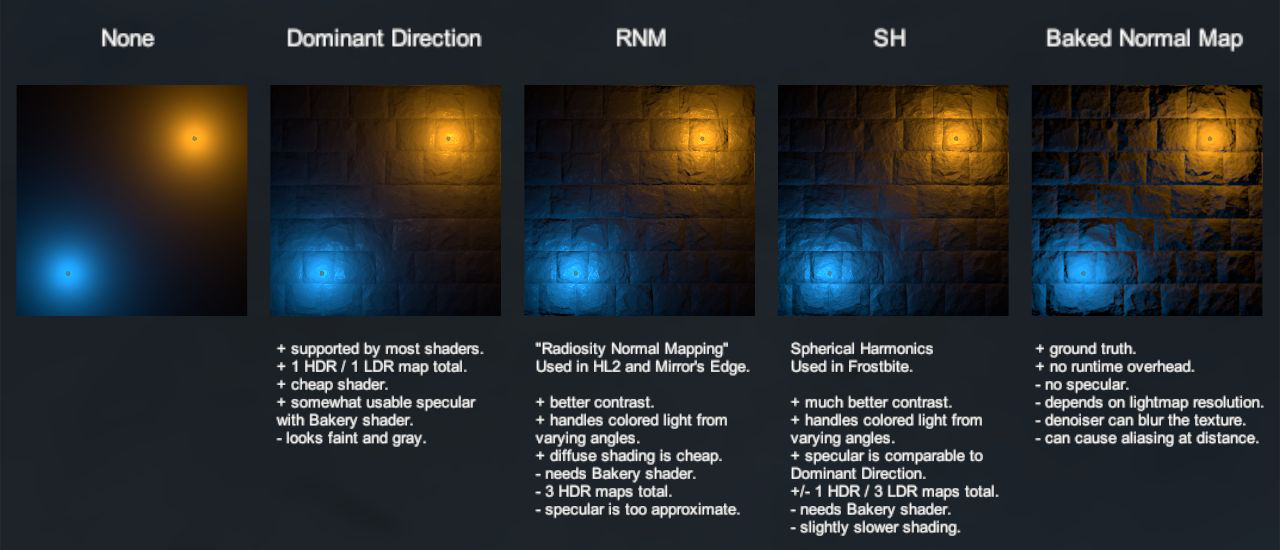
- Directional mode: defines how directional information is baked. Standard lightmaps only store a single color per texel, while directional lightmaps give shaders a hint of how lighting changes over a hemisphere around the texel. This data is required to combine fully lightmapped areas with normal maps. Plugging it into the built-in Bakery shader can also produce approximate specular response. The available modes are:– None: no directional data, single color per texel.– Baked Normal Maps: still no directional data, but normal maps are taken into account when rendering the lightmap. There is no additional runtime overhead. Since lightmaps usually have lower resolution than normal maps, the result may look blurry. Other problems include aliasing at distance due to lack of mipmapping and denoising step potentially smudging the detail. To learn how to use custom shaders with procedural normals in this mode, read S haderCompatibility section.– Dominant Direction: this mode is similar to what Enlighten and Progressive bake in Unity. It is compatible will most shaders, only generates 1 additional map and the runtime overhead is minimal. The downside is that bump-mapping looks rather faint and gray-ish and can be quite different comparing to the same object under real-time lighting.– RNM: based on Radiosity Normal Mapping technique originally invented for HL2 (s lides) and later used in many games (e.g. Mirror’s Edge). It generates 3 HDR maps in total, being the most memory-demanding mode of all. Runtime overhead is still relatively low. This mode is more precise than Dominant Direction. It is better at reproducing surface contrast and handling colored lights affecting normal maps from different angles.– SH: based on “Precomputed Global Illumination in Frostbite” paper. This is the highest quality mode, giving much better surface contrast and representing differently colored lighting coming from different directions. Generates 4 maps in total, only one of them being HDR, therefore takes less memory than RNM. Runtime overhead is slightly higher than that of RNM.● RNM and SH can be only used with Bakery shader or require adjustments to your shaders.● In RNM and SH modes, standard color lightmaps are not created. You need to either have Bakery shader on all materials in the scene, or use L ightmap Groups to separate RNM/SH objects from the rest.● RNM and SH maps are applied to objects using M aterialPropertyBlock and so may be not shown completely in Unity’s Lighting window.● Dominant Direction, RNM, and SH modes may require slightly more samples for GI and Light Meshes to get comparable quality.– Texels per unit: approximate amount of lightmap pixels per world unit. Affects the amount and resolution of generated lightmaps.● If object has a manually assigned lightmap (via Bakery Lightmap Group Selector component), it will ignore this parameter.Left: 5 texels per unit, right: 20 texels per unit.Example values to get you started:– Large outdoor area: 1 – 5– Medium outdoor area: 10-20– High-quality interior: 100Keep in mind that Texels Per Unit is base resolution, but every object can be additionally tweaked using “Scale in Lightmap” option on Mesh Renderers as well as “Scale per map type”.– Bounces: how many times light rays should bounce off surfaces. Usually lower values are sufficient for outdoor scenes (e.g. a city), while higher values are required for more closed scenes (interiors, caves).Note how more bounces bring more light to closed spaces.– Samples: affects quality of GI. Typical values are from 16 to 32.Left: samples = 4, right: sample = 16. Denoising is off for illustrative purposes.-GPU Priority: while GPU is working on lightmaps, OS and other software may become less responsive. This option allows you to balance between baking speed and system responsiveness.– Render: bakes lightmaps for all opened scenes. – Render Selected Groups: only bakes Lightmap Groups containing selected objects.● Not only selected objects will be redrawn, but all Lightmap Groups they belong to. Other lightmaps will not be updated. If objects are not a part of some manually assigned group, then a part of the scene using the same lightmap will be rebaked.– Render Light Probes: bakes light probes for all opened scenes.– Render Reflection Probes: bakes reflection probes for all opened scenes.– Update Skybox Probe: bakes skybox reflection/light probes for the current skybox.– Occlusion probes checkbox: when Render Light Probes is pressed, lets Unity bake occlusion probes using currently selected built-in light mapper. Occlusion probes prevent dynamic objects from getting lit in shadowed areas. Currently, there is no way to use custom occlusion probes in Unity, and it has to call its own lightmappers instead to do the job. – Warnings: these options will validate the scene after one of the Render buttons is pressed and show warning dialog boxes asking to continue or stop the baking process. There are 3 options:– UV validation: will check if all models have fully correct lightmapping UVs– specifically if they lie within 0-1 range and don’t overlap.– Overwrite check: will tell which lightmap files are going to be overwritten.– Memory check: will tell a very approximate amount of video memory required.– Sample count check: will check if any lights, GI or AO have unreasonable sample counts that can make GPU go out of available resources. – Lightmapped prefab validation: validates Lightmapped Prefabs and notifies if some prefabs are going to be overwritten.

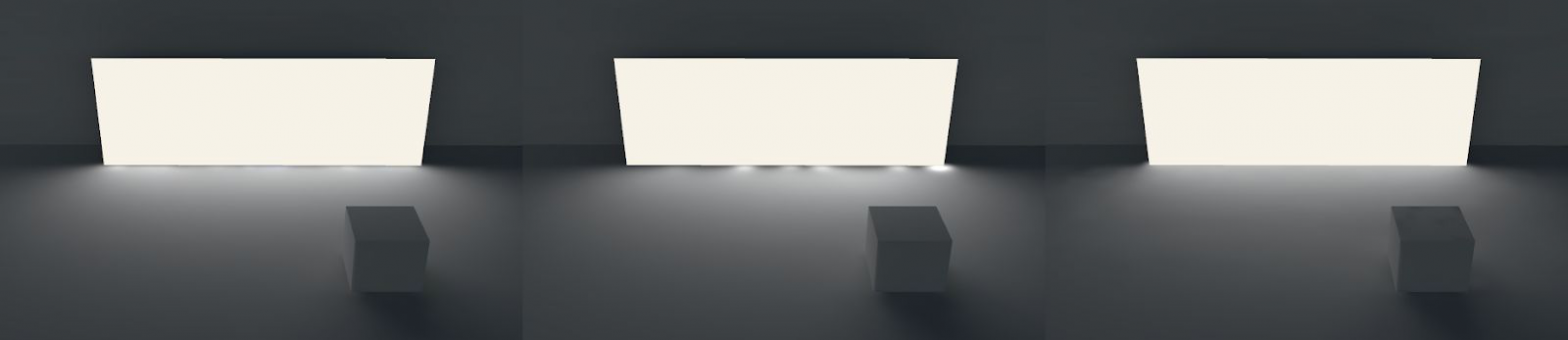
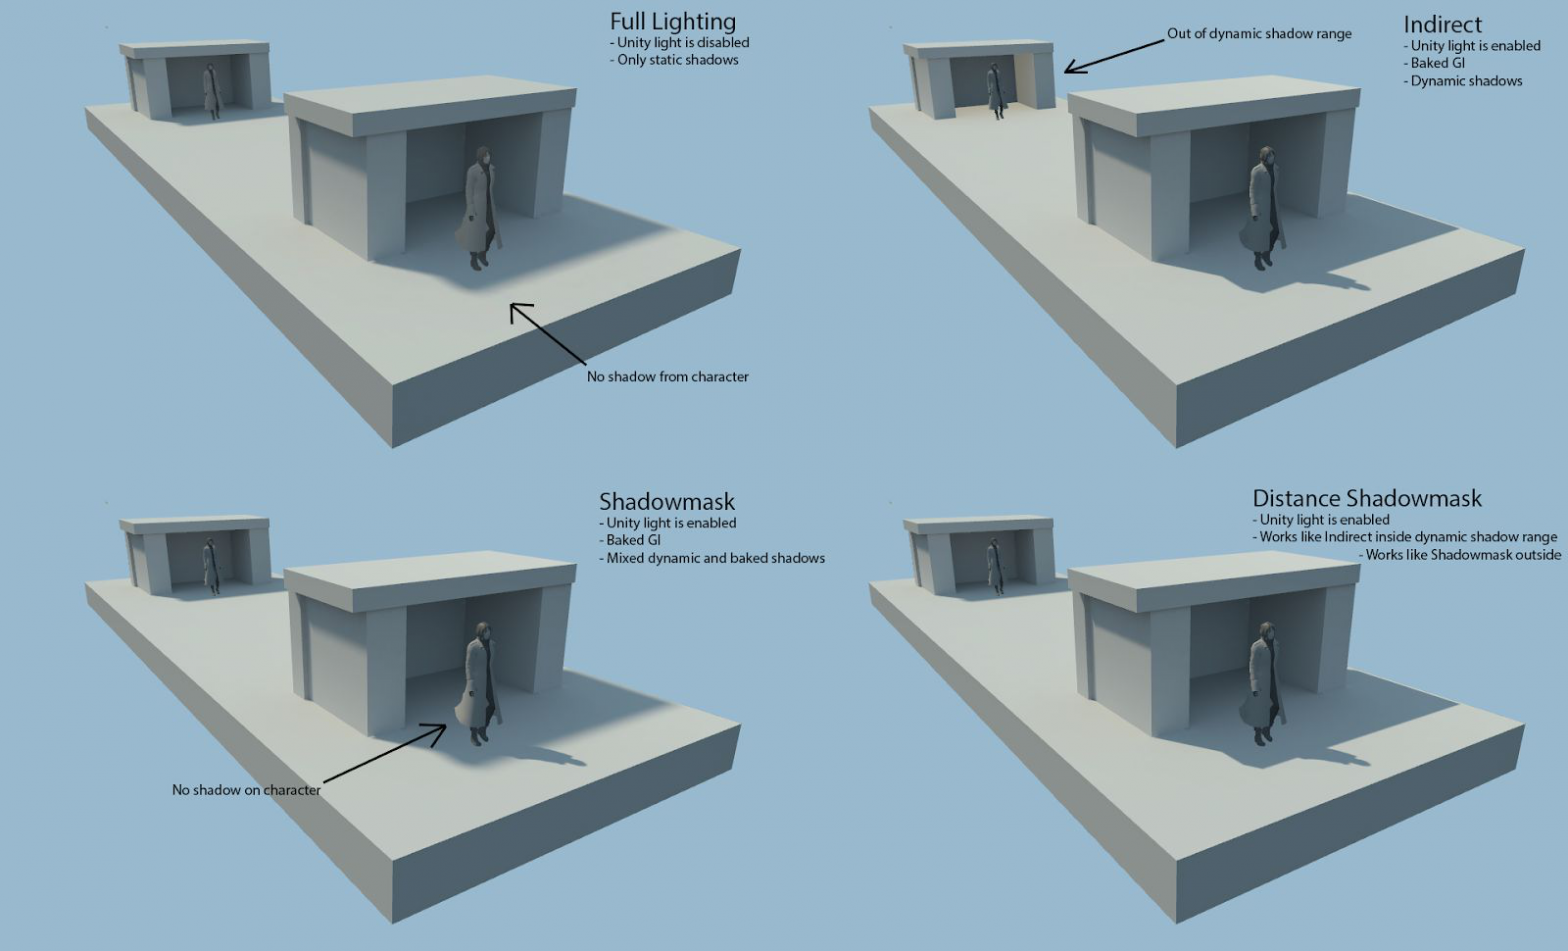 As one can conclude, Distance Shadowmask is the highest quality mode available so far, with the only problem of unshadowed dynamic objects outside of the dynamic shadow range, while regular Shadowmask mode also being relatively cheap to render.Here is also a comparison of different light configurations using Shadowmask mode. Little cubes are static, while capsules are dynamic:
 Left: completely baked light. Center: dynamic light with baked GI. Right: capsule shadow, bump and specular are dynamic, but cube shadow and GI are baked.When camera gets far away enough or if dynamic shadows are disabled, the same scene will look like this:
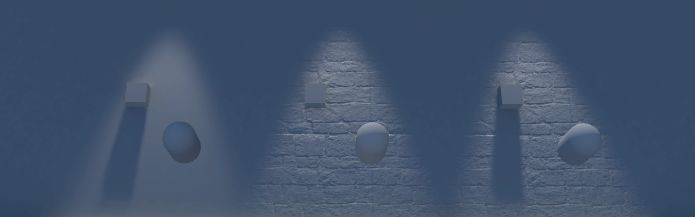
 – Texels per unit: approximate amount of lightmap pixels per world unit. Affects the amount and resolution of generated lightmaps.● If object has a manually assigned lightmap (via Bakery Lightmap Group Selector component), it will ignore this parameter.
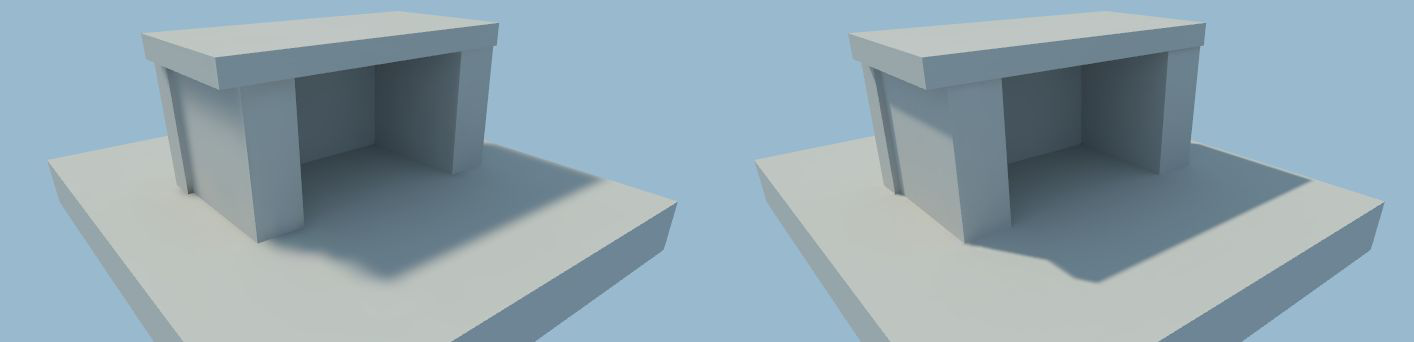 Left: 5 texels per unit, right: 20 texels per unit.Example values to get you started:– Large outdoor area: 1 – 5– Medium outdoor area: 10-20– High-quality interior: 100Keep in mind that Texels Per Unit is base resolution, but every object can be additionally tweaked using “Scale in Lightmap” option on Mesh Renderers as well as “Scale per map type”.– Bounces: how many times light rays should bounce off surfaces. Usually lower values are sufficient for outdoor scenes (e.g. a city), while higher values are required for more closed scenes (interiors, caves).
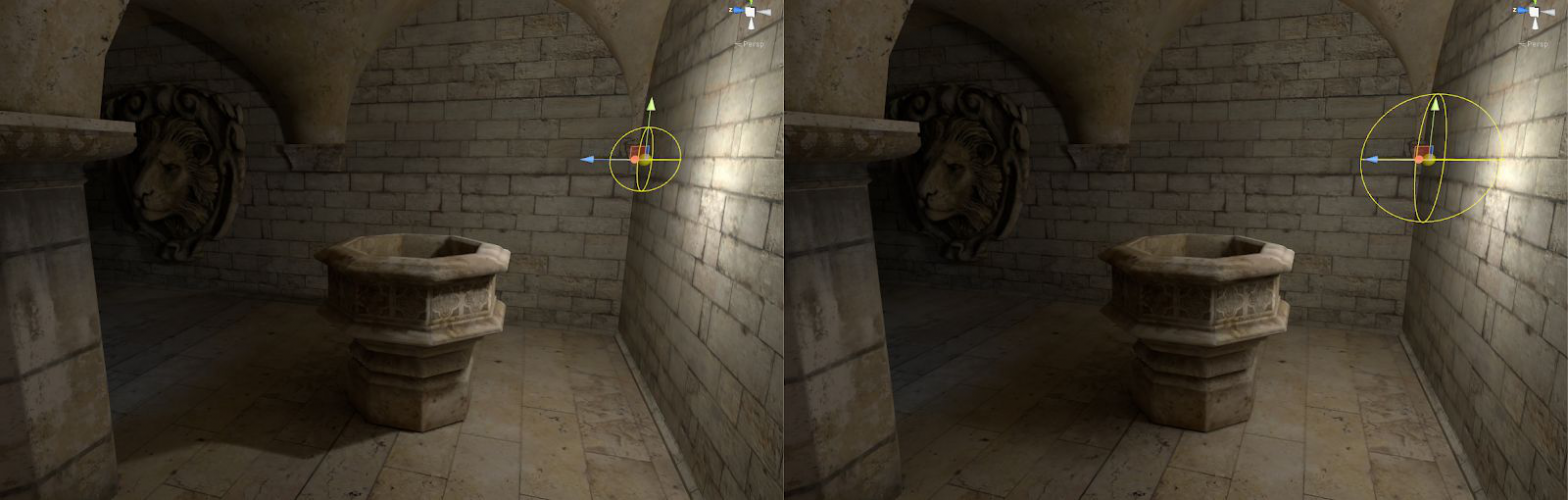
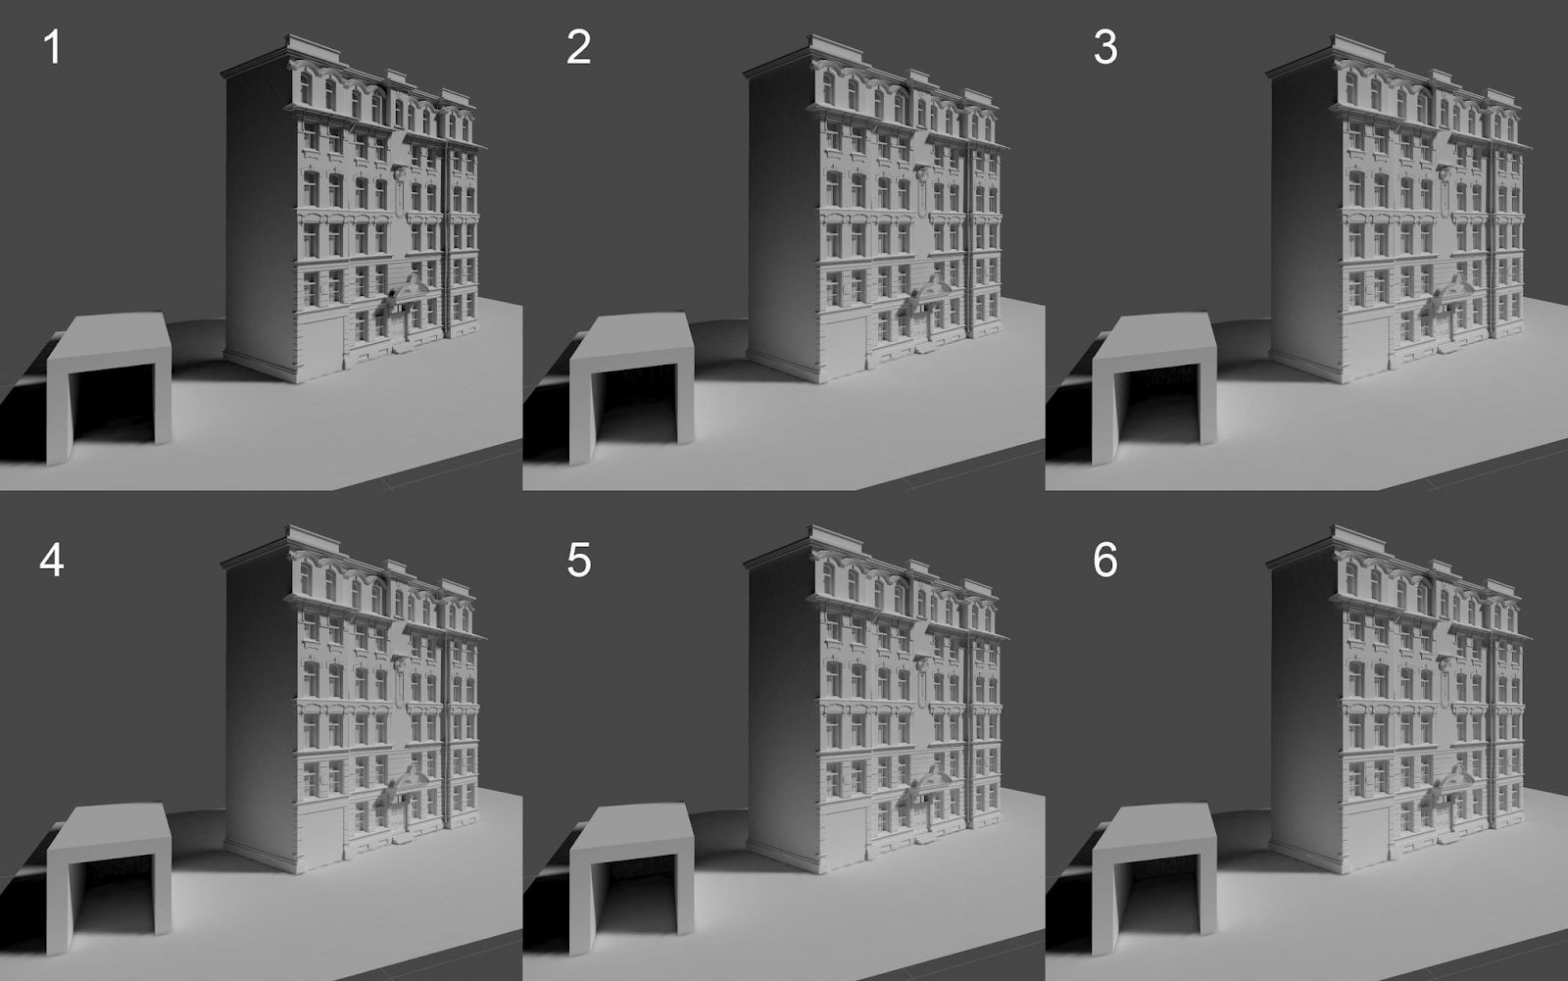 Note how more bounces bring more light to closed spaces.– Samples: affects quality of GI. Typical values are from 16 to 32.
 Left: samples = 4, right: sample = 16. Denoising is off for illustrative purposes.-GPU Priority: while GPU is working on lightmaps, OS and other software may become less responsive. This option allows you to balance between baking speed and system responsiveness.– Render: bakes lightmaps for all opened scenes. – Render Selected Groups: only bakes Lightmap Groups containing selected objects.● Not only selected objects will be redrawn, but all Lightmap Groups they belong to. Other lightmaps will not be updated. If objects are not a part of some manually assigned group, then a part of the scene using the same lightmap will be rebaked.– Render Light Probes: bakes light probes for all opened scenes.– Render Reflection Probes: bakes reflection probes for all opened scenes.– Update Skybox Probe: bakes skybox reflection/light probes for the current skybox.– Occlusion probes checkbox: when Render Light Probes is pressed, lets Unity bake occlusion probes using currently selected built-in light mapper. Occlusion probes prevent dynamic objects from getting lit in shadowed areas. Currently, there is no way to use custom occlusion probes in Unity, and it has to call its own lightmappers instead to do the job. – Warnings: these options will validate the scene after one of the Render buttons is pressed and show warning dialog boxes asking to continue or stop the baking process. There are 3 options:– UV validation: will check if all models have fully correct lightmapping UVs– specifically if they lie within 0-1 range and don’t overlap.– Overwrite check: will tell which lightmap files are going to be overwritten.– Memory check: will tell a very approximate amount of video memory required.– Sample count check: will check if any lights, GI or AO have unreasonable sample counts that can make GPU go out of available resources. – Lightmapped prefab validation: validates Lightmapped Prefabs and notifies if some prefabs are going to be overwritten.
Advanced settings
- Adjust UV padding: if enabled, will look for models with auto-generated UVs (“Generate Lightmap UVs” on the asset) and adjust them further to have proper padding between UV islands per-mesh. Model-wide Pack Margin in importer settings is ignored. Optimal values are calculated instead, given area of each mesh and lightmap resolution.
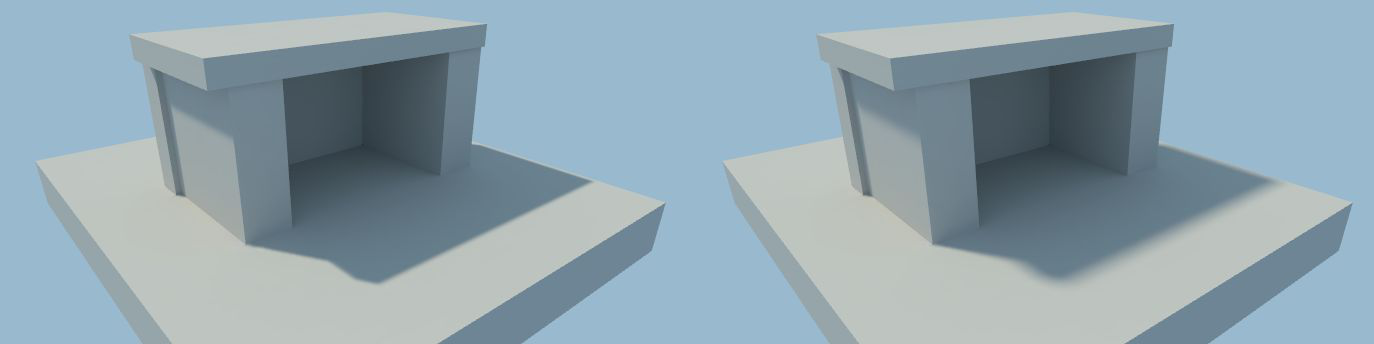
- Denoise: if enabled, will apply denoising algorithm. Bakery uses N vidia’s AI denoiser.Left: denoising off, right: denoising on.
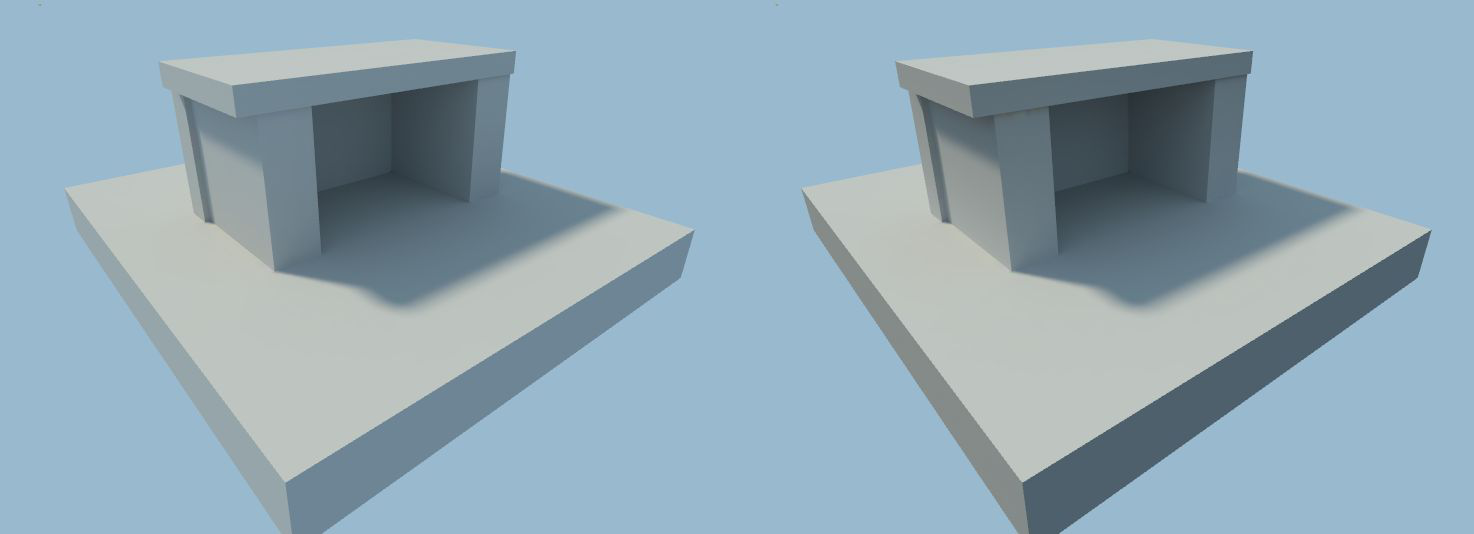
- Fix Seams: if enabled, will attempt to blend seams created by UV discontinuities. Useful for smooth geometry, including Unity’s default sphere.Left: seams, right: seams are fixed.
- Split by scene: if multiple scenes are loaded at once, and this option is enabled, each scene will have its own set of lightmaps, not shared with others. It can be useful for limiting the amount of textures loaded when scenes are streamed at runtime.
- Scale per map type: allows you to scale the resolution of color/shadowmask/direction maps differently.For example, a common case would be to have low-resolution indirect color but highly detailed shadowmask. Note that scaling is applied after the lightmaps are rendered, so it won’t save baking time. If “Adjust UV padding” is on, padding will be based on the lowest resolution map to prevent texel leaking.
- Checker preview: if Show checker checkbox is on, Scene View will render a checkerboard pattern on top of visible objects to demonstrate lightmap texel size. This is useful to make sure you are using adequate values for Texels Per Unit and other resolution-affecting settings before you bake.Enabling checker preview will force Bakery to perform atlas packing. It can take some time, but shouldn’t be longer than a few seconds. Press Refresh checker to re-atlas the scene after you changed something to see changes.Checker preview also uses random colors to show how the scene will be split into different lightmaps.● Checker preview currently does not show correct texel sizes for Terrains.
- Emissive boost: multiplies any surface emission by this number. – Indirect boost: multiplies all bounced lighting by this number. Same as I ndirect Intensity on light components, but global.
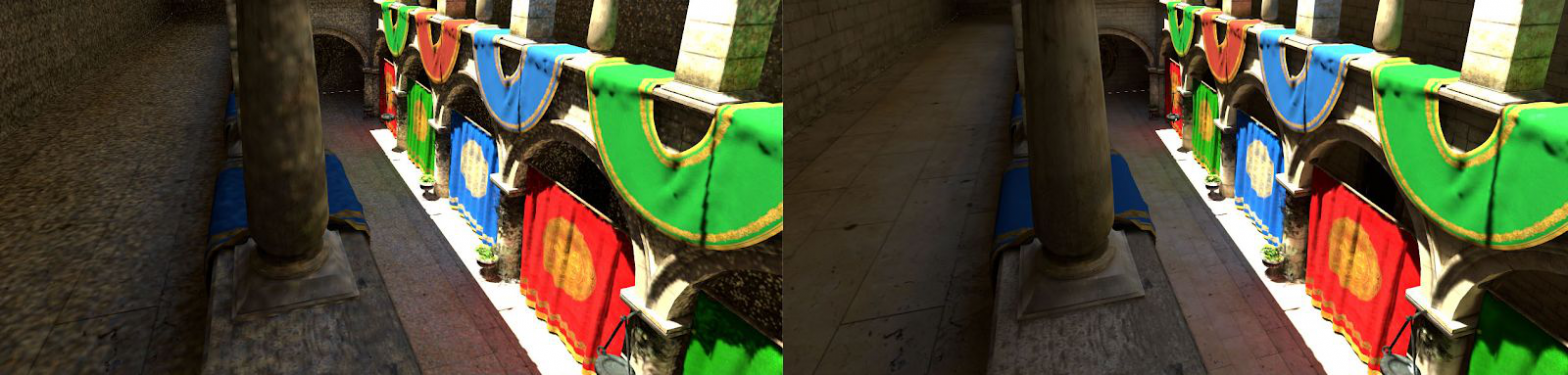
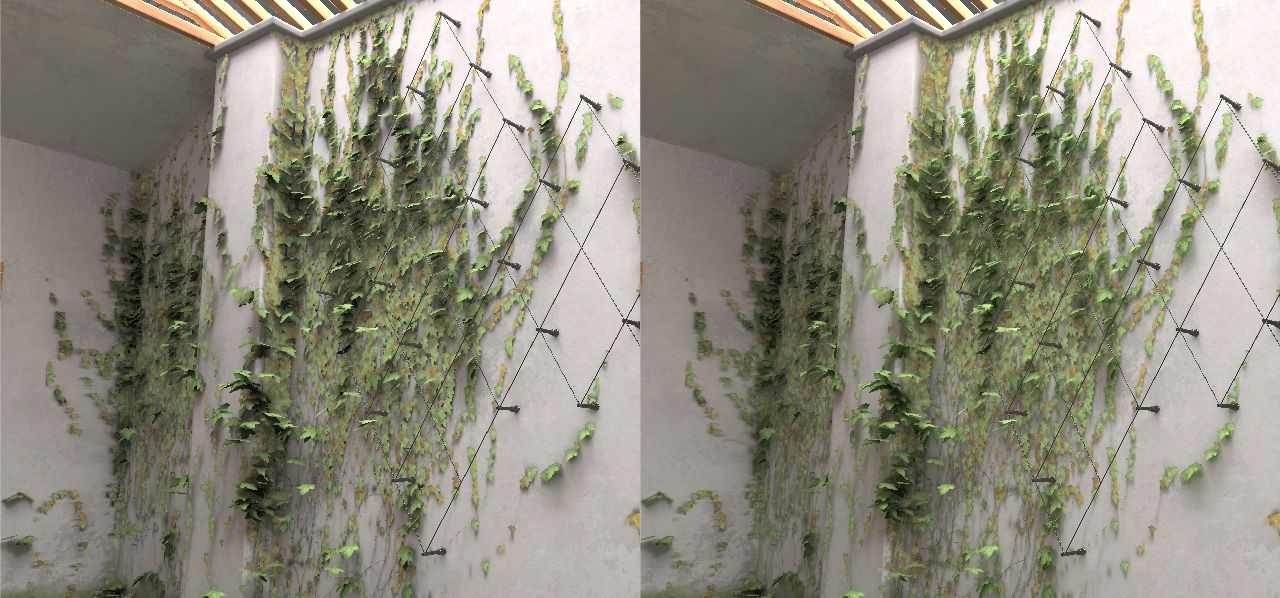
- Backface GI: determines how much light is passed through front faces to back faces and then bounced off by GI. This is especially useful for thin translucent surfaces like leaves. Values are in 0-1 range:Left: backface GI = 0, right: backface GI = 1.
- Ambient occlusion: simple non-physical ambient occlusion you can apply over final scene lighting for aesthetic purposes.Left: AO off, right: AO on.– Intensity: controls visibility of the AO effect. Value of 0 disables the effect.– Radius: determines the ray distance used in the AO effect. Smaller values give localized occlusion (corners, wrinkles), while larger values make it more similar to Skylight, giving shadows from distant objects.– Samples: affects the quality of ambient occlusion. Typical values are from 4 to 32.
- GI VRAM optimization: toggles memory optimization used for very large scenes, especially when baking too many lightmaps at once. If enabled, may slow down rendering a little bit. If disabled, and the scene is too big, Bakery may go out of memory.– Auto: guess if optimization is needed based on open scenes. The guess is only approximate, so if you know the scene is huge, set it to Force On.– Force On: always enabled.– Force Off: always disabled.
- Tile size: same as GPU Priority, but instead of abstract priority you set tile size. Bakery splits lightmaps into smaller tiles and updates one at a time. Smaller size means more GPU work interruptions and can make system more responsive.
- Temp path: temporary files folder. Bakery may require a few gigabytes of free space during rendering. Having this folder on SSD can make rendering slightly faster comparing to HDD. At the moment, this folder is not cleaned automatically. You can delete its contents anytime (except during rendering).
- Output path: lightmap folder. This is where all lightmap, and also lightprobe and vertex color assets will be saved. This path is relative to your Assets folder.
- Use scene named output path: if this option is enabled, output path will be automatically set to a folder with the same name as the currently active scene. This is similar to how built-in Unity lightmappers behave.
- Combine with Enlighten real-time GI: if enabled, then when the Render button is pressed, it will first try to bake with Enlighten to calculate real-time GI. After that, regular Bakery lightmapping process will happen. Both baked and real-time GI will work together.
- Beep on finish: if enabled, Bakery will play a sound when the bake is finished.
 Left: denoising off, right: denoising on.
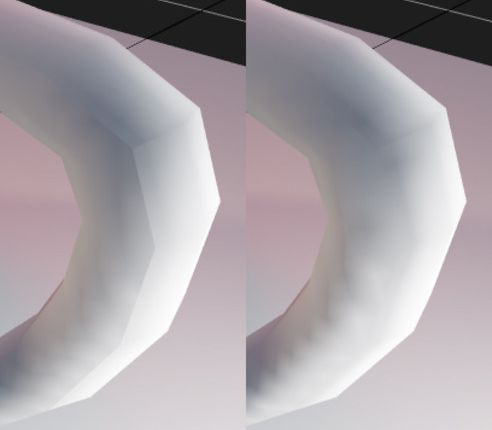 Left: seams, right: seams are fixed.

 Left: backface GI = 0, right: backface GI = 1.
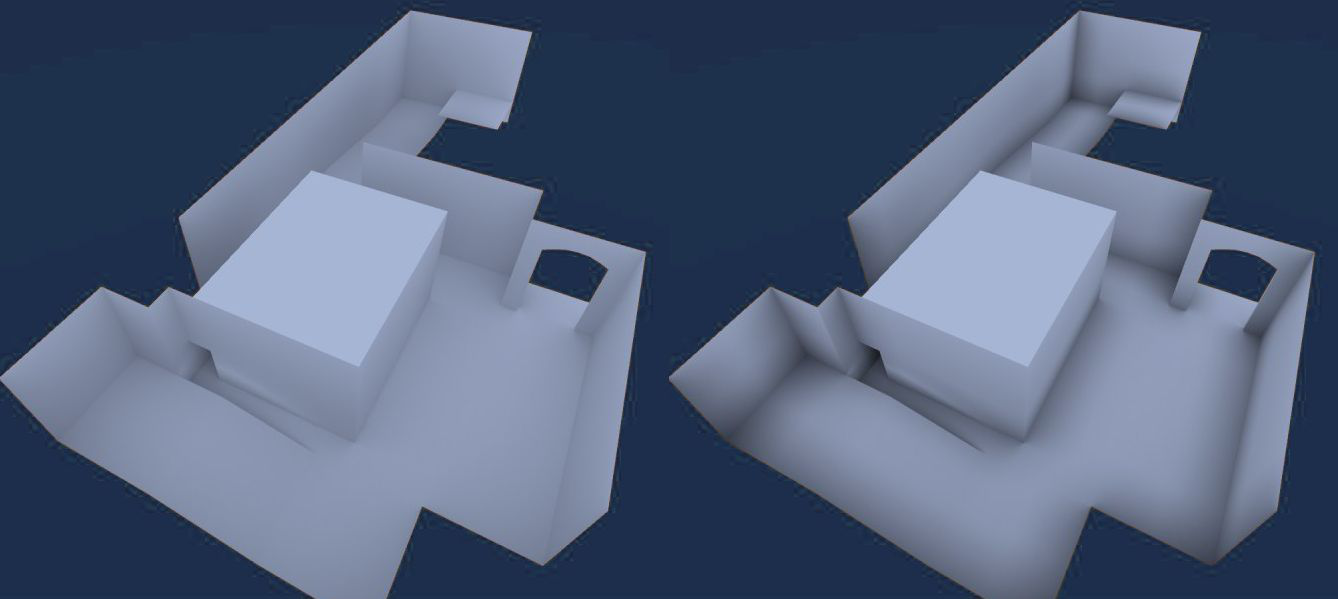 Left: AO off, right: AO on.– Intensity: controls visibility of the AO effect. Value of 0 disables the effect.– Radius: determines the ray distance used in the AO effect. Smaller values give localized occlusion (corners, wrinkles), while larger values make it more similar to Skylight, giving shadows from distant objects.– Samples: affects the quality of ambient occlusion. Typical values are from 4 to 32.
Experimental settings
- Export geometry and maps: if enabled, Bakery will export the scene to its format before rendering. If you are sure that geometry and textures of the scene and lightmap resolution settings were not changed (e.g. you are only tweaking GI or light settings), you can disable this checkbox to make next rendering faster.
- Update unmodified lights: if enabled, Bakery will recalculate light sources that didn’t change since last rendering. If you are only tweaking one light and don’t want to wait for other lights to re-render, you can disable this checkbox.
- Update modified lights and GI: if enabled, Bakery will recalculate GI and lights that were changed since last rendering.
- UV padding: increase only: only visible if Adjust UV padding is on. By default, optimal UV padding for a model asset is calculated only based on currently loaded scenes. If there are multiple instances of the same model using different lightmap resolution, the smallest one will define padding, so spacing between UV charts is large enough to prevent them from leaking over each other. However, baking the same model in 2 different isolated scenes will possibly break UVs in previous scenes while optimizing for the new one. This checkbox allows to prevent such behaviour by never decreasing the padding value, so it will be always optimized for the lowest resolution instance ever baked.
- Denoise: fix bright edges: only visible if Denoise is on. Sometimes the neural net used for denoising may produce bright edges around shadows, like if a sharpening effect was applied. If this option is enabled, Bakery will try to filter them away. Denoising stage may get slightly slower, when enabled.Left: a bright edge is visible after denoising; Right: fixed.
- Terrain optimization: If enabled (default), Terrains use separate ray tracing technique to take advantage of their heightfield geometry. Otherwise they are treated like any other mesh. Terrain optimization significantly reduces the time and memory footprint required for high-resolution landscapes.
 Left: a bright edge is visible after denoising; Right: fixed.
Scale In LightmapScale In Lightmap option available on all Mesh Renderers will affect object resolution in automatically-generated lightmap atlases. Also, similarly to built-in Unity lightmappers, setting this value to 0 will make object not have any lightmaps, but cast lightmap shadows and affect GI on baked objects.
Components
Bakery Lightmap Group SelectorSpecifies which Lightmap Group to use for the object and all of its children.Lightmap Group is a term Bakery uses for a collection of objects sharing 1 lightmap. Groups have properties telling Bakery how to pack the objects, which lights should affect them, should the result be baked into a texture or vertices.By default all static objects are automatically packed into multiple lightmaps groups, so you don’t have to worry. Defining groups manually should be only used for special purposes, for example:
- Marking certain objects use per-vertex lightmap instead of textures.
- Baking a lightmap using exact unscaled UVs as they were in a modeling package.
- Grouping certain areas of the level to use single lightmap to facilitate resource streaming or to switch different baked lighting at runtime via scripts. –
- Using Render Selected button to only update grouped objects.
To manually define a group, you create Lightmap Group Assets, either by using Assets->Create menu, or using the Create New button in the component. When using the Create New button, new asset will be created based on these forms:
- Name: Name of the Lightmap Group Asset to create.
- Packing mode: this selector defines the packing mode of the Lightmap Group. There are 3 modes:
- Original UV: object and its children will be baked with unmodified UVs. No packing is performed. This is useful for models when multiple meshes share the same already packed UV layout.
- Pack Atlas: object and its children are packed into a dedicated texture atlas. Before v1.3 every packable child needed to have the component, but it’s no longer necessary. Every child will be packed as its own rectangle, except when Bakery auto-detects a child having non-overlapping sub-children, in which case multiple objects can use a single rectangle.
- Vertex: object and its children will use vertex-colored baked lighting instead of textures. Note that you’ll need a custom shader for this to work, like Bakery Shader. One simple shader (“Bakery/Simple Vertex Lightmapped”) is also included for demonstration and reference. Seenotes.
- Directional mode: allows you to override d irectional mode on the group. Options are the same except for Auto, which will simply use the global setting.
- Resolution: desired lightmap resolution.
- Bitmask: a list of toggles used to exclude light sources from affecting the lightmap. Every Bakery light source also has a bitmask setting. Lights only affects Lightmap Groups with which they share at least one of these toggles. Default settings mean all lights affect all lightmaps.
If you have a Lightmap Group with the P ack Atlas mode assigned, additional settings will appear on the component:
- Override resolution: override the resolution this object and its children occupy in the lightmap.
- Resolution: manually defined resolution. For example, if you have a lightmap with a resolution of 512 and it is assigned to 4 objects with override resolution set to 256, Bakery will generate a single 512×512 lightmap where each object takes exactly 256×256 square.
Bakery Lightmapped PrefabIntroduced in v1.45, this component allows prefabs to store lightmapping metadata. Such prefabs can be then instantiated in any scene, both in editor and at runtime.The component should be added directly to the root object of the prefab. Because the prefab is going to be overwritten after bake (the same way as when the “Apply” button is pressed), it is required that the prefab does not have any unapplied changes (child objects shouldn’t be moved, materials and script parameters should be unchanged, etc). If such changes are detected, a error will be shown in the component UI, and no metadata will be saved after bake. If “Lightmapped prefab validation” warning is enabled, all prefab errors will be also shown in a window before the bake.Lightmapped prefabs support all Bakery features, such as LODs, terrains, directional lightmaps, RNM, SH, per-vertex modes and shadowmasks. For shadowmasks to work, you need lights to also be a part of the same prefab.
- Note that prefab shadowmasks only work on Unity 2017.4 or newer due to API limitations.After baking, an object named “BakeryPrefabLightmapData” will be added to the prefab. This object holds a script with all necessary data to apply the lightmaps.Controls:
- Save current render settings to prefab: stores a copy of current Render Settings on this prefab. This is not required, but can be useful to quickly copy settings between scenes.
- Load render settings from prefab: sets current Render Settings to those stored on the prefab..
Bakery Direct Light
Infinitely distant directional light (e.g. Sun). Settings:
- Color: color.
- Intensity: linear color multiplier.
- Shadow spread: size of the light source or, simply put, shadow blurriness. 0 = max sharp shadows, 1 = max blurred shadows. Technically it interpolates from a single ray to a wider cone of rays.Left: shadow spread = 0.01, right: 0.05. Note how shadows start sharp and get gradually blurrier with distance.
- Shadow samples: affect shadows quality. The smaller the Shadow Spread value, the less samples are needed for a clean image. Typical values for sun shadows are from 1 to 16. Setting samples to 0 will make shadows from this light disappear.
- Bitmask: a list of toggles used to exclude this light source from affecting particular Lightmap Groups.
- Bake to indirect: if enabled, then complete lighting (both direct and indirect contribution) from this light will be baked in Indirect or Shadowmask render mode. Incompatible with Shadowmask checkbox.
- Shadowmask: bakes a separate shadow mask for this light, so dynamic and static shadows can be mixed. Only works when render mode is also set to Shadowmask. Incompatible with Bake To Indirect chekbox.
- Denoise shadowmask: determines if denoising should be applied to this light’s shadowmask. Usually it’s not necessary as shadows don’t exhibit much noise, but can be useful for very wide blurry shadows (large shadow spread).
- Indirect intensity: non-physical GI multiplier for this light. Should be 1 for natural lighting, but can be modified for more stylized scenes.
- If the same object has both Unity and Bakery light sources enabled, and they don’t match, 2 buttons will appear:– Match lightmapped to real-time: copy common settings from Unity light to Bakery light.– Match real-time to lightmapped: copy common settings from Bakery light to Unity light.
 Left: shadow spread = 0.01, right: 0.05. Note how shadows start sharp and get gradually blurrier with distance.
Bakery Sky Light
Infinitely distant shadowed ambient light (sky). Settings:
- Color: color.
- Intensity: linear color multiplier.
- Sky texture: optional cubemap asset, e.g. HDRI panorama to affect lighting colors from different directions.● Rotating sky light’s GameObject will rotate lighting from the cubemap accordingly.
- Samples: affects shadows quality. Typical values are from 8 to 32.
- Hemispherical: if enabled, lighting will only come from above (upper hemisphere). Otherwise from all directionsLeft: non-hemispherical, right: hemispherical.
- Bitmask: a list of toggles used to exclude this light source from affecting particular Lightmap Groups.
- Bake to indirect: if enabled, then complete lighting (both direct and indirect contribution) from this light will be baked in Indirect or Shadowmask render mode. This is the default behaviour for all Sky Lights, as there is no real-time version to emulate them in Unity.
- If sky light’s settings and current scene skybox don’t match, 2 buttons will appear:– Match this light to scene skybox: copy common settings from active skybox material to Bakery sky light. Currently it can only match skyboxes using the “Skybox/Cubemap” or “Skybox/Bakery skybox” shaders.– Match scene skybox to this light: copy common settings from Bakery sky light to scene skybox.
 Left: non-hemispherical, right: hemispherical.
Bakery Light Mesh
Emissive mesh of any shape. Should be used together with the Mesh Renderer component or with a Light component set to Area mode. Settings.
- Color: color
- Intensity: linear color multiplier.
- Cutoff: maximum lighting distance. Bakery uses S kyforge falloff formula to balance between correct inverse-squared falloff and practical limits. It’s the best when cutoff value is just where physical falloff gets very dim.
- Samples Near: affect lighting quality near the mesh. Typical values are from 16 to 64.● “Samples Near” is only available when Self Shadow is on.
- Samples Far: affects lighting quality far away from the mesh. Typical values are from 4 to 4096.● Bakery mixes 2 different algorithms for area lights based on texel proximity to the light. Close to the light it works similar to the GI algorithm, while far away the light is approximated as a cloud of virtual point lights.● If you keep getting dirty/noisy results, try setting Samples Near to 0. Then only the VPL algorithm is used. It is also useful for very simple lights where precision is not important (e.g. window lights on a building).● Light Meshes don’t receive lighting on their own and don’t get lightmapped.● One Light Mesh with many polygons is faster to bake than many simple Light Meshes.Left: Samples Near = 0, Samples Far = 4096.Middle: Samples Near = 0, Samples Far = 128.Right: Samples Near = 16, Samples Far = 128.Note how the lighting appearance is similar, yet less combined samples are used.
- Self Shadow: determines if light mesh itself casts shadows.Left: light mesh casts no shadow, right: light mesh casts a shadow behind.
- Bitmask: a list of toggles used to exclude this light source from affecting particular Lightmap Groups.
- Bake to indirect: if enabled, then complete lighting (both direct and indirect contribution) from this light will be baked in Indirect or Shadowmask render mode. This is the default behaviour for all Light Meshes, as there is no real-time version to emulate them in Unity.
- Indirect intensity: non-physical GI multiplier for this light. Should be 1 for natural lighting, but can be modified for more stylized scenes.
- If mesh material and light settings do not match, 2 buttons will appear:– Match light to material: copy common settings from unlit mesh material or area light to Bakery light.– Match material to light: copy common settings from Bakery light to unlit mesh material or area light.
 Left: Samples Near = 0, Samples Far = 4096.Middle: Samples Near = 0, Samples Far = 128.Right: Samples Near = 16, Samples Far = 128.Note how the lighting appearance is similar, yet less combined samples are used.
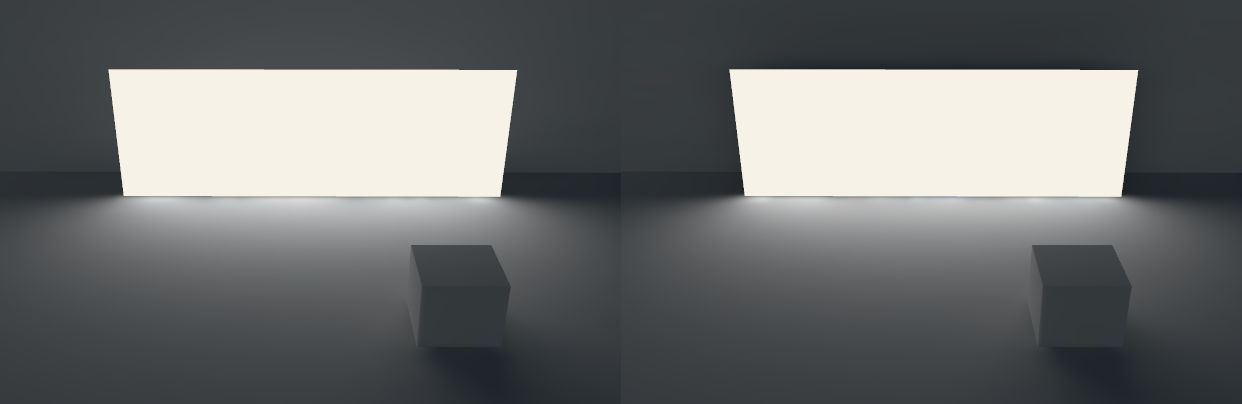 Left: light mesh casts no shadow, right: light mesh casts a shadow behind.
Bakery Point LightPoint light, doesn’t have area. Despite physical impossibility it is useful for games and the only way to match Unity’s point and spot lights. Settings:
- Color: color.
- Intensity: linear color multiplier.
- Shadow spread: shadow blurriness. Although point lights don’t have area, it is often desired to still have blurred shadows from them. For this purpose shadows are simulated as if they were cast from a spherical area light. This parameter defines the radius of such virtual sphere, directly affecting blurriness.Left: Shadow Spread = 0.5, right: Shadow Spread = 1.
- Physical falloff: if enabled, will use Skyforge falloff formula to balance between correct inverse-squared falloff and practical limits. Otherwise will try to mimic Unity’s falloff. Learn more in the B akery Shader Tweaks section below.
- Range: if physical falloff is disabled, equals to Unity’s light range. If it’s enabled, will only slightly fade away physical falloff at the edge.
- Samples: affects shadows quality. Typical values are from 1 to 512. Setting samples to 0 will make shadows from this light disappear.
- Projection mask: type of mask/cookie. Options: – Omni: no mask, equals to Unity’s Point Light.– Cookie: cookie texture projection. Additional options:– Cookie texture: 2D texture asset. Bakery includes the original Unity’s Spot Light texture (named ftUnitySpotTexture) that you can use to mimic it.– Angle: texture projection angle (similar to Unity’s Spot Light).– Cubemap: cubemap cookie projection. Additional options:– Projected cubemap: cubemap asset.– IES: lighting is modulated by the IES file data. Additional options:– IES file: file with .ies extension.Left to right: Omni, Cookie (default spot texture), Cubemap, IES.
- Bitmask: a list of toggles used to exclude this light source from affecting particular Lightmap Groups.
- Bake to indirect: if enabled, then complete lighting (both direct and indirect contribution) from this light will be baked in Indirect or Shadowmask render mode. Incompatible with Shadowmask checkbox.
- Shadowmask: bakes a separate shadow mask for this light, so dynamic and static shadows can be mixed. Only works when render mode is also set to Shadowmask. Incompatible with Bake To Indirect chekbox.
- Indirect intensity: non-physical GI multiplier for this light. Should be 1 for natural lighting, but can be modified for more stylized scenes.
- If the same object has both Unity and Bakery light sources enabled, and they don’t match, 2 buttons will appear:– Match lightmapped to real-time: copy common settings from Unity light to Bakery light.– Match real-time to lightmapped: copy common settings from Bakery light to Unity light.
 Left: Shadow Spread = 0.5, right: Shadow Spread = 1.
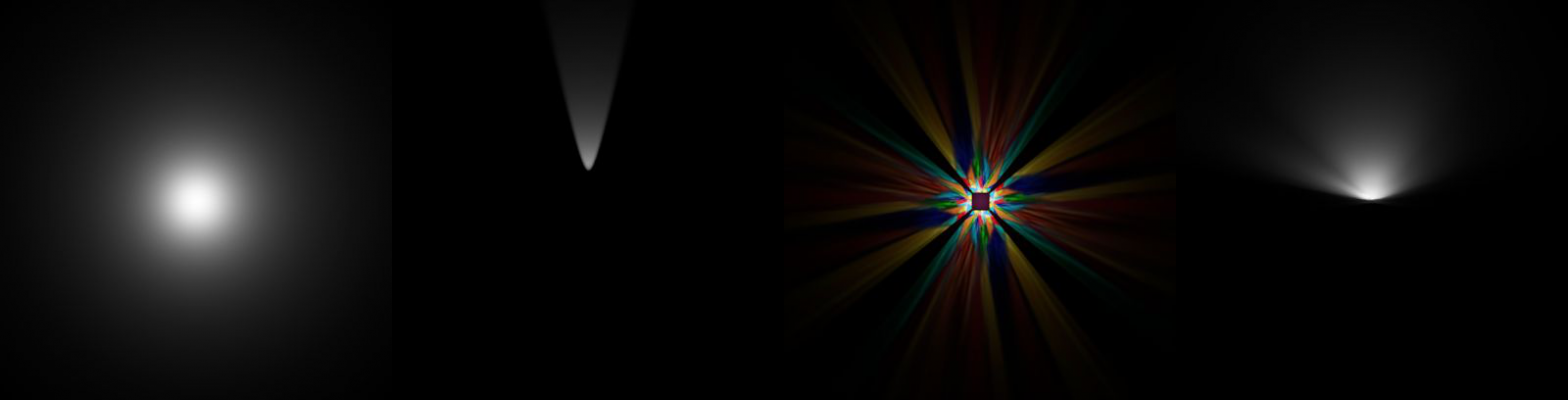 Left to right: Omni, Cookie (default spot texture), Cubemap, IES.
Bakery Shader Tweaks
Bakery offers optional shader modifications that can be applied to Unity shaders to improve graphics. Shader tweaking menu can be accessed via Bakery->Shader Tweaks.These options will patch base Unity shader includes (from the CGIncludes folder) that are used by most built-in and third party shaders. All modifications will affect all projects opened with this version of editorbut can be also easily reverted back.● Shader Tweaks currently don’t work for HDRP and LWRP.All available modifications are presented as buttons. Press the button to apply modification, and it will remain pressed. Un-press the button to remove the modification. Currently available options:
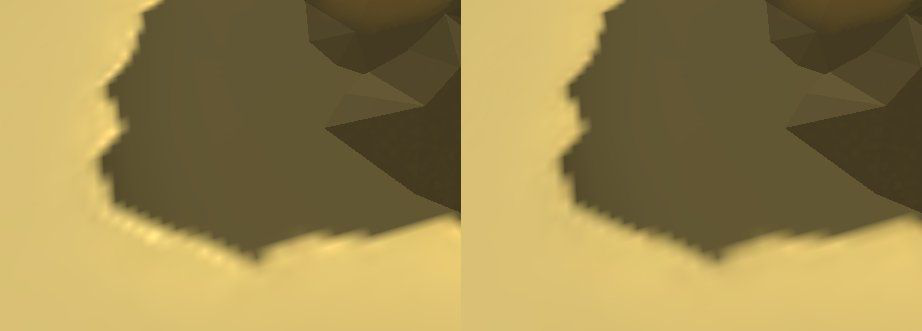
- Use bicubic interpolation for lightmaps: use bicubic interpolation instead of default bilinear. This tweak fixes many jagged edges of low resolution lightmaps pretty well. Currently it only works on DX11 and modern consoles, while other platforms will remain using bilinear interpolation.
- Left: default bilinear filtering. Right: bicubic filtering.
- Use multiplication for shadowmask: combine static and dynamic shadows using multiplication instead of minimum. For reasons unknown Unity decided to use minimum operator by default, and it produces artifacts that are not present with multiplication:Left: both shadows are baked.Center: spherical shadow is dynamic, and other shadow is static. Combined together with this shader tweak.Right: same as center, but without the tweak.
- Use physical light falloff (forward): replace default attenuation of real-time point/spot lights with physically correct inverse-squared. “Range” will only slightly fade it out near the edge (matches Bakery lights with Physical Falloff checkbox). Only affects forward renderer.
- Use physical light falloff (deferred): same as above, but only affects deferred renderer.Left: Unity falloff. Right: physical falloff.Note an unavoidable unrealistic abrupt end of the Unity falloff.Keep in mind that physical falloff acts differently. Instead of range scaling the exact same gradient from center to the edges, physical falloff is mainly influenced by light’s brightness. “Range” in this case is a mere optimization that slightly fades it near edges. It is highly recommended to enable tonemapper when setting up lights with physical falloff.Top row: Unity falloff. Bottom row: physical falloff.Note how Unity scales lighting with the range parameter, whereas physical falloff is only additionally masked by range.Left: no tonemapping, right: neutral tonemapping enabled.Note how lighting retains soft gradient, when tonemapping is enabled, yet still being physically bright.
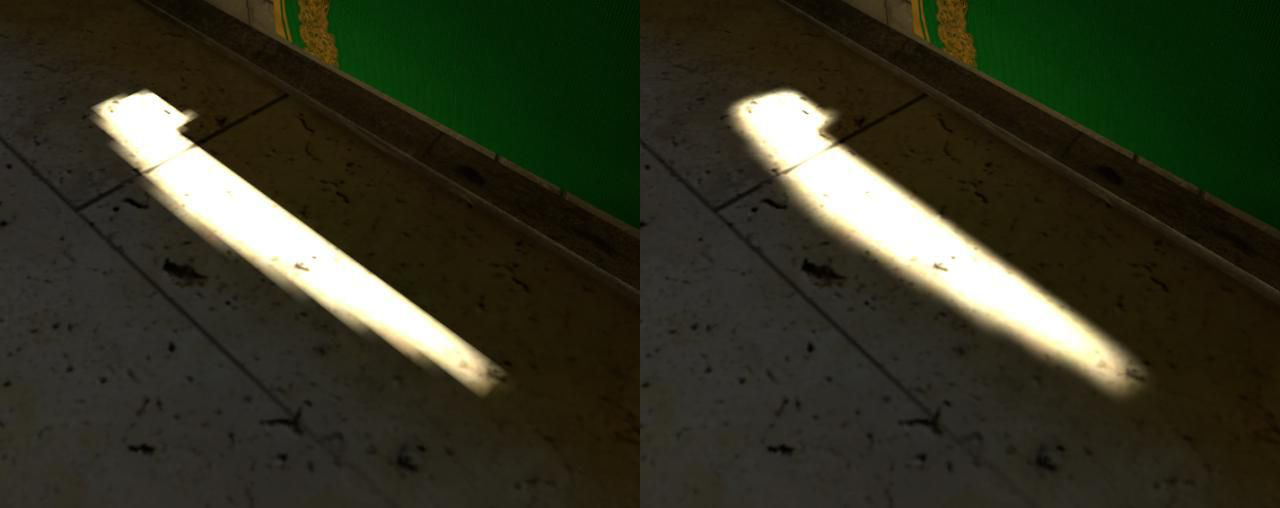
 Left: Unity falloff. Right: physical falloff.Note an unavoidable unrealistic abrupt end of the Unity falloff.Keep in mind that physical falloff acts differently. Instead of range scaling the exact same gradient from center to the edges, physical falloff is mainly influenced by light’s brightness. “Range” in this case is a mere optimization that slightly fades it near edges. It is highly recommended to enable tonemapper when setting up lights with physical falloff.
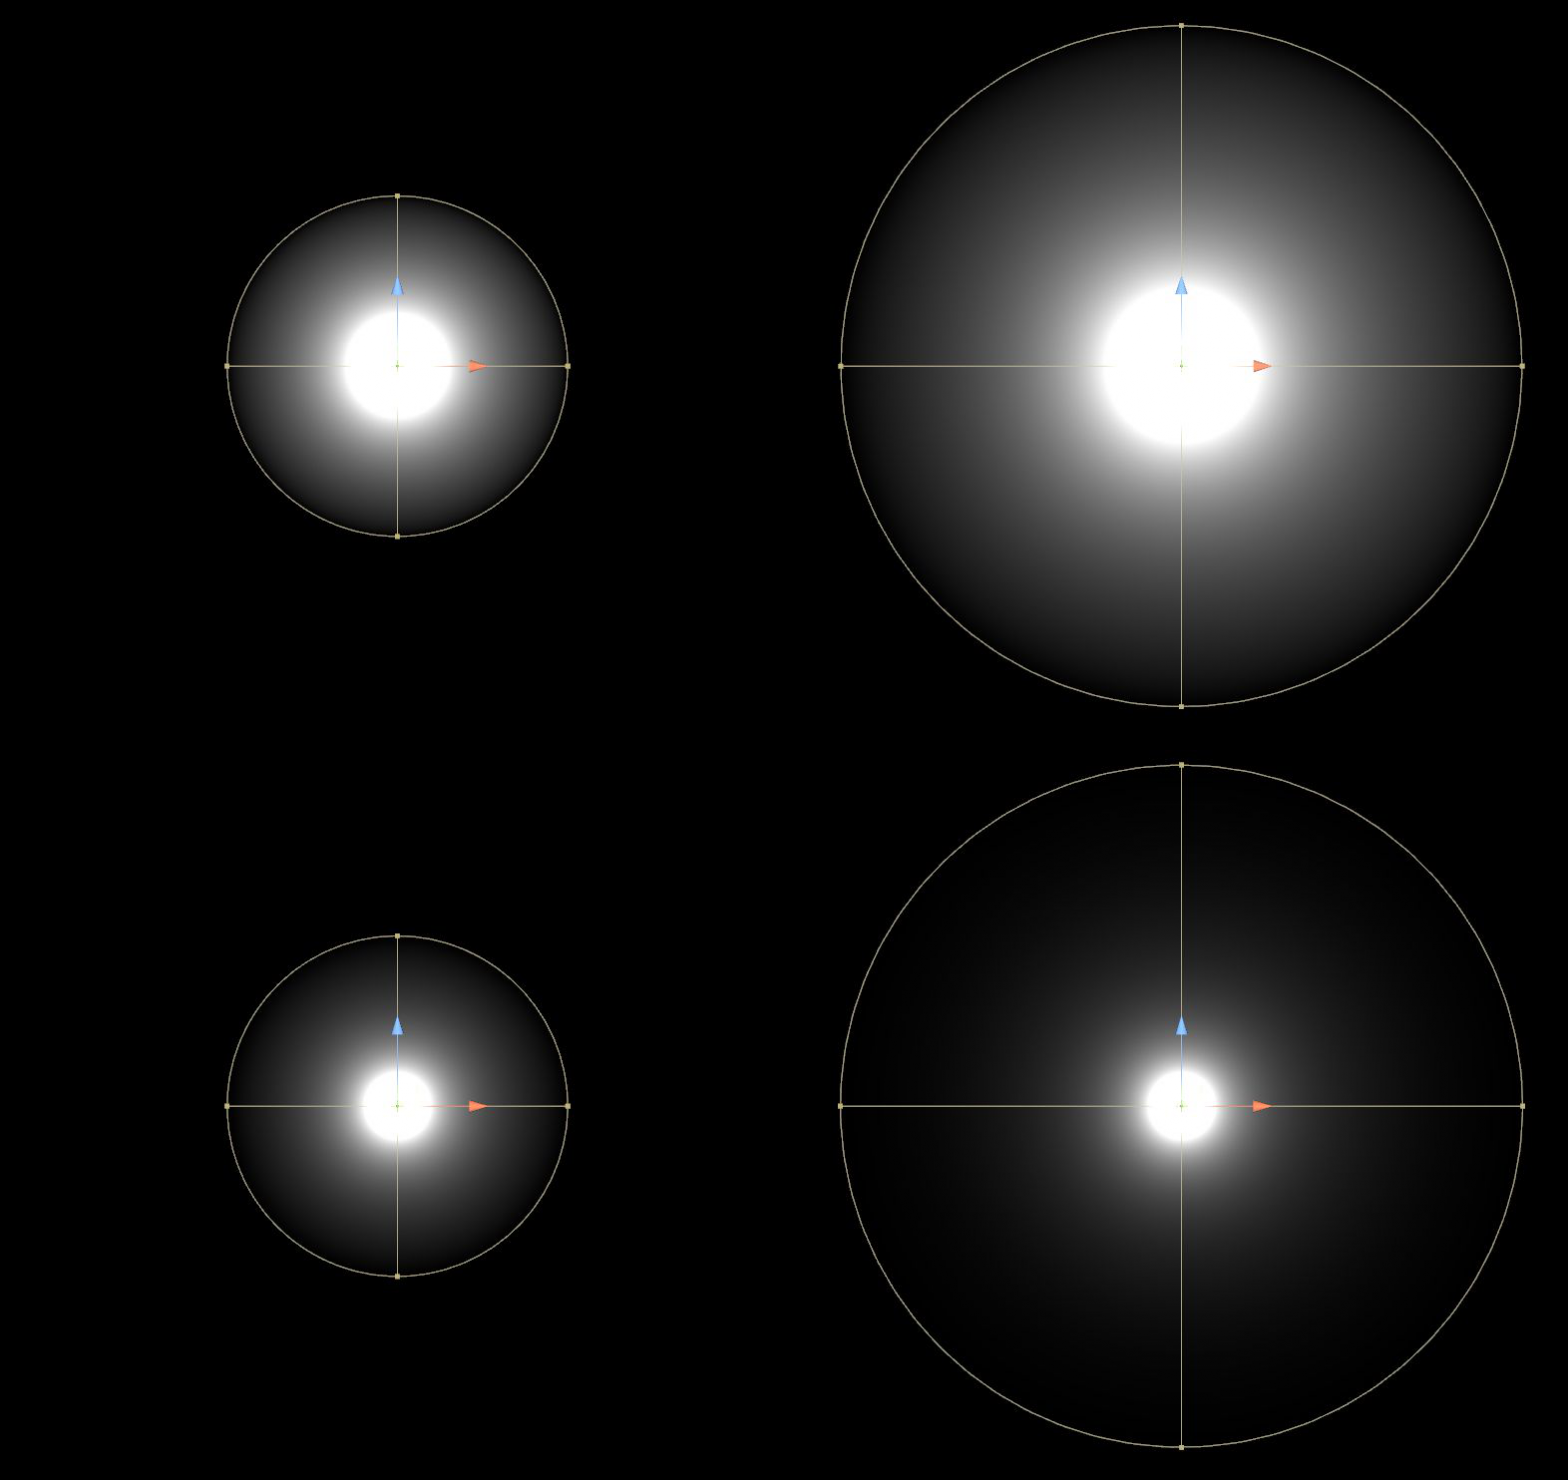 Top row: Unity falloff. Bottom row: physical falloff.Note how Unity scales lighting with the range parameter, whereas physical falloff is only additionally masked by range.
 Left: no tonemapping, right: neutral tonemapping enabled.Note how lighting retains soft gradient, when tonemapping is enabled, yet still being physically bright.
Best Practices
To maximize quality and minimize memory consumption:
- Unwrap in your modeling package, don’t use “Generate UVs” in Unity. Because both Unity and Bakery pack unwrapped objects into atlases simply as rectangles (they can’t modify UVs at this point), and every separately unwrapped object can have wasted UV space, this space accumulates, and you pay more memory for less resolution. In 3dsmax, even automatic Flatten Mapping is good enough.– Set Spacing between UV charts to 3 / lightmapResolution. E.g. if you know certain objects you unwrapped will be rendered into a single 512×512 lightmap, set spacing to 3/512 = 0.005859375.– Try to unwrap all non-repeating geometry into the smallest amount of very dense UV layouts. In Unity, create and assign a Lightmap Group asset for every layout with proper resolution and Simple mode.– Don’t unwrap heavy repeating geometry into the same atlas though, or you will lose instancing
- Use physical falloff. Unity’s falloff is only good for non-tonemapped non-HDR games with arbitrary fake lighting intensities.
- Don’t work without tonemapping. Real lighting intensities are BRIGHT. Working with a scene without a tonemapper is the same as looking at an un-edited RAW file from a camera instead of using your eyes. Unity’s built-in Neutral tonemapping is a good start. Proper lighting brightness guarantees global illumination will be bright enough without faking its intensity.
Differences between Light Mesh and emissive materialsEmissive material:
- Propagates light during GI calculation, therefore is “free”, no matter how many meshes are emissive.
- Small and bright lights can give inaccurate noisy results, depending on GI sample count.
- Has to occupy space in lightmap due to the way GI in Bakery works, therefore possibly wasting it. Also it means that emissive objects require valid UVs and have “Cast shadows” enabled..
Light mesh:
- Lighting is calculated separately for each light, therefore is slower than emissive materials.
- Designed to give clean results for small and bright lights, even very far away from them.
- Doesn’t take space in lightmaps.
Vertex Lightmap notesObjects can be baked on per-vertex level instead of having textures, if they or their parent have a Lightmap Group Selector component with Lightmap Group asset set to Vertex mode. Vertex lightmaps are compatible with shadowmasks, as well as Dominant Direction and SH modes.● It is recommended to disable vertex compression for TEXCOORD2 and TEXCOORD3 in Player Settings if you use directional vertex lightmaps.There are pros and cons using vertex lightmaps.Pros:
- No UVs needed. Suitable for complex geometry that is impossible to unwrap well.
- No space wasted – padding and empty spaces in the lightmap are not a problem.Cons:
- Obviously vertex interpolation is less subtle than texel interpolation.
- Normal texture compression techniques do not apply.
- Modified shader needed (Bakery includes such shaders).
- Denoising is not applied.The data is stored in following vertex attributes:
- Mesh.colors stores the color lightmap (or first coefficient of the SH lightmap).
- Mesh.uv2 can store packed dominant direction, shadowmask and part of SH data.
- Mesh.uv3 can store additional SH data.
Shader compatibility
To make global illumination work, Bakery needs to extract material information.Before v1.1 it simply checked for common shader parameter names such as _MainTex, _Color, _EmissionMap, and _EmissionColor and used those.Since v1.1 Bakery supports GI from custom shaders by using their existing Meta Pass definition, so it should work exactly the same way as with built-in lightmappers. Standard, HDRP and LWRP shaders already contain proper Meta Passcode, as well as any custom surface shader. For completely custom (non-surface) shaders you’ll need to either write Meta Pass yourself (refer to Unity manual) or rely on Bakery’s legacy behavior (using shader parameter names). Currently, Bakery only takes albedo and emission from Meta Pass. Opacity maps are still taken by name (_MainTex or _BaseColorMap alpha channel) to keep their resolution intact.
Baked Normal Maps modeIn Baked Normal Maps directional mode, normals are taken from materials by name and should be named _BumpMap. Tiling and offset are extracted from _MainTex_ST. It is however possible to make completely custom shaders with advanced normal mapping features (e.g. blending multiple layers) compatible. Because standard Unity Meta Pass doesn’t export normal information, a special extended Bakery Meta Pass should be added to your shader. Bakery includes 2 example shaders implementing this Meta Pass. You can find them inAssets/Bakery/examples/shaders. Here is the list of differences comparing to the standard Meta Pass:
- Pass should be named “META_BAKERY”.
- Bakery/BakeryMetaPass.cginc needs to be included.
- If unity_MetaFragmentControl.z variable is not 0, shader should return world-space normal.
- Returned normal should be encoded using BakeryEncodeNormal.
Bakery Shader
Since v1.4 Bakery includes its own shaders with support for vertex lightmapping, as well as RNM and SH directional modes. It also allows approximate baked specular to be calculated from directional data.Bakery shader is not required for regular color lightmaps, shadow masks and Dominant Directionmode, as these features are supported by most Unity shaders anyway.At the moment, there are 4 additional shaders:
- Bakery/Standard: extends regular Standard shader. Additional options available:-Allow Vertex Lightmaps: allows this material to be used with vertex lightmapping.– Allow RNM Lightmaps: allows this material to be used with RNM directional mode.– Allow SH Lightmaps: allows this material to be used with SH directional mode.● All “Allow” toggles enable a certain code path in the shader. It is recommended to only use one “allow” option in a material for performance reasons.– Enable Lightmap Specular: calculates baked specular using data from Dominant Direction, RNM or SH directional modes. Note that due to the lack of information, the effect is very approximate. If you ever used baked specular in Unity 4, it should be comparable. It looks best together with highly perturbed normal maps, not so good on flat surfaces.– Enable VertexLM directional: if vertex lightmaps are present, specifies that Dominant Direction data is stored in vertices and should be used.– Enable VertexLM SH: if vertex lightmaps are present, specifies that SH data is stored in vertices and should be used.– Enable VertexLM Shadowmask: if vertex lightmaps are present, specifies that shadow mask is stored in vertices and should be used.– Non-linear SH: in SH directional mode this option can enhance contrast (closer to ground truth), but it makes the shader a bit slower.– Force Bicubic Filter: enables bicubic filtering for all additional maps. For complete bicubic filtering (including the first color map) it is recommended to also enable it in Shader Tweaks.
- Bakery/Standard Specular: same as Standard, but for specular workflow.
- HDRenderPipeline/Bakery Lit: extends HDRP Lit shader. Currently it only has one additional option, namely Allow SH Lightmaps. This shader is zipped by default to prevent errors in non
- HDRP projects and can be found in ssets/Bakery/shader/BakeryHDRPShader.zip or on github.
- LightweightPipeline/Bakery Standard (Physically Based): extends LWRP standard PBR shader. Currently it only has two options: Allow RNM Lightmaps and Allow SH Lightmaps. This shader can be found in Assets/Bakery/shader/BakeryLWRPShader.zip.
Most Unity shaders HDRP & LWRP shaders Bakery Standard Bakery HDRP Bakey LWRP
HDR color lightmaps Yes Yes Yes Yes Yes Shadowmask Yes Yes Yes Yes Yes Dominant Direction Yes Yes Yes Yes Yes RNM No No Yes No Yes SH No No Yes Yes Yes Lightmap specular No No Yes No No Bicubic filtering Yes with Shader Tweaks No Yes with Shader Tweaks No No Vertex lightmaps No No Yes No NO
● Everything except for regular color lightmaps requires at least Shader Model 3.0 to work.● Vertex Lightmaps with SH mode require at least Shader Model 4.0 due to interpolator limit.
FAQ
Q: Does it have realtime GI?A: No.
Q: What about mixed lighting?A: Yes! Bakery supports baking indirect separately to use with real-time lights, and also baking static shadows (shadowmask) and combining them with dynamic.
Q: I can’t get shadowmask to workA: Check following things:– Bakery’s Render Mode is set to Shadowmask– Masked lights have both Unity and Bakery light components on them.– Masked Bakery light components have “shadowmask” checkbox enabled on them.
Q: I rendered shadowmasks, but all shadows are dynamicA: You’re in Distance Shadowmask mode, it’s expected
– Read about the difference:https://docs.unity3d.com/Manual/LightMode-Mixed-Shadowmask.html https://docs.unity3d.com/Manual/LightMode-Mixed-DistanceShadowmask.html – To switch between two modes, you can use “Distance Shadowmask” checkbox in Bakery main window.– If you’re on 5.6, go to Window->Lighting->Mixed Lighting->Lighting Mode to switch the mode.
Q: Which platforms are supported?A: You can ship games with Bakery lightmaps on any platform. But for using Bakery you will need a 64-bit Windows (7+) machine with a Nvidia (6xx or newer) card.
Q: Is it progressive? Does it show lightmap updates in real time?A: No. Just a progress bar.
Q: How do I make a lightmapped prefab?A: Bakery v1.45:– See L ightmapped Prefab componentBakery v1.4 or older:
- Create a scene for your prefab
- Create an empty GameObject named !ftraceLightmaps
- Bake the scene
- You should now see a component added on the empty object. Put it inside the prefab and save.Such prefab will be always lightmapped. Note, that baking a combined scene with multiple prefabs like these is not supported.
Q: How do I use git/collab/other version control system with Bakery?A: Bakery v1.45 and Unity 2017.1 or newer:
Everything should just work. Make sure all machines have the same version of Unity and Bakery.You should only commit your project files and ignore Bakery folders (Assets/Bakery a nd Assets/Editor/x64/Bakery ). If, for some reason, you decide to commit Bakery folders, then make sure you ignore A ssets/Bakery/ftLocalStorage.asset and A ssets/Bakery/ftGlobalStorage.asset to avoid getting lightmaps out of sync.
Bakery v1.4 or older / Unity versions older than 2017.1:If you are using “Adjust UV padding” option (which is on by default), there can be some difficulties with version synchronization across machines, since this option post-processes UVs on existing models. On these versions apart from your scene you need to push ftGlobalStorage.asset, where model processing directions are stored. If UVs still look broken on another machine, try replacing ftGlobalStorage manually (not via version control) and reimporting the model via right-click.Q: How do I share a scene with someone who doesn’t have Bakery installed?A: Apart from the scene and its lightmaps you also have to include a few scripts, namely: – ftLightmaps.cs– ftLightmapsStorage.cs– ftLocalStorage.cs– ftGlobalStorage.cs– ftModelPostProcessor.csQ: How do I bake using my own UVs without any alterations to them?A: Check out Lightmap Groups.
Q: Every time I bake the same model in scene A, its UVs become invalid for scene B and vice versa, how do I fix that?A: The reason here is U V padding adjustment. It modifies the UVs i n the asset, so spacing between UV charts is optimal, meaning they never leak over each other and there is no much wasted space. Unity has a manual Pack Margin option on model assets, but it’s limited since it applies the same exact value for all meshes inside the model, while each mesh can get drastically different size in the final lightmap based on its surface area.Therefore Bakery overrides it with automatically calculated p er-mesh (instead of per-model) padding. However, because “optimal” varies depending on baking resolution, it can be problematic to reuse the same asset in isolated scenes with different lightmap size. There are multiple ways to solve it:
a) Generate your own optimal UVs. UV padding adjustment only applies to models with auto-generated UV layout (aka “Generate Lightmap UVs” checkbox) and never touches custom data. b) Use U V padding: increase only checkbox and first bake the lowest resolution scene, and then the rest.c) Just disable UV padding adjustment.d) Use 2 different models for different lightmap resolutions, so each will get the most efficient set of UVs.e) Bake both scenes together.
Q: Denoiser throws error 505.A: U pdate the drivers.
Q: How can I trigger the bake via scripting?A: There are 3 steps involved:– Get the render settings object:ftLightmapsStorage storage = ftRenderLightmap.FindRenderSettingsStorage();– Modify the settings. Full list can be seen in ftLightmapsStorage.cs. As an example, here is how you can limit the amount of bounces and set the output folder:storage.renderSettingsBounces = 2; storage.renderSettingsOutPath = “MyFolder”;– Create Bakery instance, load the settings and bake:ftRenderLightmap bakery = new ftRenderLightmap(); bakery.LoadRenderSettings(); bakery.RenderButton();
Reporting bugsIf you encounter any problems with Bakery, please:
- Contact me anywhere, preferably on Unity forum.
- Take screenshots of any errors or bugs.
- If it’s an error/crash:
- Also take a screenshot of Unity console with info/warning/error logging enabled
- Remember what was the last text shown on the progress window, as it will tell at which task exactly the problem occured.
Bakery GPU Lightmapper Manual – Bakery GPU Lightmapper Manual –
[xyz-ips snippet=”download-snippet”]