![]()
AGE 14+User Manual
![]()
![]()
Read the user manual carefully before the first operation
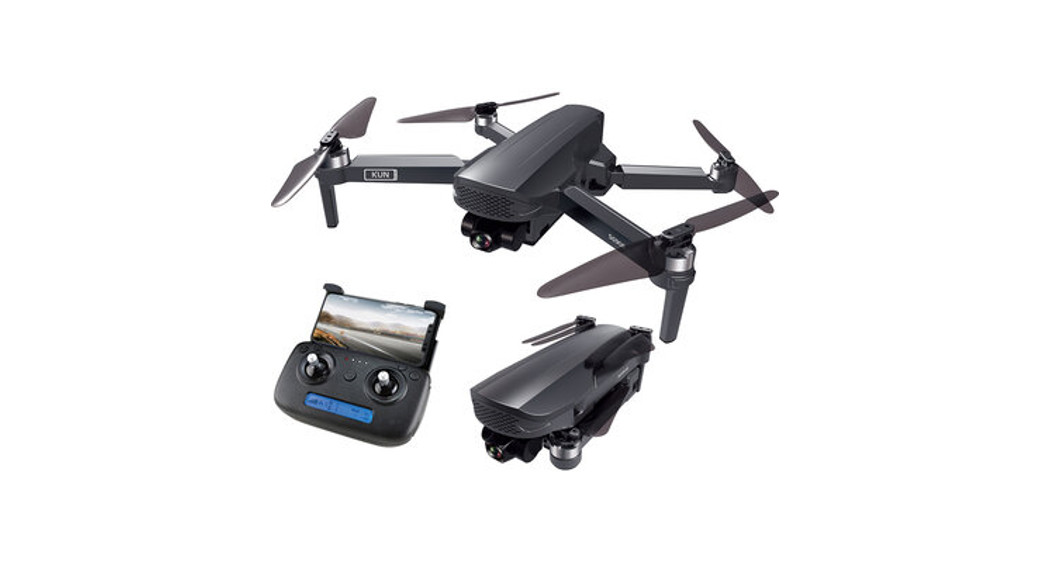
INCLUDED ACCESSORIES

 Notes:
Please check the number of accessories carefully (as shown above). Please provide proof of purchase and contact the store for replacement if any missing parts.
SAFETY PARAMETERS
Calibrate the GPS prior to the first and repeat calibration when the geographical area is changed. It will fly more stable. Failure to do this could result in a flyaway.
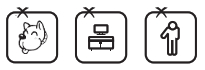
- This product is intended for calibration use and by users over the age of 14 years old.
- When you play the product, keep far away from the product from you, even the spare parts, such as propellers and motors
- This product could be used in a safe and open legal space. Play it according to your skill level and mental state.
- Read the fly environment instructions carefully Before flying this product. Play this product in the environment.
- Check the local law carefully Before flying this product. Play this product obey the local law strictly. Don’t play this product over the local law rule.
DISCLAIMER
Please read this disclaimer carefully before using the product. By using this product, you accept and agree to the contents of this disclaimer.
- This product is intended for calibration use and by users over the age of 14 years old.
- Users shall strictly follow the instructions of the user manual and learn how to fly a drone correctly otherwise it might cause damages to the users or surrounding people and environment.
- Check the local law carefully Before flying this product. Play this product obey the local law strictly. Don’t play this product over the local law rule.
- If different versions have semantics differences, the country or area refers to the related language version.
- Users cant disassemble and repair this product. Otherwise, it might result in damage. We will not be held responsible for any losses or damage occurring.
Flight Environment
 |
Indoor: Spacious spaces away from barriers, crowds, or pets are preferred. |
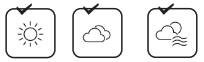 |
Outdoor: Sunny, windless, and breezy weather are preferred. |
 |
Do not fly in extreme environments, such as hot, cold, strong wind, or heavy rain. |
 |
Please keep the drone in sight during the flight and keep it away from barriers, high-tension cables, trees, and people |
1.0 Product Description
- New modular design, Easy to assemble and upgrade;
- 5G WiFi digital map transmission system, it brings different Visual effects;
- Built-in latest generation flight control system, offer Stable and reliable flight function;
- Built-in GPS position Navigation system, more accurate and safe flight
KNOW YOUR HAX+
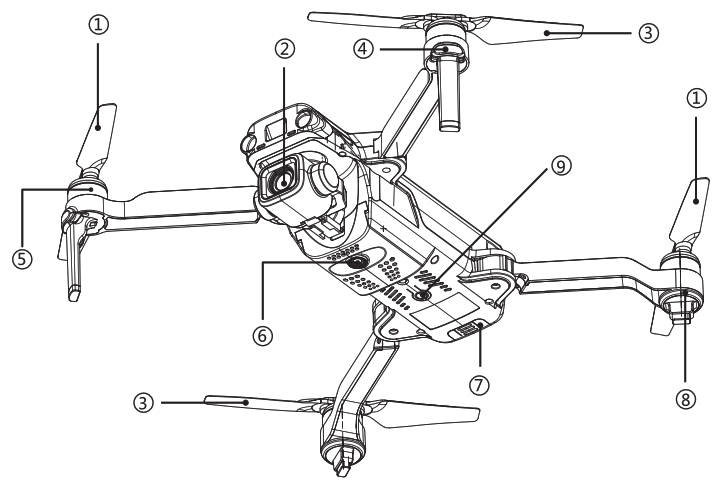
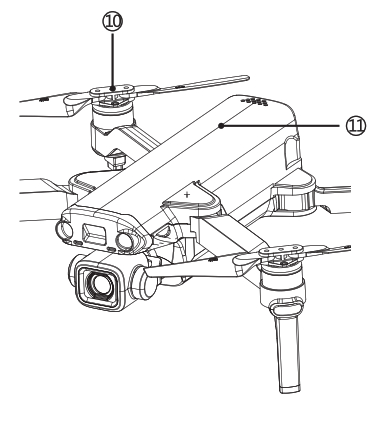
- Propeller A(Forward Propeller)
- HD Camera
- Propeller B(Backward Propeller)
- Front Indicator Light (Blue)
- Motor
- Vision Position lens
- Battery Buckle
- Back Indicator Light (Green)
- Power Switch
- Propeller
KNOW YOUR REMOTE CONTROLLER
9. Video (long press)10. High / Low-Speed switch (short press) Fence Mode Switch (Long Press)11. USB Charging Interface12. Gimble Pitch Angle13. GPS Mode (Constant Light) Retune to Home Mode (Flashing light)14. Fence Mode (Constant Light) Pairing / Low Power (Flashing light)15. Headless Mode (Constant Light)16. Mode Switch (Vision Positioning Model Outdoor GPS Mode)

- Left joysticklHealess Mode (Long Press)
- One key Return To Home (Long Press)
- Phone Holder
- One-key Up / One-key Down
- Antenna
- Power Switch
- Right joystick
- Photo (short press)


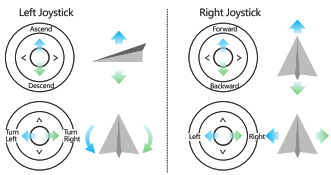
The default mode is “American Hand”. Use the left joystick to control the flight altitude and flying direction, and the right joystick to control the directions of forwarding, backward, left, and right sideward. You can also press the button of the gimbal pitch angle to control the camera pitch angle.
Switch between American hand and Japanese hand (MODEL 1)
- Press the button on the right side (see MODEL 1) when the remote controller has not been switched on yet.
- Switch on the remote controller. And the screen prompts with a number of 01.
- Switch American hand to Japanese hand, power off, and then power on the remote controller to complete.
Switch between Japanese hand and American hand (MODEL 2)
- Press the button on the left side (see MODEL 2) when the remote controller has not been switched on yet.
- Switch on the remote controller. And the screen prompts with a number of 02.
- Switch Japanese hand to American hand, power off, and then power on the remote controller to complete.
Before flight To prepare
Download and Install APP
Please scan the QR code to download or open the APP Store to search for “UAV GO” Prepare the Drone
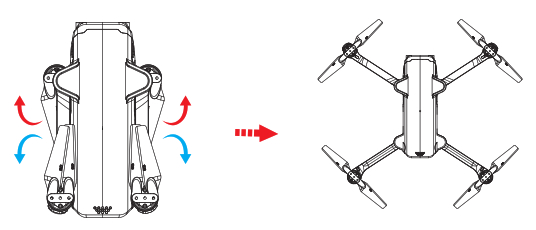
Untold the Aircraft
The Aircraft is folded inside the package. Follow the steps as blows unfold the aircraft.
Battery installation
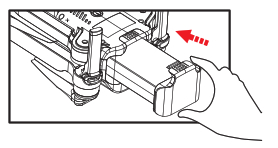
Notes:The battery should be installed firmly: If not, the aircraft may crash due to a power cut during the flight.Battery Charging for DronePlease charge the flight battery to activate it before using it for the first time.
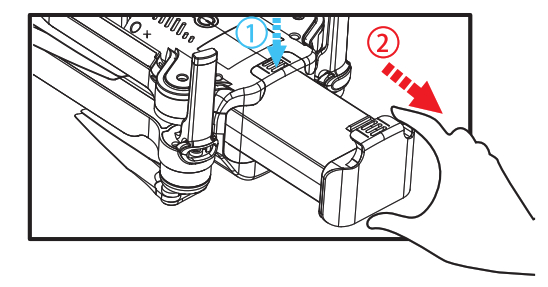
1. Hold the buckle and take out C)Connect the battery with the smart battery.

Connect the battery with the USB charging interface.
1. Connect the USB charging cable to the 5V USB charger (Recommends 5V 2A charger).2. Insert the USB connector into the charging interface of the drone battery. Notes :The LED light turns on during charging and turns off when the charging completes. It takes about 2-4 hours to charge up to full and gives about 16-18 minutes of running time when fully charged.
Prepare the Remote Control
Charge the Remote control
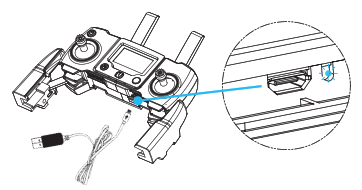
- Remote control built-in with a rechargeable battery, the LED light will flash slowly and remind to charge when gets low voltage
- using the 5V USB cable to charge the battery, charging time approx 50minsDeploy remote control, install the smartphone,
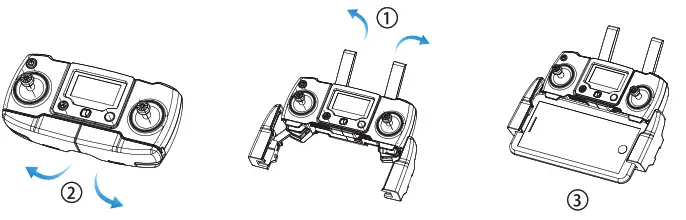
- The controller is folding with factory settings, First, deploy the antenna and make sure the antenna is vertical, then rotate the handle as photos shown.
- Extent the handle, install the mobile device, Keep it properly and stable. ( Pairing )
( Pairing )

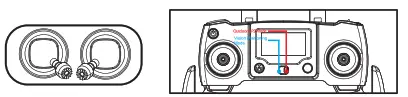
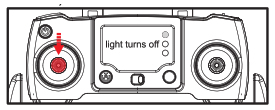
1. Hold the Photo button (Pic 1) and slide the power switch to the right to power on the transmitter (Pic 2), and then transmitter has a sound “Di” with the LED light flashing,2. Tum on the drone, then the transmitter has a “DI” sound, and the LED light will turn to solid, the drone pairing successfully. If it fails to pairing, repeat above steps, please.
Gyroscope calibration
After the aircraft and the remote controller are banded, set the aircraft on flat ground and follow the indication photo as below to calibrate the gyro. Once the aircraft front lights turn from flashing to solid on, the gyro calibration is successful.

• The gyroscope calibration has been done by factory default. Gyroscope calibration is no need to be performed unless the aircraft can not exit the aircraft initialization detection procedure while the aircraft initialization detection is finished.• Please make sure to set the aircraft on a horizontal surface when performing calibration; failure to do this will affect the flight.
First time flying
Compass Calibration
- Calibrate the compass before using it for the first time. Re-calibrate it when needed.
- Re-calibrate the compass when the drone spins or yaws unexpectedly.
- Calibrate the compass in the outdoor spacious environment free from the interference of the electromagnet.
The compass calibration method is as follows:
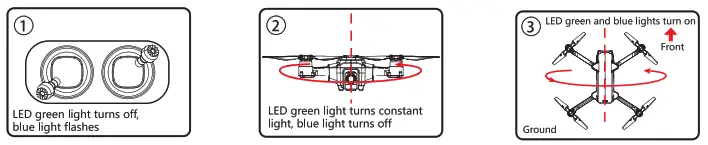
- Toggle the left and right joysticks towards different directions (shown in figure 1) and keep them still until the front blue light blinks with a clear sound of the beep.
- Slowly rotate the drone horizontally until the back green light turns solid while the front blue light turning solid with a clear sound of the beep.
- Slowly rotate the drone for few circles with its nose facing upward until the front and backlights turn on with another clear sound of the beep, indicating the calibration has been successful. If it fails to calibrate, please repeat the steps above.
Aircraft Status
- Indoor Altitude Hold Mode: Turn the switch to the indoor altitude hold mode. And you can see both of the drone’s front and backlights turn solid.
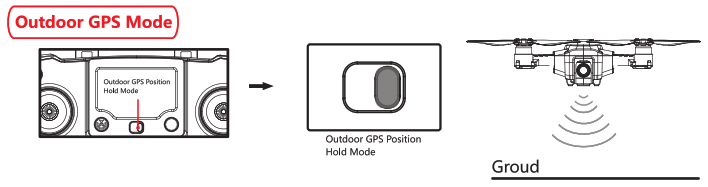
- Outdoor GPS Mode: Turn the switch to the outdoor GPS mode. And you can see both of the drone’s front and backlights turn blinking, indicating there are insufficient or no GPS satellites that have been searched. When 8 GPS satellites have been successfully searched, the front blue light would turn solid, indicating the successful process of searching satellites.
- Headless Mode: The direction the drone takes off is forward, and the opposite side along the arrow is backward, and the vertical directions of the arrow are left-side and right-side.
- Auto Return to Home Mode: Toggle the mode to the right to turn on auto return to home mode. The green light turns slow flashing, indicating the return to home mode has been enabled.
- When the drone battery is in a low condition, both of the blue and green lights turn quickly flashing. Under this circumstance, please keep the drone within your eyesight.
|
Modes |
Navigation Indicator |
Navigation Indicator Light ( Green) |
| Indoor Altitude Hold Mode | Constant Light | Constant Light |
| Outdoor GPS Mode (Positionin•) | Constant Li•ht | Flashin• Li•ht |
| Outdoor GPS Mode (Non-positionin.) | Flashin• Light | Flashin• Li • ht |
| Headless Mode | Quick-flashing for 3 Times | Quick-flashing for 3 Times |
| Return to Home Mode | Constant Light | Slow-flashing |
| First Level Voltage | Slow-flashing | Slow-flashing |
| Second Level Voltage | Quick-flashing | Quick-flashing |
| Remote Control Disconnected | Quick-flashing | Quick-flashing |
| Unprepared for Flight | Slow-flashing alternately | Slow-flashing alternately |
Lock/Unlock MotorUnlock Motor
 Once the pairing has been successful, turn the switch to the indoor altitude home or outdoor GPS mode, and toggle the left and right joysticks towards different directions (shown as bellow) until the front and backlights blink twice, indicating the motor has been unlocked. The motor then starts to rotate at a slow speed.
Lock Motor
 Option One: After the drone lands, toggle the left joystick to the lowest position (shown as the left figure) until the motor stops rotating and both of the front and backlights blink twice, indicating the motor has been locked.Option Two: After thy e drone t lands, toggle the lefts and rghtostickso a different direction (shown as the right figure) until the motor stops rotating and both of the i joysticks front and backlights blink twice, indicating the motor has been locked.
- When there is a GPS signal, unlock the motor either in outdoor GPS mode or indoor altitude hold mode.
- When there is no GPS signal, unlock the motor in indoor altitude hold mode.
- The motor would automatically lock itself after 6 seconds of no operation.
Basic flight operation steps
- Place the aircraft in a wide open area that its front is your front.
- Turn on the aircraft and remote controller.
- Connect the remote controller with the aircraft and then proceed aircraft initialization detection
- Connect the aircraft with your phone and enter into the image transmission interface.
- Unlock the aircraft after the gyro detection of the aircraft is completed.
- Pull up the throttle stick then the aircraft takes off, and control the aircraft flight by left/right stick.
- Pull down the throttle stick to land the aircraft.
- Pull down the throttle stick to the bottom position and keep for 3 seconds to lock the aircraft.
- Pull out the battery from the aircraft and then turn off the remote controller
Video suggestions and tips
- Do pre-flight checklist;
- Choose appropriate gimbal shooting angle;
- Fly in good weather with no wind;
- Perform test flights to establish flight routes and to preview scenes;
- Push the control stick gently to keep the aircraft’s movement smooth and stable.
One-key
Start Please unlock the motor in GPS mode before taking off. Make sure the GPS signal is well-received (the front blue LED light turns solid). The back green light flashes, indicating the satellite’s searching has been completed and the drone is ready for the outdoor flight.
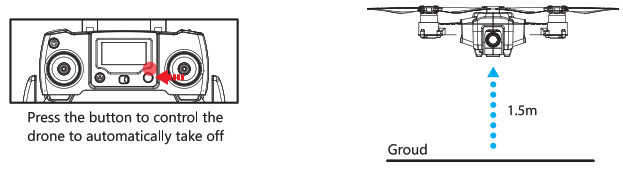
Unlock the motor in outdoor GPS mode. When the motor starts to rotate at a slow speed, press the “One-key Takeoff” button to control the drone to automatically take off and ascend to an altitude of 1.5 meters.One-key Landing
Notes:
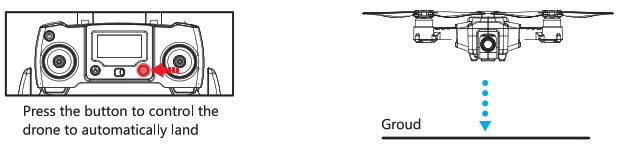
- It allows the control of full directions, including forwarding, backward, turning left, and turning right, during landing. Toggle the throttle joystick upward to turn off this mode.
- Ensure the landing area is flat and spacious, away from crowds or obstacles.
- The one-key landing function can only be activated when the drone flies within 10 meters of the home point.
Vision Pisitioning Mode

Notes: Put the drone on level ground, and ensure the front and back indicator lights turn solid before take off.
Vision Pisitioning System function
The Vision Positioning System is typically used in an indoor environment when GPS is weak or unavailable. It works best when the aircraft’s altitude is less than 10 meters.

The precision of the vision system is easily affected by the light strength and features of the surface textures. Once the image sensor not available, your aircraft will switch to Gesture Mode automatically Be cautious to operate the aircraft in the following situation:
- Fly fast at an altitude below 0.5m.
- Fly over monochrome surfaces (like pure black, pure red, pure red and pure green).
- Fly over strong light reflective surfaces or surfaces prone to reflection.
- Fly over water or transparent object surfaces.
- Fly over moving object surfaces (such as crowds, swaying juggles and glass).
- Fly over an area where light changes dramatically and rapidly.
- Fly over surfaces extremely dark (lux<10) or extremely bright (lux>10,000)
- Fly over surfaces without clear textures.
- Fly over surfaces with highly repeating textures (small grid brick in the same color).
- Flying speed should be controlled within a moderate range. When the aircraft is 1 meter against the ground, the flying speed should not be over 5m/s; When the aircraft is 2 meters against the ground, the flying speed should not be over 14m/s.• Keep sensors clean at all times• The vision system is only effective when the aircraft is within the altitude range of 10 meters.• Make sure that the light is bright enough and the surfaces is with clear textures so that the vision system can acquire the movement information through recognizing the ground textures.
Outdoor GPS Mode
• The vision system may not function properly when the aircraft is flying over water, low light ground, and surfaces without clear patterns or textures.• Do not use another ultrasonic device with a frequency of 40KHz when the vision system is in operation.
Notes:
- Ensure at least 8 GPS satellites have been searched to well receive the GPS signal.
- 1t is able to handle a smooth flight and control functions of position hold, altitude hold, and emergency stop in outdoor GPS mode.
- Switch to indoor altitude hold mode when there is no GPS signal.
- Do not turn on the outdoor GPS mode in an environment surrounded by narrow lanes and tall buildings.
Return to Home Mode
Notes:
- .Ensure that the GPS position signal is well-received (at least 8 satellites ).
- Ensure no barriers outstand the flying height along the way of the flight path during return before switching on “Return to Home Mode”.
- Ensure the takeoff point is away from crowds and other barriers. Switch on “Return to Home Mode” and the drone would automatically return to home.Press this button and buzzer sounds ‘DI” to start a one-key return drone t will return to the latest recorded location During the return flight, the user can control the flight altitude by remote control.
Intelligent Return to Home Under Low Voltage
A: When the drone is at low voltage and flies at an altitude of over 20 meters, it would automatically return home at the same altitude and then descend.B: When the drone is at low voltage and flies at an altitude lower than 20 meters, it would ascend to the altitude of 20 meters before returning home and descending.
Notes:
- Ensure at least 8 GPS satellites have been searched to well receive the GPS signal. 0 Home Point
- Do not touch other buttons when the drone has entered low voltage returns to home mode.
- When the low voltage alarm triggers, please manually return the drone back or turn on auto return to home mode.
Intelligent low voltage return is introduced
1. The built-in system automatically calculates the flight distance and battery capacity for return, flight ensuring the flight safety particularly when it is at low battery condition.The front and backlights blink when the battery voltage is under 7.05V, triggering the low voltage alarm.
Fence Mode
The fence mode is the default mode when starting up. Press the button on the left side of the controller for at least 2 seconds to turn off the fence mode. Press 2 seconds to turn on the fence mode. Please fly the drone within an altitude of 30 meters and a range of 200 meters. (There is a long-lasting clear sound of beep when switching between modes.)
Notes:
- If you are a new pilot, please do not turn off the fence mode.
- Please follow local regulations and rules when you fly a drone.
Headless Mode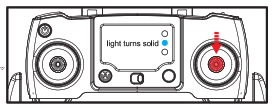 Long press this button on the remote control to enable headless mode The indicator light turns solid Long press this button again to disable headless mode The indicator light turns off
After Landing
- Control the drone to land on the ground and lock the motor. There are three ways to control the drone to land: Manually operate it to land, enable one key landing to return it back, or enable an auto return to home mode to return it back automatically.
- Press the drone power for at least 2 seconds and then release the button. The indicator light would turn off. Then turn off the remote controller.
- Take the drone battery out of the drone.
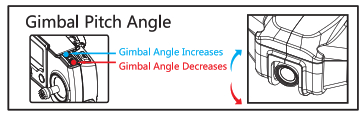
GIMBAL CAMERA
About the Gimbal
Whist flying, the drone’s camera can be adjusted to capture the scene at different angles, bringing you a superior aerial photography experience.
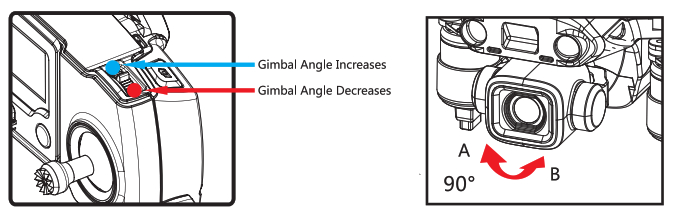
Camera Angle Adjustment
Use the pitch angle button to adjust the viewing angle of the camera from -90 degrees to 0 degrees.
Notes:
- Prohibit manually adjust the angle of the camera, May cause structural failure
- Plug cable can’t insert opposite when installing the camera, May damage the components and failure
- Prohibit insert/pull out the SD card during the flying, May cause data damage or loss
Battery Instructions
- There is a certain risk when using a lithium battery. It may cause fire, body injury or property loss. Users must be aware of the risks and take full responsibility for using batteries improperly.
- If battery leakage occurs, please avoid contacting your eyes or skin with electrolytes. Once it happens, please wash your eyes with clean water and seek medical care immediately.
- Please remove the plug immediately if you sense any peculiar smell, noise or smog. Battery Charging
- Please use a standard 5V USB charger to charge up while avoid using worn or old chargers.
- Do not charge the dilatant or outworn battery.
- Do not overcharge the battery. Please unplug the charger once fully charged.
- Do not charge the battery next to inflammable, such as carpet, timber floor or wood furniture or on the surface of electro-conductive objects. Please always keep an eye on the battery when charging.
- Do not charge the battery which not cool down yet.
- The charging temperature should be between 0°C to 40°C.
Battery Recycling
- Do not dispose of the battery as daily rubbish. Please familiarize yourself with the local garbage disposal method and dispose of it according to the special requirement.
[xyz-ips snippet=”download-snippet”]