
BarkmateInvisible Dog Fence SystemUser Manual
DF113R/DF112
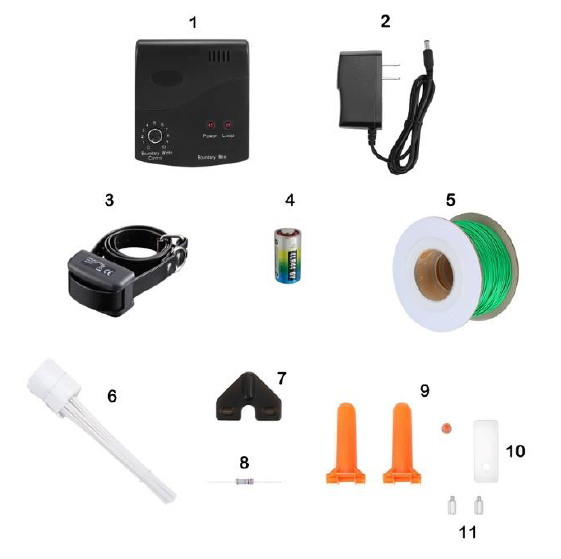
DF113R Kit Contents

- Dog Fence Transmitter Unit
- Dog Fence Transmitter Power Supply
- Remote Trainer Transmitter (Sold Separately) works with DF113R collar only
- DF113R Contain N Train Collar (Medium to Large Size Dogs)
- DF113R Collar and Remote Transmitter Charger
- 150 Metres Boundary Wire
- 50 x Boundary Flags
- Collar Test Light Tool
- Resistor
- Wire Joiner
- Dog Collar Probe Wrench
- 1 Pair of Long Contact Probes for long hair dog
DF112 Kit Contents
- Dog Fence Transmitter Unit
- Dog Fence Transmitter Power Supply
- DF112 Contain N Train Collar (Small to Medium Size Dogs)
- 6V Alkaline Battery for DF112 collar
- 150 Metres Boundary Wire
- 50 x Boundary Flags
- Collar Test Light Tool
- Resistor
- Wire Joiner
- Dog Collar Probe Wrench
- 1 Pair of Long Contact Probes for long hair dog
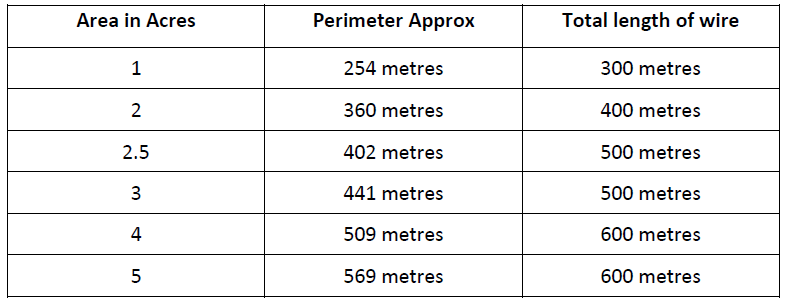
The Barkmate Invisible Pet Containment system is an effective invisible barrier to keep your pets inside the property. The transmitter is designed to cover property size up to 5 acres. The Standard Barkmate DF113R Fence collar suits most dogs from 7kg. The Barkmate Mini DF112 collar suits small dogs from 3.5kg.
How does it work?
The Barkmate invisible dog fence consists of a 150 metres copper insulated loop wire connected to a radio transmitter. The wall mounted transmitter plugs into a power socket and emits a radio field that travels around the loop wire. The radio field can be adjusted in radius at the Wall transmitter approximately a ½metre to 3 metres (10 increments) in radius from the wire. Your dog wears a Barkmate receiver collar that detects the radio field, warning the dog as they near the boundary.
If your dog enters the radio field, they will receive a mild electronic pulse. This electronic pulse is harmless but startling enough to act as a deterrent to prevent your pet from escaping or challenging the existing boundaries of your property.
Barkmate Fence Transmitter
![]()
Boundary Width Control Knob: Boundary Width Control adjusts the zone width. It controls how far away before the receiver collar starts activating before reaching the boundary wire. It is the combination of Warning Zone (Vibration) & Static Correction Zone.
Boundary Wire Terminals: Twist the loop wire tails all the way from the boundary to the Fence Transmitter Unit. Connect loop wire tails to terminals by firmly pressing the red levels
Power Light: The Red light indicates the system is on.
Loop Indicator Light: It indicates the boundary wire is connected to the transmitter. Transmitter will beep if there is a break or poor connection of the wire.
Power Jack: This is the connection point for Power Adaptor. The Transmitter is powered by 18V DC Power.
The Barkmate DDF113R Dog Fence Collar
The Standard Barkmate DF113R Dog Fence Collar has a vibration warning plus 3 levels of mild to high stimulation output for medium to large stubborn dogs. This DF113R collar is waterproof and rechargeable. It is also compatible with Barkmate Dog Training Remote Transmitter to be used as a dog training collar.

Press and hold on 4 seconds to turn the collar on. The Collar will beep twice rapidly, and the green LED light will flash once every 5 seconds. Press and hold on 4 seconds to turn the collar off. The collar emits a long beep, and the LED light will turn off.
Switch between Fence Collar only mode or Contain N Train collar mode
Fence Collar only mode: Containment only, LED flashes Green twice every 5 seconds
Contain N Train mode: Containment and remote training activated, LED flashes Green once per 5 seconds
Change the operating mode when the collar is ON! Press and hold the ON/OFF button while the collar is on for 2 seconds, the LED will turn Red. Release the Button immediately, the Green light will flash either once or twice to indicate the current operating mode. Twice every 5 second is the Fence only Mode and once every 5 second is the Contain N Train Mode. To change the mode, repeat the step. If the ON/OFF button has been pressed too long, the collar will be turned off and you will hear a long beep.
The DF113R collar has 2-hour fast charge battery. The LED will flash Red when you need to charge and Green means fully charged.
The Barkmate DF112 Dog Fence Collar (Not compactible with Barkmate Remote Transmitter)
The Barkmate Mini DF112 Fence collar has warning tone plus 3 levels of mild to medium stimulation output for small to medium size sensitive dogs.

Please Note: Make sure that the Battery Cover is tightened properly or the water can get into the collar.
The Optional Barkmate Remote Training Transmitter – DF113R collar only
![]()
Stimulation Level Adjustment Button“ ![]() ” and “
” and “ ![]() ” to adjust the stimulation output. Press
” to adjust the stimulation output. Press ![]() to increase and
to increase and ![]() to decrease. The Maximum level is 10.
to decrease. The Maximum level is 10.
The ON/OFF ButtonHold the button for 2 seconds to turn it on. The LED indicator turn Blue then off, and the LCD should show default “A01. To switch the power off, hold this button for 2 seconds and the power light indicator will switch off.
Beep/Tone Button“ ![]() ” Press the button, the collar will emit a no- stimulation Beep.
” Press the button, the collar will emit a no- stimulation Beep.
Vibration Button“ ![]() ” Press once for a single short vibration. Press and hold the button for a continuous vibration for max. 8 seconds.“
” Press once for a single short vibration. Press and hold the button for a continuous vibration for max. 8 seconds.“ ![]() ” Press once for a single short static correction with pre-set output. Press and hold the button for a continuous static correction for max. 8 seconds.
” Press once for a single short static correction with pre-set output. Press and hold the button for a continuous static correction for max. 8 seconds.
The Dog Selector ButtonsThe Transmitter is able to train up to 3 dogs up to 800 metres line of sight. The default is in “1”. The LCD screen will display dog ID “A XX”. Press “2” button to switch to dog 2. The LCD will display “BXX”. Press 3 to switch to dog 3. And the LCD will display “C XX”. A = Dog 1; B = Dog 2; C = Dog 3; “XX” = The output level for static correction & vibration.
Please Note: The LED flashes Red when the battery is low.The Barkmate Training remote is able to control up to 3 collars. You may need to unpair the collar before you can pair it with the new remote as the collar may be paired with a different remote for testing purpose from the factory. MAKE SURE the collar is in dog training mode (flashes GREEN once every 5 seconds).
Unpairing the new collar/remove coding
- Turn both collar (wish to unpair) and remote transmitter on. (if you have more than one collar, please turn off other collars). Keep the collar close to transmitter (almost touches or touches each other).
- Press & hold both “
 ” and “ ” button on the remote in the same time, until the digit on the LCD changes very fast.
 - Press any dog selector button (“1”, “2” or “3”). Once you press the button, the collar should beep five times rapidly. If the collar doesn’t beep, release the button and press/hold the button (“1”, “2” or “3”) again.If you want to remove an existing collar from a number, you can press and hold the number of dog selector button until the collar beeps five times and flashes Green Rapidly.
- Press & hold both “ ” and the “ ” button again until the digit on the LCD display stop changing. The collar is unpaired (coding removed) from previous transmitter successfully. Dog collar should still flash Green rapidly.
Pair the new collar to the remote
- Turn both collar (wish to pair) and remote transmitter on (Collar in Dog Training Mode).
- Press & hold the “ ”button and “ ” button at the same time, until the digit on the LCD display changes very fast. It means the remote transmitter is enter the pairing mode. The LED on dog collar should flash quickly in the same time.
- Press & hold on the Dog selection button: Press and hold “1” to match the Receiver Collar as the dog 1, press and hold “2” to match the Receiver Collar as dog 2, or press and hold “3” to match the collar as the dog 3. The collar should “beep” 5 times rapidly and green LED on the collar will flash normally(GREEN once every 5 seconds). If the collar doesn’t beep, release the button and press/hold the button again.
- Release the Dog Selector button.
- Press & hold the “ ” button and the “ ” button at the same time again, until the digit on LCD display is no longer changing, then release both buttons.
- Select the collar number and test with warning beep or vibration
Transmitter Charging
The transmitter has 2-hour fast charge lithium battery. When the Transmitter is plugged in with DC power supply, the LCD will display “CHA”. This means the device is charging. The LCD will display “FUL” when the transmitter is fully charged.
Installation
Find location for Dog Fence Transmitter Unit
The transmitter unit is mains powered. It is not water resistant so must keep under cover.
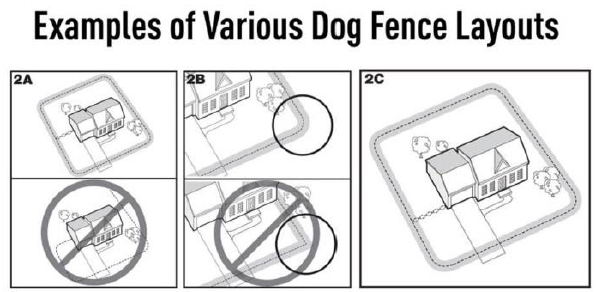
Design the Layout
- The wire must be one continuous loop which starts from one wire connector terminal of the Dog Fence transmitter unit and back to the other wire connector terminal.
- Follow existing boundary or easy to see objects (existing fence, wall, trees, edge of lawn etc for wire boundary)
- Wire can be buried under the ground for approx. 5cm or above the ground same height as the dog.
- Avoid installing the wire attached or close to any conductive metal objects like electricity cables and colourbond fence.
- Before fixing the wire by burying under the ground or tighten on your existing fence, make sure to test the fence with collar to find out if any signal interferes or weak connection.
- Turn the boundary width control knob to mid setting (number 5). Attaching the test light tool onto the contact probes of the collar. Holding the receiver collar at about the dog’s height towards the boundary wire. The DF113R and DF112 collars should beep when entering the warning zone. When the DF113R collar enters the static zone, the collar should vibrate and followed by low level of static correction. This collar has 3 levels of autorise stimulation which will increase by itself when the collar is getting closer to the boundary wire. The DF112 collar does not have vibration warning, it has 3 levels of lower output autorise stimulation for smaller dog.
- Fine tune the Boundary Width Control Knob until you find the desired activation distance for the dog.
- If you find the strength of signal is not equal in some area, move the wire to a different location or check all the wire joins for poor connection.
- Fix the wire in the location.
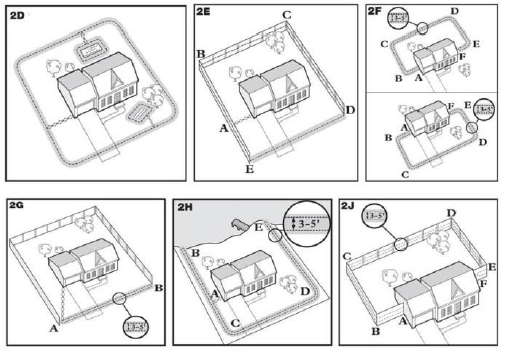
Place the Boundary Flags:
The Boundary Flags are a visual boundary for dogs. Place the flags along the warning zone of the boundary in every 3 to 5 metres. Hold the Receiver Collar at the dog’s height and slowly walk towards to the Warning Zone until the it (vibrates/beeps). Place a flag immediately into the ground when the collar (vibrates/beeps). Walk back into the Pet Area until the collar warning stops. Repeat this process around the Warning Zone until it is marked with Boundary Flags.
Fitting the collar on the dog:
The collar should be fitted properly while the dog is standing so the contact probes have good contact with the dog’s skin. Long contact probes should be used for long/thick hair dog. After fitting the collar on the dog, you should be able to fit a finger tip between the contact probes and dog’s skin. A loose fit can allow the collar to move around on the dog’s neck. When this happens, the contact probes may rub around dog’s skin and cause irritation. The dog may also receive intermittent stimulation which makes the fence system not as effective on the dog.
Please Note: leaving a static correction collar on a dog for an extended period of time can also cause skin irritation. Please check dog’s skin everyday after taking the collar off. If the dog is to wear the collar for a long period, occasionally reposition the collar or moving the collar to different spot on the dog’s neck. Preferably no longer than 10 hours at any one time.
Barkmate Dog Fence System Training
Step 1: Introduce the new boundary to the dog (1 to 3 days)Have both normal collar and Barkmate Dog Fence collar on the dog. Leash the dog and walk towards the boundary flags. When the dog is next to the flag, the collar should start beeping (warning zone). Say “NO” to the dog and pull the leash. Let the dog walk away from the warning zone and praise the dog.
Step 2: Understanding the Stimulation and Boundary (1 to 5 days)Continue the training in step 1 but let the dog pass the boundary flags. Let the dog stay in the static stimulation zone and say “NO”. Pull the leash and take the dog back to containment area. Repeat this step along the boundary so the dog understands where the boundary is and what will happen when he walks past the boundary flag (warning zone).
Step 3: Off leash training (up to 2 weeks)Take the leash off the dog, let the dog walk freely. Use food, toys to distract the dog in the stimulation zone (past the boundary flags), see if the dog will walk past the flag. If this happens, repeat the training in Step 2. Keep an eye on the dog till you are confident he is ok by himself. Slowly remove boundary flags after 2 weeks.
Step 4: Safe to leave boundary (1 to 3 days)Train the dog to understand when he is safe to leave the boundary. Take the Barkmate dog fence collar off, leash the dog when taking the dog out. So, the dog knows, only you can take him out but not by himself.
The Barkmate Pet Fence transmitter is able to cover up to 5 acres area with extra wire. Please contact your local supplier or DogMaster Trainers to purchase extra rolls of wire.
Troubleshooting
The Dog Does not respond to stimulation
- Check if the collar is fitted properly
- For long/thick hair dog, trim the hair of the contact area. Use the long contact probes, must make contact with skin.
- Recharge the battery/replace new battery of the collar, test the output with the collar test light tool. The collar will still beep with low battery but it would not emit the strength of stimulation.
Loop Wire Problem
- Transmitter is beeping. Check transmitter wire connector terminal if the wire is plugged in properly. Check all the wire joins if the joins are secure and solid.
- Dog is escaping in some area. Walk along the boundary with the collar. Find the signal weak spot and fix the wire in that area.
- The dog is getting closer to the wire. Adjust the boundary width control, test the activation zone with the collar and collar test light tool
Dog Fence Transmitter Problem
Short loop test. Use about 20 metres of wire to do a smaller loop. Turn the boundary width control to Min and test the wire with the collar. Adjust the boundary width control while testing the signal strength. If the signal is not consistent, please contact DogMaster Trainers Support Line: AU: 07 5559 9100, NZ: (07) 855 4799.
[xyz-ips snippet=”download-snippet”]