![]()
THERMO-BRACE®, TAPES, AND FLASHINGINSTALLATION GUIDE
BARRICADE PRODUCTS
THERMO-BRACE®
 |
 |
| Thermo-Brace structural sheathing provides rocking resistance and may be used as an alternative corner bracing method with structural ratings equivalent or better than OSB. | An all-in-one, insulated, structural, AWRB solution, Thermo-Brace Sig is the ultimate defense against the elements. Versatile. lightweight and superior in strength to 058, Thermo-Brace S.J.B. combines the insulative power of BASF Aleopor‘’ GPS with the strength and rocking resistance of Barricade Thermo-Brace to deliver the toughest insulation solution on the market. |
FLASHING
 |
A high-performance, asphalt-based window, and door flashing tape designed to provide a permanent, weather-tight seal to protect from moisture, leaks. and air penetration. |
 |
Our top-of-the-line flushing tope offers the ultimate protection for windows and doors. The 100% butyl rubber adhesive creates a permanent, flexible, weatherproof seal, while the UV inhibitors protect against the sun’s harmful rays. |
 |
A highly stretchable flashing tape with on aggressive. slower-acting butyl rubber adhesive that conforms around radii and corners while providing maximum protection from water intrusion. |
 |
Extremely aggressive. sell- adhering flashing membrane designed to protect windows and doors from moisture penetration. |
 |
Precut Barricade Sill Corners provide a quick easy. and economical seal at transitions between building envelope components. |
ADDITIONAL MATERIALS
 |
A thin, strong film-coated tape with a cold-weather adhesive system for added protection against energy-robbing air infiltration and exterior moisture penetration. |
 |
The perfect partner to Barricade tapes — a flexible, waterproof, door and window caulk for framework and joints. |
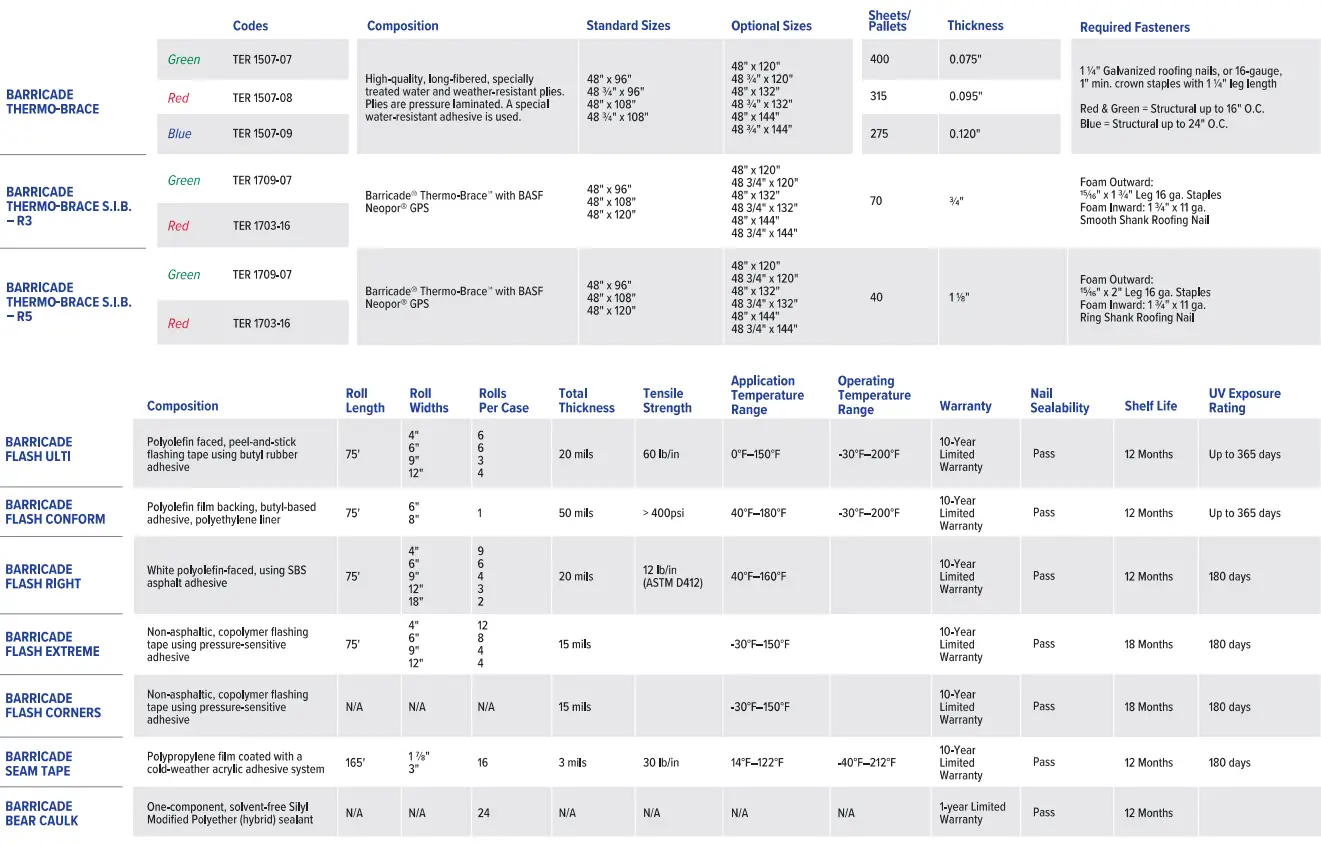
SPECIFICATIONS OVERVIEW
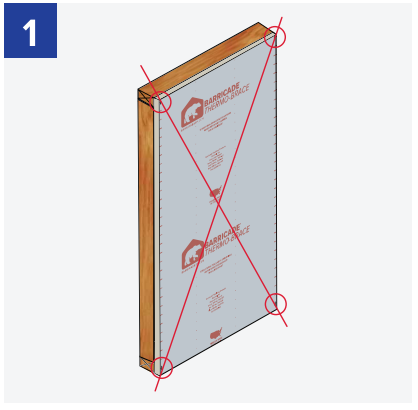
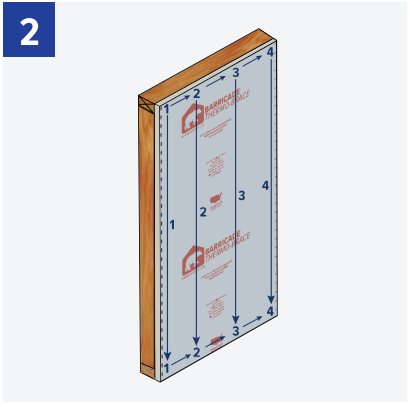
THERMO-BRACE INSTALLATION
FORBARRICADE® THERMO-BRACE®BARRICADE®THERMO-BRACE S.I.B. -R3BARRICADE® THERMO-BRACE S.I.B. – R5
 |
 |
 |
 |
| DO NOT fasten the four corners first. In order to prevent gaps or rippling, it’s important to move horizontally, from one side of the panel to the other, when installing. | Starting at the top left of the panel, begin fastening from top to bottom following the printed fastener schedule (every 3″). | Moving across the panel, attach fasteners at the top and bottom of the panel until you reach the next stud. (Note: when using staples, it’s important to fasten them in a parallel direction to the stud.) | Fasten panel in numerical order repeating the procedure described in steps 2 and 3. Continue until the Thermo-Brace panel is properly secured to the frame. |
SEAMS & JOINTS48″ sheets should have a slight gap of approximately 1/8″ between panels at the seams. 48 3/4″ sheets are to be overlapped 3/4″.For use as a water-resistive barrier (WRB) noted in IRC section R703.2 and IBC section 1404.2, use Barricade “° Seam Tape on joints and seams. Overlapped seams do not require tape for use as a WRB.FOR THERMO-BRACE S.I.B.Weather-resistant barrier on both sides allows for install with foam side in or out.R3 Foam Outward: 15/16″ x 1 3/4″ Leg 16 ga. Staples Foam Inward: 1 3,4″ x 11 ga. Smooth Shank Roofing NailR5 Foam Outward: 15/16″ x 2″ Leg 16 ga. Staples Foam Inward: 1 3/4″ x 11 ga. Ring Shank Roofing Nail
FLASHING TAPE INSTALLATION
FORBARRICADE® FLASH RIGHTBARRICADE® FLASH ULTlBARRICADE® FLASH CONFORMBARRICADE® FLASH EXTREME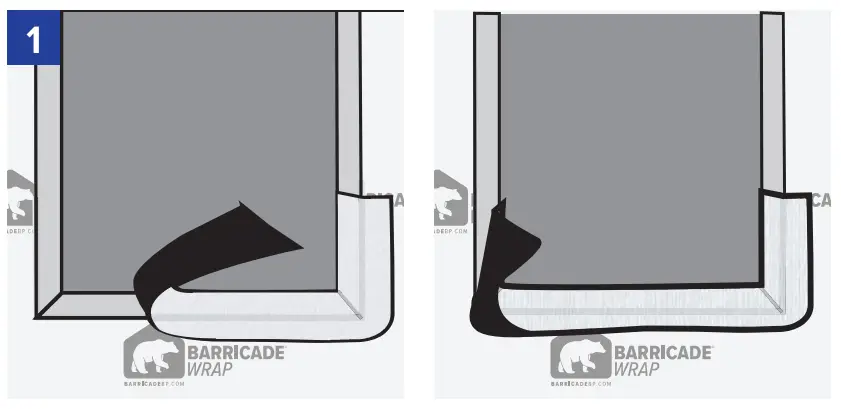
NOTE:If a WRB will be applied after the window and flashing have already been installed, be sure not to fasten the lower edge of the flashing so that the WRB may be slipped underneath the flashing in weatherboard or shingle lap fashion (i.e., top layer overlapping bottom layer).
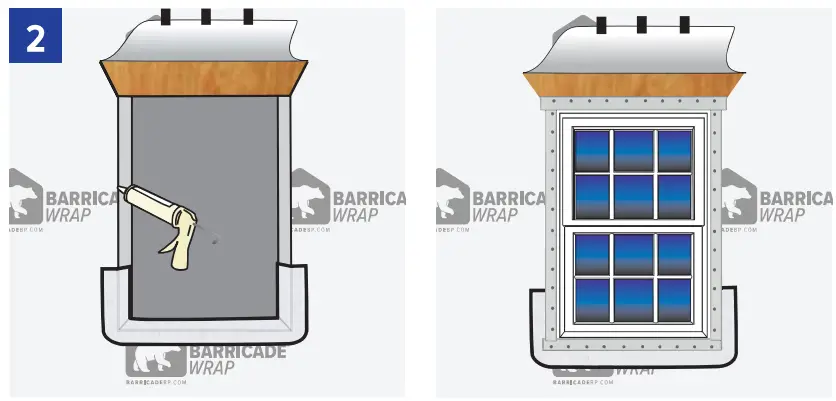
BARRICADES FLASHINGPrepare sill flashing by cutting Barricade Flash Conform at least 12″ longer than the width of the rough opening. Install sill flashing by removing the release paper, centering sill flashing on the sill framing stud, and adhering into a rough opening. The back edge of Flash Conform should extend to the inside edge of the sill framing stud and at least 6″ up each jamb framing stud. (Sill flashing should not wrap onto the inside of the wall.) DO NOT stretch material along the sill or jamb. When house wrap or conventional building paper is used as a weather-resistive barrier (WRB) over wall sheathing prior to the window and flashing installation, Flash Conform should be applied over the WRB after it has been properly cut and folded in and around the window rough opening.
WINDOW AND DOOR INSTALLATION
Before installing the window, either (A) apply a continuous bead of sealant to the backside (interior) of the mounting flange near the outer edge, or (B) apply a continuous seal to the rough window opening at a point to assure contact with the backside (interior) of the mounting flange. DO NOT caulk along the bottom. Install window according to manufacturer’s installation procedures. Use of Barricade Bear Caulk is recommended.
SIDE JAM FLASHING
Utilizing a roller to provide firm, consistent pressure, apply Barricade window flashing along vertical sides of the opening. Flashover the side window flanges. Extend the flashing a minimum of 3″ beyond the sill flashing already in place and extend the flashing you’re using a minimum of 3″ beyond the top of the opening so that it projects beyond the head flashing to be applied later.

HEAD FLASHING
Affix the bottom of the head flashing over the mounting flange. Be sure to extend the flashing beyond each jamb flashing. Secure in place by applying pressure. Unattached house wraps and apply overhead flashing as shown. Tape all seams and joints.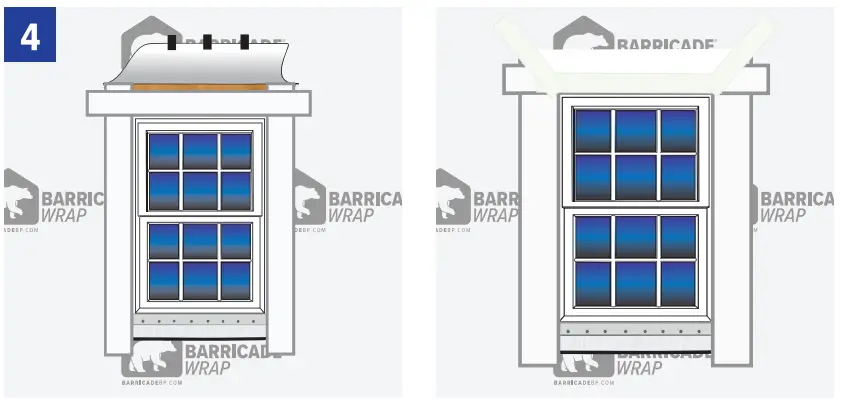
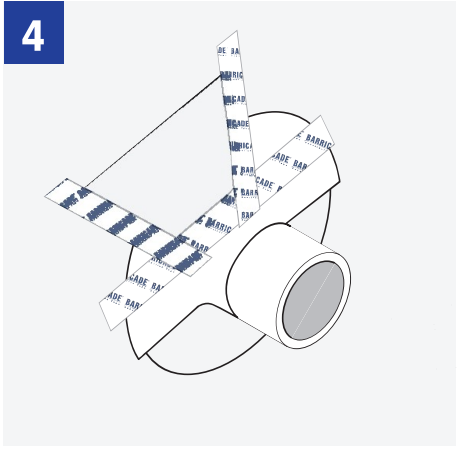
CIRCULAR WINDOWS
Follow the above instructions for proper installation pro to head flashing installation. Install circular-top windows according to window manufacturers’ installation guidelines, then follow the instructions below to complete the process.Measure the circular portion of the window and add 12″ to this number. Cut flashing to this length for the head flashing. Remove approximately 20″ of release paper and position flashing tightly along the first edge of the round window; press firmly into place.
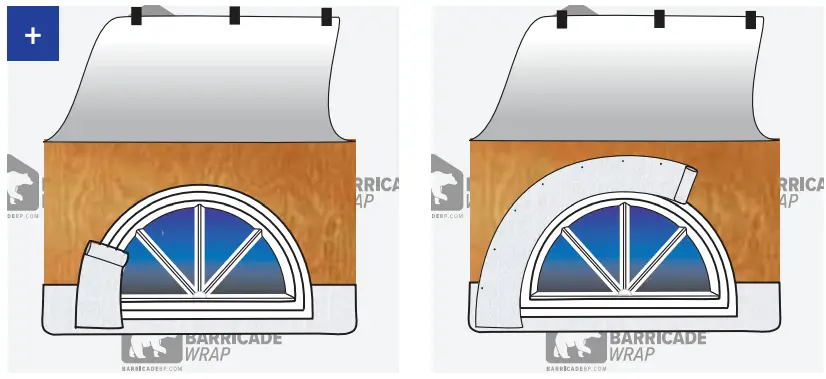 Continue removing release paper and conform Barricade Flash Conform along an entire circular portion of the window. Use Barricade Seam Tape or mechanical fasteners (i.e. nails, staples, or screws) to temporarily hold the top edge of the head flashing to the wall. Flash Conform’s adhesive bond will strengthen over time. Both ends of head flashing should overlap jamb flashings by at least 6″.Note: This recommendation refers to the most commonly used types of windows (surface mounted). For other types of frames, special attention should be paid to window manufacturer instructions.

FLASHING CORNERS
FOR
BARRICADE®FLASH CORNERS
PREPARATORY WORKA spray adhesive, such as Nashua 357, is recommended when Barricade Flash Corners are applied directly to Oriented Strand Board (OSB) or other surfaces where additional adhesion is needed or required.
 |
 |
 |
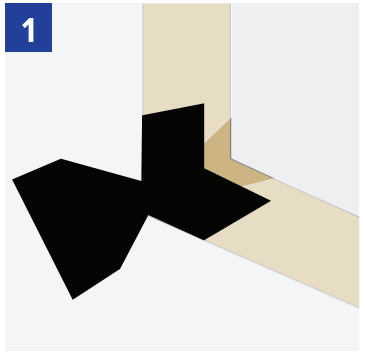
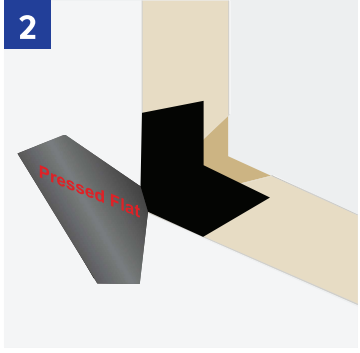
| Peel back paper-release liner and discard. Adhere square-edged side of Barricade Flash Corners to a front, inside sill corner. Ensure the front edge of the material is flush with the front edge of the window opening. | Smooth the dove-tailed edge of the Flash Corners over the sill and adhere to the vertical wall face. Make certain any bubbles or wrinkles are smoothed out. | Repeat Steps 1-3 for the other corner of the window. Overlap the horizontal flanges of Barricade Flash Corners with a measured piece of Barricade Flash Ulti or Barricade Flash Extreme window flashing. Hash the remaining portion of the window per the building code. |
IMPORTANT TO NOTEAvoid contact with residual asphaltic products (mastics or primers), such as coatings and other roofing products. 15-pound felt paper or building paper may be used with Barricade Flash Corners. Make sure overlaps are in the direction of moisture drainage
FLASHING PENETRATIONS
WHEN INSTALLED UNDER THE HOUSE WRAP
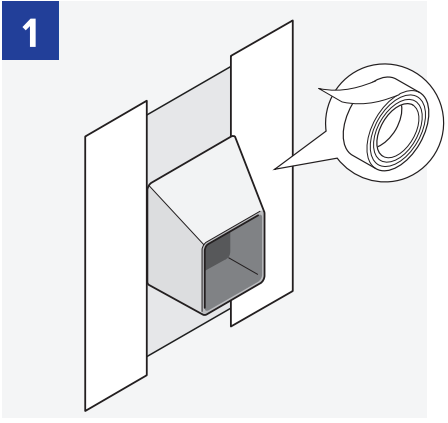
SQUARE PENETRATION
 |
 |
 |
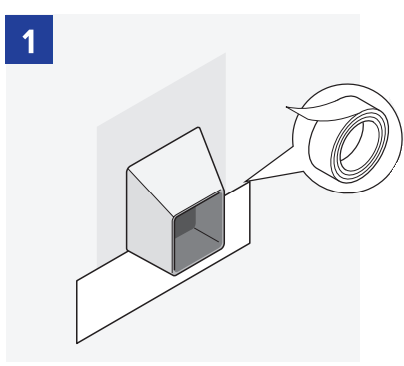
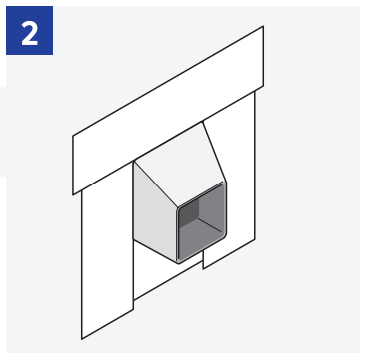
| Apply to flash to the bottom of the penetration. We recommend using Barricade Flash Ulti, Barricade Hash Extreme, or Barricade Hash Right. | Apply flashing along the sides and then the top, shingling each layer. | Use a roller to apply even pressure along with the flashing, being sure to push out any air pockets that may have appeared. Barricade suggests finishing with Barricade Bear Caulk commercial sealant to ensure a tight seal around the edges of the penetration. |
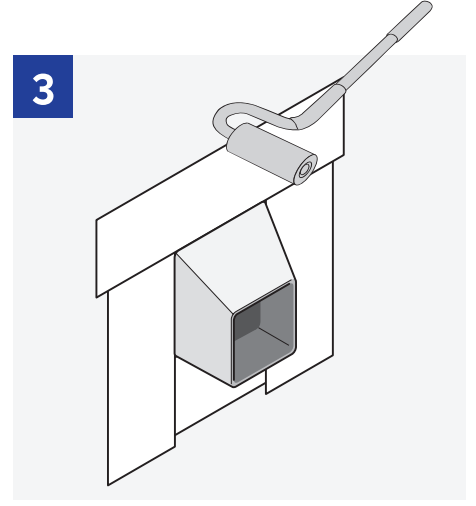
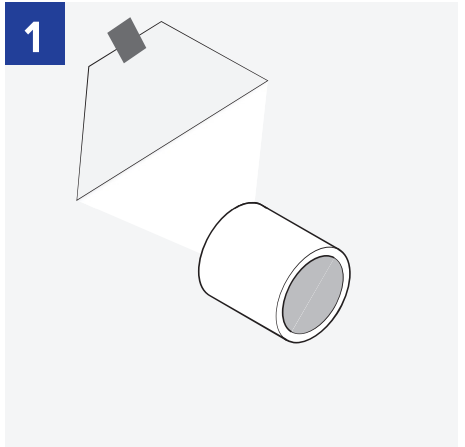
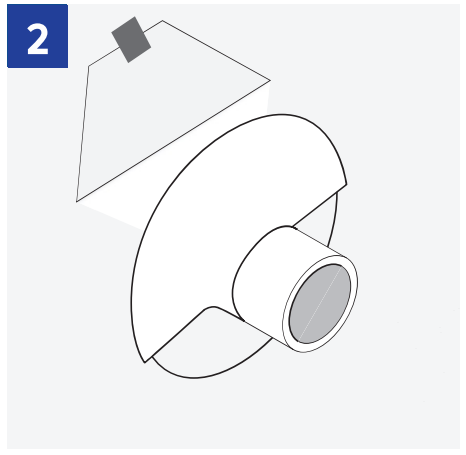
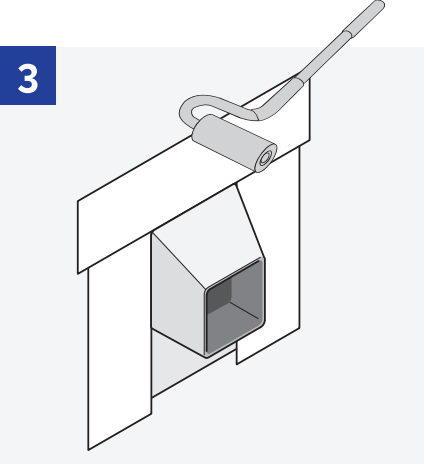
ROUND PENETRATION
 |
 |
 |
 |
| Cut two 45° angles and peel back house wrap above the penetration.Tip: Use Barricade Seam Tape to hold the flap up while not in use. | Apply Barricade Flash Conform to the underside of penetration, shingling the above side after. Use a roller to apply even pressure along with the flashing. | Replace house wrap flap over the flashing and tape across using Barricade Seam Tape. | Tape over the 45° cuts using Barricade Seam Tape. |
FLASHING PENETRATIONS
WHEN INSTALLED OVER THE HOUSE WARP
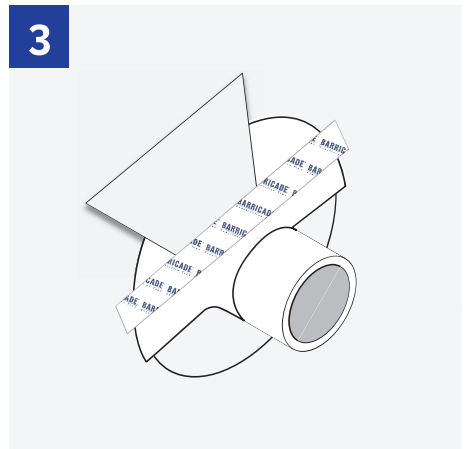
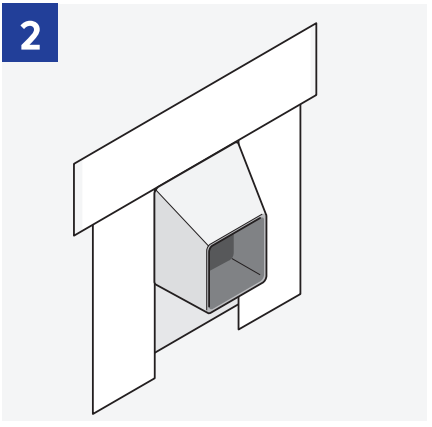
SQUARE PENETRATION
 |
 |
 |
| Apply flashing along the sides first, leaving the bottom unflashed. We recommend using Barricade Flash Ulti, Barricade Flash Extreme, or Barricade Flash Right. | Next app y flashing over the top, shingling the side flashing. | Use a roller to apply even pressure along with the flash ng, being sure to push out any air pockets that may have appeared. Barricade suggests finishing with Barricade Bear Caulk commercial sealant to ensure a tight seal around the edges of the penetration. |
OTHER DETAILS:
All installation instructions and procedures contained within this brochure are recommended by Barricade Building Products and should be followed. Failure to follow these instructions and procedures may compromise the integrity of the product and impact its performance.All Barricade Building Products are manufactured to meet the full intent of all applicable building codes and their governing bodies.Barricade Thermo-Brace is a weather-resistive barrier (WRB) designed to provide a secondary line of defense against bulk water penetration. It is not designed or intended for use as a primary waterproofing membrane.Wind-driven rain can penetrate exterior sidings/cladding such as vinyl, wood, brick, aluminum, hardboard, cementitious, etc. Vinyl and aluminum siding is manufactured with built-in weep holes to allow proper drainage of water that gets past it. Wood, hardboard, and brick exteriors are porous, allowing water to be absorbed into them. Most brick facades also have weep holes built into the wall system to promote water drainage.Any rips, tears, breaks, holes, etc. that happen during normal construction should be repaired by taping or patching. Other holes, gaps, or cracks created in the exterior wall around items such as faucets, dryer vents, electrical outlets, etc. should also be properly taped, flashed, and sealed. Any of these occurrences that go unrepaired will diminish the product’s performance and contribution to the overall water-resistance of the wall system.It’s always a wise construction practice to use and integrate properly installed flashings around all window and door openings as well as other exterior penetrations as part of an overall design strategy to control moisture movement and transport. Please contact your builder or Barricade Building Products for more details.The information contained in this installation guide is to the best of our knowledge, true and accurate and is presented in good faith. Barricade Building Products assumes no liability, expressed or implied as to the architecture, engineering, or workmanship of any project. This information may be concurrent with or superseded by other applicable documents.Contact Barricade Building Products for further information or technical support at 877-832-0333.
![]()
BARRICADE INSTALLATION GUIDE: THERMO-BRACE / FLASHING BARRICADEBP.COM©2020 BARRICADE BUILDING PRODUCTS
[xyz-ips snippet=”download-snippet”]