![]()
X3 SeriesUser ManualX3 ClassicX3 SportX3R

ATTENTION: Please follow all assembly instructions. READ the instructions carefully to understand the operating procedures BEFORE you run your caddy.
PACKING LIST
X3 Classic & X3 Sport
- 1 Caddy Frame (including Front Wheel Set)
- 2 Rear Wheels (Left & Right)
- 1 Battery, Battery Carry Bag, Battery Lead, Battery Charger
- 1 Tool Kit
- Operational Guide, Battery Care Instructions
- User Manual, Warranty, Terms & Conditions
X3R
- 1 Caddy Frame (including Front Wheel Set)
- 1 Anti-Tip Wheel & Pin
- 2 Rear Wheels
- 1 Battery, Battery Carry Bag, Battery Lead, Battery Charger
- 1 Charger
- 1 Tool Kit
- 1 Remote Control (2 AAA Batteries included)
- Operational Guide, Battery Care Instructions
- User Manual, Warranty, Terms & Conditions
NOTE:This device complies with part 15 of the FCC Rules and with Industry Canada license-exempt RSS standard(s). Operation is subject to the following two conditions:
- This device may not cause harmful interference, and
- this device must accept any interference received, including interference that may cause undesired operation.
NOTE: THE MANUFACTURER IS NOT RESPONSIBLE FOR ANY RADIO OR TV INTERFERENCE CAUSED BY UNAUTHORIZED MODIFICATIONS TO THIS EQUIPMENT SUCH MODIFICATIONS COULD VOID THE USER’S AUTHORITY TO OPERATE THE EQUIPMENTBat-Caddy X3RFCC ID: QSQ GC827322IC ID: 10716A
PARTS GLOSSARY
X3 Classic, X3 Sport
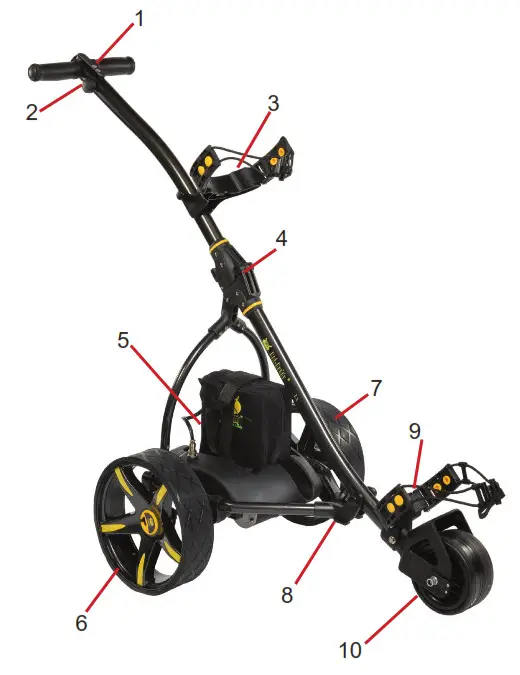
| 1. T- Handle w/power button2. Speed control dial (Rheostat)3. Upper bag support (bungee pigtails)4. Frame locking hinge5. Battery w/Bag & Lead(Charger not pictured) | 6. Rear wheel (Right)7. Rear wheel (Left)8. Lower frame connector9. Lower bag support(bungee pigtails)10. Front-wheel assembly(w/ Tracking Adjustment & Quick Release Axle) |
X3R
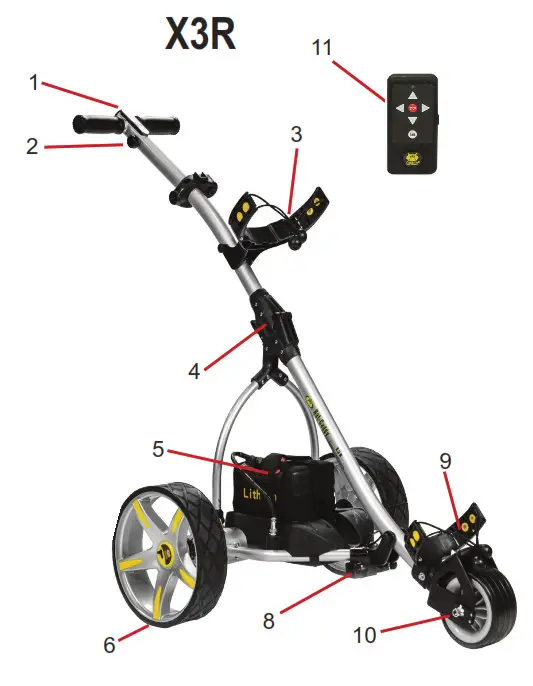
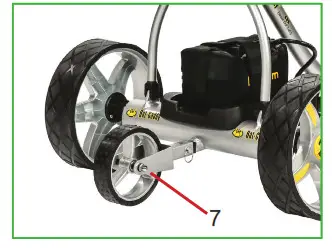
| 1. T-Handle w/power button2. Speed control dial (Rheostat)3. Upper bag support (bungee pigtails)4. Frame locking hinge5. Battery w/Bag & Lead(Charger not pictured)6. Rear wheels7. Anti-tip wheel & Pin | 8. Lower frame connector9. Lower bag support(bungee pigtails)10. Front-wheel assembly(w/ Tracking Adjustment & Quick Release Axle)11. Remote controltransmitter |
ASSEMBLY INSTRUCTIONS
X3 Classic, X3 Sport, X3R
There is a video on how to assemble your X3 Series cart on our website (support.batcaddy.com)
- Unpack all items carefully and check inventory. Place frame structure (one piece) on soft clean ground to protect the frame from being scratched.
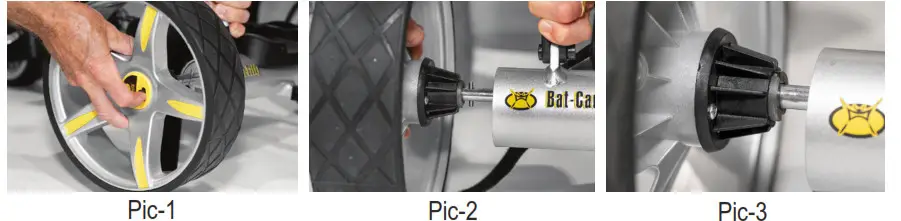
- Attach rear wheels to axles by sliding the locking lever on the wheel hub to the right, opening the internal lock. Insert the axle into the wheel. Make sure to keep the locking lever in the open position during this process (Pic-1). Then insert the axle all the way onto the wheel (Pic-2). Align the axle pins so they fit into the inner core of the wheel (Pic-3). Release the lever and let the wheel lock into the groove on the front of the axle to secure it in place. If not locked in, the wheel will not be connected to the motor and may come off. Test the lock by trying to pull the wheel out. To disassemble the wheels, proceed in reverse order.
 ATTENTION:X3 Classic & X3Make sure that the right wheel (marked R) is attached to the right side and the left wheel (marked L) to the left side (seen from behind the cart in the driving direction), as the wheels have built-in one-way clutches. The caddy will not move if the wheels are not on the proper side.
 - Erect the frame by first unfolding the u-shaped frame piece (Pic-4). Bring up the frame piece with the main hinge attachment and first attach the bottom of the hinge to the outside of the pin on the top of the u-shape frame (Pic-5). Open the top frame and using the hinge lever, attach it to the inside of the pin locking the entire joint together (Pic-6). Proceed in reverse for folding the caddy.X3R only
- Insert Anti-tip Wheel into the frame holding bar and secure it with a pin.
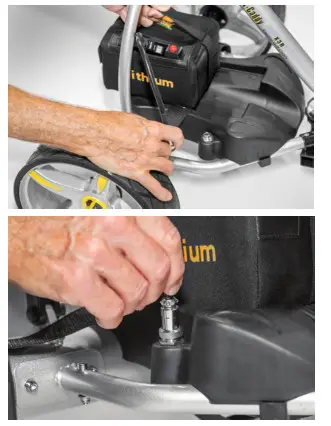
- Place the battery pack on the battery tray and tightly fasten the Velcro strap around the battery. Insert the 3-prong battery plug into the caddy outlet so the notch aligns properly. It is recommended that you DO NOT fasten the screw on the plug to the outlet, so in case of tip-over, the cable can unplug from the socket.NOTE: Before connecting make sure that the speed control dial (rheostat) on the handle is in the OFF position!X3R Only
- Unpack remote control and install batteries with plus and minus poles as indicated in the diagram in the receiver compartment of the unit.
 ATTENTION:X3 Classic & X3Make sure that the right wheel (marked R) is attached to the right side and the left wheel (marked L) to the left side (seen from behind the cart in the driving direction), as the wheels have built-in one-way clutches. The caddy will not move if the wheels are not on the proper side.
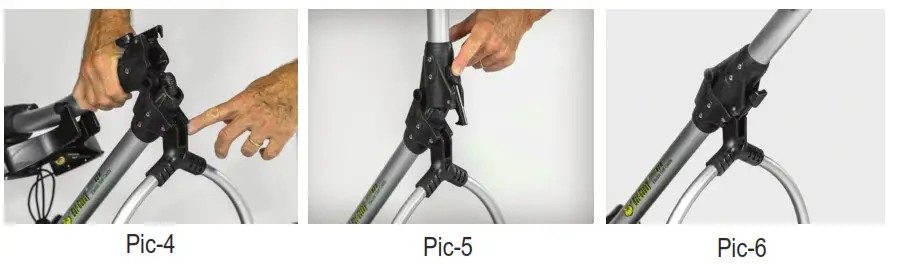 X3R only
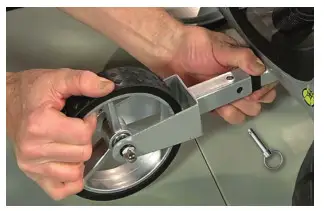
 X3R Only
OPERATING YOUR Bat-Caddy
Manual Controls (located on the upper handle)
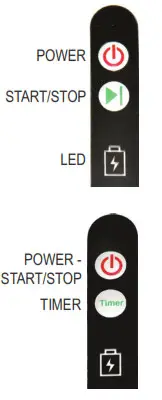
- Control Panel:A. Power Button – Holding down the button for 3-5 seconds will turn your Bat-Caddy on or off. A green/red LED light will turn on behind the battery icon (On Bat-Caddys equipped with a Timer Button, the Power Button also acts as the Start/Stop button)B Start/Stop Button – (on select models) Pushing the button while the Caddy is in motion will stop the Caddy. Pushing the button again will start the Caddy again and resume at the same speed when stopped.)*NOTE -This is not a parking brake. Caddys need to be properly angled when parking on slopes to keep them from drifting.C. Timer Button (on select models) – When your Bat-Caddy is stopped pressing this button once will advance the Caddy approximately 10 yards and it will stop on its own. Pressing the button twice will advance it 20 yards, and pressing 3 times will advance it 30 yards.
- Speed Control Dial: A. The dial on the side of the handle controls the forward speed of your Bat-Caddy. This dial should always be turned off prior to powering on yourCaddy. This is done by turning the dial counterclockwise until it clicks. Once you have powered on your Caddy, slowly turn the dial clockwise until the Caddy matches your preferred walking speed. Once your desired speed is set you can use the Start/Stop button as described above to stop and start your Caddy for the rest of the round. Speed can be adjusted on the fly at any time by turning the dial-up or down while in motion.
 A. The dial on the side of the handle controls the forward speed of your Bat-Caddy. This dial should always be turned off prior to powering on yourCaddy. This is done by turning the dial counterclockwise until it clicks. Once you have powered on your Caddy, slowly turn the dial clockwise until the Caddy matches your preferred walking speed. Once your desired speed is set you can use the Start/Stop button as described above to stop and start your Caddy for the rest of the round. Speed can be adjusted on the fly at any time by turning the dial-up or down while in motion.
Remote-Control
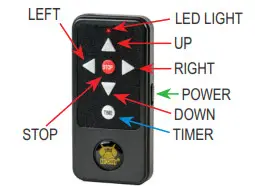
- POWER Switch: Slide up to turn on the Remote-Control. Slide down to turn off. It is recommended to turn the Remote-Control off when not actively operating your Caddy. This will avoid accidental button pushes when not paying attention to your Caddy.
- LED Light: Lights up when Remote-Control is turned on and a button is pushed. This indicates that the remote is sending a signal to the Caddy.
- STOPPING: The STOP button will stop the Caddy
- GOING FORWARD: Pressing the UP BUTTON while the Caddy is standing still will start the Caddy in forwarding motion. Pushing the UP BUTTON again will increase the Caddy’s forward speed one level. Your Caddy has 9 forward speeds. Pushing the DOWN BUTTON will lower the forward speed one level.
- GOING BACKWARD: Pressing the DOWN BUTTON while the Caddy is standing still will start the Caddy in reverse motion. Pushing the DOWN BUTTON again will increase the Caddy’ s reverse speed one level. Your Caddy has 9 reverse speeds. Pushing the UP BUTTON will lower the reverse speed one level.
- TURNING RIGHT: Press and hold the RIGHT BUTTON and the Caddy will turn to the right (from a stop and while in motion) until the button is released.
- TURNING LEFT: Press and hold the LEFT BUTTON and the Caddy will turn to the left (from a stop and while in motion) until the button is released.
IMPORTANT SAFETY NOTES:
- Your Bat-Caddy comes with an automatic shut-down feature to help prevent “run-away” Caddys when operating remotely. If the caddy does not receive a signal from the Remote-Control after the last button push for approximately 40 seconds, it will assume the caddy has lost contact and stop automatically. If this happens simply push any button on the remote control to resume operation.
- While the maximum range for your Bat-Caddy to receive a signal from your Remote- Control is 80-100 yards, this range is in perfect “laboratory” conditions. It is strongly recommended that you operate your Bat-Caddy at a maximum of 20-30 yards. This will help prevent any signal interference and/or loss of control.
SYNCHRONIZING YOUR REMOTE:
If your Bat-Caddy will not respond to your Remote-Control it may need to be resynchronized.A. Power off your Bat-Caddy for 5 seconds.B. Turn on your Remote-ControlC. Press and hold down the STOP button on the Remote-ControlD. Press and hold down the ON/OFF button on the Control Panel until the green LED light under the battery symbol begins to blink.E. Release both buttonsF. Your Caddy and Remote-Control are now synched and ready to go.
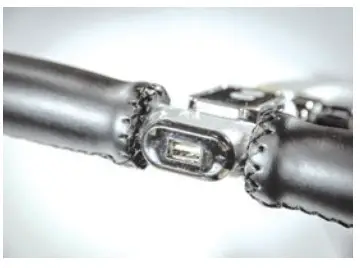
USB port is available for charging GPS and/or cell phones. It is located in the end cap of the upper frame above the handle control.
Additional Functions Tracking Adjustment:
The tracking behavior of all-electric caddies is strongly dependent on equal weight distribution on the caddy and slope/topography of the golf course. Test your caddy’s tracking behavior by operating it on an even surface without the bag.If changes are necessary, you can adjust the tracking of your caddy by loosening the front wheel axle and shifting the front wheel as needed. After adjustment, fasten screws in reverse order. Note: DO NOT over-tighten the nuts.Note: There is a video on our website (support.batcaddy.com) under “tech tips” that shows how to adjust tracking
MAINTENANCE
Testing Your Caddy
Test EnvironmentMake sure that you perform your first test of the caddy in a wide and safe area, free of obstructions or valuables, such as people, parked automobiles, flowing traffic, bodies of water (rivers, swimming pools, etc.), steep hills, cliffs or similar hazards.
Recommendations for Efficient and Safe Operation
• Be alert and act responsibly at all times while operating your caddy, just as you would when operating a riding cart, motor vehicle, or any other type of machinery. We absolutely do not recommend the consumption of alcohol or any other impairing substances while operating our caddies.• DO NOT operate the caddy carelessly or in narrow or dangerous places. Avoid using your caddy in places where people may gather, such as parking lots, drop-off areas, or practice areas, to avoid damage to people or valuables. We recommend operating your caddy manually in crowded areas with or without power. Please make sure to always switch off the power and secure the caddy when you are through or when not in use.
General Maintenance
All of these recommendations, along with common sense, will help keep your Bat-Caddy in top condition and ensure that it remains your reliable partner, both on and off the links.
- The Bat-Caddy has been designed so that the user can concentrate on playing golf, while the caddy does the work of carrying your bag. In order to keep your Bat-Caddy looking its best, wipe any mud or grass from the frame, wheels, and chassis after every round using a damp cloth or paper towel.
- NEVER use water hoses or high-pressure jet washers to clean your caddy to prevent moisture from entering the electronic systems, motors, or gearboxes.
- Remove the rear wheels every few weeks and clean out any debris that may cause the wheels to drag. You may apply some lubricant, such as WD-40, to keep moving parts smooth and corrosion-free.
- A 4 to 5 hour round of golf played once a week for 12 months is equivalent to approximately four years’ use of a lawnmower. Thoroughly inspect your cart at least once a year, and if you notice any symptoms of wear, contact your Bat-Caddy Service Center. Alternatively, you can have your caddy inspected and tuned at our Service Centers, so it’s always in great shape for the new season.
Note: Bat-Caddy reserves the right to modify/upgrade any components during a model year, so illustrations on our website, brochures, and manuals may slightly vary from the actual product shipped. However, Bat-Caddy guarantees that specifications and functionality will be always equal to or better than the advertised product. Promotional accessories may also vary from illustrations shown on our website and other publications.
TROUBLESHOOTING GUIDE
| Caddy does not have power | • Make sure battery is plugged correctly into the cart• Make sure battery is sufficiently charged• Depress and hold power button for at least 5 seconds• Make sure battery leads are connected to proper poles (red on red & black on black)• Make sure the power button is an engaging circuit board (you should hear a click) |
| Motor is running but wheels don’t turn | • Check if wheels are attached correctly. You should not be able to pull off the wheel• On X3C/X3S Check right and left wheel positions. Wheels must be on the correct side• Check connection between controller and motor• Check if wheels are secured to axle by an axle pin• Check right/left wheel clutches |
| Caddy pulls to left or right | • Check if the wheel is fitted over clutch & latched to axle• Check if axle pin is visible at both sides of the axle• Check clutch: turn freely in one direction only• Check to track on level ground• Check weight distribution in a golf bag |
| Battery/Caddy lacks power | • Check cable connections• Check battery charge• Check charger function |
| Problems attaching wheels | • Make sure you are holding the spring clip down• Sand and smooth axle with Emery cloth to remove excess paint or burrs |
CUSTOMER SERVICE AND TECHNICAL SUPPORT
![]()
Call/text us at (888) 229-5218 or email us at [email protected]
SPECIFICATIONS
Series 3 Features
| X3 Classic | X3 Sport | X3R | |
| One-Click Locking Frame | ✓ | ✓ | ✓ |
| Dual 200w Quiet Motor | ✓ | ✓ | |
| Dual 200w Quiet Motor | ✓ | ||
| Simple Handle Operation | ✓ | ✓ | ✓ |
| Speed-Recall Cruise Control | ✓ | ✓ | ✓ |
| Fully Directional Remote Control | ✓ | ||
| Battery Level Indicator | ✓ | ✓ | ✓ |
| USB Charging Port | ✓ | ✓ | |
| Single Anti-Tip Wheel (Upgradeable to Dual) | ✓ | ||
| Dual Anti-Tip Wheel “The Mountain Slayer” | |||
| Power-off Freewheel | ✓ | ✓ | ✓ |
| Auto-Timed Distance Control | ✓ | ✓ | |
| Downhill Speed Control | ✓ | ||
| Seat Compatible | ✓ | ✓ | ✓ |
 report this ad
Weight & Measurements
| X3 Classic / X3 Sport | X3R | |
| Open Dimensions | Length: 42 .0” Width: 22.3”Height: 39.8” | Length: 42 .0”Width: 25.5”Height: 37.5” |
| Folded Dimensions | Length: 30.0”Width: 22.3”Height: 15.3” | Length: 37.0”Width: 25.5”Height: 13.5” |
| Shipping Box Dimensions | Length: 36.0”Width: 21.0”Height: 13.0” | Length: 34.0”Width: 24.0”Height: 14.0” |
| Weight (Excluding Battery & Accessories) | 19.0 Lbs | 22.4 LBS |
References
[xyz-ips snippet=”download-snippet”]