Battery Power Solution SV2-A10 Freedom V2 CPAP Battery Kit for ResMed Air10 User Manual
The Freedom v² CPAP Battery is an external lithium-ion battery that powers positive airway pressure (PAP) devices and portable electronic devices like cell phones and tablets when AC power is unavailable.
Please read this manual carefully before using your Freedom V² CPAP Battery for the first time and observe all safety warnings.
If you have any questions regarding the use of your Freedom V2 CPAP Battery or any other Battery Power Solutions product please contact us at 1-877-445-5228 or [email protected].
Package Contents
The Freedom v² CPAP Battery comes packaged in a variety of kits that include the output cables required to connect the battery to specific PAP device models. These kits will include the following items:
ResMed Air 10 Series Kit {Model: SV2-A10}

- Freedom V² CPAP Battery
- Air 10 Output Cable
- fits AirSense & AirCurve 10 devices
- User ManualThe Air 10 power supply is used to charge the Freedom v² battery and connects directly to the DC IN port of the battery.
ResMed AirMini Travel CPAP Kit {Model: SV2-AM}

- Freedom v² CPAP Battery
- AirMini Output Cable
- AirMini Power Supply Adapter (charge adapter)
- User ManualThe AirMini power supply is used to charge the Freedom v² battery and connects to the battery via the Power Supply Adapter.
ResMed S9 Series Kit {Model: SV2-S9}
- Freedom v² CPAP Battery
- S9 Output Cable
- S9 Power Supply Adapter (charge adapter)
- User ManualThe S9 power supply is used to charge the Freedom V² battery and connects to the battery via the Power Supply Adapter.
Respironics DreamStation Kit {Model: SV2-DS}
- Freedom V² CPAP Battery
- DreamStation Output Cable
- also fits System One 60 Series devices
- User ManualThe DreamStation or System One 60 Series power supply is used to charge the Freedom v² battery and connects directly to the DC IN port of the battery.
150W Sine Wave Power Inverter Kit {Model: SV2-INV}
- Freedom v² CPAP Battery
- 150W Sine Wave Power Inverter
- Mobile Power Receptacle
- Freedom V² Power Supply
- User ManualThe included power supply is used to charge the Freedom V2 battery and connects directly to the DC IN port of the battery.
Battery + Bridge Cable Kit {Model: FDV2}
- Freedom V² CPAP Battery
- Battery Bridge Cable
- User Manual
IMPORTANT: No PAP device connection cables or charging cables are included in this package. The Battery + Bridge Cable Kit is intended as an add-on battery (to bridge two batteries together for longer run times) or as a replacement battery for an existing Freedom v² CPAP Battery Kit.
Charging Accessories (sold separately)
Keep the Freedom v² battery charged up even when AC power is not available. Visit www.batterypowersolutions.net for more information .
- Solar Charging
 Freedom 50W Solar Panel (Item: SP50)
 - Auto ChargingAuto Charge DC Cable (Item: DC.CABLE-V2)
- Auto Charging150W Power Inverter (Item: INVERTER)
Compatibility
Variable voltage output and DC/DC soft switching technology allow the Freedom V² battery to power most common PAP devices as the voltage output is determined by the power path of the DC output cable.
Battery Power Solutions manufactures DC output cables to fit the most common PAP device models. All other models connect to the battery using the 150W Sine Wave Power Inverter.
The original Freedom CPAP battery and its output cables and power supply ARE NOT compatible with the Freedom V² CPAP battery.
Average Run Times
Many factors can affect how long the Freedom V² battery will power your PAP device, including, but not limited to the device type, pressure setting, your mask fit, and the use of heated humidification or tubing.
Using heated humidification and/or heated tubing will significantly reduce expected run times by up to two thirds in most cases and in some cases could prevent the battery from being able to power your PAP device. For optimal battery performance you should disable or detach your humidifier and heated tubing.
- Listed run times are based on standard CPAP devices without heated humidification or heated tubing on a pressure setting of 10 cm/H20. For specific PAP device run times visit www.batterypowersolutions.net.
Safety Features
- Battery Management Unit (BMU) provides internal protection against thermal runaway (overheating), over voltage, under voltage, over current, over charging, over discharging, and short circuiting.
- Aluminum alloy shell offers maximum cell protection and durability.
- Meets FAA requirements (< 100 Wh) for lithium-ion batteries taken in carry-on baggage during air travel.
- The Freedom V2 CPAP Battery has been UN 38.3 certified, meets UL2056 testing standards, and all current safety regulations and shipping requirements.
Safety Warnings
The following safety warnings are to be followed at all times!
- Do not drop, hit, crush, or otherwise cause any impact damage to the battery as this may result in exposure of the cell contents.
- Do not expose the battery to open flames, heaters, incineration or other extreme heat (> 104°F) including long term exposure to direct sunlight, as this may result in a hazardous reaction.
- Do not expose the battery to moisture of any type.
- Do not disassemble or attempt to repair the battery or any charging or connection components supplied by Battery Power Solutions as there are no user-serviceable parts inside.
- Do not charge the battery on any highly flammable surface.
- Do not use the battery with a device that requires higher amperage than the output of the battery (> 8A) as this may result in the battery shutting off to protect from overheating.
- Regularly inspect the battery ports, connection cables and any other components for damage or signs of wear. Do not use the battery if it is damaged or has been modified.
Warranty & Usage Disclaimer
- Battery Power Solutions products are under warranty for quality and manufacturing defects for 1 (one) year. This warranty does not cover damages resulting from modification of or improper use of the product that is not consistent with the instructions provided with the product.
- By purchasing, using or possessing any Battery Power Solutions product, you agree to hold harmless Battery Power Solutions, its subsidiaries, affiliates, owners, officers and employees from any and all claims or liability for any damage to any property or injury, illness or death of any person when such damage, injury, illness or death shall be caused in whole or in part from use of the product(s).
Control Board

- A: DC IN Port (charging port)
- B: Charge Level/Reset Button
- C: Digital Display Screen
- D: USB OUT Port (Quick Charge 3.0)
- E: DC OUT Port (DC output cable port)
- On/Off: The battery turns on or off automatically when a device is connected to or disconnected from the DC OUT or USB OUT ports. When not in use we recommended that you disconnect all devices from the battery to allow the battery to completely shut down.
- USB Port: When you connect a device to the USB OUT port you must press the charge level/reset button to initiate power output.
- Display Screen: Pressing the charge level/reset button illuminates the digital display screen for a few seconds.
- Resetting the Battery: Press the charge level/reset button for a full 10 secs. The display screen will flash two dash marks. Release the button and wait until the screen goes blank for the battery to reset.
Battery Charging
The Freedom v² battery is designed to be charged using your PAP device original power supply or the Freedom v² power supply.
Your PAP device power supply will either connect directly to the battery or via a Power Supply Adapter included in the battery kit (see pages 1-2).
Battery charge times are based on the wattage of the power supply being used: 2-3 90W I 3-4 60W I 8-9 20W
- charge times are when the battery is fully depleted (0%)
Accessories are also available to charge the Freedom V² battery in a vehicle or by using solar power (see page 3),
General Notes & International Charging
- It is normal for the power supply and the battery to be slightly warm to the touch during the charging process.
- The digital display screen will show the charge level of the battery. Press the charge level/reset button to illuminate the screen.
- When the battery is at 0% it may take some time before the display screen begins to show a charge level during which time the screen may flash.
- If the display screen flashes but does not show a charge level then disconnect the power supply, press the charge level/reset button and then reconnect the power supply to resume charging.
- When charging is complete disconnect the power supply from the wall outlet and the battery.
- If the power supply being used to charge the Freedom v² battery accepts current from 100-240V AC and 50/60 Hz then only an electrical adapter plug is needed to charge in any country.
Single Battery Charging
- Plug the power supply into the battery DC IN port and then into the wall outlet to begin the charging process.
- If a Power Supply Adapter is required, plug it into the battery DC IN port and then into the PAP device power supply.
Dual Battery Charging
Two batteries may be bridged together for charging; however, they will not charge simultaneously. As shown in the image below, battery B will charge first and then battery A will begin charging.
To begin the dual charging process battery A must be charged to at least 15%. Battery B can be at any charge level including 0%.
Depending on the power supply being used, it is normal for the digital display screen of the batteries to read separate and different voltages. This is due to the voltage output of the Bridge Cable used to connect the two batteries together.
- Plug the power supply into the DC IN port of battery A. The charge level of this battery must be ≥ 15%.
- If a Power Supply Adapter is required, plug it into the DC IN port of battery A and then into the PAP device power supply.
- Plug the Bridge Cable into the DC OUT port of battery A then into the DC IN port of battery B.
- Plug the power supply into the wall outlet to begin charging.
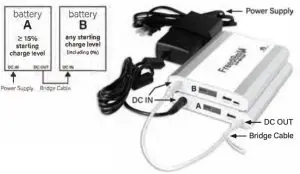 Example image shown with ResMed AirSense 10 power supply.
Standard Connection: Output Cable
The most common PAP device models will connect to the Freedom v² battery using a unique Output Cable included in your battery kit.
Once the Output Cable is connected to your PAP device it should begin receiving power. When not in use we recommend disconnecting your device from the battery to allow the battery to completely shut down.
Using heated humidification and/or heated tubing will significantly reduce run times. For optimal battery performance disable and/or detach your humidifier and heated tubing!
Single Battery Connection
- Plug the Output Cable into the battery DC OUT port and then into the power inlet port of your PAP device.
Dual Battery Connection
To increase your PAP device run time, you can connect two batteries together using the Bridge Cable that is included in the Freedom v² CPAP Battery box (Model: FDV2).
The batteries do not discharge simultaneously. Battery A will start to power your PAP device first (discharge) and once it has depleted then battery B will begin powering your device.
- Plug the Bridge Cable into the DC IN port of battery A and then into the DC OUT port of battery B.
- Plug the Output Cable into the battery DC OUT port and then into the power inlet port of your PAP device.
Note: Depending on the PAP device being powered, it is normal for the digital display screen of the batteries to read separate and different voltages. This is due to the voltage output of the Bridge Cable.
Example images shown with ResMed AirSense 10 CPAP device and Air 10 Output Cable.
Single Battery
Dual Battery
Standard Connection: Power Inverter
PAP device models that do not connect to the Freedom v² battery via a unique Output Cable will connect using the Mobile Power Receptacle and 150W Sine Wave Power Inverter (Power Inverter).
Once your PAP device is connected to the battery it should begin receiving power. When not in use we recommend disconnecting your device from the battery to allow the battery to completely shut down.
Using heated humidification and/or heated tubing will significantly reduce run times. For optimal battery performance disable and/or detach your humidifier and heated tubing!
Single Battery Connection
- Plug the Mobile Power Receptacle into the battery DC OUT port.
- Plug the Power Inverter into the Mobile Power Receptacle.
- Plug your PAP device power supply/cord into the Power Inverter.
Dual Battery Connection
To increase your PAP device run time, you can connect two batteries together using the Bridge Cable that is included in the Freedom V² CPAP Battery box (Model: FDV2).
The batteries do not discharge simultaneously. Battery A will start to power your PAP device first (discharge) and once it has depleted then battery B will begin powering your device.
- Plug the Bridge Cable into the DC IN port of battery A and then into the DC OUT port of battery B.
- Plug the Mobile Power Receptacle into the DC OUT port of battery A.
- Plug the Power Inverter into the Mobile Power Receptacle.
- Plug your PAP device power supply/cord into the Power Inverter.
Note: Depending on the PAP device being powered, it is normal for the digital display screen of the batteries to read separate and different voltages. This is due to the voltage output of the Bridge Cable.
Example images shown with DreamStation Go travel CPAP and 150W Sine Wave Power Inverter.
Single Battery
Dual Battery
Power Backup Connection: Output Cable
The Freedom v² CPAP Battery can be setup as an uninterrupted battery backup system for your PAP device in the event of a power outage.
When AC power is available it will bypass the lithium-ion cells of the battery and power your device normally. If AC power is lost the battery will recognize this and automatically start powering your PAP device.
Single Battery Connection
- Plug the power supply into the battery DC IN port.
- If a Power Supply Adapter is required, plug it into the battery DC IN port and then into the PAP device power supply.
- Plug the Output Cable into the battery DC OUT port and then into the power inlet port of the PAP device.
- Plug the power supply into the wall outlet.
Dual Battery Connection
To begin the dual battery setup battery A must be charged to at least 15%. Battery B can be at any charge level including 0%.
- Plug the power supply into the DC IN port of battery A. The charge level of this battery must be ≥ 15%.
- If a Power Supply Adapter is required, plug it into the DC IN port of battery A and then into the PAP device power supply.
- Plug the Bridge Cable into the DC OUT port of battery A then into the DC IN port of battery 8.
- Plug the Output Cable into the DC OUT port of battery 8 and then into the power inlet port of the PAP device.
- Plug the power supply into the wall outlet.
Example images shown with ResMed AirSense 10 CPAP device and power supply and Air 10 Output Cable.
Single Battery Connection
Dual Battery Connection
Note: Depending on the PAP device being powered, it is normal for the digital display screen of the batteries to read separate and different voltages. This is due to the voltage output of the Bridge Cable.
Power Backup Connection: Power Inverter
The Freedom v² CPAP Battery can be setup as an uninterrupted battery backup system for your PAP device in the event of a power outage. When AC power is available it will bypass the lithium-ion cells of the battery and power your device normally. If AC power is lost the battery will recognize this and automatically start powering your PAP device.
Single Battery Connection
- Plug the Freedom v² power supply into the battery DC IN port and then into the wall outlet.
- Plug the Mobile Power Receptacle into the battery DC OUT port.
- Plug the Power Inverter into the Mobile Power Receptacle.
- Plug your PAP device power supply/cord into the Power Inverter.
Dual Battery Connection
To begin the dual battery setup battery A must be charged to at least 15%. Battery B can be at any charge level including 0%.
- Plug the Freedom v² power supply into the DC IN port of battery A and then into the wall outlet. The charge level of this battery must be ≥ 15%.
- Plug the Bridge Cable into the DC OUT port of battery A then into the DC IN port of battery B.
- Plug the Mobile Power Receptacle into the DC OUT port of battery B.
- Plug the Power Inverter into the Mobile Power Receptacle.
- Plug your PAP device power supply/cord into the Power Inverter.
Note: Depending on the PAP device being powered, it is normal for the digital display screen of the batteries to read separate and different voltages. This is due to the voltage output of the Bridge Cable.
Example images shown with DreamStation Go travel CPAP, Freedom V² Power Supply and 150W Sine Wave Power Invertex.
Single Battery Connection
Dual Battery Connection
USB Port Connection
The Freedom V² battery features a Quick Charge 3.0 USB port for charging portable electronics like cell phones, tablets and MP3 players.
- Plug the USB power cable of the electronic device into the USB OUT port of the battery.
- You must press the charge level/reset button to initiate power output from the USB OUT port.
Specifications
- Cell Type: Rechargeable Lithium-ion (LG/Samsung ICR18650)
- Capacity: 99.9 Wh
- Output Voltage: 12V-24V DC (depending on DC output cable)
- Output Current: 8A (maximum)
- DC Input Voltage Range: 10V-28V
- QC 3.0 USB Output Voltage: 5V I 2.4A (maximum)
- Charge Input: 10V-28V
- Optimal Charging Conditions: 32°F to 104°F Optimal Operating Conditions: 23°F to 104°F
- *battery capacity is reduced by 30% when operating between 23° F to 32°F
- Charge Time: 2-3 hrs @ 90W I 3-4 hrs @ 60W I 8-9 hrs @ 20W
- charge times are per battery when two batteries are bridged together
- Power Gauge: Digital Display Screen (shows charge level as a percentage)
- Storage Conditions: -4° F to 104° F (optimal range: 60°F to 80°F)
- Life Span: 500 charge/discharge cycles (100%-0% then back to 100%}
- after 500 cycles the battery shall recover at least 70% of its initial charge
- Weight: 1.7 lbs.
- Dimensions: 7.5″ x 4.8″ x 0.8″ (L x w x H)
Battery Storage & Disposal
- Fully charge the battery before storage. For optimal performance charge and discharge the battery once every 90 days.
- Store the battery in a dry, cool and well ventilated place away from extreme heat(> 104°F) and direct sunlight. Storage temperature range is -4°F to 104°F; however, the optimal range is 60°F to 80°F.
- Lithium- ion batteries should be recycled and many U.S. states have laws regarding battery disposal. For information on disposal facilities near you call 1- 877-723-1297 or visit www.call2recycle.org.
Frequently Asked Questions
Lower Than Expected Run Time
- Using heated humidification and/or heated tubing is the number one cause of lower than expected run times. For optimal battery performance disable and/or detach your humidifier and heated tubing! If heated humidification or tubing is required, lowering your heat settings may help or you can bridge two batteries together.
- A high pressure setting (> 16 cm/H2O) can impact run times especially when other factors are present. All run time testing is done on a pressure setting of 10 cm/H2O.
- A leaking mask makes the device work harder to maintain your prescribed pressure setting and thus it draws more power.
- The device type will impact the run time as some types (Bi Level/ Bi PAP, VPAP, SV, etc.) draw more power than a standard CPAP.
Battery Starts Then Stops Working
If the battery starts powering your device and then shuts down, try to reset the internal circuitry (see page 5). If the battery continues to shut down, the device you are trying to power may:
- have higher amp requirements(> 8A) than the battery can provide
- require a constant voltage output to operate properly (the Freedom V² battery operates on a voltage range of 10V-28V)
Technical Support
Visit our website for more product and troubleshooting information. If you have any questions or concerns please contact us toll-free at 1-877-445-5228 or via email at [email protected].
Do not disassemble or attempt to service the Freedom V² CPAP battery or any of the connection or charging cables or components.

report this adFREEDOM V² CPAP BATTERY USER MANUALSeptember 2020
References
[xyz-ips snippet=”download-snippet”]