ASSEMBLY INSTRUCTIONSSE SD 8016WI- CLB WH
Thank you for you purchase.Before assembly, please read these instructions.Please read all warnings.Store this instruction manual for future reference.
| Product Size | Approximately 600 Width x 1600 Length x 1480Height (MM) |
| Main Materials | MDF (Medium Density Fiberboard) |
| Weight Capacity | Top insert: About 30KG, Shelf insert: About 10KG,* These are measured figures, not guaranteed figures. |
| Time To Assembly | About 60 Minutes |
Assembly Warning
- Assembling with 2 or more people is recommended.
- Please assemble at a spacious and flat place
- Please place blankets or cardboard so floor or walls will not be scratched
- Please ventilate the area if there is a strong glue odor after opening the product
- Please follow assembly instructions
- Please have the below tools ready before assembling
- Screwdriver, Scissors or Blade Box cutter, Rubber hammer, Drill
Hardware
Before assembly, inspect unit for missing parts. Be sure that children do not accidentally swallow these parts.
- Same sized parts are in a bag. Please check the size of the screws.
Parts
| 1. Desktop Panel2. Big Side Panel3. Back Panel (L)4. Back Panel(R)5. Top Panel6.Bottom Panel7. Left Side Panel8. Center Panel9. Above Right Side Panel10. Below Right side Panel11. Left Shelf Panel12. Fix Shelf Panel13. Stand Panel14. 1st Fix Right Shelf Panel15. Fix Right Shelf Panel16. Right Shelf Panel17. Back Mdf Bord | 1Pc1 Pc1Pc1Pc1Pc1Pc1Pc1 Pc1 Pc1Pc2 Pcs2 Pcs1 Pc1Pc2 PcS1 Pc1 Pc |
Assembly Information
- Assemble screws
1. Screw up to half point to make sure allspots are lined up 
2. Tighten all screws - Assemble Wood Dowels
1. Insert dowels into holes tightly 2. Attach the insert holes along with dowels - Assemble Minifix
1. Screw Up Minifix M5X24MM into holes. Tighten all Minifix. 2. Insert Minifix Casing into holes. Set the arrow of the screw up toward the nut slot. 3. Insert Minifix MSX24mm and Minifix Casing togehter into the slot 4. Tighten the cam lock screw Use Allen Key or Screwdriver

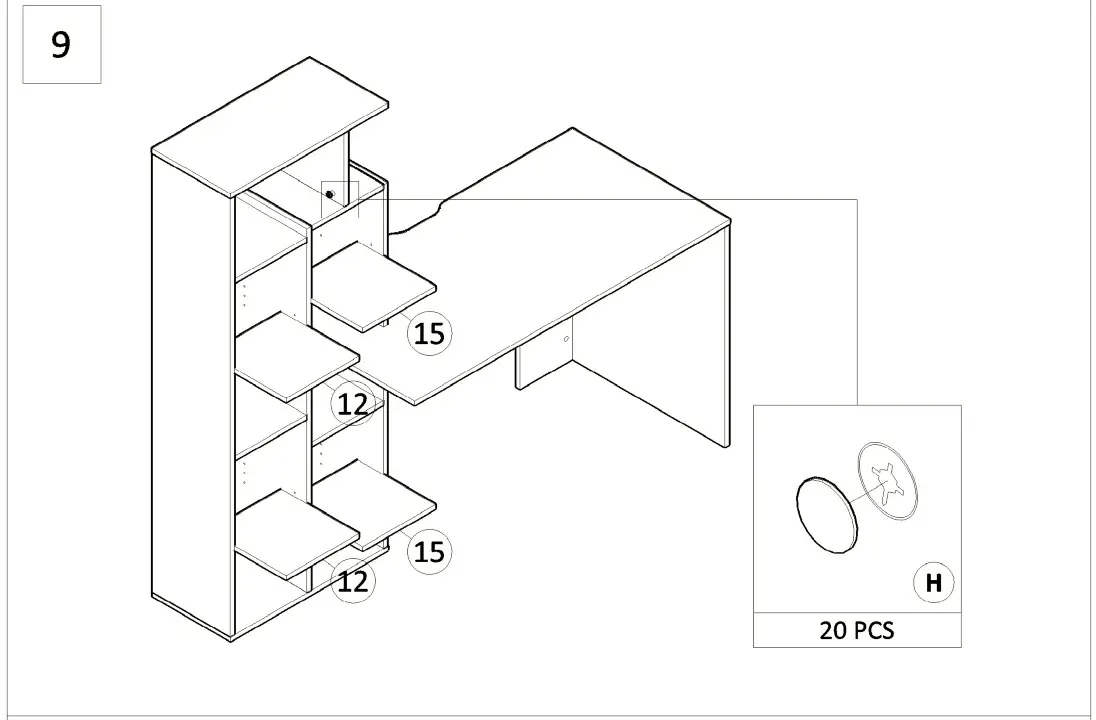
Assembly Step
Failure to follow these directions could cause poor strength or stability. Insert screws loose to line up with slots then tighten up each screw.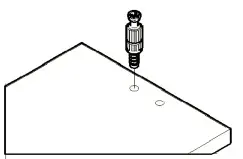
Safety
Please read the below warnings before use.Failure to follow these warnings could result in serious injury.
CAUTION !!!
Purpose
■ Do not use this unit except for original application■ This unit is for household use. Do not use it for wholesale.■ This unit is for indoor use. Do not use it outside.
Assembly
■ Assembling with 2 or more people is recommended■ Please assemble at a spacious and flat place■ Please place blankets or cardboard so floor or walls will not be scratched■ Please ventilate the area if there is strong glue odor after opening the product■ Please follow assembly instructions
Placing The Unit
■ Store the unit on a flat surface.■ Place a mat under the unit if you place it on wood floors for floor protection■ Do not place the unit in areas where conditions are extreme, such as direct sun or a humid place■ Do not place the unit in a hot or humid area, such as near the heater or fireplace Usage■ Please check your surroundings when you use this unit■ Do not place any hot or wet objects on the unit■ Remove all objects on the unit when you move it■ Do not leave water or wet objects on the surface.■ Do not use it for toys■ Do not stand on it or use it for a step stool.■ Do not overload only the top drawers. Load the same amount to help prevent tipping of the unit.■ Do not leave drawers open or put pressure on opened drawers to help prevent falling or wrecking.■ Do not stand or put pressure on opened drawers.■ Colors could fade■ Please open drawers slowly■ Make sure you do not catch your finger when you use the drawer.■ Weight Capacity Top insert: About 30KG , Shelf insert: About 10KG, These are measured figures, not guaranteed figures
Cleaning
■ Please check all assembled parts are tight regularly. (About once a month)■ Use dry soft cloths for dust and spots■ For heavy spots, use clothes with neutral detergent then dry in a well ventilated area.■ Do not use if any parts are broken.■ Please recycle the unit or its package depending on your city rules.
[xyz-ips snippet=”download-snippet”]