
beamZ SLIMPAR 30 UV LED Wash

UNPACKING INSTRUCTION
CAUTION: Immediately upon receiving the product, carefully unpack the carton, check the contents to ensure that all parts are present, and have been received in good condition. Notify the shipper immediately and retain packing material for inspection if any parts appear damage from shipping or the package itself shows signs of mishandling. Save the package and all packing materials. In the event that the product must be returned to the factory, it is important that the product be returned in the original factory box and packing.If the unit has been exposed to drastic temperature fluctuation (e.g. after transportation), do not switch it on immediately. The arising condensation water might damage your unit. Leave the unit switched off until it has reached room temperature.
POWERSUPPLYOn the label on the backside of the unit is indicated on this type of power supply must be connected. Check that the mains voltage corresponds to this, all other voltages than specified, the light effect can be irreparably damaged. The product must also be directly connected to the mains and may be used. No dimmer or adjustable power supply.WARNING: Always connect the unit to a protected circuit (circuit breaker or fuse). Make sure the unit has an appropriate electrical ground to avoid the risk of electrocution or fire.
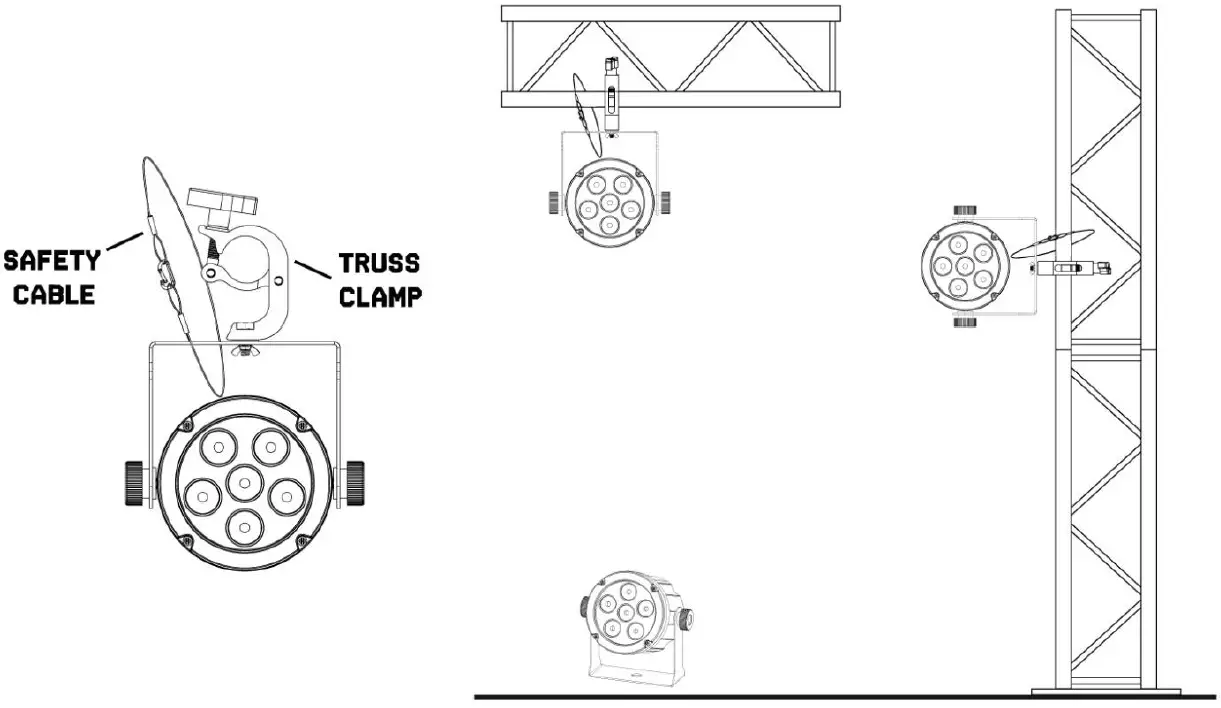
RIGGINGThe unit may be set up on a stable and even surface. By means of the fixing facilities of the baseplate, the unit can also be mounted upside down to a truss, see below picture. For fixing, certified clamps with correct save working load are required. According to the figure, the quick lock bolts of the omega brackets are placed into the openings provided in the base plate and turned clockwise until they lock (to the stop). The mounting place must be of sufficient stability and be able to support a weight of 10 times of the unit’s weight. Secure the unit with a safety cable so that it cannot fall down.When carrying out any installation, always comply European and national guidelines concerning rigging, truss and all other safety issues. Always let the installation checked out by an authorized dealer !
REMOTE CONTROLLER
BLACK OUT MODEPress <BLACK OUT > off existing modes. Press <BLACK OUT >return the last modes.
AUTO MODEAutomatic mode will enable you to run the automatic programs on the product.To turn on Automatic mode:1. Press <AUTO> on the remote controller.2. Press <+> or <-> to choose between the different auto programs.
SOUND MODESound-Active mode will enable the product to respond to the music.To turn on Sound-Active mode:1. Press <SOUND> on the remote controller.2. Press <+> or <-> to choose between the different sound programs.
STROBE MODETo adjust the strobe speed of the automatic program and the sound active program.1. Press <STROBE> on the remote controller.2. Press <+> or <-> to either increase or decrease the speed of the program.3. Press <STROBE> again to turn off the strobe.
SPEED MODETo adjust the speed of the automatic program and the sound active program.1. Press <SPEED> on the remote controller.2. Press <+> or <-> to either increase or decrease the speed of the program.
SENSITIVITY MODETo adjust sound sensitivity for in Sound-Active mode1. Press <SENSITIVITY> on the remote controller.2. Press <+> or <-> to either increase or decrease sound sensitivity.
MANUAL MODE1. Press <MANUAL> on the remote controller.2. Press to <UV> choose the colour.3. Press again to <UV> close the colour.4. Press <+> or <-> to either increase or decrease the percentage of each colour.
FADE/UNIT MODETo adjust the FADE speed of the automatic program, the sound active program and the manual mode.1. Press <FADE> on the remote controller.2. Press <FADE> again to turn off the Fade mode.
NUMBER 1~9To adjust the brightness value of the automatic program, the Sound active program and Manual Mode.Press digit <1> to <9> change different brightness on the device.
CAUTION: The remote control is supplied with a battery inserted. An insulating foil between the battery and the battery contacts prevents the battery from being discharged during storage. Prior to the first operation remove the foil from the battery support on the rear side of the remote control. Otherwise operation of the remote control is not possible.
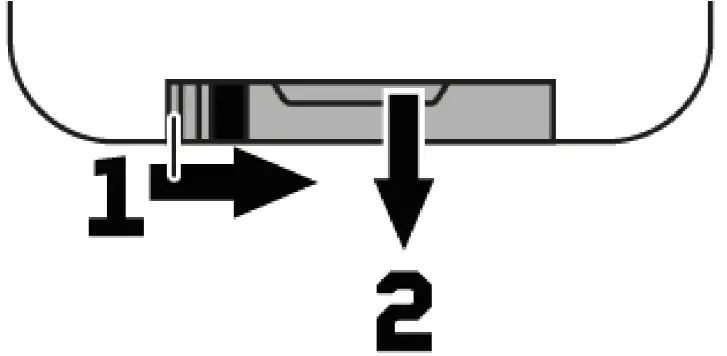
If the range of the remote control decreases, replace the battery. For this purpose, on the rear side of the remote control press the small bar with the groove to the right (1) and at the same time remove the battery support (2). For operation, one 3 V button cell type CR 2025 is required. When inserting, pay attention that the positive pole of the button cell shows upwards in the support.
 report this ad
![]()
[xyz-ips snippet=”download-snippet”]