
![]()
MANUAL
WEATHERSTATIONMod.-Nr.: 303715/20190404SZ247
Thank you for choosing a BEARWARE product. Please read the following user manual carefully so as to get the most from the product that you have purchased. Before using the product, first check that the delivered item is complete, accurate and undamaged.
1. Scope of delivery
• Weather station• DC coaxial plug connection cable• User manual
2. Technical data
| Power supply | • Main unit: Three 1.5V AAA batteries or alternatively one DC 4.5 V, 150 mA power adapter with coaxial connector (3.5 mm / 1. 25 mm) / Polarity: – —(o— +• Sensor: Two 1.5V AAA batteries |
| Temperature range | • Main unit: 0°C to 60°C•Sensor: -40°C to +60°C |
| Transmission power (EIRP) | < 0 dBm |
| Frequency range | 433 MHz |
| External sensor protection class | IPX4 |
| Features | • Date display• Indoor and outdoor temperature• Outdoor sensor• Humidity display• Air pressure display• Weather forecast pictogram• Snooze function• 12/24-hours display• Alarm function (alarm) |
15
![]() 3. Additional information about this device
3. Additional information about this device
Check that the product and the components are intact and that the device is working properly when using it for the first time Do not use this device if it is damaged. Do not expose the base station to either moisture or direct sunlight.
Before using the product, ensure that the available supply voltage corresponds to the operating voltage indicated on the specification plate.
Make sure that the cables are not damaged.
The device must be connected to an easily accessible socket so that it can be disconnected in case of an emergency.
This product is suitable only for use with the mains adapter supplied.
It is intended only for private use and not for medical purposes or for public information.
![]() Caution!Keep the batteries and the device out of the reach of children. Batteries contain harmful acids. Weak batteries should be replaced as soon as possible to prevent leakage! Do not use new and old batteries or batteries of different types together. Never throw batteries into a fire and do not short-circuit them. Do not recharge the batteries or take them apart. There is a risk of explosion!
Caution!Keep the batteries and the device out of the reach of children. Batteries contain harmful acids. Weak batteries should be replaced as soon as possible to prevent leakage! Do not use new and old batteries or batteries of different types together. Never throw batteries into a fire and do not short-circuit them. Do not recharge the batteries or take them apart. There is a risk of explosion!
16
| Button | Function |
| MODE
SET |
MODE: Press the “MODE/SET” button in the default screen to select between the different display modes. You can choose between day and seconds display, between the normal outdoor temperature and the dew point as well as between the absolute (ABS) and relative (REL) air pressure. If you do not press any button within 10 seconds, the weather station switches back to the default screen.
SET: Press and hold the “MODE/SET” button for about 5 seconds in the default screen until “24Hr” flashes in the display. This takes you to the basic settings. |
| MAX / MIN
– |
MAX/MIN: Press the “MAX/MIN” button in the default screen to toggle between the maximum / minimum and current values. By pressing and holding for about 2 seconds in the default screen, you can toggle the temperature and air pressure unit between ° F and ° C and between inHg (° F) and hPa (° C).
Minus (-): Press the button to change the values in the settings. |
| CHANNEL
+ |
CHANNEL: Hold the button to delete the currently displayed values of the outdoor sensor. The deletion is confirmed with a beep. The weather station reconnects to the external sensor.
Plus (+): Use the button to change the values in the settings. |
| SNOOZE
LIGHT |
SNOOZE/LIGHT:
Press the “SNOOZE/LIGHT” button to activate the backlight and to choose between three different brightness levels. Press and hold the “SNOOZE/LIGHT” button for about 5 seconds, to turn off the backlight after 5 seconds of inactivity (OFF) or to turn it on permanently (ON). You can press the “SNOOZE/LIGHT” button as soon as the alarm goes off to put the device in snooze mode for 5 minutes. The alarm goes off once again after 5 minutes. |
17
5. Product details
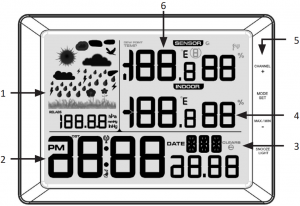
| No. | Display area |
| 1 | Weather forecast + air pressure |
| 2 | Time |
| 3 | Date / Day |
| 4 | Indoor temperature + humidity |
| 5 | Operating controls |
| 6 | Outdoor temperature + humidity |

18
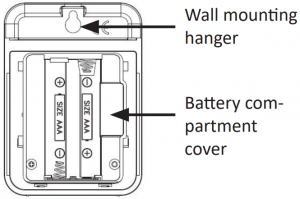
6. Initial useTake the product out of the package and remove all the packaging material. Open the battery compartment of the outdoor sensor and insert two 1.5V AAA batteries. Then open the battery compartment on the back of the main unit and insert three 1.5V AAA batteries. Alternatively, you can use the supplied DC coaxial plug connection cable for operation. Connect the cable with a 5V USB port (for example, the charger of a smart phone) and connect the coaxial plug with the port on the main unit.
The weather station should then establish a connection with the outdoor sensor. For this purpose, press and hold the “Channel” button until you hear a beep and the following symbol is shown in the display: ![]() . Make sure that both the devices are with each other’s range. The outdoor temperature and humidity are then displayed in the “Outdoor temperature display” of the main unit. If the main unit cannot establish a connection with the outdoor sensor within 5 minutes, then it stops searching. The connection icon stops glowing and the temperature display shows “-._°C” and “–%” on the display.
. Make sure that both the devices are with each other’s range. The outdoor temperature and humidity are then displayed in the “Outdoor temperature display” of the main unit. If the main unit cannot establish a connection with the outdoor sensor within 5 minutes, then it stops searching. The connection icon stops glowing and the temperature display shows “-._°C” and “–%” on the display.
In most cases, the connection cannot be established due to specific factors such as reinforced walls or too great a distance between the sensor and the main unit. In this case, position the sensor and the main unit closer to each other. To restart scanning, press and hold the “Channel” button on the front of the main unit for about 3 seconds until the connection symbol appears in the display.
7. Display
Time display:

The time can be displayed in a 12-hour or 24-hour format.
19
Date and day:
 The weather station comes with a date and day display. The date is displayed in the top section and the day in the bottom section. The pre-configured language is German.
Barometric pressure display

The pressure indicator shows the currently measured air pressure. The units for the air pressure are hPa, mmHg and InHg.
Weather forecast:
The weather station calculates a weather forecast for about 12 hours, which is based on the air pressure trend. As expected, this forecast can not be compared with satellites or high-performance computers. The forecast only shows an approximate ion of the current trend.
Indoor temperature display and humidity

The indoor temperature is measured by the base station and is shown to an accuracy of one tenth of a degree. The configured temperature unit is shown above the measured value. The temperature unit can be changed between °C and °F. To do this, press and hold the “MAX/MIN” button on the weather station. This display also shows the current air humidity experienced by the weather station.
20
Outdoor temperature display:
The outdoor temperature is measured by the outdoor sensor and shown to an accuracy of one tenth of a degree. The configured temperature unit is displayed to the right of the reading. The temperature unit can be changed between °C and °F. To do this, press and hold the “MAX/ MIN” button on the weather station. This display also shows the current air humidity experienced by the weather station.
Low battery:
If the battery symbol appears next to the temperature display, then the inserted batteries will soon be empty and should be replaced with new batteries as soon as possible.
Channel display
The weather station receives the signal of the outdoor sensor automatically after all settings have been configured. Press and hold the “Channel” button to clear the currently displayed reading and to start rescanning for the outdoor sensor.
8. Basic settings
![]()
Note: By pressing the “SNOOZE/SLEEP” button, you can change between several levels of brightness of the backlight. Please note that the base station does not respond to 2 buttons at the same time. Therefore, it is advisable to always press just one button.
To change from the day display to the second display, press the “MODE/SET” button and then change the display using the “+” and “-” buttons. Press the “MODE/SET” button again to select between the current outdoor temperature and the dew point. Press the “MODE/SET” button once again to select between the absolute (abs) and relative (rel) air pressure.
21
Press and hold the “MODE/SET” button until the 12/24 hour display starts to flash to change the basic settings. With the “+” and “-” buttons you can change the values accordingly. Confirm the settings by briefly pressing the “SET” button and you can then access the next setting option.
In this way, you can change and customise the following settings in the sequence mentioned below:
- 12 or 24 hour display
- Hour
- Minute
- Day/month format
- Month
- Day
- Year
- Alarm time hour
- Alarm time minute
- °C / °F display
- Air Pressure unit
- Clear 24 hours – Resets the min / max values every 24 hours
- Weather forecast preset – Select the approximate current weather condition here
- Setting the pressure threshold (for explanation see Chapter 10)
- Setting the storm threshold (for explanation see Chapter 10)
8.1 Alarm setting
Setting the alarm
- Open the basic settings by pressing and holding the “MODE/SET” button in the default screen for about 5 seconds.
- Press the “MODE” button seven times in the default settings to access the alarm mode. The alarm time is now shown in the display.
- Press the “+” and “-” buttons to configure the values. Confirm the entry using the “MODE/SET” button. Close the default settings or wait about 15 seconds till the weather station returns to the default screen.
22
Enabling the alarm
1. Open the basic settings by pressing and holding the “MODE/SET” button in the default screen for about 5 seconds.2. Press the “MODE” button seven times in the default settings to access the alarm mode. The alarm time is now shown in the display.3. Now press and hold the “MODE/SET” button for 3 seconds to turn the alarm time on or off. Once the alarm time is on, a bell symbol (![]() ) is shown in the display under the alarm time. If the alarm time is off, the bell symbol disappears.
) is shown in the display under the alarm time. If the alarm time is off, the bell symbol disappears.
Switching off the alarm
The alarm is activated at the configured time. The alarm sounds for about 2 minutes before it turns off automatically.
Press the “SNOOZE/LIGHT” button to cancel the alarm. If a snooze symbol is shown on the display, this means that the snooze function is activated and the alarm will go off again in 5 minutes.
Press any button to switch off the alarm.
Weather forecast
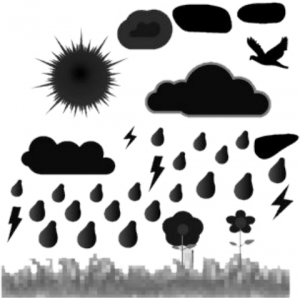
| Image | Meaning |
 |
Sunny: The air pressure increases and the previous state is partly cloudy. |
| Partly cloudy:
The air pressure reduces and the previous state is sunny, or the air pressure increases and the previous state is cloudy. |
23
| Image | Meaning |
 |
Cloudy: The air pressure reduces and the previous state is partly cloudy, or the air pressure increases and the previous state is rainy. |
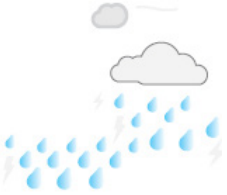 |
Rainy: The air pressure reduces and the previous state is cloudy. |
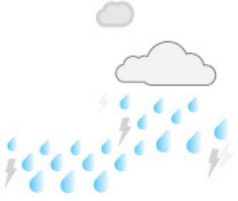 |
Storm: The air pressure reduces and the previous state is rainy. The cloudy and rainy symbols start flashing. |
9. Stored data
Maximum and minimum values
Press the “MAX/MIN” button in default screen to view the maximum indoor and outdoor temperature, the maximum and minimum humidity as well as the maximum and minimum air pressure. “MAX” appears at the bottom right of the display. Press the “MAX/MIN” button again to view the minimum measured values. “MIN” appears in the display. After about 20 seconds, the current reading is shown.
Note: The min/max temperatures are measured from the total operating time of the weather station. Unless you have enabled the 24-hour clear function in the basic settings. In this case, the readings are reset after 24 hours.
![]()
Note that you can not make any other settings or press any buttons while displaying the “MAX” or “MIN” values.
24
10. Definition of terms
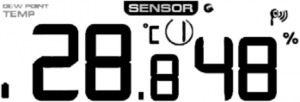
“Dew Point”
The “Dew Point” is the temperature at which dew forms at a certain humidity. The more water vapour in the air, the higher is the dew point temperature.
Pressure threshold
The pressure threshold (the negative or positive rate of pressure change that indicates a change in the weather) can be set from 2 mbar / hour to 4 mbar / hour (Default = 2 mbar / hour).
The lower the setting of the pressure threshold, the higher is the sensitivity for weather forecast changes. Places where the air pressure changes frequently require a higher setting than places where the air pressure is typically constant.
Storm threshold
The storm threshold (the negative rate of pressure change at which a storm may be expected) can be set from 3 mbar / hour to 9 mbar / hour (Default = 4 mbar / hour). The lower the setting of the pressure threshold, the higher is the sensitivity for changes in the weather forecast. Places at which the air pressure changes frequently require a higher setting than places where the air pressure is typically constant.
When the negative rate of pressure change is exceeded for three hours, the storm warning display is activated and the clouds with rain symbol flash for three hours in the display. This means that the storm warning is active.
25
 Caution!
11. Safety instructions and disclaimer
Never try to open the device to repair or make modifications. Avoid contact with the mains voltage. Do not short-circuit the product. The device is not waterproof, hence please use it only in dry surroundings. Protect it from high humidity, water and snow. Keep the device away from high temperatures. Do not expose the device to sudden changes in temperature or strong vibrations, as this could damage the electronic components. Check the device for any damage before using it. The device should not be used if it was subject to impact or has been damaged in some other manner. Please comply with the local regulations and restrictions.
Do not use the device for purposes other than those described in the user manual. This product is not a toy. Keep it out of the reach of children or mentally disabled persons. Any repair or modifications to the device, which is not carried out by the original supplier will void any warranty and guarantee claims. The device should only be used by those who have read and understood this user manual. The specifications of the device may be changed without prior intimation.
12. Disposal instructions
In line with the European WEEE directive, electrical and electronic devices should not be disposed of along with domestic waste. Their components have to be separately sent for recycling or disposal, because improper disposal of toxic and dangerous components may permanently damage the environment. According to the Electrical and Electronic Equipment Act (ElektroG), you are obliged (as a consumer) to return (free of charge) all electrical and electronic devices to the manufacturer, the point of sale, or public collection points at the end of their service life. The relevant local laws regulate the details in this regard. The symbol displayed on the product, in the user manual or/and on the packaging refers to these regulations. With this manner of sorting, recycling and disposal of used devices, you make an important contribution towards protecting our environment.
26
13. Instructions for battery disposal
In conjunction with the sale of batteries along with the supply of devices that include batteries, the supplier is obliged to point out the following to the customer: The customer is legally obliged to return used batteries. He can return used batteries which the supplier offers or has offered as new batteries in his assortment free of charge to the supplier’s dispatch warehouse (shipping address). The symbols shown on the batteries indicate the following: Pb = battery contains more than 0.004 percent lead by weight, Cd = battery contains more than 0.002 percent cadmium by weight, Hg = battery contains more than 0.0005 percent mercury by weight.

The symbol of the crossed-out dustbin means that the battery may not be disposed of in household waste.

![]()
WEEE directive 2012/19/EUWEEE Register no.: DE 67896761
The company WD Plus GmbH hereby certifies that the device 303715/20190404SZ247 complies with the fundamental requirements and all other relevant stipulations of the guideline 2014/53/EC. A complete conformity statement can be obtained from: WD Plus GmbH, Wohlenbergstraße 16, 30179 Hannover, https://www.ganzeinfach.de/
27
Notes
67
![]()
WD Plus GmbH • Wohlenbergstraße 16 • D-30179 Hannover
References
[xyz-ips snippet=”download-snippet”]