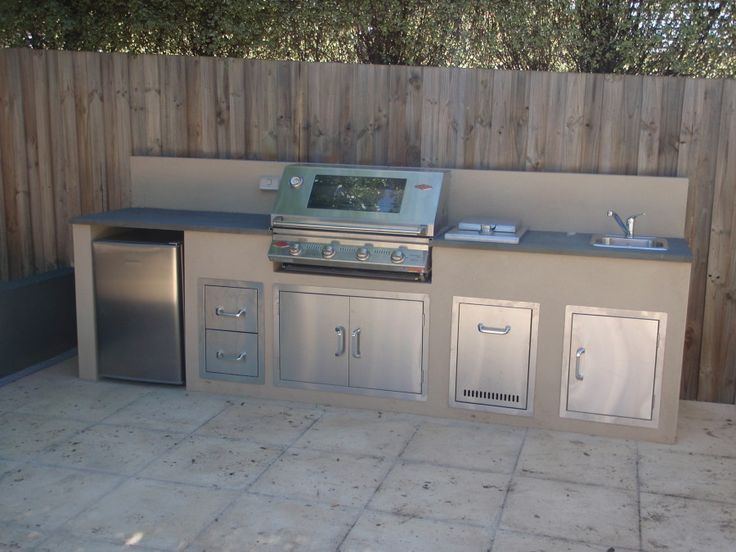
Beef Eater Outdoor Kitchen

IMPORTANT SAFETY INSTRUCTIONS
Please read the user manual carefully and store in a handy place for later reference.
IMPORTANT:
Important – check for any damages or marksIf you find the barbecue is damaged or marked, you mustreport it within 7 days if you wish to claim for damage/marksunder the manufacturer’s warranty. This does not affectyour statutory rights.
ENVIRONMENT
Information on disposal for users
- Most of the packing materials are recyclable.Please dispose of those materials through your local recycling depot or by placing them in appropriate collection containers.
- If you wish to discard this product, please contact your local authorities and ask for the correct method of disposal.
WARNING:
This appliance must be serviced only by a qualified licensed person.Improper installation, adjustment, alteration or maintenance can cause injury or property damage and may affect your ability to claim under the manufacturer’s warranty.Please contact your nearest BeefEater Service Department for additional information or assistance for an approved installer.
Note to the installerThis manual must remain with the owner for future reference.
WARNING:
- Do not lean over barbecue when lighting.
- Do not leave the barbecue unattended when alight.
- Do not delay lighting once the gas has been turned on.
- Do not store or use aerosol cans in the vicinity of the barbecue.
- Do not store flammable liquids in the vicinity of the barbecue.
- Do not use caustic or abrasive based cleaners on the barbecue.
- Do not attempt to dismantle or adjust the control valves.
- Do not attempt to dismantle or adjust the regulator.
- Do not test for leaks with a naked flame.
- Do not modify the construction of this appliance or modify the injector orifice size.
- Do not obstruct any ventilation of the barbecue.
- Do not allow children to operate or play near the barbecue.
Failure to adhere to the above warnings may cause injury or property damage and affect your ability to make a claim under the manufacturer’s warranty.
CAUTION:
This appliance is set up for Universal LPG and is labelled accordingly. A natural gas conversion kit is available if required. Conversion of this unit to natural gas must be carried out by a qualified licensed person and a Certificate of Compliance must be issued to the owner at the completionof the installation and conversion.
IMPORTANT:
BeefEater Barbecues are approved for OUTDOOR USE ONLY and must not be used in a building, garage or any other enclosed area.
- BeefEater Barbecues must not be used inside recreational vehicles or boats.
- Read instructions thoroughly before operating this Barbecue.
- Save this manual for future reference.
- Always use the Barbecue on a flat, level surface.
- Some foods produce flammable fats and juices. Regular cleaning is essential.
- Attend an operating barbecue at all times. Damage caused by fat & grease fires is not covered by warranty.
- When not in use keep Barbecue dry and covered.
WARNING:
If you smell gas:
- Shut off gas to the appliance.
- Extinguish any open flame.
- Open hood.
- If odour continues, immediately call your gas supplier or your fire department.
For your safety
- Do not store or use gasoline or other flammable vapours or liquids in the vicinity of this or any other appliance.
- An LPG cylinder not connected for use shall not be stored in the vicinity of this or any other appliance.
WARNING:
Failure to follow these instructions and observe the warnings provided in this operations manual could result in fire, explosion or burn hazard, which could cause property damage, personal injury or death.Gas vapour is highly explosive and can cause serious bodily injury or damage to property if allowed to accumulate in a confined space and ignited.This appliance must not be installed under or on any combustible material. Minimum clearance from combustible materials to all sides of the appliance is 450mm (18”).These instructions must be left with the owner.
NOTE:
- Do not use gas other than the type specified on the Data Plate.
- The appliance is designed for use by adults, keep children away from the barbecue at all times.
- Use only on a flat, level, stable non-combustible surface. Do not use this appliance on any surface that can burn or melt.
- When in use, gas cylinder should be kept at designated mountings of barbecue, and supply hoses kept away from any hot surfaces.
- To prevent accidental fires, before using the appliance ensure that there is no apparent damage to hose and regulator and all joint connections are in good order and not leaking.
- Use a soapy water solution on all joints in order to check for leaks. If bubbles appear, it indicates that there is a leak and the appliance must not be used.
- LPG cylinder, regulator and hose must comply with national standards.
- Do not move or attempt to move the appliance while in operation.
- Do not operate this appliance before leak checking hoses and gas cylinder connection.
To the installer
- For fixed installations, in Australia refer also to the requirements of AS/NZS5601, local authority, gas, electricity, and any other relevant statutory regulations.
- For fixed installations, refer to AS/NZS5601 for pipe sizing details.
- Consult other trades. Where required, consult a bricklayer or an electrician for parts of the installation that could have an effect on these areas.
- Allow a 20mm gap from back of barbecue body for ventilation and air access.
- Test appliance for correct operation before leaving, and instruct user on its use.
- If correct operation cannot be achieved, disconnect barbecue from gas supply, and contact your nearest BeefEater dealer.
- Please only use BeefEater supplied hose(s) to connect this appliance. Natural Gas conversion kits are available from your nearest BeefEater dealer.
- Australia only (applies to all gas types) : Where a mobile appliance is to be connected to a fixed gas supply via a flexible hose connection, a retaining tether of adequate strength shall be fixed to the appliance and be suitable to be fixed to the wall within 50mm of each connection point. The length of the tether shall not exceed 80% of the length of the hose assembly. In this way, if the barbecue is accidentally moved, the tether stops the barbecue from stretching the hose.
Do not
- Lean over barbecue when lighting.
- Leave cooking food unattended.
- Delay lighting burners after turning gas on.
- Spray or store aerosols in vicinity of barbecue whilst in operation.
- Place articles on or against this appliance
- Store combustible materials, gasoline or flammable liquids or vapours within 450mm (18”) of barbecue.
- Use caustic based cleaning agents on the barbecue.
- Operate barbecue with any cover on.
- Use plastic or glass utensils on the barbecue.
- Operate barbecue in strong winds.
- Attempt to dismantle control valves.
- Attempt to dismantle or adjust regulator.
- Test for gas leaks with a naked flame.
- Store gas cylinder indoors, or in any enclosed area.
- Lay the gas cylinder down. Always keep it upright.
- Use barbecue indoors.
- Expose hose to direct sunlight.
- Modify the construction of this appliance or the size of any burner or valve orifice.
- Move the appliance during use.
- Obstruct any ventilation of barbecue or the cylinder.
- Allow the flexible gas supply hose or any electrical cord to come in contact with hot surface of the appliance.
- Allow children to operate this appliance.
- Use charcoal or any other solid fuel in this appliance.
- Disconnect any gas fittings while the appliance is operating.
- Use a rusty or dented gas cylinder or cylinder with a damaged gas valve.
- Fill the gas cylinder beyond 80% capacity.
- Touch some accessible parts, other than the ones meant for handling. They may be hot.
Do
- Spanner tighten all gas fittings as per instructions.
- Check all gas hoses and line connections for damage, cuts or cracks each time the appliance is about to be used.
- Always leak test with a solution of soapy water.
- Check main opening, throat and venturi to each burner and pilot flame tube regularly for insect nests (eg. wasp, ants or spiders). Nests are dangerous and must be cleaned out thoroughly.
- Visually check burner flames to confirm lighting.
- Use your barbecue only on a level surface.
- Attend barbecue whilst cooking food.
- Preheat the barbecue for up to 10 minutes.
- After cooking turn barbecue to high for up to 10 minutes to burn off excess grease.
- Let the barbecue cool before replacing any lid or cover.
- Regularly replace foil material in grease/drip tray.
- Keep children away from barbecue at all times.
- Have the gas cylinder filled by an authorised LPG supplier.
- Refer to this instruction manual if in doubt concerning assembly, installation, or operation.
- Use protective gloves when handling hot components.
- Close the gas cylinder valve after each use.
- Clean the grease/drip tray regularly and clean the appliance at least twice annually.
- Always remove any lid or cover off the appliance before lighting.
- Carefully follow the instructions relating to the hose/ regulator connection.
- Keep the barbecue area free from combustible materials, gasoline, flammable liquids or vapours.
IMPORTANT:
Should the appliance go out for any reason, turn off all control knobs and the cylinder gas valve. Wait 5 minutes before attempting to relight the appliance.
- If a grease or fat fire should occur, immediately turn off all control knobs and the gas cylinder valve until the fire is out. Remove all food from the appliance.
- A leak test must be carried out prior to using the appliance for the first time and whenever the gas cylinder is refilled or whenever the gas hose and regulator have been disconnected from the gas cylinder or appliance.
GAS CYLINDER SAFETY INFORMATION
Gas cylinders must be stored outdoors, out of reach of children and must not be stored in a building, garage or any other enclosed area.
• This appliance is designed to be used with a gas cylinder not exceeding 9KG (20lbs) capacity.• The Gas cylinder must be constructed and marked in accordance with specifications for LP Gas Cylinders.• Ensure gas cylinder is within the expiration date, it is not advised to use or attempt to refill a gas cylinder that is outside of it’s expiration date.• The gas cylinder supply valve must be turned off when the appliance is not in use.• The gas cylinder used must incorporate a safety collar to protect the valve assembly.• The gas cylinder must always be kept and used in the upright position.
IMPORTANT:
When disconnecting and removing the gas cylinder for the purpose of refilling, always observe the following procedure:
• Ensure that all gas control valves on the appliance and the gas cylinder are turned off before disconnecting the gas line from the cylinder.• Do not smoke or use a naked flame near the appliance or gas cylinder while disconnecting the gas line between the appliance and gas cylinder.• Remove the gas cylinder from the enclosure before disconnecting the gas line from the appliance.• Tighten all connections before placing the gas cylinder back in its enclosure.
The Gas Leak Testing Procedure should be conducted every time the gas cylinder is refilled and reconnected to the appliance – before using the appliance.
Regulator Connection
1. Check that all control knobs are in the ‘Off’ position.2. Make sure the cylinder valve is off by turning the valve knob all the way clockwise.3. Remove the protective cap from the cylinder if present.4. Make connection as described in figures 1 and 2.5. Leak-test the connection with a soapy water solution. (See Gas Leak Testing Procedure).
Hose and regulator replacement must be a genuine part specified for this appliance and is obtainable from your nearest BeefEater stockist.
Standard POL regulator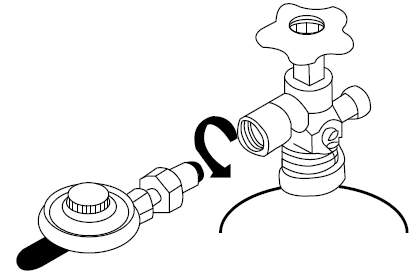
Quick connect regulator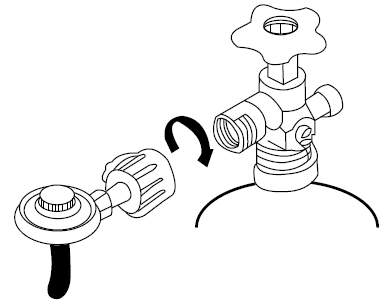
Gas Leak Test Procedure
Use the following procedure to check for gas leaks. Never use a naked flame to check for gas leaks.
1. In a small container, mix up a solution of water and detergent or soap. Mix the solution well.2. Make sure that the gas supply valve on the gas cylinder is turned on.3. Make sure that the gas control valves on the appliance are all turned off.4. Using a brush or spray bottle apply the solution to the gas line and each join in the gas line. See Fig 3.5. Bubbling of the solution will indicate that there is a leak present.6. Re-tighten or re-seal any joints that are leaking.7. If a leak persists then contact your distributor or the manufacturer for assistance.

KNOW YOUR BARBECUE
BOLT PACK CONTENT
| Mark | Qty. | Part Description |
| A | 4 | M6 x 30mm screw |
| B | 4 | M6 x 12mm screw |
| C | 4 | M4 x 10mm screw |
| D | 8 | Fiber washer |
| E | 4 | M6 Nut |
| F | 1 | Rubber grommet |
| G | 8 | Medium plastic plug |
| H | 8 | Small plastic plug |
| I | 2 | Large plastic cover |
| J | 1 | Allen key |
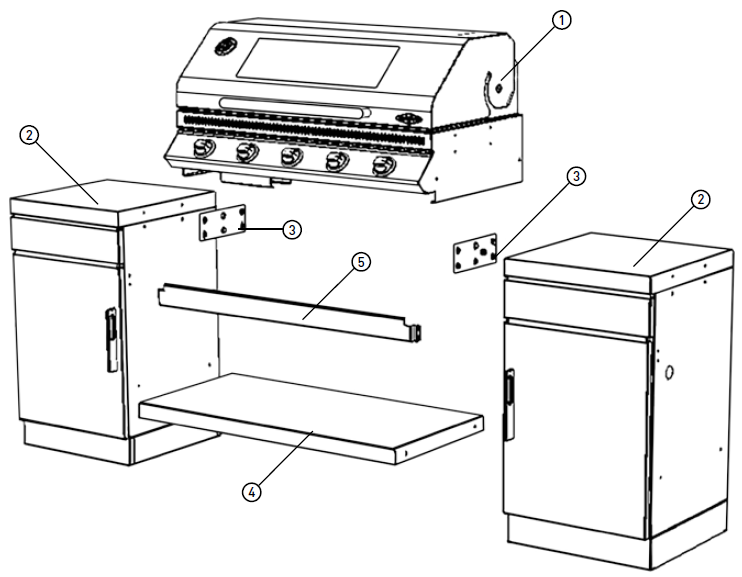
MAIN PARTS
- 1000/1100 Series barbecue with Hood
- Standard Cabinet
- Heat Shield Spacer
- Base Shelf
- Front Guard
The image and assembly procedure refers to Basic Outdoor Kitchen configuration. If you have purchased additional modules, continue to page 6 of this manual ofr instructions on how to put them together and assemble to this Outdoor Kitchen.Bolt Pack can be found inside the Base Shelf carton.
ASSEMBLY
IMPORTANT:
It is easier to do all assembly work while components are lying on their back, so that they do not need to be supported in the air. Once completed, the assembly can be brought back upright, leveled and completed.If choosing to work this way, ensure to remove all loose items from the different parts, and lay back on a padded, flat and level surface, not too far from where you wish the Outdoor Kitchen to stand.
Tools Required for Assembly:

Phillips Head Screwdriver
Step 14 x ‘B’, 4 x ‘E’, 8 x ‘D’Remove the Hood and all other loose items from inside barbecue, and place it on its back.Attached the Heat Shield spacer with 2 short screws to each side using nuts.
Step 24 x ‘A’, 4 x ‘E’, 8 x ‘D’Position the 2 cabinets on the sides of the barbecue, and attach to the barbecue with 2 screws through the 2 remaining free holes in Heat Shield spacer on each side.Fasten with nuts.
Step 34 x ‘D’, 4 x ‘B’, 1 x ‘F’Connect the base shelf to place.Once done, stand the whole assembly upright. Fit rubber grommet.

Step 44 x ‘C’Attach the Front Guard.You may reassemble the Hood, burners, Vaporizers, Grills and Plates.

Step 5Cabinet handles should be mounted using the bottom and middle holes.

REVERSING A DOOR DIRECTION
Tools Required for Assembly:

Allen keyDoors are fully reversible, and can be Right or Left hand opening.
Step 1Remove the door by lifting up off the hinge pin, and taking out.
Step 2Remove the hinge blocks from the side panel, turn upside down, and reattach to opposite panel.
Step 3In the door, remove 2 hinge brackets and reattach upside down, on other side of opening.
Step 4Release the handle, turn upside down, and re-attach.
Step 5Turn door upside down, and insert to place to re-engage over hinges.
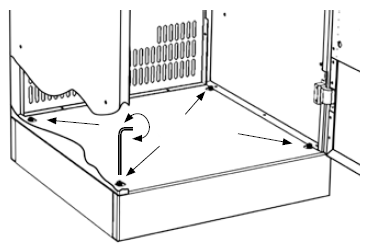
• Holes on the very end panels can be hidden using plugs ‘G’, ‘H’, and ‘I’ supplied.• Each cabinet is fitted with 4 adjustable feet. The Outdoor Kitchen can be leveled by adjusting these feet up or down, turning with the Allen key supplied from inside the cabinet, through the holes in the corners.
OTHER MODULES AND ACCESSORIES
If you have purchased other, optional modules to be part of your Outdoor Kitchen, here are a few hints on assembly and function.
Tools Required for Assembly:
Phillips Head Screwdriver
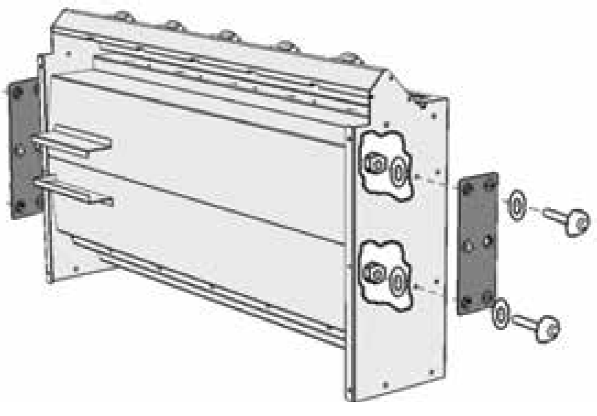
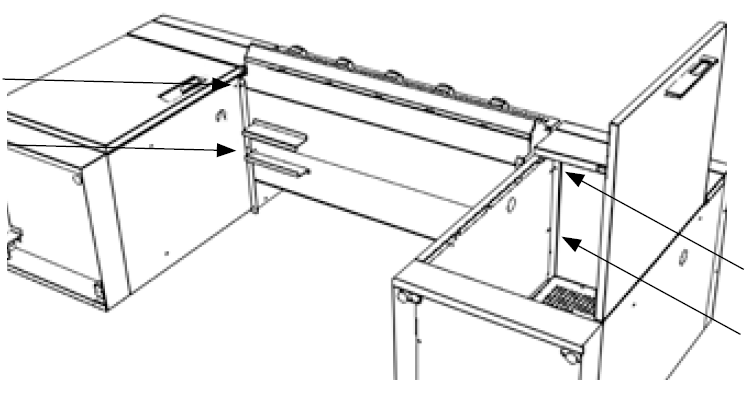
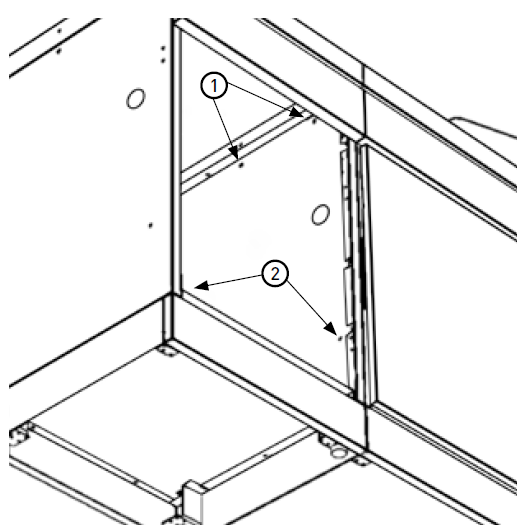
CabinetPosition each cabinet to be added in its correct position, level it with the Outdoor Kitchen, and then fasten to the near cabinet with the 4 screws included.In position 1 (see below), 2 x screw, washers and nuts. In position 2 (see below), 2 x special screw – thread through both cabinets and tighten.
Sink ModuleThe sink module is supplied with a tap, and a drainage hose for sink outlet. The tap is to be positioned in the hole in the bench top, and tightened.All water fittings and connections are the responsibility of the customer.
Drawer ModuleTo attach the drawer module to the rest of the Outdoor Kitchen, it will be required to remove the drawer altogether, in order to gain access to the holes through which the screws are inserted (see above).To remove the drawer, simply pull out towards you completely.
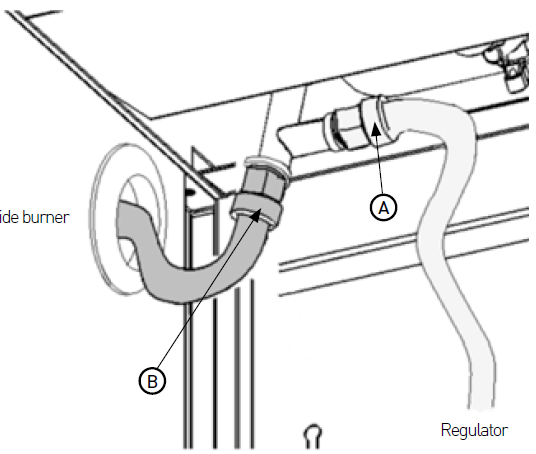
Side Burner ModuleThe side burner is to be connected to the Gas supply.BeefEater recommends positioning the side burner as close as possible to the barbecue, and never using a rubber hose to connect longer than 1.5m.Regulator is connected to entry ‘A’ (see below) in the Barbecue. Side burner connected to entry ‘B’ (see below)– remove cap and connect side burner hose. Ensure to conduct Leak-Test after making gas connections.Ensure every place the hose is crossing the metal, is protected with a rubber grommet. This is very important!
Connection to Side Burner
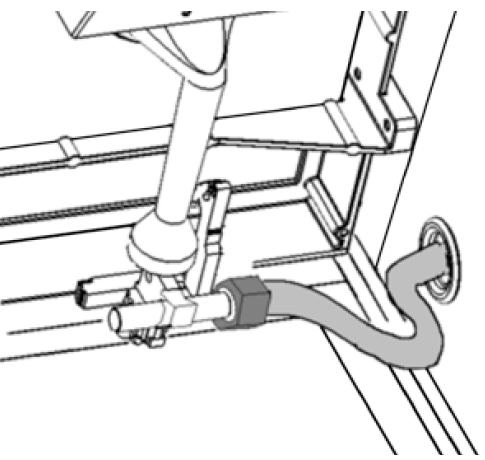
Connection to outlet ‘B’ in Barbecue
SPARE PARTS (BASIC CABINET)

| Mark | Index | Part no. | Part Description |
| A | 8109 | DIS2840 | Door handle |
| B | 8401 | DIS2826 | Bench top – basic |
| C | 8402 | DIS2815 | Side panel LH |
| D | 8403 | DIS2816 | Side panel RH |
| E | 8404 | DIS2817 | Rear panel |
| F | 8405 | DIS2824 | Base panel |
| G | 8406 | DIS2825 | Door comp. (inc. hinge brkt) |
| H | 8407 | DIS2818 | Front panel (SS only) |
| I | 8408 | DIS2825 | Inner shelf |
| J | 8409 | DIS2854 | Hinge block – ODK |
| K | 8410 | DIS2841 | Adjustable feet |
NATURAL GAS CONVERSION
Natural gas installation
NOTE: Conversion of this unit to natural gas must be carried out by a qualified licenced person and a Certificate of Compliance must be issued to the owner on completion of the installation conversion.’
Converting to natural gas (to the installer)
This barbecue is supplied set up for Universal LPG and is labelled accordingly. A natural gas conversion kit is available as an accessory by contacting Electrolux customer service. 1 x Natural gas hose and regulator assembly with quick connect bayonet fitting.1 x bag containing:5 x 45° valve with 1.90mm injectors1 x 90° valve with 1.80mm injector1 x Natural gas label
Procedure
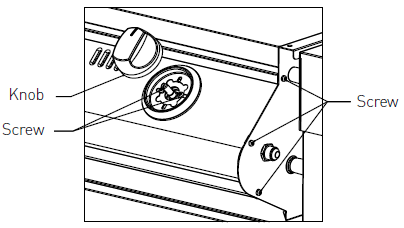
- Remove knobs and for each bezel remove 2 screws retaining the bezel to the valve.
- At each end of the control panel, remove 3 screws retaining the control panel.

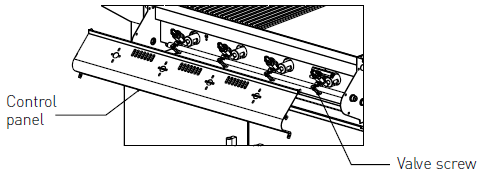
- Remove control panel to access the valves
- Remove each valve and replace with valve provided in the natural gas conversion kit, note the injector size, as shown on page 14.
USING YOUR BARBECUE
WARNNG:
Excess yellow tipping means the combustion is not right, if that is observed, turn the Barbecue burners off, and refer to troubleshooting at the end of this manual.Do not use more than 2 burners on ‘High’ with the hood closed.
If the burner does not light
Keep the control knob pushed, and return the knob in the clockwise direction to the ‘Off’ position. Wait 5 minutes, and repeat the lighting procedure steps 1 – 4 above again. If after a few attempts you still can not light the burners, contact your retailer before proceeding.
Manual Lighting
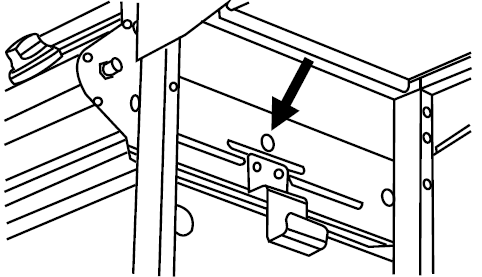
Press and turn the right hand control knob anti-clockwise to the ‘High’ position, then light the right hand burner immediately through a hole provided in the middle of the right hand barbecue side panel.
Check for proper burner operation
Following operating instructions light each burner and check for a clear blue flame with just a tip of yellow. Excess yellow tipping can be adjusted using the screw on the side of the burner. If you are unable to achieve correct operation, consult your dealer.
Preparing the Plate and Grill
Your barbecue has heavy duty enamelled Cast Iron plate and grill. Enamel is a hard, non-rusting surface which will ensure the long life of your cooking surface.The plate and grill are ready to use, but it is recommended to wash them with warm soapy water and a soft cloth, and rinse before use.To ensure the longevity of the enamel surface on the Cast Iron plate and grill it is strongly advised to avoid impact with other metal parts and sharp utensils.
To turn off a burnerSimply turn the knob (without pushing) clockwise to the ‘Off’ position.
After Use
It is a good idea to leave the barbecue on for about 10 minutes after you have finished cooking. This helps to burn away any excess food residues and oil, and makes cleaning easier.
- Be sure to turn off all control knobs and the gas supply.
- Allow the barbecue to cool.
- Clean the drip tray and cooking surfaces. Clean any food spills from the side burner, if one is installed.
- Lower the hood and side burner lid.
The gas cylinder supply valve must be turned off when the appliance is not in use.
Direct Cooking Method
Commonly used for traditional barbecuing. Place food over the lit grill section. Some flaring may occur, so care must be taken while cooking. Check inside the roasting hood regularly. The direct cooking method is recommended for steaks, chops, sausages, and hamburgers.
Indirect Cooking
Indirect cooking involves little or no heat directly underneath the food. Instead, the food is placed on the grill, the burners below the food are turned off or Low, and burners on either side are used. The hood is closed to trap heat and moisture. With this method, heat circulates around the food, cooking by convection. By trapping the vapour inside your “outdoor oven”, the cooking vapour will fall back on the food on all sides, not just from underneath. The food cooks more evenly, and stays moist in the process. Indirect cooking is similar to using a conventional oven and is recommended for rotisserie cooking, roasts, poultry, casseroles, vegetables and whole fish. When cooking a roast, it is a good idea to use a roast holder and baking dish. Always use a baking dish with a depth greater than 35mm. Shallower trays may fill quickly and overflow, which may cause a fat fire.
Controlling the Burners
The control knob can now be turned to the desired heat setting, Low, High or anywhere in between. The control knob does not need to be pushed in while selecting the heat setting.
TECHNICAL SPECIFICATIONS
| Dimension | 3 Burner | 4 Burner | 5 Burner |
| A – Barbecue unit height | 486mm | 486mm | 486mm |
| B – Barbecue unit mid depth | 515mm | 515mm | 515mm |
| C – Barbecue unit base depth | 580mm | 580mm | 580mm |
| D – Full unit width (1100 Series) | 1763mm | 1919mm | 2027mm |
| D – Full unit width (1000 Series) | 1738mm | 1894mm | 2002mm |
| E – Cabinet depth | 592mm | 592mm | 592mm |
| F – Cabinet height | 1170mm | 1170mm | 1170mm |

LOCATING YOUR BARBECUE
Most importantly, this is an outdoor appliance. Ensure your barbecue is positioned safely away from anything that can catch fire.
Outdoors Use Only
Under no circumstances is this barbecue to be used indoors. This includes garages or any other enclosed area.Clearance from Combustibles: Ensure your barbecue remains at a distance of at least 45 cm (18”) from any combustible material such as wood, gyprock, paper and plants. Do not store combustible materials, gasoline or flammable liquids or vapours within 45 cm (18”) of the barbecue.
Adequate Ventilation
Ensure there is adequate ventilation for both the barbecue and cylinder. This is required not only for proper combustion, but also to prevent gas build up.20mm ventilation and air-intake gap is to be left at rear of the barbecue in fixed installations.
Firm Level Surface
Use your barbecue only on a firm level surface. This barbecue is not designed for recreational vehicles, and shall not be installed on a boat or any marine craft.Protection From Weather: Keep the barbecue protected from adverse weather, including rain and high winds.Polyvinyl covers are available that have been specially designed for this range of barbecues. Allow clear access to the entire gas supply hose and regulator.Maintenance Access: When your barbecue is installed, you should be able to access the gas supply line including the gas piping or hose, gas regulator, gas cylinder and any shut off valves.Partial Enclosures: Many backyards have areas that are partially closed off, such as balconies and pergolas. In some cases, it is hard to decide whether these partially enclosed areas should be classified as indoor areas. This manual provides clear definition of such areas in page 10 for your reference.Connect the Regulator to the gas Cylinder
WARNING:
Verify ‘Gas Type’ label & data plate attached to side of barbecue is correct for the gas you are about to connect to.The hose and regulator is connected to the barbecue and leak tested at factory. Do not disassemble unnecessarily.
- Make sure burner valves are in the ‘Off’ position.
- Screw regulator side to the cylinder, and hand-tighten.
See more details on page 4.
NOTE: Do not modify this appliance. Any deviation from the factory settings could result in a safety hazard.
- If moving the barbecue from one place to another, never drag the cylinder behind. Disconnect the cylinder first, move, and re-connect once reached the new location.
- For storage and cylinder exchange, disconnect hose at the cylinder only, do not disconnect hose from the appliance.
- If you have purchased a trolley with a Side-Burner, please refer to Trolley instruction book for correct connection of the Side-Burner to the gas supply.
INSTALLATION OPTIONS
Partial Enclosures (Australia Only)
This appliance shall only be used in an above ground, open air situation with natural ventilation, without stagnant areas, where gas leakage and products of combustion are rapidly dispersed by wind and natural convection. Any enclosure in which the appliance is used shall comply with one of the following:
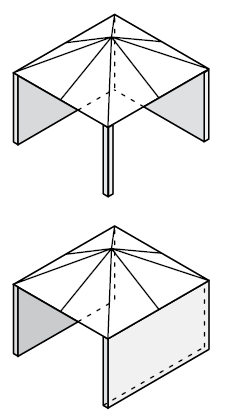
Within a partial enclosure that includes an overhead cover and no more than two walls.
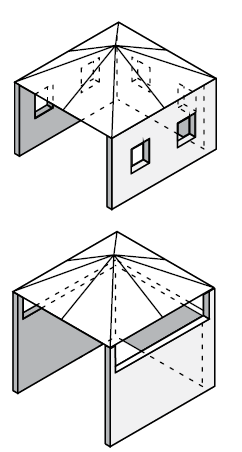
Within a partial enclosure that includes an overhead cover and more than two walls, the following shall apply:
- At least 25% of the total wall area is completely open; and
- at least 30% of the remaining wall area is open and unrestricted.
In the case of balconies, at least 20% of the total of the side, back and front wall areas shall be and remain open and unrestricted.
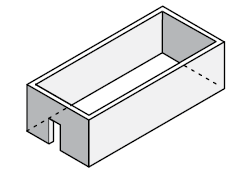
Any enclosure with walls on all sides, but at least one permanent opening at ground level, and no overhead cover.
Before proceeding, you need to establish the gas type which your barbecue will run on, and the style of installation you need.
Natural Gas or LPG/Propane.
Before beginning installation or assembly, check that the gas type which the barbecue is designed for is correct for the gas available to you. In most countries the choices are natural gas or LPG/propane. You will find the gas type label on the side of your barbecue. If your barbecue uses the incorrect gas type, or if you are unsure, consult your dealer before going any further. Using the wrong type of gas for a barbecue is extremely dangerous.
Natural Gas Conversion
Most newly purchased barbecues are made for LPG/ propane. A natural gas conversion kit is available to allow your barbecue to run on Natural Gas. This kit includes all hoses required for installation.
CLEANING AND STORING YOUR BARBECUE
Cleaning Vitreous Enamel Surfaces and Barbecue Control Panel
Although porcelain enamel will keep its lustrous finish even under adverse conditions, it still needs regular cleaning. After the appliance has been used, wash down the surfaces with hot soapy water. Caustic cleaners should be avoided. For barbecues near the ocean or salt-water environment, more frequent cleaning and servicing should be conducted. Wash regularly, rinse and then dry before covering. (In a salt water or marine environment, more rapid deterioration can be expected which is not covered by warranty).
The cleaning and care instructions are essential for the proper functioning and operation of your appliance over time. Failure to adhere to these care instructions may affect your ability to make a claim under the manufacturer’s warranty.
Cleaning Plates and Grills
Many food acids, marinades, juices and sauces contain highly acidic elements that will slowly attack the surface of the plates and grills if not removed after cooking.
- After use, remove all solid material from the cooking surfaces using a brass bristle brush or plastic scourer. Brushes specifically designed for this purpose can be purchased from your BeefEater retailer. Wipe off remaining residue with a paper towel.
- Gently wash the surface of the grills with a soft sponge and a solution of hot water and a mild dishwashing liquid. Do not use highly caustic, harsh or abrasive chemical cleaners to clean the cooking grills. Always check the manufacturer’s recommendations for the cleaner prior to use.
- Coat the grills with a layer of cooking oil. This will help protect the surfaces between uses.
- For porcelain enamel coated cooking surfaces, do not use any metal tools to clean the surface. Use only a brass bristle wire brush to remove hard deposits.
Do not clean the cooking surfaces in a dishwashing machine.For hard deposits and heavy grease, do not use steel wool or metal scrapers. Use concentrated detergent or domestic cleaning powders.
Cleaning The Drip Tray
Never remove the grease tray while the barbecue is hot.Always remove and clean the grease tray after the unit has cooled down.Replace aluminium foil on main drip tray (if used) and clean both waste trays at regular intervals to prevent grease buildup, which could result in a grease fire and void the barbecue warranty.
Cleaning The Burners
- Check main opening, throat and venturi to each burner regularly for insect nests (eg. wasp, ants or spiders). Nests are dangerous and must be cleaned out thoroughly.
- Remove burners periodically and scrub clean with soapy water and a wire brush making sure that the ports are free of obstructions.
Replace burners in the correct position and dry by lighting each one to avoid subsequent corrosion.

Storing Your Barbecue
When storing barbecue for extended periods, be certain all controls and cylinder valves are turned off. If storing the barbecue indoors remove gas cylinder and store the cylinder in a ventilated area outdoors.Gas cylinders must be stored outdoors, out of reach of children and must not be stored in a building, garage or any other enclosed area.The barbecue should be covered when not in use. eg. a polyester or vinyl barbecue cover. Frequently check and tighten all nuts and bolts on the barbecue and trolley. The gas cylinder supply valve must be turned off when the appliance is not in use.
WARNING
Note: For storage and cylinder exchange, disconnect hose at the cylinder only, do not disconnect hose from appliance.
Please note that environmental conditions need to be taken into account with regards to the maintenance required on your product. In particular units installed in humid climates or seaside locations will be more susceptible to surface corrosion/discolouration over time. In these conditions Electrolux strongly recommends cleaning and drying your barbecue after every use and covering it when not in use to minimise exposure to the elements.
MAINTENANCE
This appliance should be checked and serviced by an authorised service person every 2 years to ensure the appliance remains in a safe operating condition. (These services are not covered by warranty). Replacement parts are available from your authorised BeefEater Dealer.
| Check gas supply hose(s) for cracks and leaks | ü |
| Check gas regulator for leaks | ü |
| Check that all gas fittings are tight | ü |
| Inspect and clean ignition module and probe | ü |
| Inspect and clean barbecue Burners | ü |
| Check gas cylinder expiration date | ü |
| Inspect and clean gas injectors | ü |
| Check gas control valve on cylinder | ü |
| Inspect gas control valves | ü |
| Inspect and proof all internal structure barbecue and trolley | ü |
TROUBLESHOOTING
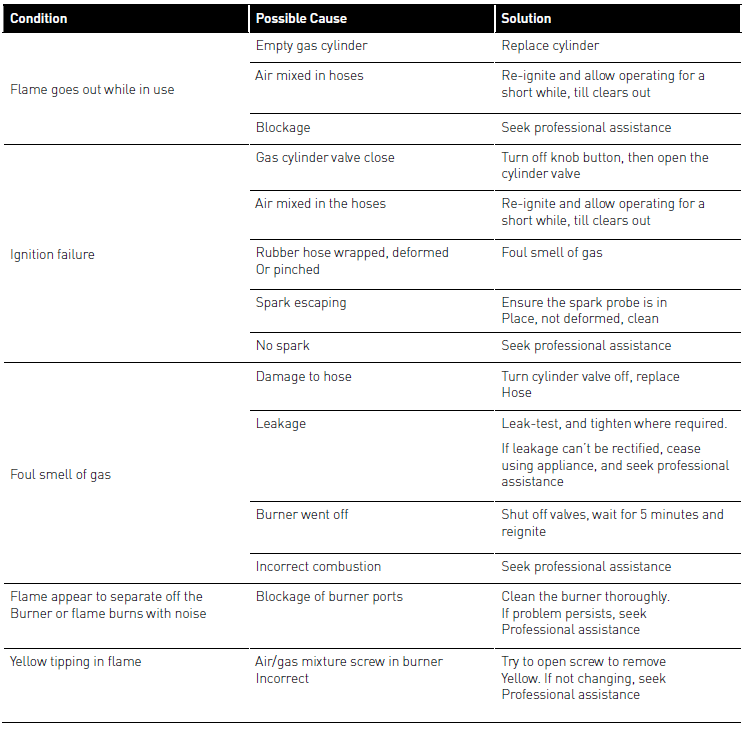
![]()
References
[xyz-ips snippet=”download-snippet”]